About This Guide
This guide is prepared to roll out two-factor authentication (2FA) end to end with SignLogger for firewall admin-panel logins and SSL/IPsec VPN user logins.
The goal is simple: even when the user enters the correct password, a second factor — an Authenticator (TOTP) code or an SMS code — is requested to secure access.
Mechanism — how does it work?
In this scenario, SignLogger is a RADIUS server; the firewall/VPN device, acting as a RADIUS client (NAS), asks SignLogger to authenticate. The flow works as follows:
| # | Step | What happens |
|---|---|---|
| 1 | The user enters the password | The user enters their username and password into the firewall admin panel or the VPN client. |
| 2 | The firewall queries RADIUS | The firewall sends an Access-Request to SignLogger over port 1812/udp. |
| 3 | SignLogger verifies the password | The user is authenticated locally or against LDAP/AD. |
| 4 | A rule matches, 2FA is requested | If the NAC rule you defined matches, SignLogger requests the second factor (a TOTP/SMS code) — this is called a challenge. |
| 5 | Access is granted | If 2FA succeeds, an Access-Accept is returned and the user is let in. If it fails, access is denied. |
Caution: Do not confuse this with Windows Agent 2FA.its ownAgent sign-in 2FA is an entirely different mechanism"Windows Logon Enforcement""Workstation Users"are out of scope
Who is this for?
It is written for the system and security administrators who manage the firewall/VPN infrastructure and for operators who hold NAC permissions in SignLogger. You are expected to be familiar with the concept of RADIUS, but all the necessary terms are explained in the next section.
Prerequisites
Before you begin the steps, make sure the following are ready:
| Prerequisite | Description |
|---|---|
| RADIUS support | Your firewall/VPN device must support authentication via RADIUS; it must be able to define an external RADIUS server. |
| Network access | Port 1812/udp (RADIUS authentication) must be open from the firewall/VPN device to the SignLogger server. |
| Users and groups | The users to which 2FA will be applied must be defined in SignLogger (locally or via LDAP/AD) and must belong to a NAC group. |
| NAC permission | The view_nac permission is required to view, and edit_nac to edit and save. |
| 2FA channel | For TOTP, the users' Authenticator app; for SMS, a defined SMS provider and the users' phone numbers. |
How should this guide be read?
| Your situation | The section you should read |
|---|---|
| I am setting up the system from scratch | Work through the Quick Start section from beginning to end. It gets 2FA up and running in 7 steps. |
| I want to learn a specific screen | Go to the relevant page in the Page Guides section; every field and button is explained one by one. |
| I need to separate admin from VPN | Use the three ready-made recipes in the Scenarios section (admin / SSL-VPN / IPsec). |
| I am running into a problem | Go to the Troubleshooting section. Each item follows a symptom → cause → solution format. |
Callouts used in this guide
Note: Provides additional information, an explanation of behavior, or a detail worth keeping in mind.
Caution: Flags situations that require care and, if handled incorrectly, could lead to loss of access or a security vulnerability.
Tip: Offers suggestions and best-practice advice that make your work easier.
About the screenshots
The screenshots in this guide were prepared with sample data so that all states of the interface (populated tables, pop-up windows, different badges) could be shown. Device serial numbers are masked, and usernames and phone numbers are representative. In your own installation the values will differ; the layout, fields, and buttons of the screens are the same.
Where is it in the menu?
The entire guide takes place under the NAC Management heading in the left menu. Five pages are used:
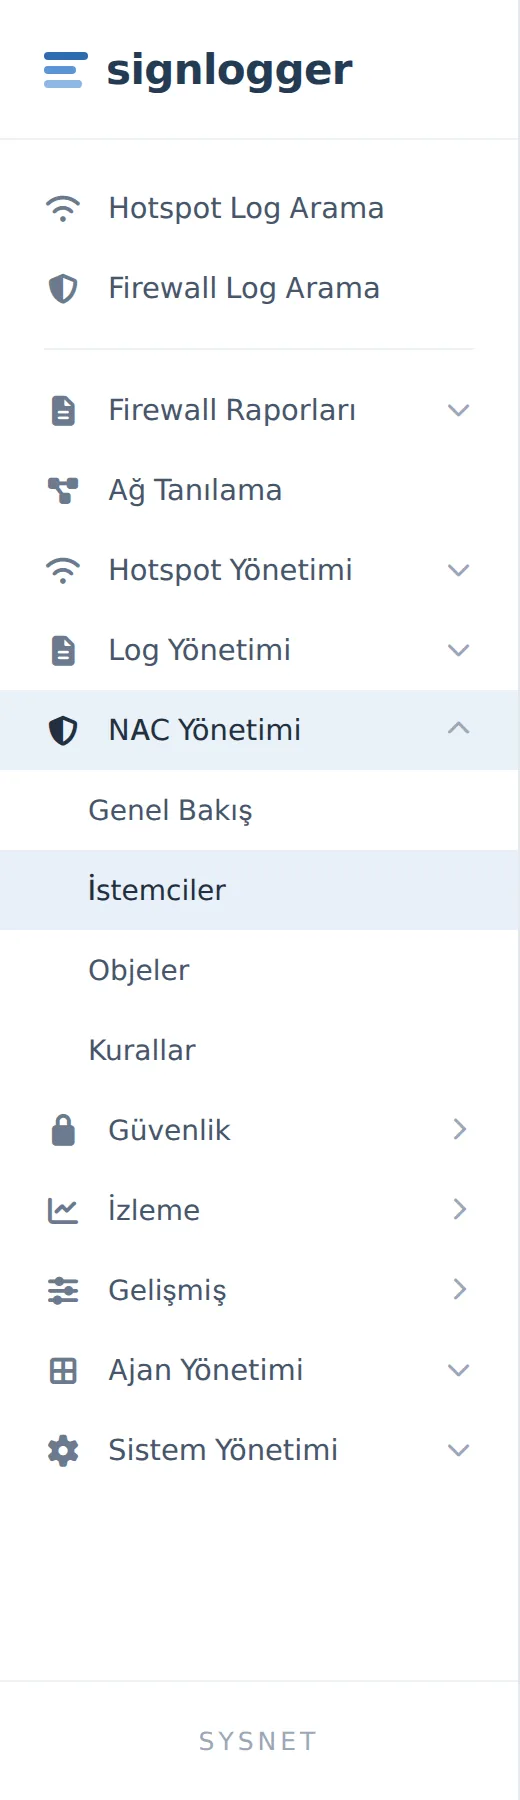
Figure 1. NAC Management menu: Clients, Objects, Rules, Security → 2FA Configuration, and Monitoring → Sign-in Logs.
| Page | Its role in this guide |
|---|---|
| NAC Management → Clients | You register the firewall/VPN device as a RADIUS client (NAS). The connectivity prerequisite for the whole flow. |
| Security → 2FA Configuration | You enable 2FA system-wide and configure the TOTP and/or SMS methods. |
| NAC Management → Objects | You define users and groups and perform each user's TOTP/SMS enrollment. |
| NAC Management → Rules | You create the rule that determines which login enforces 2FA using the wizard. |
| Monitoring → Sign-in Logs | You test the setup and verify the record of successful logins. |
Note: Only root (Super User) accounts see a Domain selector at the top of the pages. If you are root, select the correct domain before proceeding; each domain carries its own clients, objects, rules, and 2FA settings. Non-root accounts automatically operate within their own domain and do not see this selector.

Figure 2. The Domain selector shown at the top of the pages for root accounts.
Glossary
Concepts that appear throughout the guide. Whenever a term trips you up, you can return to this page.
| Term | Meaning |
|---|---|
| RADIUS | The network protocol by which firewall/VPN devices ask a central server (here, SignLogger) to authenticate users. |
| NAS (RADIUS client) | The device that sends authentication requests to the RADIUS server. In this scenario, the firewall/VPN gateway. |
| Shared secret | The shared password that authenticates RADIUS traffic between the firewall and SignLogger. It must be entered exactly the same on both sides; at least 8 characters. |
| 2FA (TOTP / SMS) | Two-factor authentication that requests a second factor (a code) in addition to the password. The code comes from an Authenticator app (TOTP) or by SMS. |
| TOTP / Authenticator | The time-based 6-digit code that the Authenticator app on the user's phone (Google/Microsoft Authenticator, etc.) generates every 30 seconds. |
| Enrollment (2FA registration) | Generating a TOTP secret for a user and having its QR code scanned into the Authenticator, and/or defining the SMS phone number. |
| Rule (policy) | The NAC rule that determines which login enforces 2FA. When the conditions match, the second factor is requested. |
| Condition | The comparison that determines which login triggers the rule (e.g. is_admin_login eq true). |
| Action | The additional RADIUS reply attributes returned to the firewall when the rule matches (e.g. Session-Timeout). |
| auth_type (Local / LDAP) | Where the user is authenticated: Local is a local/application account, while LDAP is an AD/directory account. |
| is_admin_login | The condition field that indicates whether the login is a firewall/VPN management (admin) login. It does not cover VPN end users. |
| nas_ip / NAS-IP | The IP address of the firewall sending the request. Used to limit the rule to a single device. |
| Source / IP match | RADIUS requests are accepted only from the IP/CIDR defined in SignLogger; if it does not match, the request is rejected. |
| Challenge (2FA prompt) | The additional verification step in which SignLogger requests the second factor after the password has been verified. |
| Access-Accept / Access-Reject | The final response given by the RADIUS server: access approved / denied. |
Quick Start
The shortest path to rolling out 2FA from scratch: seven steps. Each step tells you which page to go to; the details are in the relevant page guide.
The links of the chain
Firewall/VPN 2FA is a single chain of seven links. Each link depends on the previous one; if you run into a problem, verifying the chain in order from the start is the fastest solution.
| # | Step | Where | Result |
|---|---|---|---|
| 1 | Add the client | NAC → Clients | The firewall becomes able to send RADIUS requests. |
| 2 | Connect the firewall | The firewall's own interface | Admin and VPN authentication is directed to SignLogger. |
| 3 | Enable 2FA | Security → 2FA Configuration | TOTP and/or SMS become available system-wide. |
| 4 | Define the objects | NAC → Objects | Groups and users are ready. |
| 5 | Enroll the users | Objects → 2FA Settings | Each user's TOTP secret / phone is defined. |
| 6 | Create the rule | NAC → Rules → Wizard | Which login enforces 2FA is determined. |
| 7 | Test it | Monitoring → Sign-in Logs | Verified end to end with a real login. |
Step 1 — Add the firewall/VPN as a RADIUS client
- From the left menu, go to NAC Management → Clients.
- Click the Add (+) button at the top right.
- In the Client name box, enter a meaningful name for the device (e.g.
HQ-FW-VPN). Use only letters, digits, and hyphens. - In the IP/CIDR box, enter the source IP from which the firewall will send RADIUS requests (e.g.
10.0.0.1or10.0.0.0/24). - In the Secret box, enter a strong shared secret of at least 8 characters. You will shortly enter this same value exactly on the firewall side as well.
- Select the device type/brand from the Type list and click Save.
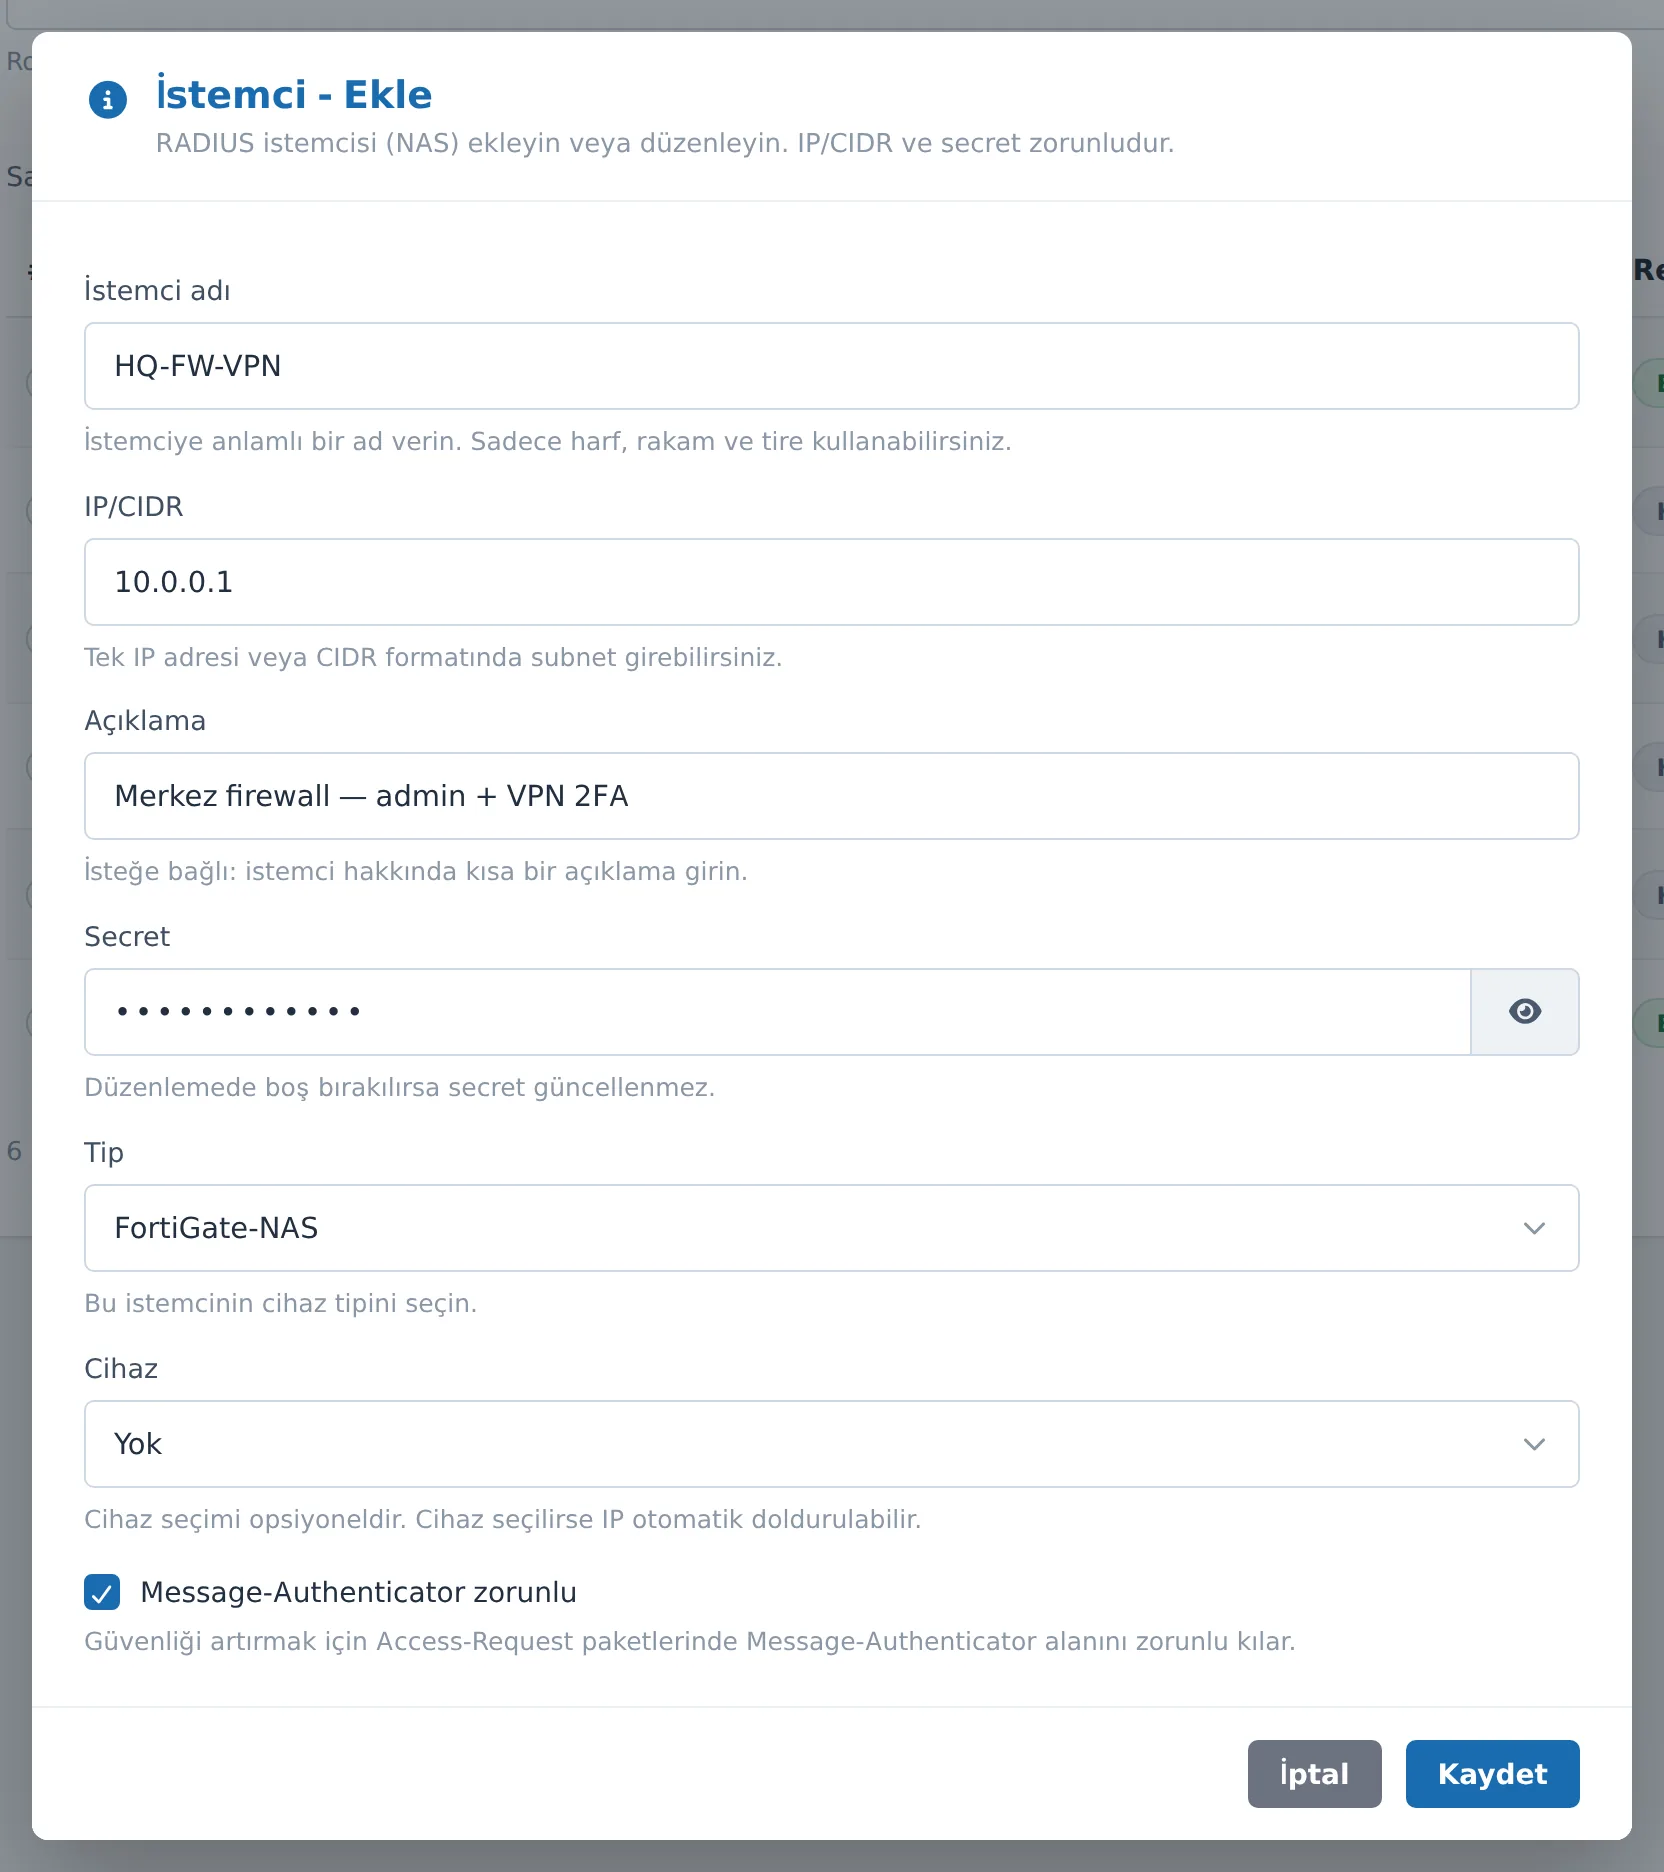
Figure 3. Client - Add window. Client name, IP/CIDR, and Type are required; for a new record, Secret is required as well.
Caution: If the shared secret differs by even a single character, the firewall reports "authentication failed," and the error is often silent. If you run into a problem, the first place to check is the IP and secret match.
Step 2 — On the firewall side, make SignLogger the RADIUS server
This step is done in the device's own management interface; there is no counterpart for it in SignLogger.
- In the firewall/VPN device's interface, define a new RADIUS server.
- Enter the SignLogger server's IP address as the server address.
- Enter 1812 (UDP) as the authentication port.
- In the shared secret field, enter exactly the same value you entered in Step 1.
- Verify that the source IP of the device's RADIUS requests matches the IP/CIDR you entered in Step 1.
- Direct administrator (admin) logins and SSL/IPsec VPN user authentication to this RADIUS server.
Note: On multi-interface devices, the RADIUS request may leave from a different interface than you expect. Check which source IP the device sends requests from; if necessary, enter the appropriate subnet (CIDR) in Step 1 instead of a single IP.
Step 3 — Enable 2FA system-wide
- Open the NAC Management → Security → 2FA Configuration page.
- On the General tab, turn on the Active switch on the 2FA card.
- Switch to the Methods tab and enable at least one method: TOTP (recommended) and/or SMS.
- For TOTP, fill in the Issuer, Window, and Period fields; for SMS, enter the Method, Provider, Token Length, and Token Lifetime.
- Click the Save button at the bottom of the page and verify that the 2FA / SMS / TOTP badges at the top show Active.

Figure 4. The status strip at the top of the page: shows the current state of each method as Active / Off.
Caution: Turning on the global switch alone is not enough. If global 2FA is on + no method is selected, users proceed with only their password and the "2FA active" option in your rule does nothing.
Step 4 — Define groups and users
Because rules are written against a group rather than individual users, you must create the group first.
- On the NAC Management → Objects → Groups tab, create the target group with Add Group (e.g.
Firewall-Admins,SSLVPN-Users). - For local (password-based) users, enter the users on the Local Users tab with Add Local User.
- For directory users, pull them from AD on the Remote Users tab with Import from LDAP.
- In both cases, make sure you assign the user to the group you created in Step 4.1.
Step 5 — Enroll the users in 2FA
This step is the heart of firewall/VPN 2FA: the user's Authenticator secret and/or SMS phone is defined here.
- On the relevant user's row, click the 2FA Settings button with the shield icon.
- If you will use SMS, enter the number in international format in the Phone box (
+905551234567). - In the TOTP (Authenticator) section, click the Generate Secret button; a secret is generated and a QR code appears below it.
- The user scans the QR code with the Authenticator app on their phone.
- If you like, check the Send QR information by mail/SMS after enrollment box, choose the channel, and then click Save.
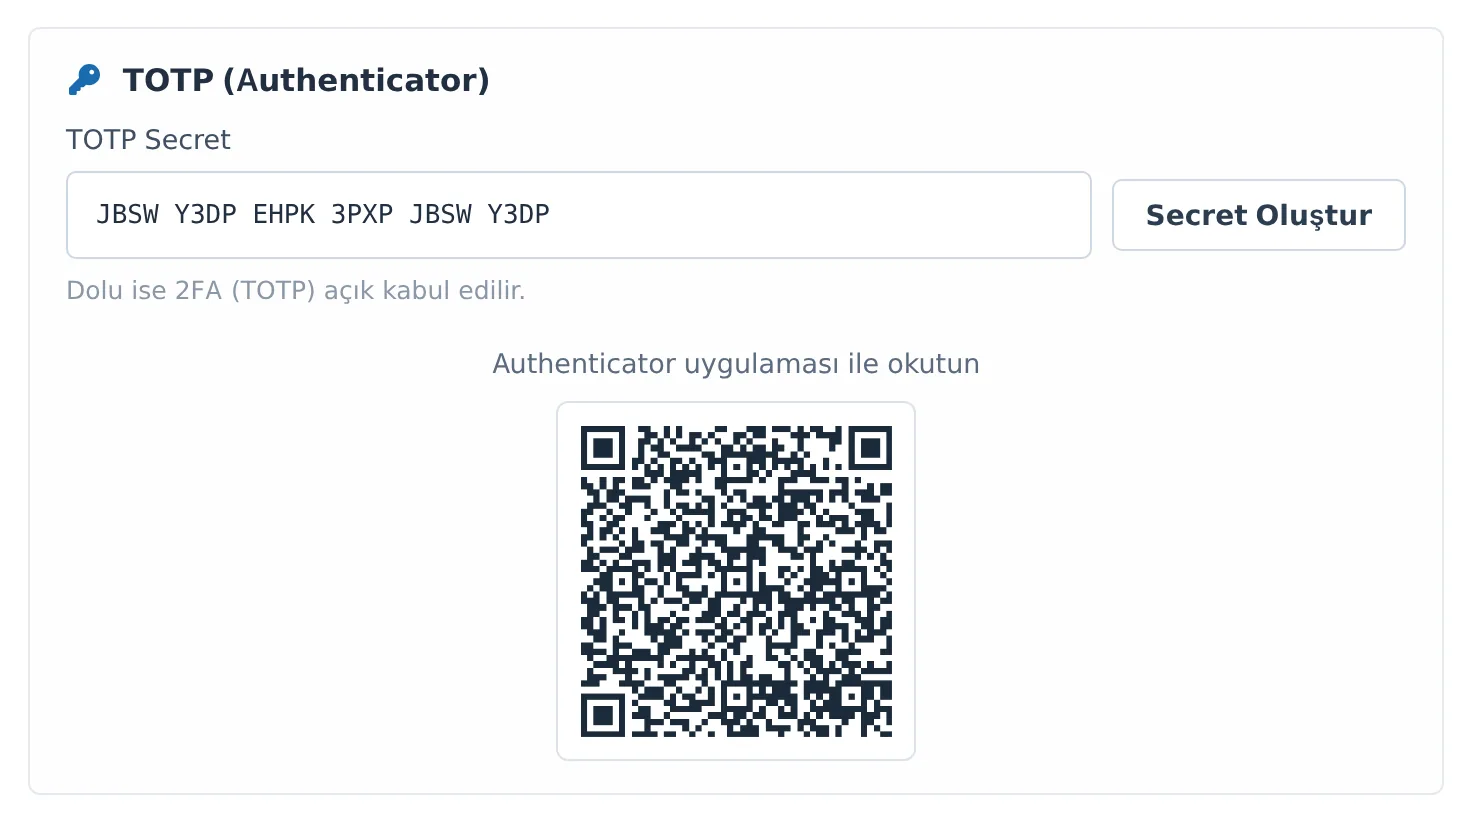
Figure 5. The QR code shown after the TOTP secret is generated. The user scans it into the Authenticator app.
Caution: Do not touch the Windows Logon Enforcement field in the user 2FA modal. This field affects only the Windows agent sign-in path and does not change firewall/VPN logins. Leave it as Inherit (policy/group decision).
Step 6 — Create the rule that enforces 2FA
- On the NAC Management → Rules page, click the Add with Wizard button.
- Step 1 — Policy Information: Enter a name (e.g.
Firewall-Admin-2FA), check the 2FA active box, and selecttotp(orboth) from the 2FA method list. - Step 2 — Group Selection: Check the target group with Select Group and click Apply.
- Step 3 — Conditions: For firewall admin logins, click the Firewall/VPN admin shortcut button; for VPN users, add a User group and/or NAS IP address condition.
- Step 4 — Actions: Can be left empty in most cases; if needed, add an attribute such as
Session-Timeout. - Step 5 — Summary: Check that 2FA active = Yes and the method is correct, then click Save.
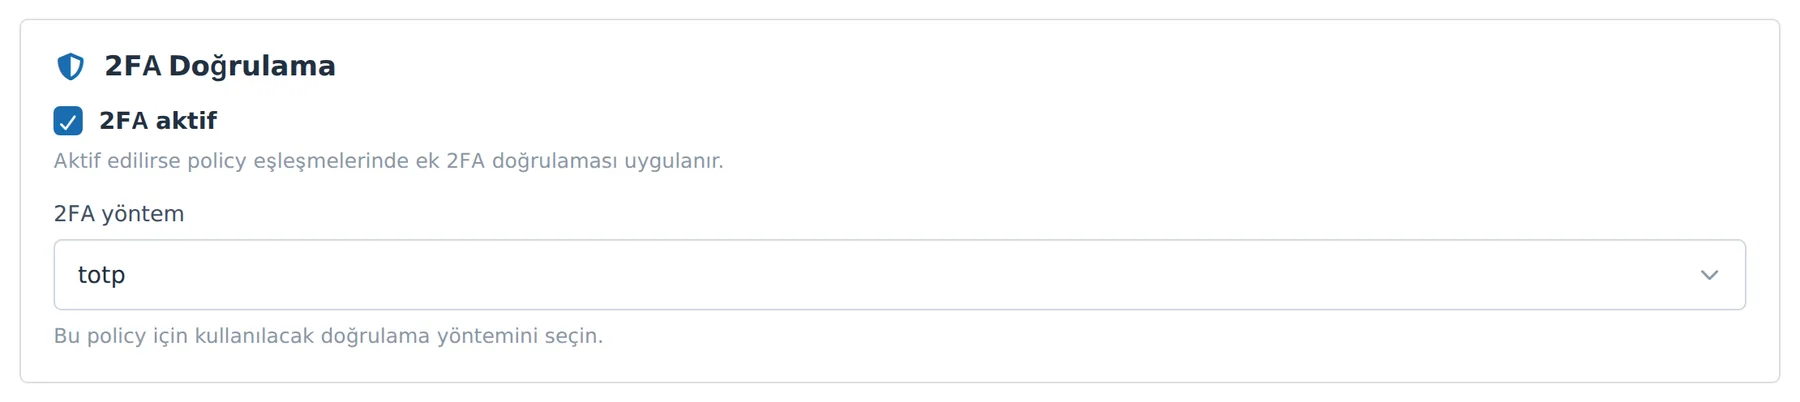
Figure 6. The 2FA Verification section in Step 1 of the wizard. This box is the only switch that turns on 2FA.
Step 7 — Test it
- Perform a real admin or VPN login; verify that the TOTP/SMS code is requested after the password step.
- Open the NAC Management → Monitoring → Sign-in Logs page.
- Set the Time filter to Today and click Refresh.
- Verify that your test login appears as a row in the table and that the User and NAS IP values are as you expect.
Note: A row appearing on this screen is itself proof that 2FA passed: a RADIUS session record is opened only after an
Access-Accept, and in a rule with 2FA anAccess-Acceptis not issued unless code verification succeeds.
Rollout checklist
| ✓ | Check | Where to verify |
|---|---|---|
| ☐ | Firewall added as a client (IP + secret) | NAC → Clients |
| ☐ | RADIUS server defined on the firewall side, port 1812 | Firewall interface |
| ☐ | Admin and VPN authentication directed to RADIUS | Firewall interface |
| ☐ | Global 2FA badge Active | 2FA Configuration → status strip |
| ☐ | At least one method (TOTP / SMS) Active | 2FA Configuration → status strip |
| ☐ | Target group created | Objects → Groups |
| ☐ | Users assigned to the group | Objects → Local / Remote Users |
| ☐ | Users have TOTP ✓ or a phone filled in | Objects → user row |
| ☐ | 2FA active checked and method selected in the rule | Rules → 2FA badge on the rule row |
| ☐ | The rule has a context condition (admin / group / NAS-IP) | Rules → Wizard Step 3 |
| ☐ | Rule priority is correct (narrow rules on top) | Rules list |
| ☐ | Real login test successful, a log record was created | Monitoring → Sign-in Logs |
Page Guides
This section covers, in order, the five pages used in the 2FA setup. For each page: where to go, what appears on screen, what each field does, and the steps for typical operations.
The pages are arranged in setup order. As you read a page, remember that you will need the output of the previous page — for example, the group must be ready before you write a rule, and the client must be ready before you create a group.
RADIUS Clients
Register the firewall/VPN device with SignLogger as a RADIUS client (NAS). This is the connectivity prerequisite for the entire 2FA flow.
Menu: NAC Management → Clients
For 2FA to take effect on firewall admin logins and SSL/IPsec VPN logins, the device must be able to send an Access-Request to SignLogger's RADIUS server. These requests are accepted only with a registered IP and the correct shared secret.
Note: The record on this page does not enable 2FA on its own; it only makes the connection possible. For 2FA to actually be enforced, the 2FA configuration, the user/group objects, and a NAC rule are also required.
Navigating to the page
- From the left menu, follow the path NAC Management → Clients.
- On the NAC (RADIUS) — Clients page that opens, all registered RADIUS clients are listed in a table.
- Use the two buttons at the top right: Refresh (loop icon) reloads the list, and Add (+) opens the new client window.
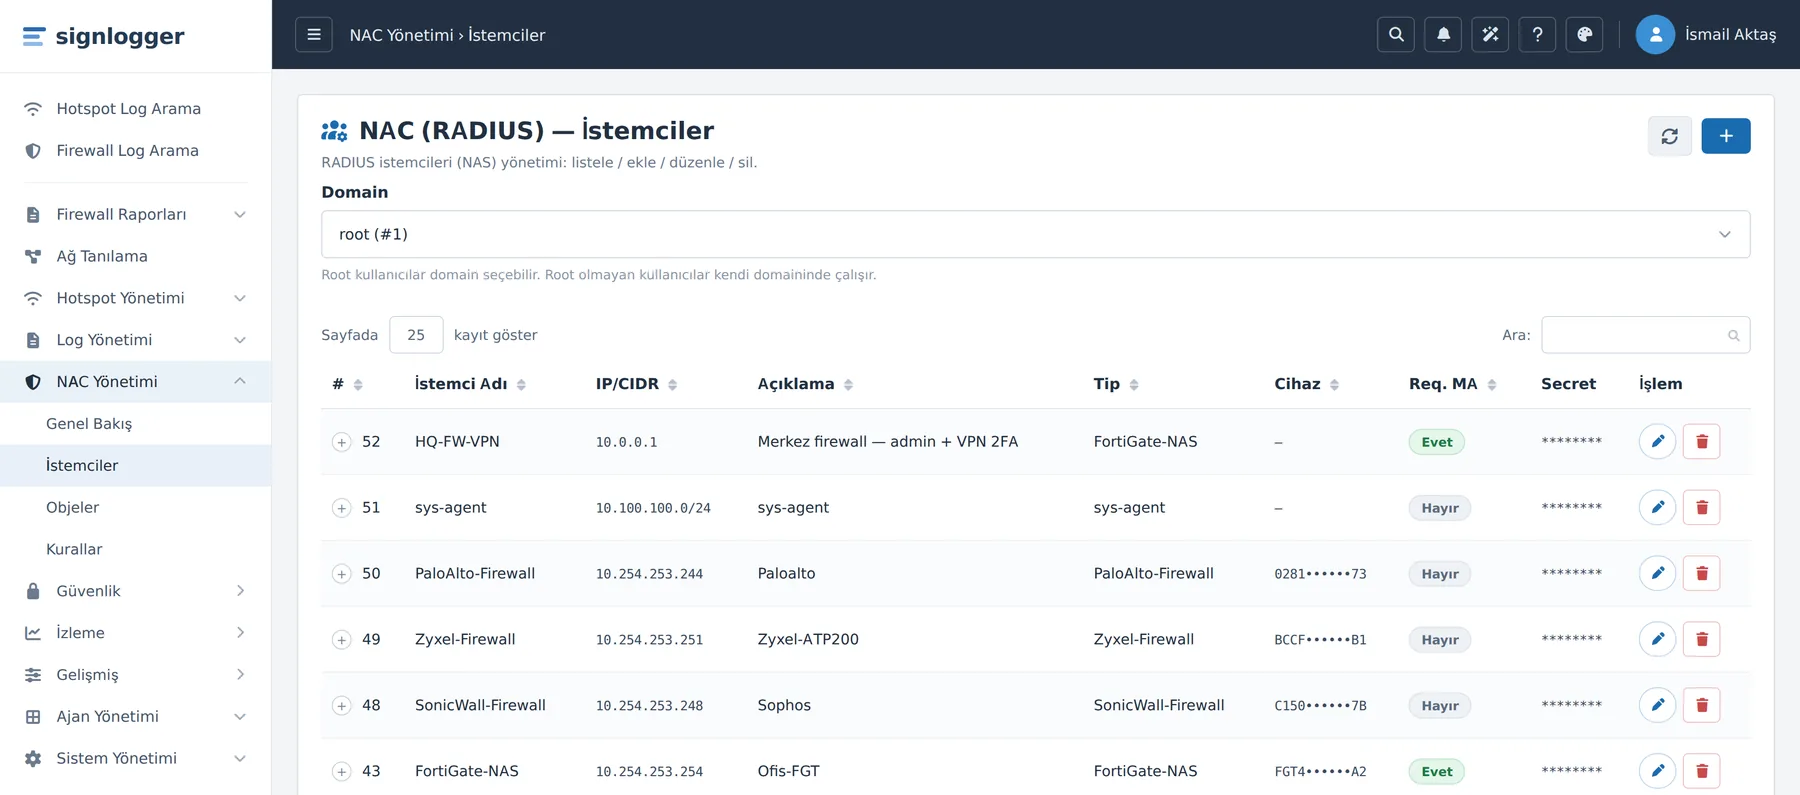
Figure 7. The NAC (RADIUS) — Clients page. Each row is a firewall, VPN gateway, or other NAS device.
Note: The Add button is enabled only if you have permission to create clients. If you are root, select the correct domain from the Domain selector at the top before adding the client.
Table columns
| Column | Meaning / function for 2FA |
|---|---|
| # | The record's system number (ID). |
| Client Name | The short name you gave the device (e.g. HQ-FW-VPN). For identifying the record only. |
| IP/CIDR | The source IP or subnet from which the firewall/VPN device will send RADIUS requests to SignLogger. RADIUS requests are accepted only from this address. |
| Description | Free-form note (optional). |
| Type | The client's device type/brand. Determines the type of the RADIUS client. |
| Device | The inventory device the client is associated with (optional). Serial numbers appear masked in the list. |
| Req. MA | Whether Message-Authenticator is required (Yes / No). An additional RADIUS security check. |
| Secret | The shared secret is always shown masked for security (********); it is never displayed in plain text. |
| Action | Per-row Edit (pencil) and Delete (trash) buttons. |
Adding a new firewall/VPN client
- Click the Add (+) button at the top right. The Client - Add window opens.
- In the Client name box, enter a meaningful name (e.g.
HQ-FW-VPN). Use only letters, digits, and hyphens. - In the IP/CIDR box, enter the address from which the device will send RADIUS requests. You can enter a single IP (
10.0.0.1) or a CIDR block (10.0.0.0/24). - (Optional) Enter a short note in the Description box (e.g.
Central firewall — admin + VPN 2FA). - In the Secret box, enter the shared secret. You can make what you typed visible with the eye button next to it.
- Select the device type/brand from the Type dropdown.
- (Optional) Link the client to an inventory device from the Device list. The default is None; if you select a device, the IP field may be filled in automatically.
- (Optional, recommended) Check the Message-Authenticator required box.
- Click the Save button. A "Saved" notification appears and the new client shows up in the list.
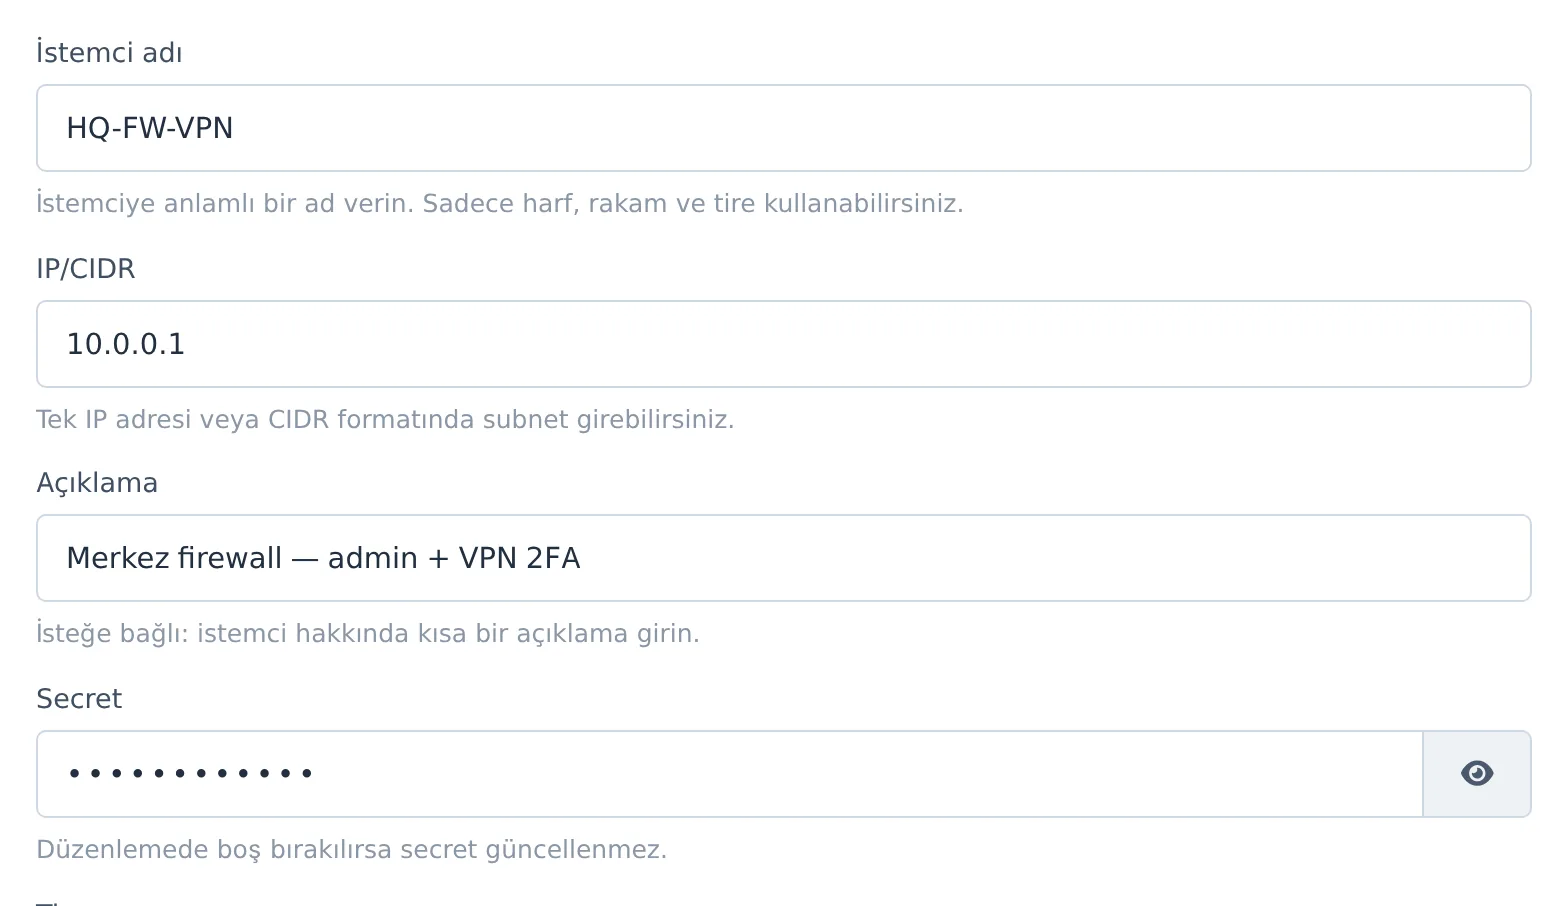
Figure 8. The upper part of the Client - Add window: name, IP/CIDR, description, and shared secret.
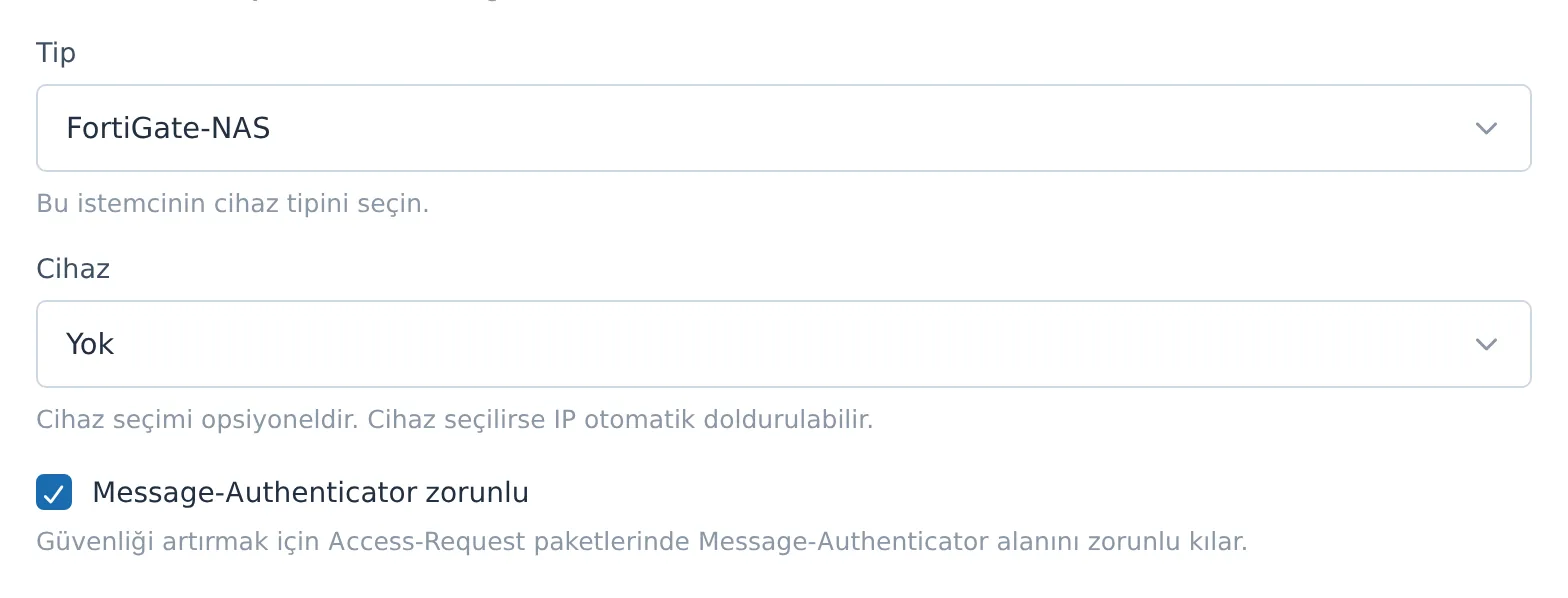
Figure 9. The lower part: device type, linking an inventory device, and the Message-Authenticator option.
Summary of the fields:
| Field | Required | Note |
|---|---|---|
| Client name | Yes | Letters, digits, and hyphens. |
| IP/CIDR | Yes | Single IP or CIDR. Must match the device's actual source IP. |
| Description | No | Free-form text. |
| Secret | Yes (for a new record) | At least 8 characters. Must be exactly the same as on the firewall side. |
| Type | Yes | Device type / brand. |
| Device | No | If selected, the IP may be filled in automatically; it associates the record in reporting. |
| Message-Authenticator required | No | Check only if your device sends this attribute. |
Caution: Client name, IP/CIDR, and Type are required; for a new record, Secret is required as well. The shared secret must be at least 8 characters; shorter values are rejected by the server.
Editing a client
- Click the Edit (pencil) button on the relevant row. The window opens with the current values.
- Update the fields you want to change.
- For security, the Secret field comes up empty. If you leave it empty, the existing shared secret does not change.
- If you want to renew the secret, enter the new value (again at least 8 characters) and click Save.
Caution: If you change the shared secret here, you must also update the same new value in the firewall/VPN device's RADIUS settings. Otherwise, 2FA logins fail silently — RADIUS requests are rejected and the user sees only "authentication failed."
Deleting a client
- Click the Delete (trash) button on the relevant row.
- Confirm with Delete in the confirmation window that opens (you can back out with Cancel).
Caution: When you delete a client, RADIUS requests from that device are no longer accepted and all 2FA logins on that device stop — including the admin panel and VPN. Delete an actively used client only if you truly intend to remove it.
What to do on the firewall side
After defining the client in SignLogger, you must set up the same match in the device's own interface:
- In the firewall/VPN device's management interface, define a RADIUS server: server address = SignLogger IP, authentication port = 1812, shared secret = exactly the same as the value you entered on this page.
- Verify that the source IP of the device's RADIUS requests matches the IP/CIDR you entered here.
- Direct administrator (admin) logins and SSL/IPsec VPN authentication to this RADIUS server.
Server address : <SignLogger IP>
Port           : 1812/udp   (RADIUS authentication)
Shared secret  : <exactly the same as the secret on the Clients page>
Source IP      : <must match the IP/CIDR on the Clients page>
Tips and notes
- Keep the secrets equal. If the shared secret on the two sides differs by even a single character, the device reports "authentication failed"; the error is silent. If you run into a problem, first verify the IP and secret match.
- The IP match is critical. If the device sends requests via a different interface/IP, enter that source IP or the appropriate subnet.
- Do not enable Message-Authenticator blindly. Check this option only if your device supports this attribute; if you check it on a device that does not support it, requests may be rejected.
- Secret security. The shared secret always appears masked in the list and comes up empty in the edit window; leaving it empty preserves the existing secret.
- Linking a device is optional. If you link the client to an inventory device, the IP may be filled in automatically and the record becomes readable by device name on the monitoring screens.
- Test after changes. After adding a new client or changing the secret, try the 2FA flow with a real user.
2FA Configuration
The main switch that enables 2FA system-wide. You decide here which methods (TOTP / SMS) will be available.
Menu: NAC Management → Security → 2FA Configuration
The user first authenticates with their password, then with the method you enable on this page. Unless global 2FA is turned on and at least one method is enabled on this page, the NAC rules you define cannot enforce 2FA — the "2FA active" option on the rule side works only through the methods enabled here.
Caution: This page does not determine "who" is subject to 2FA. Here you enable/disable methods system-wide; you define which user group is forced into 2FA on which login with the "2FA active" option on the Rules page.
Note: Windows agent sign-in 2FA is a separate mechanism and takes its method from the agent group; it should not be confused with the global settings on this page.
Accessing the page and overall layout
- From the left menu, click NAC Management → Security → 2FA Configuration.
- At the top of the page there is a status summary strip: the 2FA, SMS, and TOTP badges show the current state of each method as Active / Off.
- The Refresh (loop) button at the top right re-fetches the saved settings from the server; the Save (floppy disk) button does the same job as the Save at the bottom of the page.
- The page consists of two tabs: General and Methods.
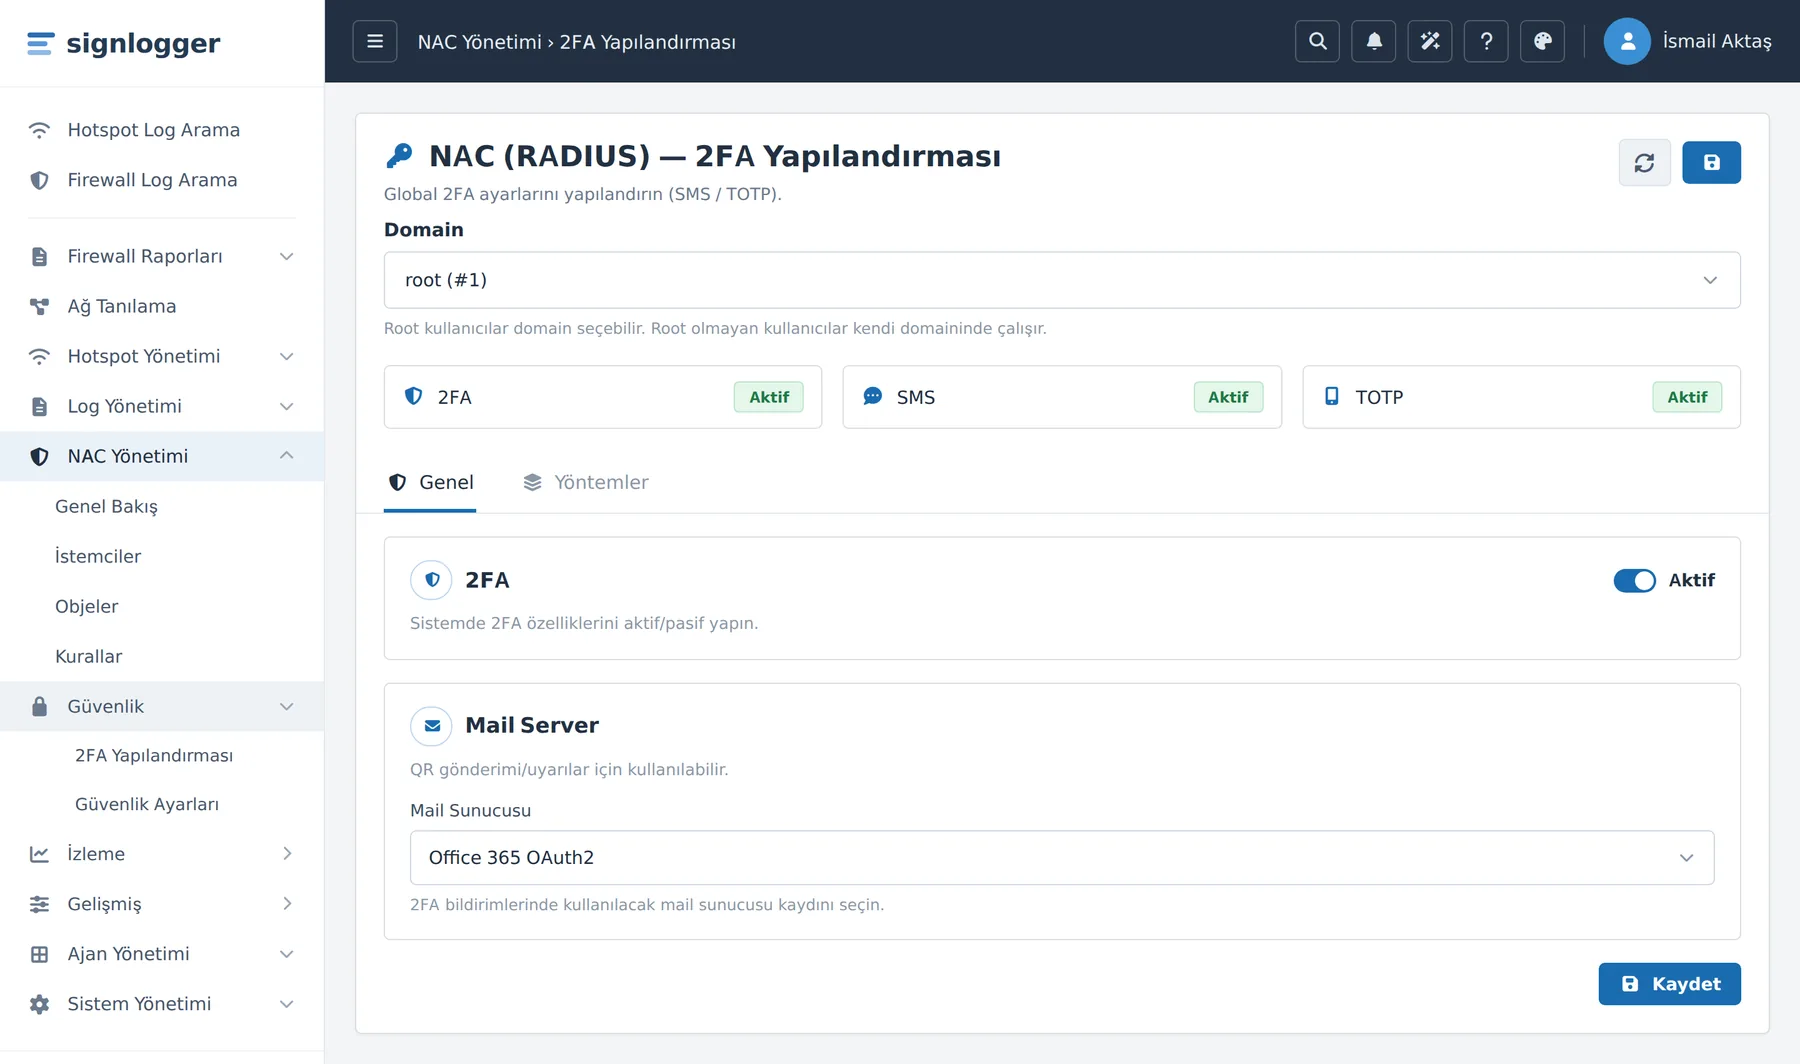
Figure 10. The 2FA Configuration page, General tab. The strip at the top summarizes the state of each method.
Tip: One Save, two tabs. After making your settings, a single Save saves all fields on both tabs together — switching tabs does not lose data.
Step 1 — Enable global 2FA (General tab)
While the global switch is off, the fields on the SMS and TOTP cards remain inactive (dimmed); this step is the prerequisite for the whole flow.
- Make sure the General tab is open (the page opens on this tab).
- On the card titled 2FA, move the Active switch on the right to the on position.
- Observe that the 2FA badge at the top changes to Active.

Figure 11. The main 2FA switch on the General tab. While off, the method fields remain inactive.
Caution: Turning on this switch alone does not make 2FA work. You must also enable at least one method from the Methods tab. If global is on + no method is selected, users proceed with only their password.
Step 2 — Enable the TOTP (Authenticator) method
TOTP verifies with the time-based 6-digit code produced by the Authenticator app on the user's phone. Because it requires no cellular network or SMS, it is the recommended primary method for firewall administrators and VPN users.
- Click the Methods tab at the top.
- Turn on the Active switch at the top right of the card titled TOTP.
- Fill in the Issuer, Window, and Period fields according to the table below.
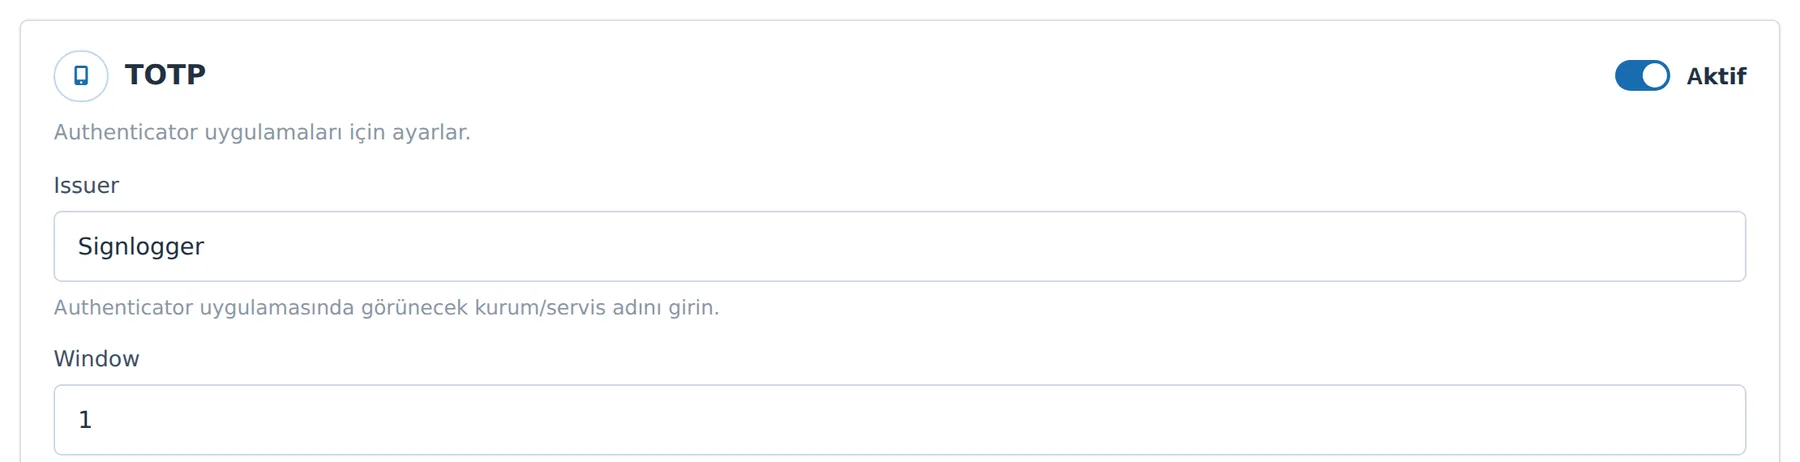
Figure 12. Methods tab — TOTP card: the Issuer, Window, and Period fields.
| Field | What it does | Range | Recommended |
|---|---|---|---|
| Issuer | The organization/service name that will appear next to the account in the user's Authenticator app. | Up to 255 characters | Your organization's name |
| Window | The time-drift tolerance window. The number of additional steps within which the code is accepted when there are small offsets between the phone and server clocks. A larger value is more tolerant but slightly less strict. | 1 – 5 | 1 |
| Period (s) | How often, in seconds, the Authenticator generates a new code. Usually 30 is used for compatibility with standard apps. | 15 – 60 s | 30 |
Note: A user using TOTP for the first time must register the shared secret (QR) into their Authenticator app. The Issuer value here determines the name under which the account appears in the user's app.
Step 3 — Enable the SMS method
The SMS method sends the verification code to the user's phone by text message. It is used as an alternative or additional method for users who cannot install an Authenticator; you can leave it enabled alongside TOTP.
- On the Methods tab, turn on the Active switch at the top right of the SMS card.
- Fill in the fields according to the table below.
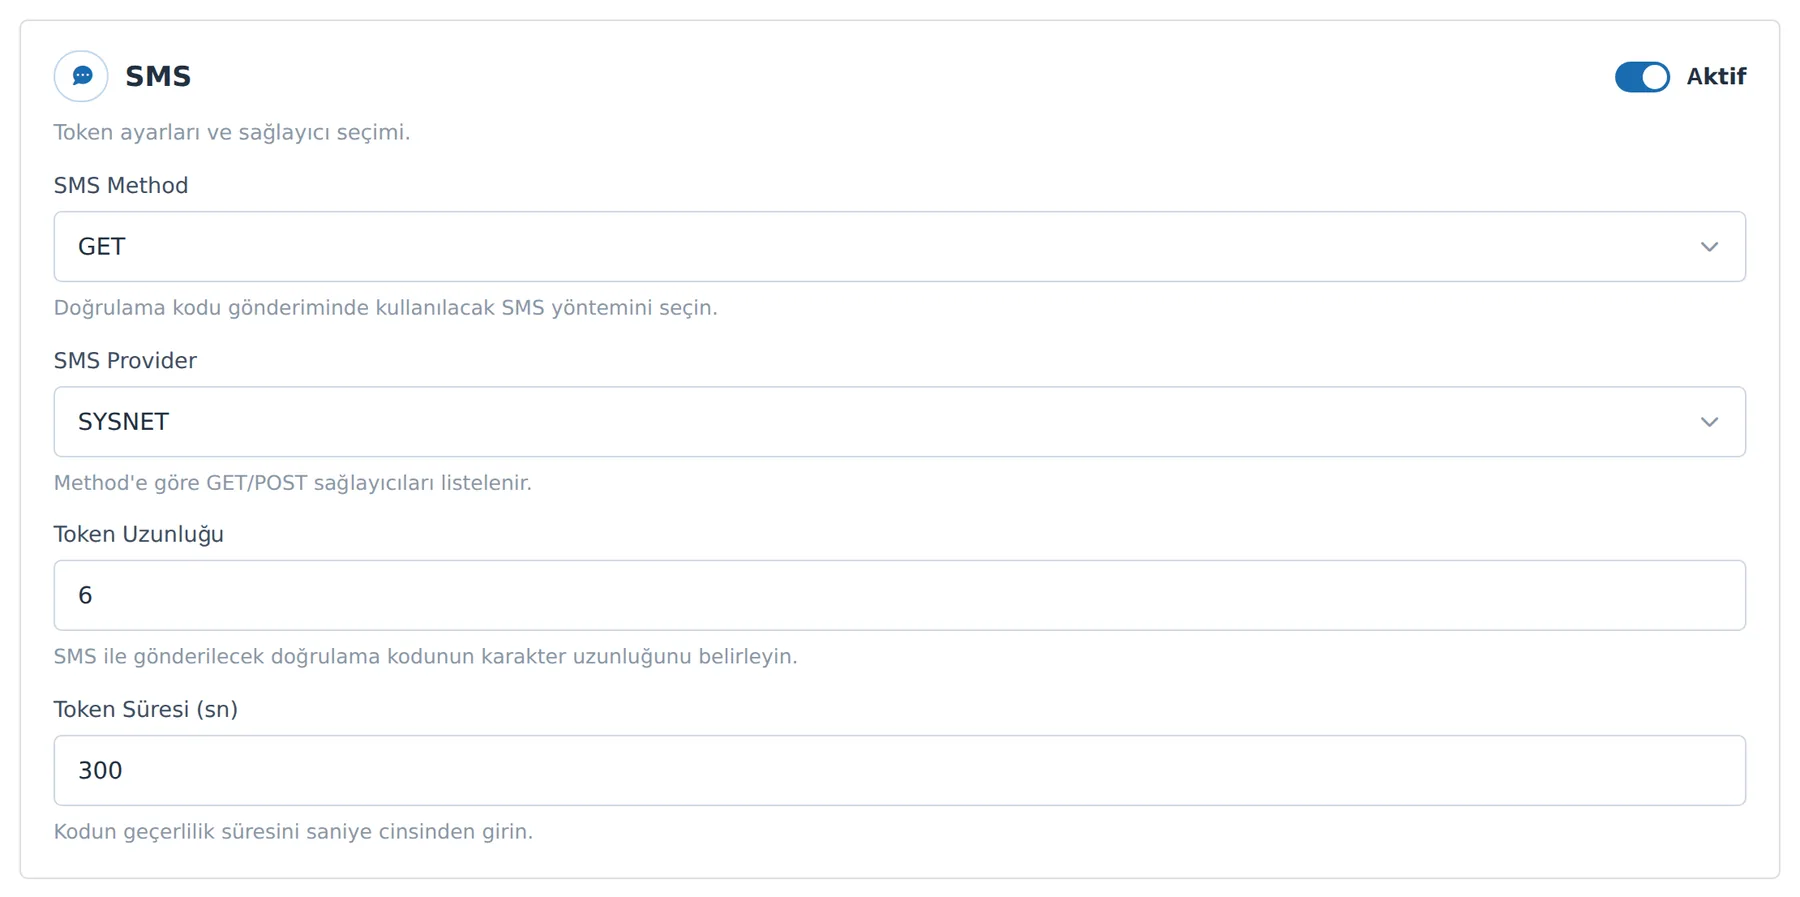
Figure 13. Methods tab — SMS card: method, provider, token length, and lifetime.
| Field | What it does | Range | Recommended |
|---|---|---|---|
| SMS Method | The SMS call method used when sending the code. This selection determines the provider list next to it. | POST / GET | Whatever your provider supports |
| SMS Provider | The SMS provider that will send the code. The list is populated according to the method you selected. | Defined providers | Your corporate provider |
| Token Length | The number of characters in the verification code sent by SMS. | 4 – 10 | 6 |
| Token Lifetime (s) | How long the sent code remains valid. Once it expires, the code is rejected. | 60 – 600 s | 300 |
Caution: When you change the SMS Method, the SMS Provider list reloads according to that method. If the list shows the warning "No GET provider found." or "No POST provider found.", it means you have no provider defined for that method; first define the relevant SMS provider or select the other supported method.
Step 4 — (Optional) Select the mail server
- Return to the General tab.
- On the Mail Server card, select from the Mail Server list the registered mail server to be used for 2FA notifications and QR delivery.
- If you do not need it, you can leave it empty.
Note: This field feeds the auxiliary notifications and QR delivery, not the 2FA verification itself. TOTP and SMS verification work independently of this selection.
Step 5 — Save and verify the status
- Click the Save button at the bottom of the page (or the floppy-disk icon at the top right). The button changes to a "Saving…" state.
- If successful, you see a confirmation notification at the top; the system reloads the settings and normalizes the field values.
- Verify that the 2FA / SMS / TOTP badges at the top show the states you expect.
- If there is an error, a validation message appears below/above the fields (e.g. "Token length must be between 4 and 10."). Correct the relevant field and save again.
Caution: Values are also validated on the server side before saving. A single out-of-range value stops the save entirely — no field is written. So until you correct the field named in the error message, your other changes are not persisted either.
For a method to actually be in effect
Three conditions must be met together:
| # | Condition | Where to check |
|---|---|---|
| 1 | Global 2FA / Active is on | General tab + the 2FA badge at the top |
| 2 | The Active switch of the relevant method card is on | Methods tab + the SMS / TOTP badge |
| 3 | That method's fields are valid (within range) | No error message should appear after Save |
Tips and notes
- TOTP and SMS can be enabled together. You can enable both methods and manage which one applies at the rule layer (
totp/sms/both). - Make TOTP primary. It works independently of the cellular network, causes no delay, and incurs no SMS cost. Keep SMS enabled as a fallback for users who cannot install an Authenticator.
- Do not overdo the Window value. 1 is enough for most environments. If you experience clock-drift problems, first align the server and client clocks with NTP; increasing the Window hides the problem, it does not solve it.
- Root and domain scope. If you are root, select the correct domain from the Domain selector at the top; each domain's 2FA settings are separate.
- Permissions. The
view_nacpermission is required to view the page, andedit_nacto save. Without permission, the Save buttons are disabled and a yellow warning is shown. - Test after saving. Making sure you have defined the firewall as a client and that 2FA is enabled in the rule, try a real login; verify that the code is requested after the password.
Objects — Users, Groups, and 2FA Enrollment
Define the identity objects that 2FA verification operates on: users, groups, and each user's TOTP/SMS enrollment.
Menu: NAC Management → Objects
This page does three jobs at once: defining users (local or LDAP), placing them into groups (rules match by group), and performing each user's 2FA enrollment. The rule-writing step is on a separate page; here, only the objects are prepared.
Tabs

Figure 14. The six tabs of the Objects page.
| Tab | Function for firewall/VPN 2FA |
|---|---|
| Local Users | Adding password-based local users. Sub-tabs: Network User (802.1x) and Captive Portal User. |
| Remote Users | Remote users imported from LDAP/AD. Identity is verified in LDAP; the record here holds the 2FA binding and group membership. |
| Workstation Users | Windows agent users — out of scope for this guide. |
| MAC Addresses | Device MAC-bypass records — not subject to 2FA, out of scope. |
| Groups | NAC groups. Rules are written against these groups. |
| Sync Rules | Rules that periodically and automatically pull LDAP/AD users. |
Caution: The Workstation Users tab and the Windows Logon Enforcement option in the user 2FA window belong to Windows agent sign-in 2FA and do not affect firewall/VPN 2FA. Do not touch them in this guide.
Step 1 — Create the group first
Because 2FA rules are written against a group rather than individual users, create the target group first.
- Click the Groups tab.
- Click the Add Group button at the top right. The Group - Add window opens.
- Select the group's type from the Type list: User (for local users), LDAP (directory group), or MAC.
- Enter the name in the Group name box (e.g.
Firewall-Admins,SSLVPN-Users,IPsec-Users). For the LDAP type, DN/CN format can be used. - In the Details section, optionally select a Device and enter a Description. Leave the Active box checked.
- Click the Save button. The group appears in the list.
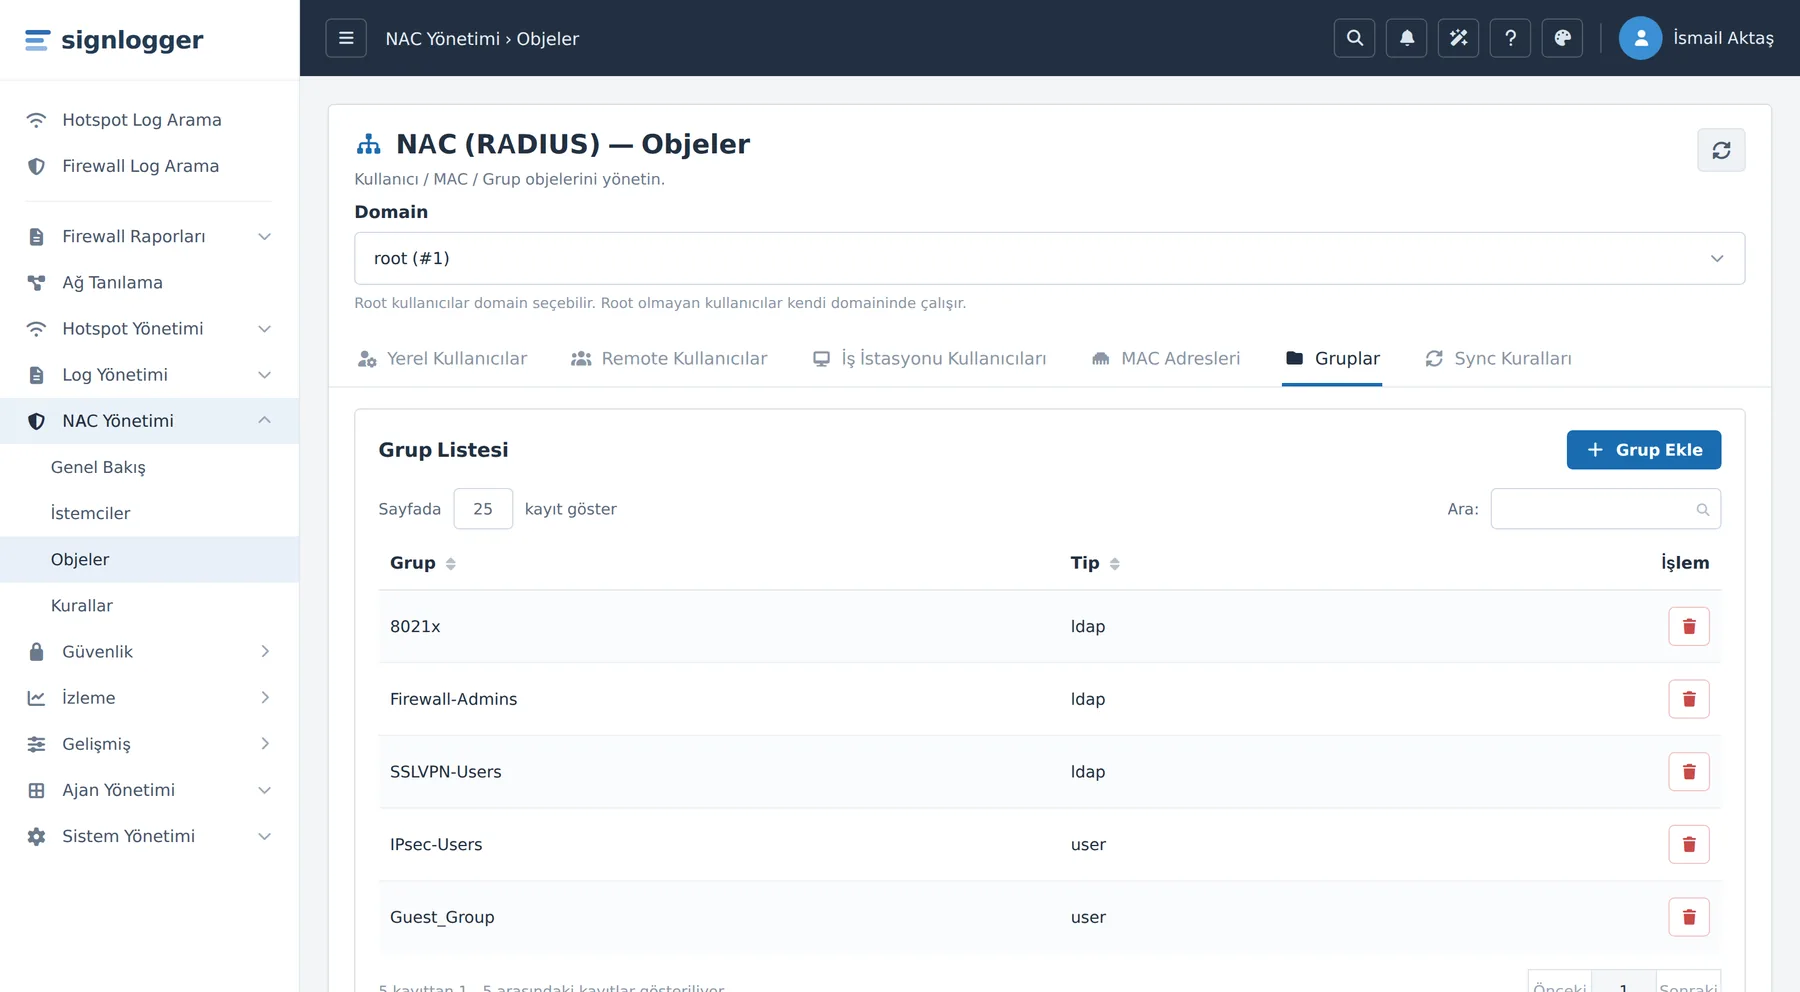
Figure 15. The Groups tab. Rules match by these groups.
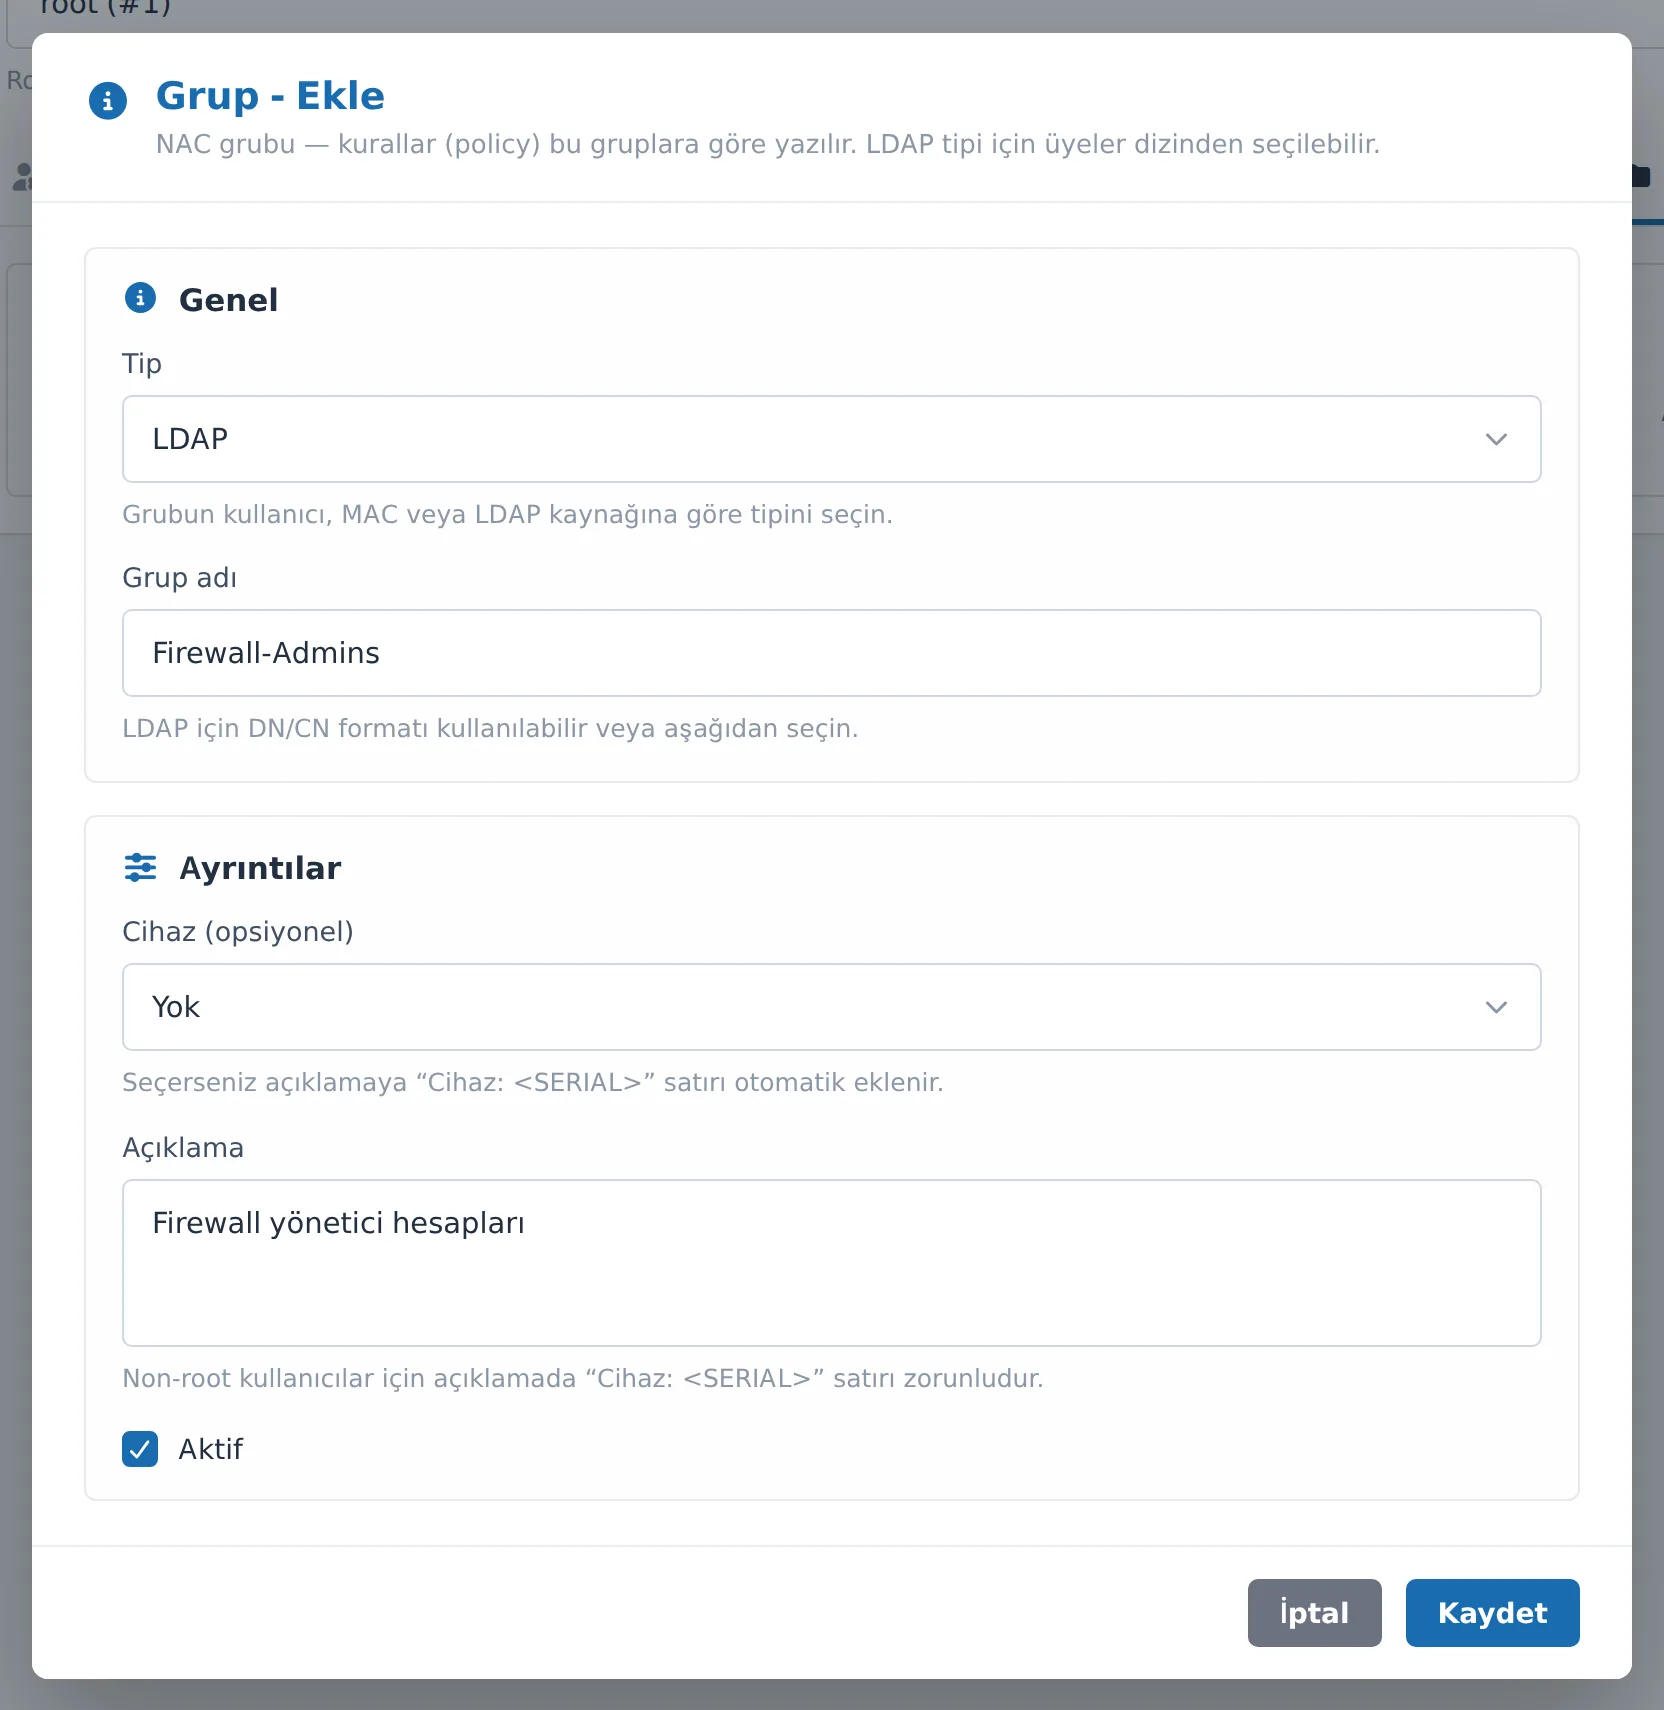
Figure 16. The Group - Add window.
Note: When you select Type = LDAP, the Select group from LDAP section opens: select the LDAP Configuration, list the directory groups with Fetch groups, and select one by clicking its row. If you like, you can check the Sync this LDAP group's members to Remote Users box, provide an Interval (min), and pull them immediately with Sync Now.
Caution: For non-root users, the "Device: <SERIAL>" line is required in the group description; if you select a device, this line is added automatically.
Tip: Separate groups by login type:
Firewall-Admins,SSLVPN-Users,IPsec-Users. This way you can apply a different 2FA method and different conditions to each login type. A single "VPN" group makes it impossible to separate the admin from the end user.
Step 2 — Adding a local (password-based) user
Creates a local identity that the firewall/VPN will authenticate via RADIUS. The password is defined here, while the 2FA enrollment is defined in Step 4.
- Click the Local Users tab.
- Choose one of the sub-tabs at the top according to the intended use: Network User (802.1x / network access) or Captive Portal User. For firewall admin sessions and VPN logins, Network User is usually appropriate.
- Click the Add Local User button at the top right.
- In the User box, enter the username to be used in RADIUS authentication; fill in the First name and Last name fields.
- Under Intended Use, select Network (802.1x) or Captive Portal.
- From the Groups field, select the group you created in Step 1.
- Fill in the E-mail and Phone fields — they are optional but important for 2FA: e-mail is needed to send the QR by e-mail, and phone is needed for SMS 2FA.
- Fill in the Password and Password (Repeat) boxes and click Save.
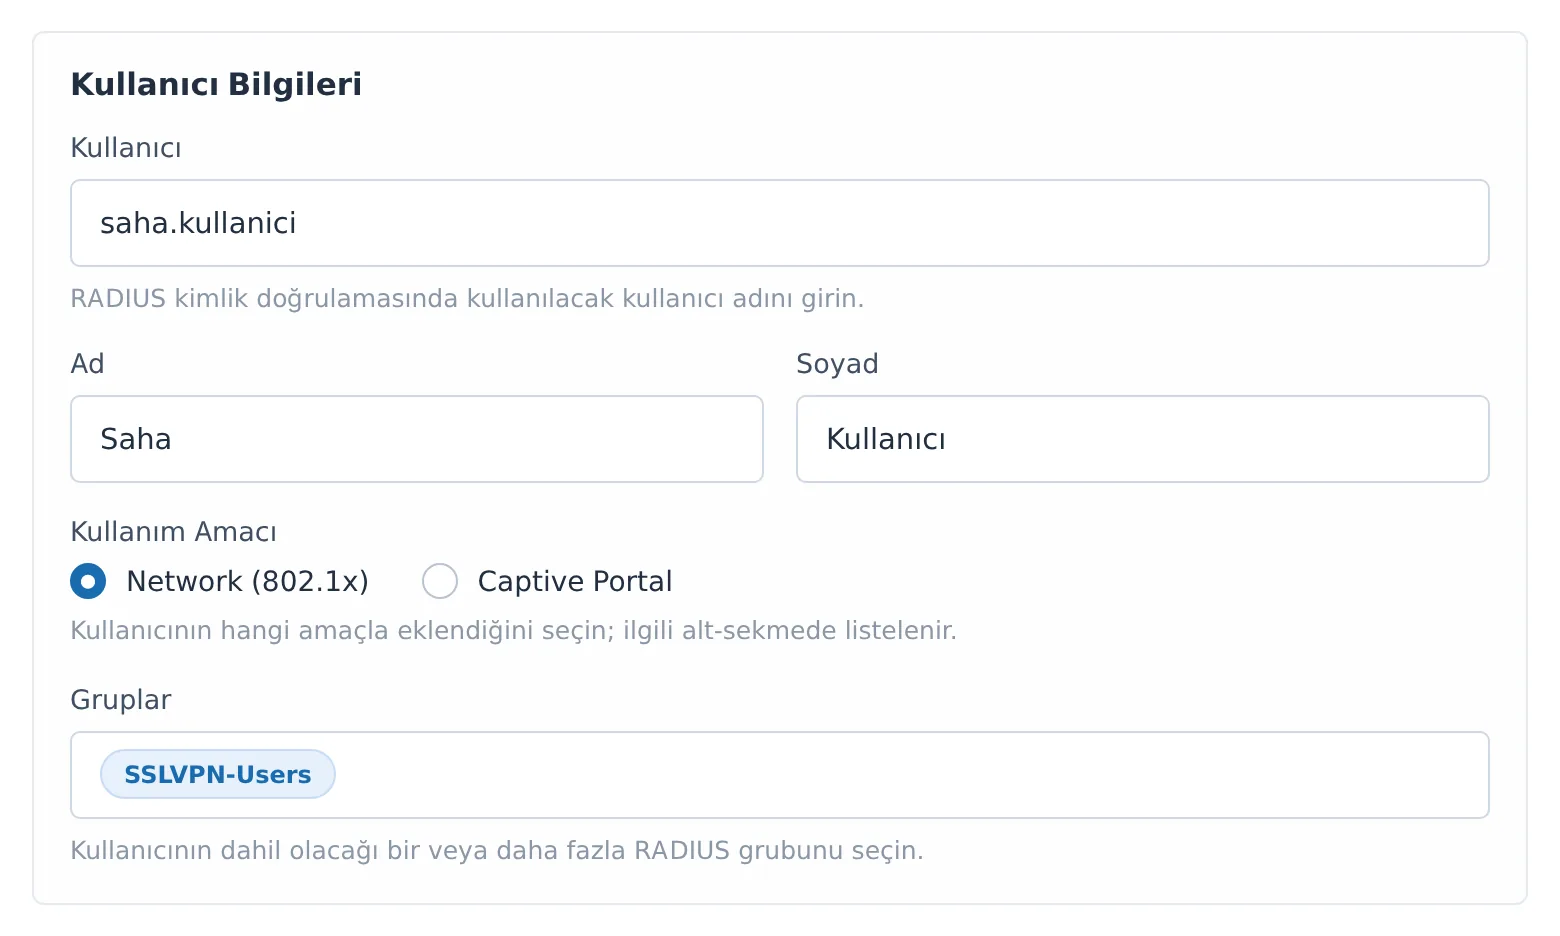
Figure 17. The User - Add window: identity information, intended use, and group selection.
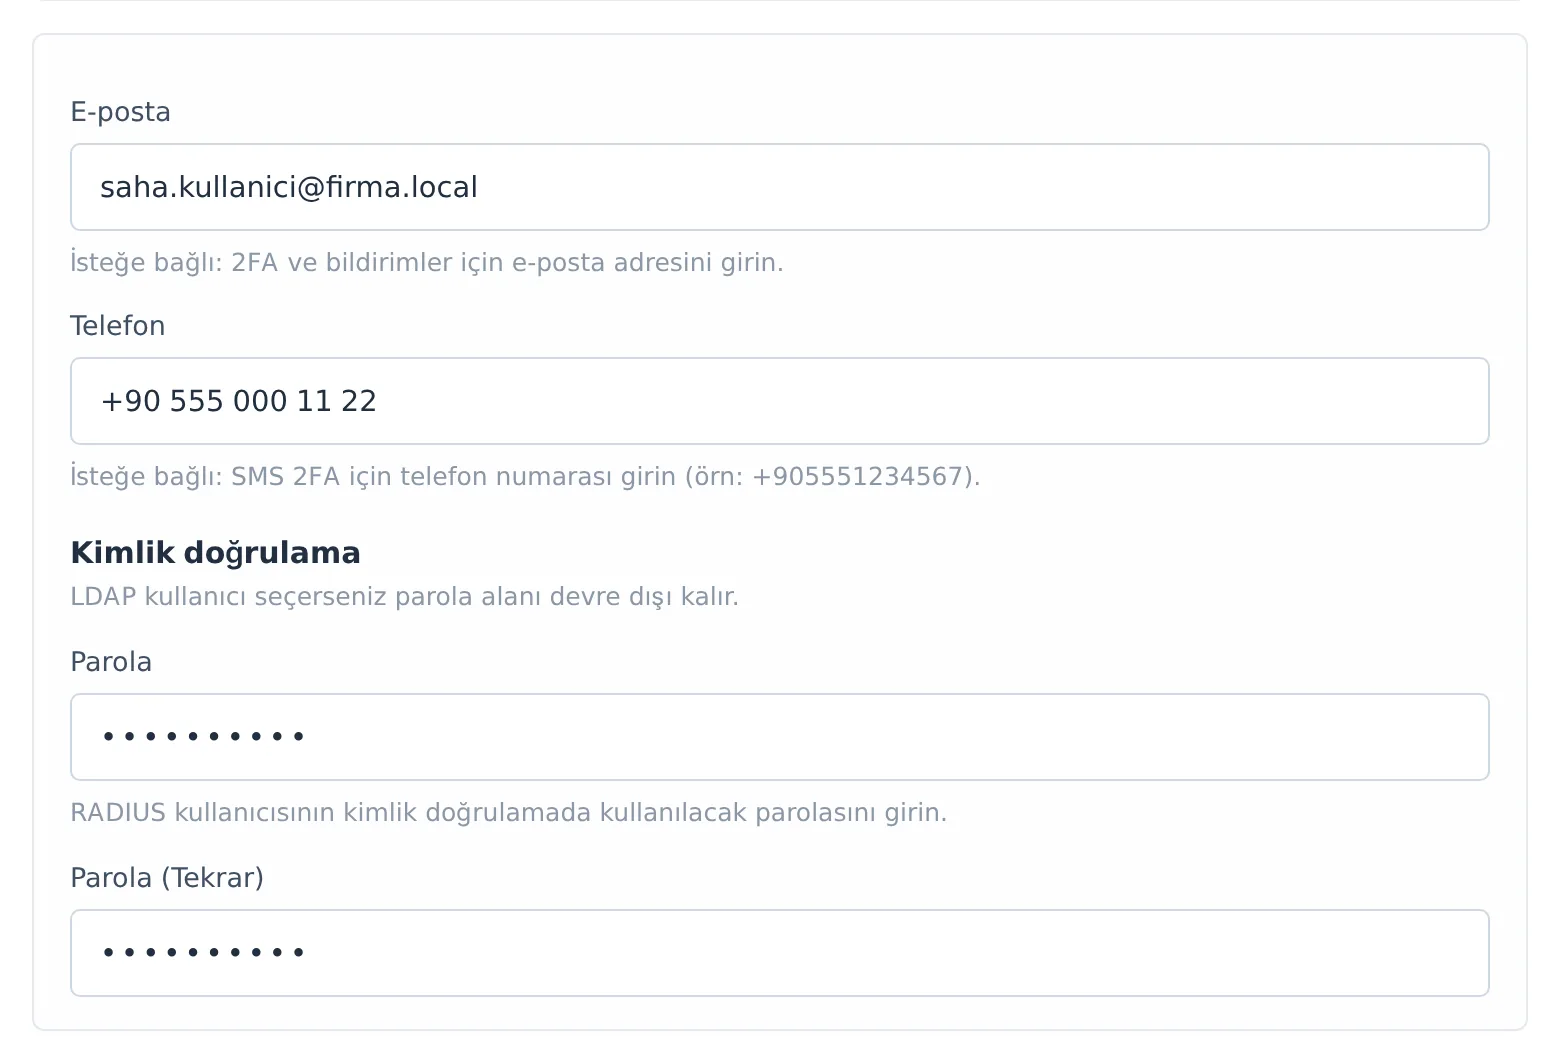
Figure 18. The lower section: e-mail, phone, and password fields.
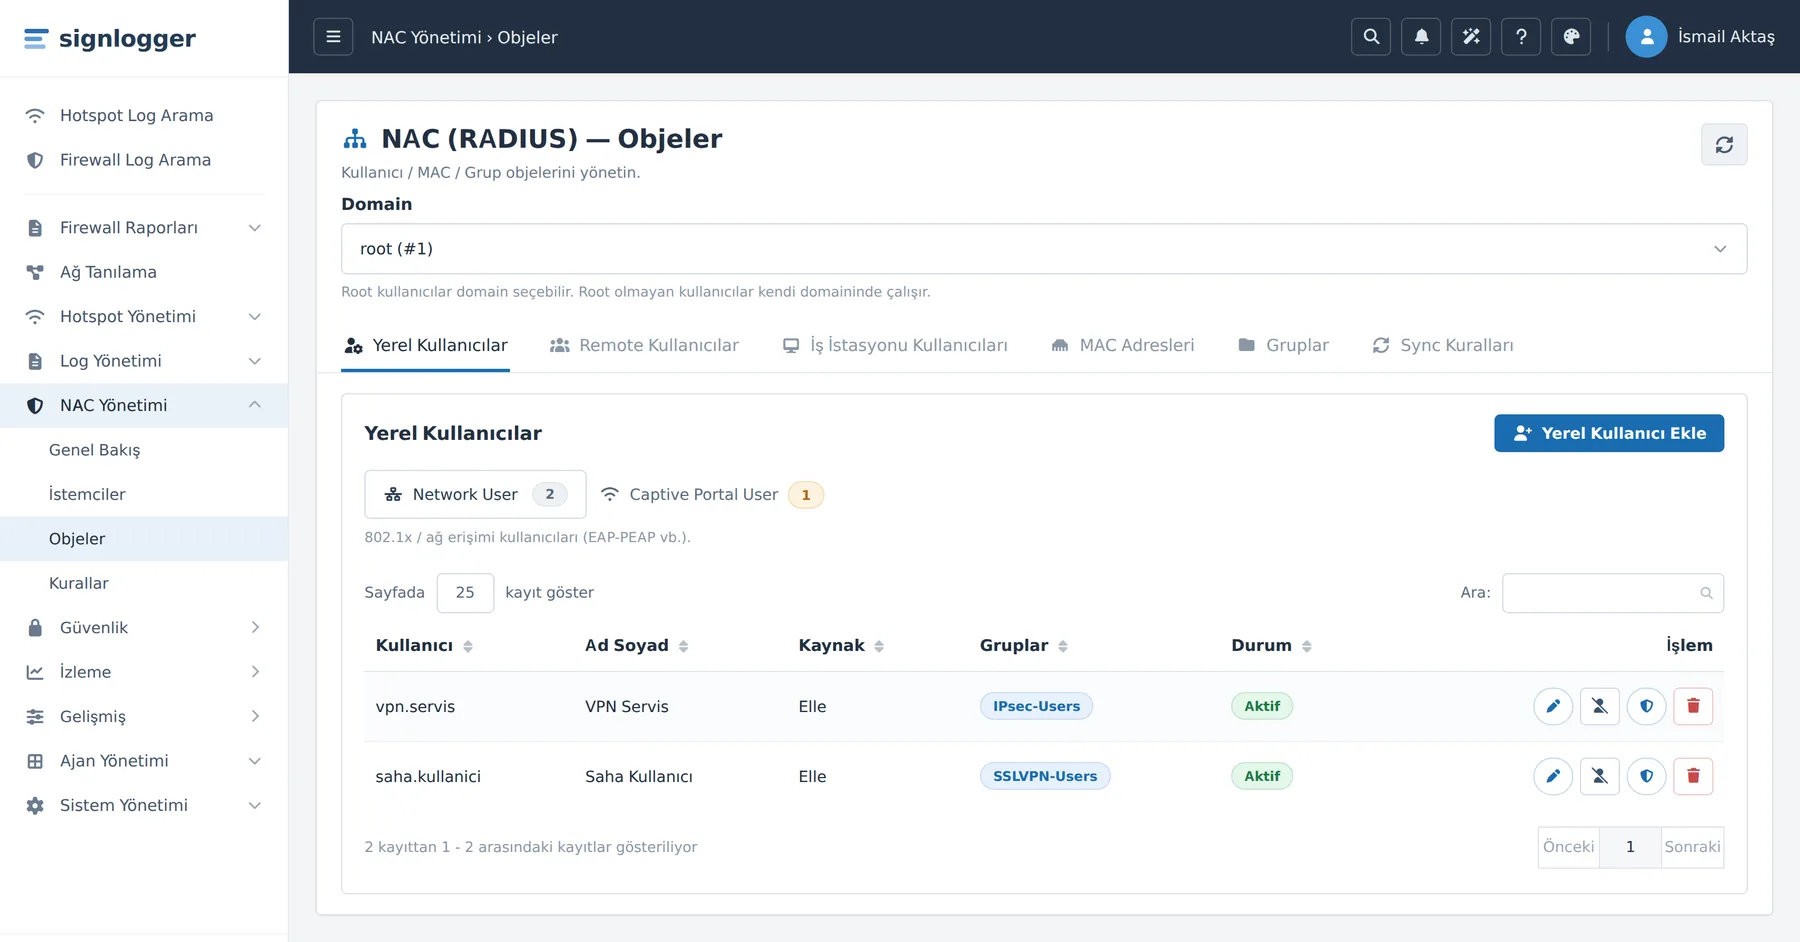
Figure 19. The Local Users list. Each row has edit, deactivate, 2FA Settings, and delete buttons.
| Table column | Meaning |
|---|---|
| User | RADIUS username. |
| Full Name | Identity profile (for 5651 compliance). |
| Source | Where the record came from (Manual, LDAP, Hotspot, SMS, Hotel PMS, External DB…). |
| Groups | The NAC groups it belongs to — rule matching is done accordingly. |
| Status | Active / Inactive. An inactive record cuts off RADIUS and portal access. |
Note: If you check the LDAP user box, the Select from LDAP card opens on the right and you can select the user from the directory. In this case the password field is not required; authentication is done in LDAP.
Row buttons: edit (pencil), deactivate/activate (user-slash), 2FA Settings (shield), and delete (trash).
Step 3 — Importing LDAP/AD users
Registers users whose authentication is done in the directory into SignLogger, with a 2FA binding and group membership.
- Click the Remote Users tab.
- Click the Import from LDAP button at the top right.
- Select the LDAP Configuration.
- From the NAC Groups to assign field, select the group to be given to the imported users. (Optional but recommended for rule matching.)
- If you like, turn on the Generate TOTP on import switch: an Authenticator secret is generated for users who do not have TOTP, while existing secrets are preserved.
- Choose the method: on the Browse & Select tab, provide an OU and a limit, list them with Fetch Users, and check them; or on the Filter / Group (Bulk) tab, import in bulk with an LDAP filter (e.g.
(department=IT)) or an LDAP group. - Click the Import button.
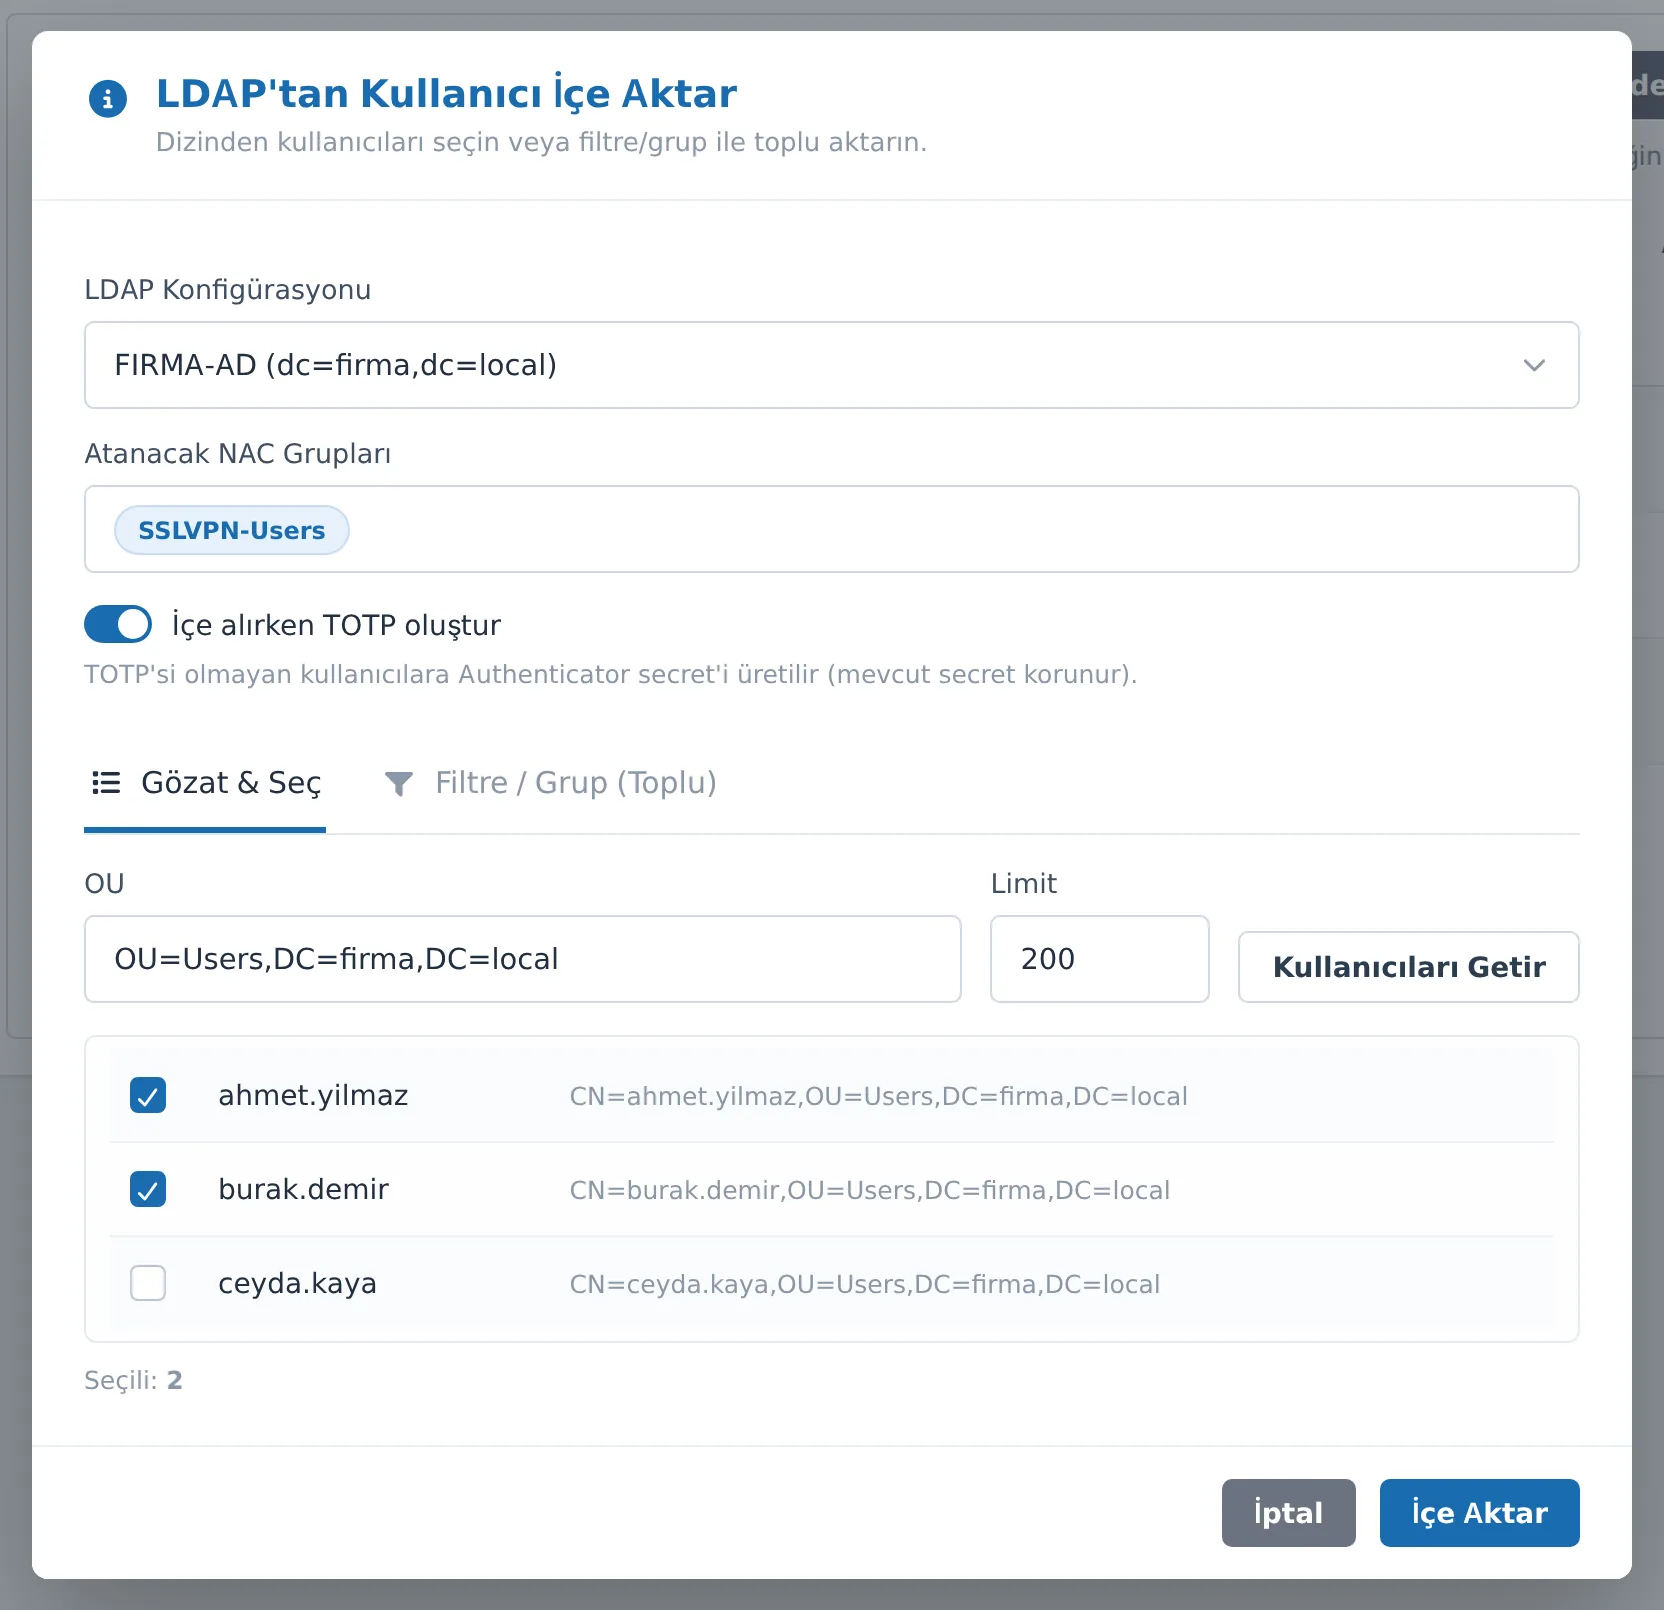
Figure 20. The Import Users from LDAP window. The "Generate TOTP on import" option speeds up enrollment.
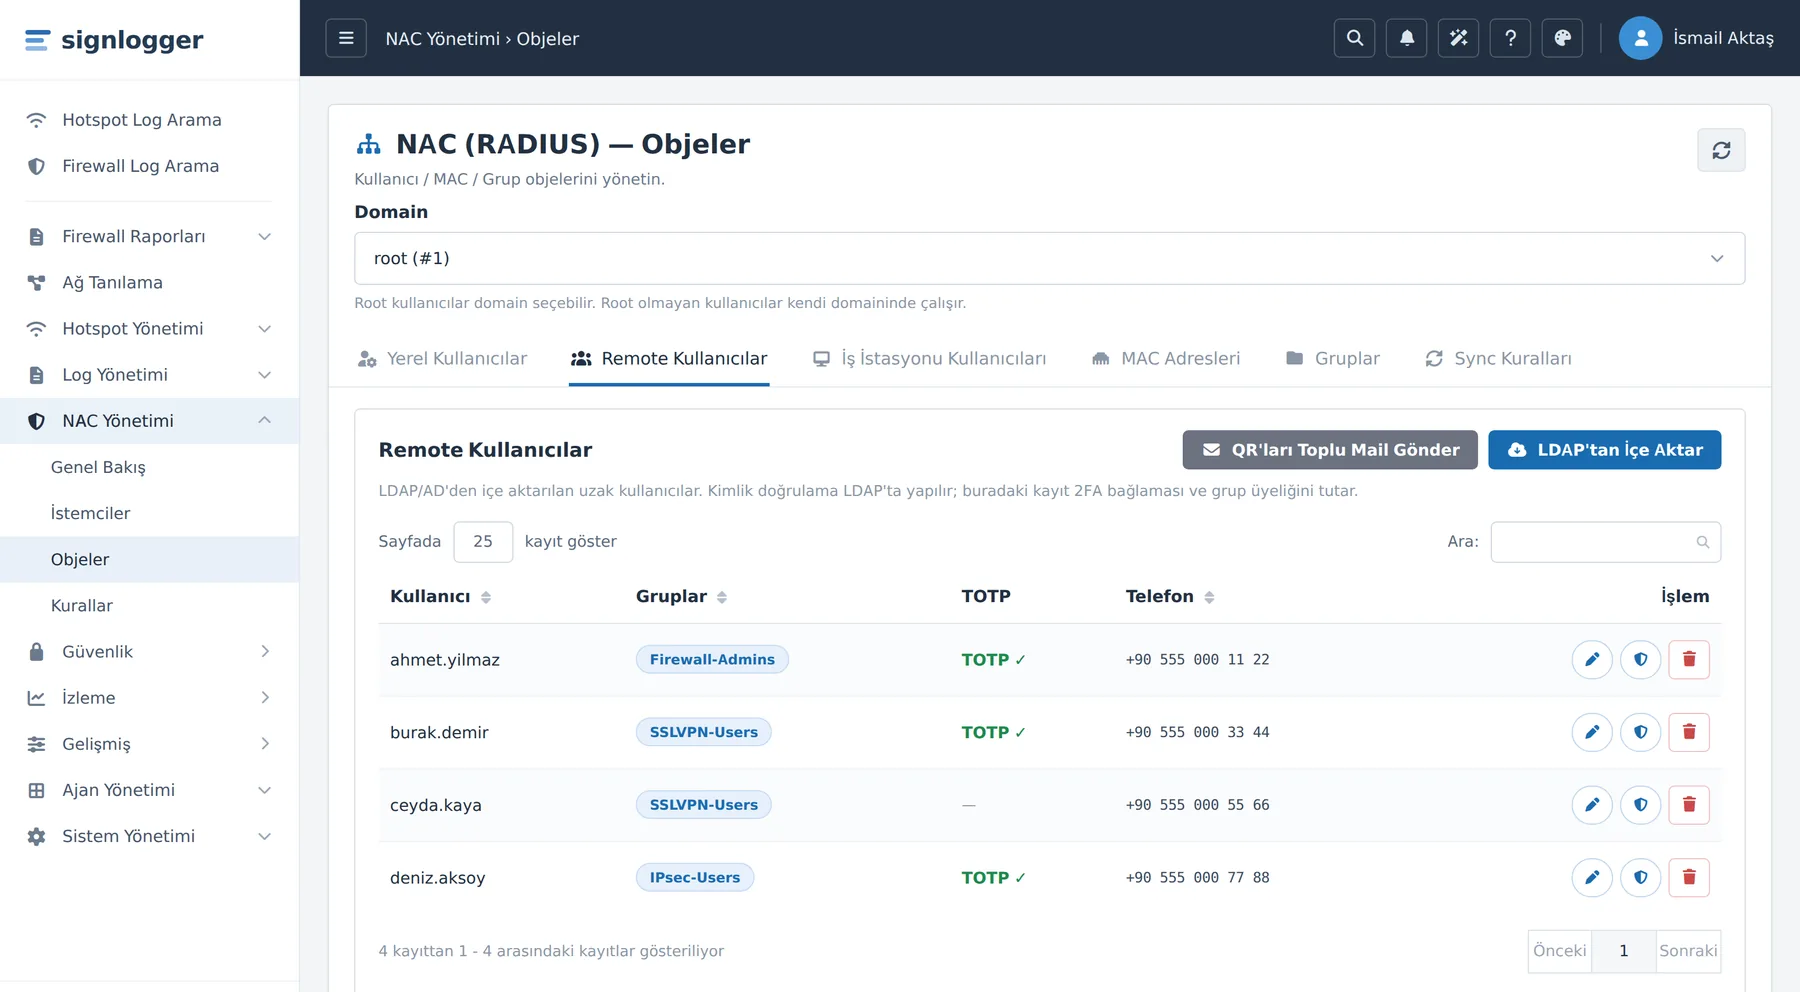
Figure 21. The Remote Users list. The TOTP ✓ mark shows that the user's Authenticator enrollment is ready.
Tip: The combination of Generate TOTP on import + Bulk Mail QR Codes is the fastest way to enroll dozens of users in 2FA without going through them one by one.
Step 4 — User 2FA/OTP enrollment
This step is the heart of firewall/VPN 2FA: each user's Authenticator secret and/or SMS phone is defined here.
- On the Local Users or Remote Users tab, click the 2FA Settings button with the shield icon on the relevant user's row.
- In the Contact section, fill in the E-mail and/or Phone box. If you will use SMS 2FA, the phone is required in
+905551234567format. - In the TOTP (Authenticator) section, click the Generate Secret button. The system generates a new secret and a QR code is displayed below it.
- The user opens the Authenticator app on their phone and scans the QR code. The app now generates a 6-digit code every 30 seconds.
- In the QR notification section, leave the Send QR information by mail/SMS after enrollment box checked and select the Notification channel: Automatic / E-mail / SMS / Both / Do not send.
- Click the Save button.
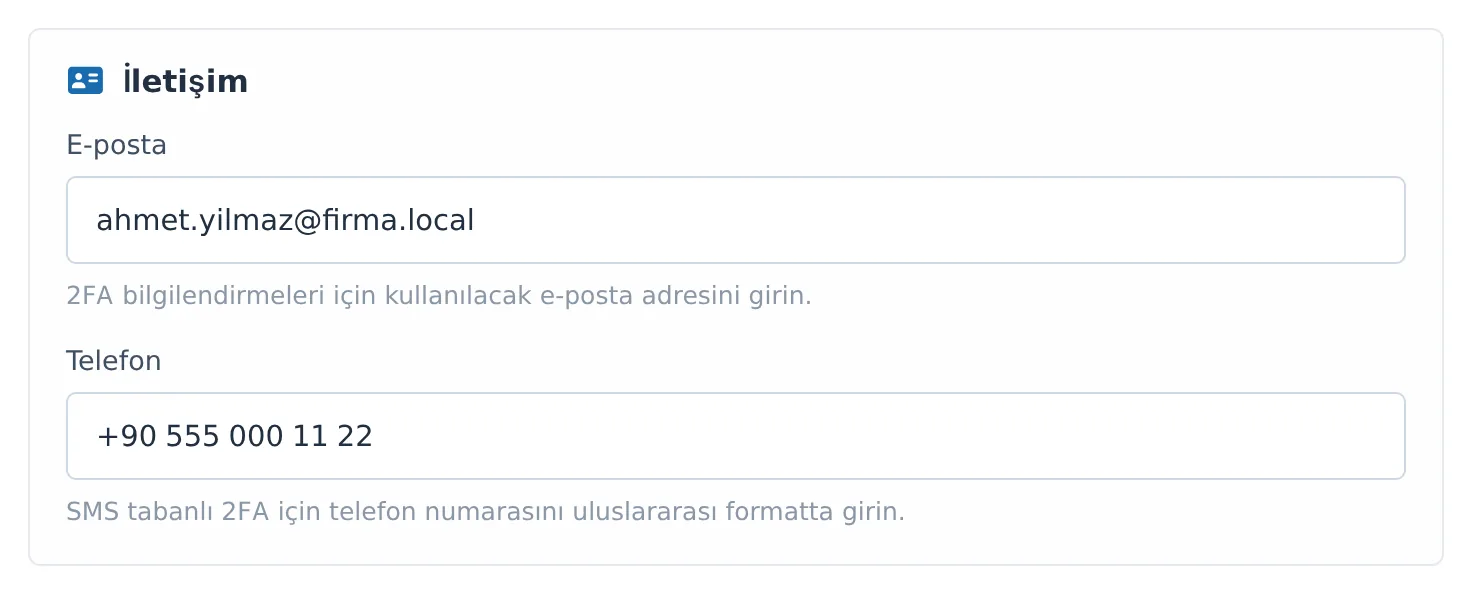
Figure 22. 2FA Settings — Contact section. A phone is needed for SMS 2FA, and an e-mail for the QR e-mail.
Figure 23. TOTP section: the Generate Secret button and the QR code for the user to scan.
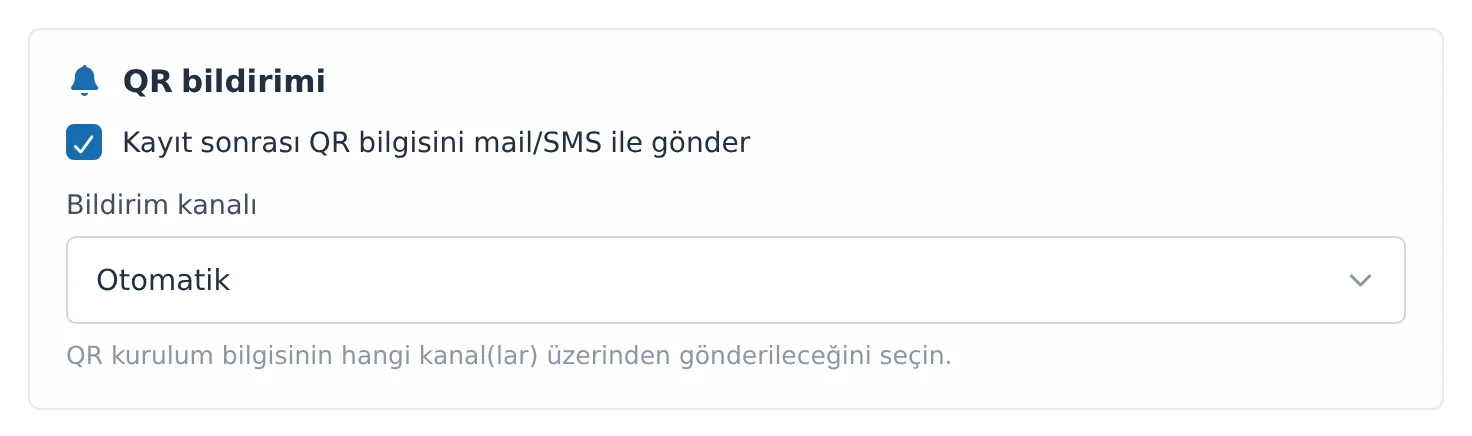
Figure 24. The QR notification section: you choose through which channel the enrollment is delivered to the user.
| Field | Its role in firewall/VPN 2FA |
|---|---|
| The address to which the TOTP QR information is delivered by e-mail. | |
| Phone | The number to which the SMS 2FA code and the QR notification are sent. |
| TOTP Secret + Generate Secret | The Authenticator secret. If it is filled in, TOTP 2FA is considered enabled. |
| QR code | The otpauth record that the user scans into the Authenticator. |
| Notification channel | Through which channel the QR/enrollment information is sent. |
| Windows Logon Enforcement | Affects only the Windows agent path — firewall/VPNis not affected.Leave it asInherit. |
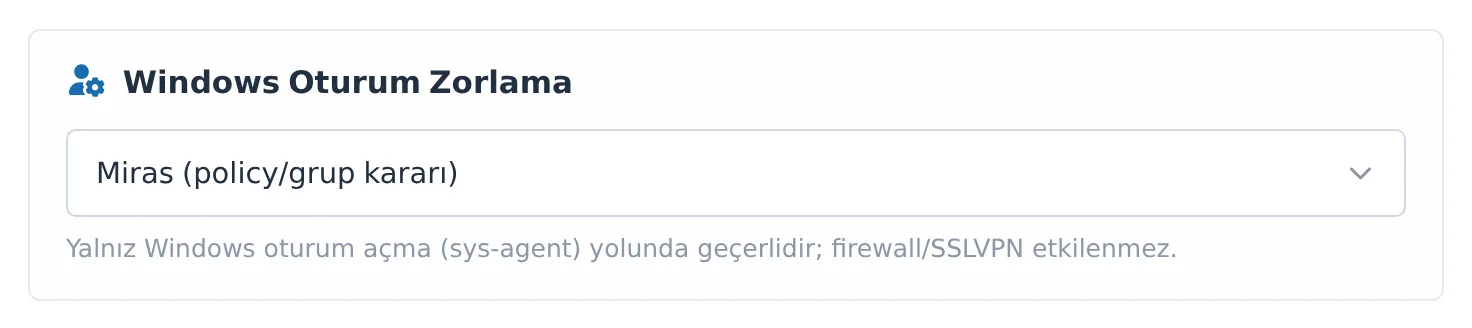
Figure 25. The Windows Logon Enforcement field is out of scope for this guide; leave it as Inherit.
Caution: Windows Logon Enforcement (Inherit / Required / Exempt) is only for the Windows sign-in path and does not change firewall/VPN logins. Whether 2FA is requested on firewall/VPN is determined in the rule of the group the user belongs to.
Note: For security, a registered TOTP secret comes up masked when the window opens, and the field shows the text "Configured — Generate New to change". To change the secret, use Generate Secret again — this produces a new secret and invalidates the old record, meaning the user must scan the QR again.
Step 5 — Resending the QR and bulk mail
Resending to a single user
In the 2FA window, if the user has a registered TOTP secret and at least one channel (e-mail or phone), the Resend QR button becomes enabled. This button re-delivers the QR information using the current values in the database; it does not use unsaved changes in the window (if there are unsaved changes, it asks for confirmation).
Bulk mail (Remote users)
- On the Remote Users tab, click the Bulk Mail QR Codes button.
- In the window that opens, you see the To send / Sent / Failed / Status counters.
- Click the Start Sending button. You can close the window while the progress bar fills; the operation continues in the background.
- If necessary, you can stop it with Cancel.
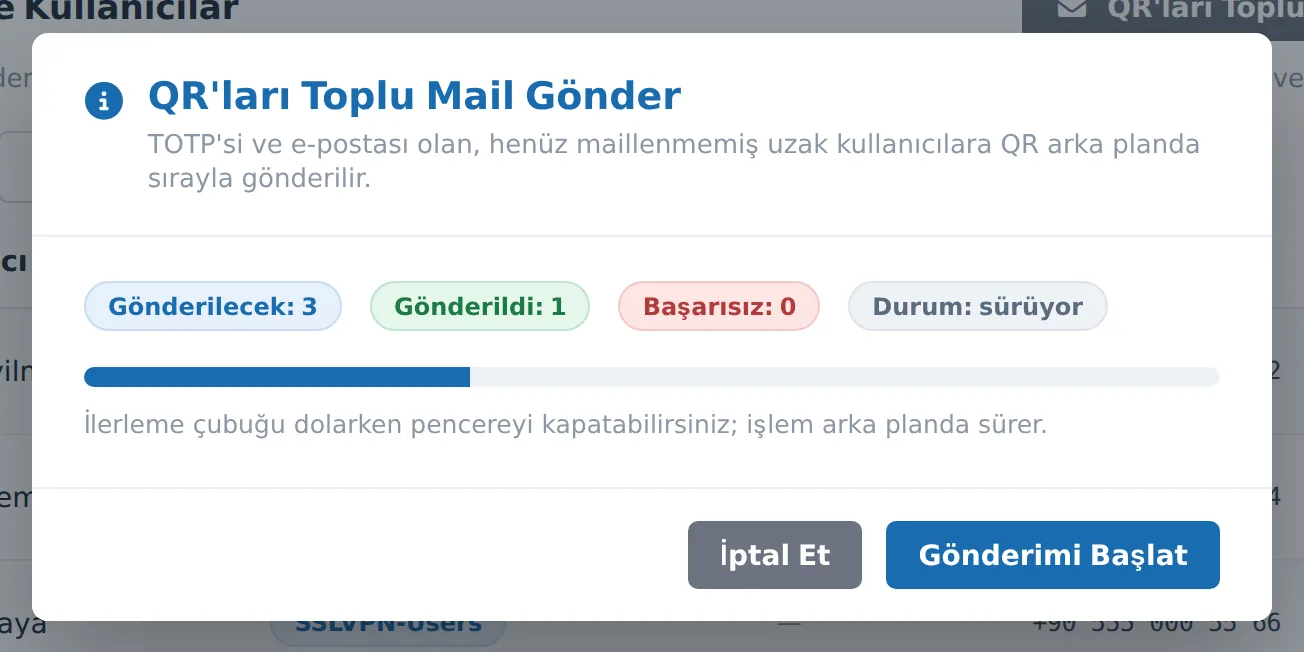
Figure 26. The Bulk Mail QR Codes window. The operation runs in the background, in intervals.
Note: Bulk sending targets only remote users who have a TOTP and an e-mail and have not yet been mailed. Users who have already received the mail are not targeted again.
Step 6 (optional) — Automatic import with Sync Rules
Defines a rule that periodically and automatically pulls directory users instead of importing them manually; it keeps the 2FA coverage up to date in large AD environments.
- Click the Sync Rules tab and click the New Rule button.
- Enter the Rule Name.
- In the Source & Scope section, select the LDAP Configuration and the Scope: LDAP Group, OU, or Entire Directory.
- Attribute Mapping: If the AD field names differ, fill in the Username / E-mail / Phone attribute boxes (e.g.
otherMobilefor phone). If left empty, the defaults are used. - Target & Scheduling: Select the Target NAC Group, provide a Sync Interval (minutes), and leave the Rule enabled switch on.
- If you like, turn on the Generate TOTP on sync switch to have an Authenticator secret generated for the imported users.
- Click Save. To trigger the rules manually, use the Sync All button at the top of the tab.
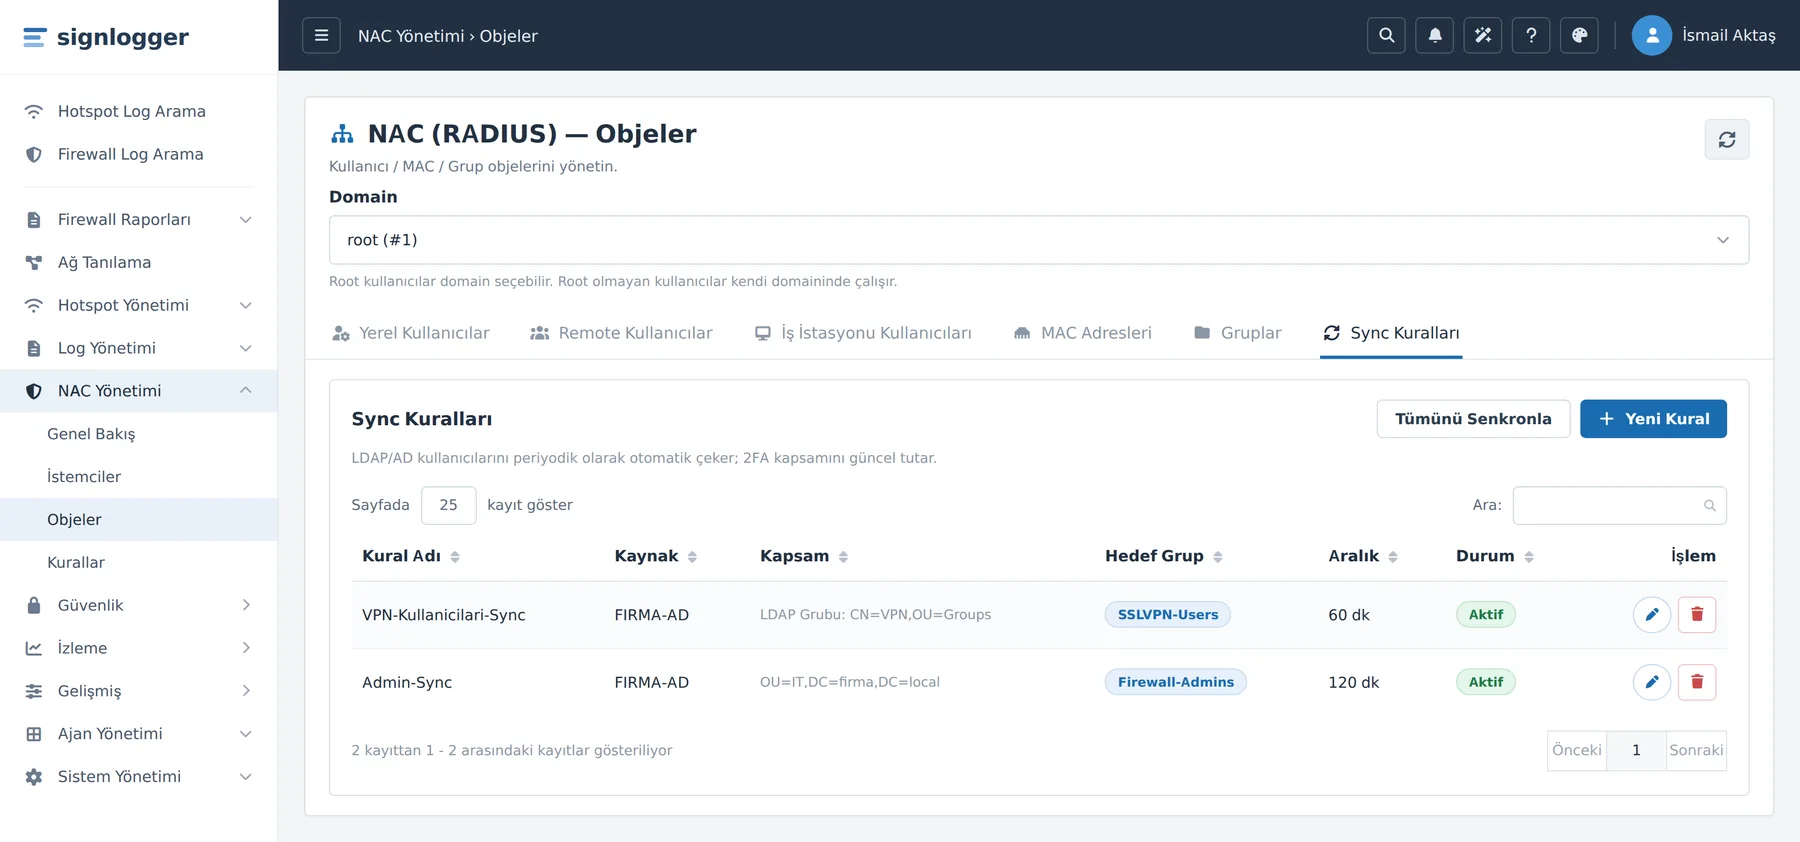
Figure 27. The Sync Rules tab. It periodically pulls directory users and assigns them to the target group.
Tips and notes
- The correct order: first the group → then adding/importing users → then each user's 2FA enrollment. Rule writing is done last, on a separate page.
- When 2FA counts as "ready": if a user has a filled-in TOTP Secret, TOTP is ready; if the Phone is filled in, SMS can be used. Which one is requested is determined in the rule.
- Verifying enrollment: The TOTP ✓ mark in the Remote Users table and the "Configured" text in the 2FA window show that the enrollment is complete.
- Phone format: For SMS 2FA, enter the number in international format (
+905551234567); otherwise sending may fail. - Deactivation: To temporarily cut off a user's access, use the deactivate button on the row; without deleting the record, RADIUS and portal access stop.
- Avoid Windows confusion: The Workstation Users tab and the Windows Logon Enforcement field belong to the agent side; do not touch them for firewall/VPN 2FA.
Rules and the Rule Wizard
The heart of the 2FA flow: here you create the RADIUS rule that catches firewall admin and VPN logins and enforces the second factor.
Menu: NAC Management → Rules
Even if the user enters the correct password, if the rule you define on this page matches, SignLogger requests the second factor and returns an Access-Accept only if 2FA succeeds.
Note: Prerequisites: for the rule to work, (1) your firewall/VPN device must be defined as a NAS under Clients, (2) the users must belong to a NAC group, and (3) global 2FA and at least one method must be enabled in 2FA Configuration.
Caution: The Agent sign-in 2FA installed on Windows machines is a separate mechanism; do not confuse it with the rules on this page. The agent 2FA method comes from the agent group, whereas the rule here applies to the logins that the firewall/VPN queries via RADIUS.
Section A — The rules list
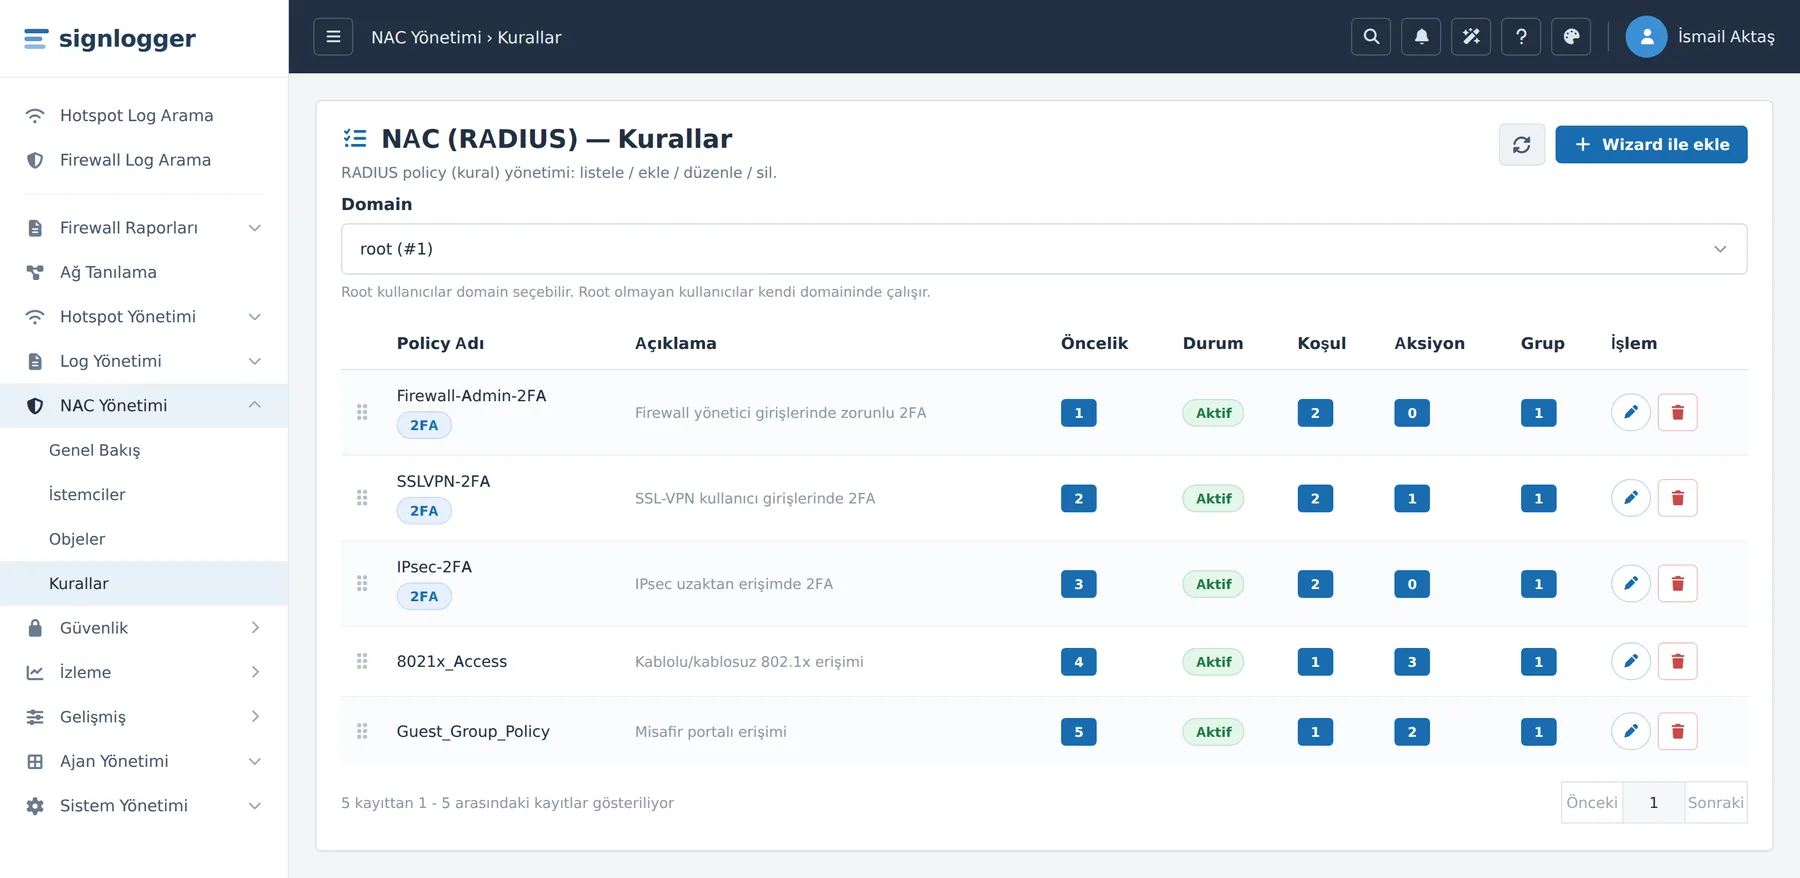
Figure 28. The NAC (RADIUS) — Rules page. The 2FA badge shows that the second factor is enabled on that rule.
| Column | Meaning (for 2FA) |
|---|---|
| Policy Name | The rule's name. Under the name, 2FA, SSO, and Trusted agent badges may appear; the 2FA badge shows that the second factor is enabled on that rule. |
| Description | The rule's purpose. |
| Priority | The evaluation order. Lower priority is evaluated first; the first matching rule is applied. |
| Status | Active / Inactive. Inactive rules are not evaluated at all. |
| Condition | The number of conditions in the rule. |
| Action | The number of actions (reply attributes) in the rule. |
| Group | The number of groups bound to the rule. |
| Action | Edit (pencil) and Delete (trash). |
The two buttons at the top: Refresh re-fetches the list from the server, and Add with Wizard opens the Rule Wizard.
Tip: Drag-and-drop priority. You can change the evaluation order by dragging the row up/down from the handle at its far left; when you drop it, the new order is saved automatically. Move narrow rules such as firewall admin above the broad rules so that they match first.
Section B — Opening the Rule Wizard
- Click the Add with Wizard button at the top right. The Policy Wizard page opens.
- Track which step you are on from the step strip at the top.
- Move between steps with the Next / Back buttons at the bottom; on the last step, Save appears.
- To back out, use the X (Cancel) or the list icon (Back to list) at the top right.

Figure 29. The five steps of the wizard.
| Step | Title | Content |
|---|---|---|
| 1 | Policy Information | Name, description, status, and 2FA Verification — 2FA is enabled here. |
| 2 | Group Selection | Which groups the rule will apply to. |
| 3 | Conditions | The conditions that catch the login (login type, group, NAS-IP, auth_type…). |
| 4 | Actions | The reply attributes to be added when it matches (optional). |
| 5 | Summary | A check before saving. |
Step 1 — Policy Information and 2FA Verification
In this step you enter the rule's identity and enable the second factor.
- In the Policy Name box, enter a distinctive name of at least 3 characters (e.g.
Firewall-Admin-2FA,SSLVPN-2FA). - In the Description box, write the rule's purpose.
- The Active box is checked by default; if you want the rule to take effect, leave it checked.
- In the 2FA Verification section, check the 2FA active box. This means "the second factor is required on a login whose conditions match."
- Select the method from the 2FA method dropdown.
- Click the Next button.
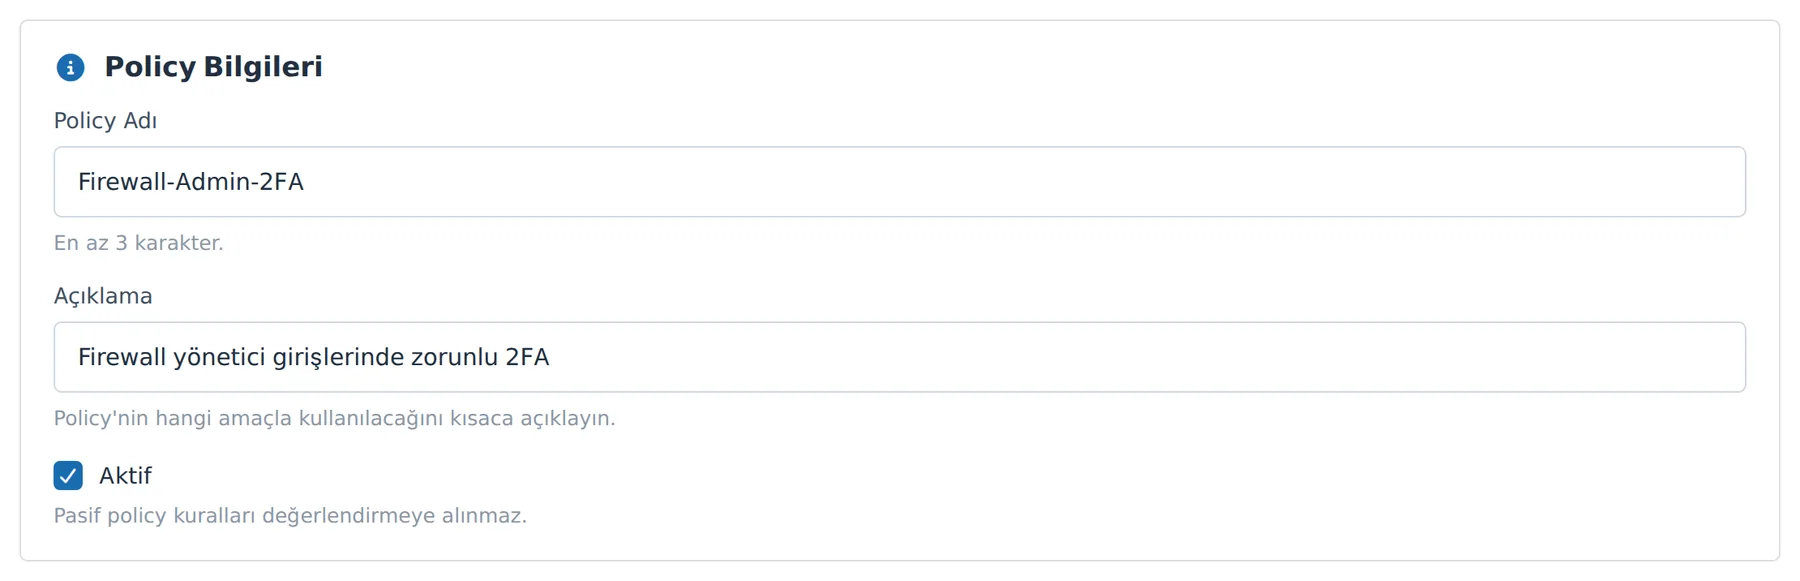
Figure 30. Step 1 — Policy Information: name, description, and active state.
Figure 31. Step 1 — 2FA Verification. This box is the only switch that turns on 2FA.
| 2FA method | What it does |
|---|---|
| totp | The TOTP code in the user's Authenticator app is requested. Recommended for admin logins. |
| sms | The second-factor code is sent to the user by SMS. |
| both | Both methods are accepted; the user uses whichever is ready. Provides flexibility for mixed user groups. |
Caution: This box is the only switch that turns on 2FA. Conditions determine only which login triggers the rule; they do not turn on the second factor. The 2FA method is saved only if 2FA active is checked.
Step 2 — Group Selection
The rule applies to the logins of the users in the groups you select.
- Click the Select Group button. The Select Group window opens.
- Filter the list by typing the group name in the Search box at the top.
- Check the relevant groups (e.g.
Firewall-Admins). - Click the Apply button; the selected groups appear as tags in the Selected Groups card.

Figure 32. Step 2 — The Selected Groups card.
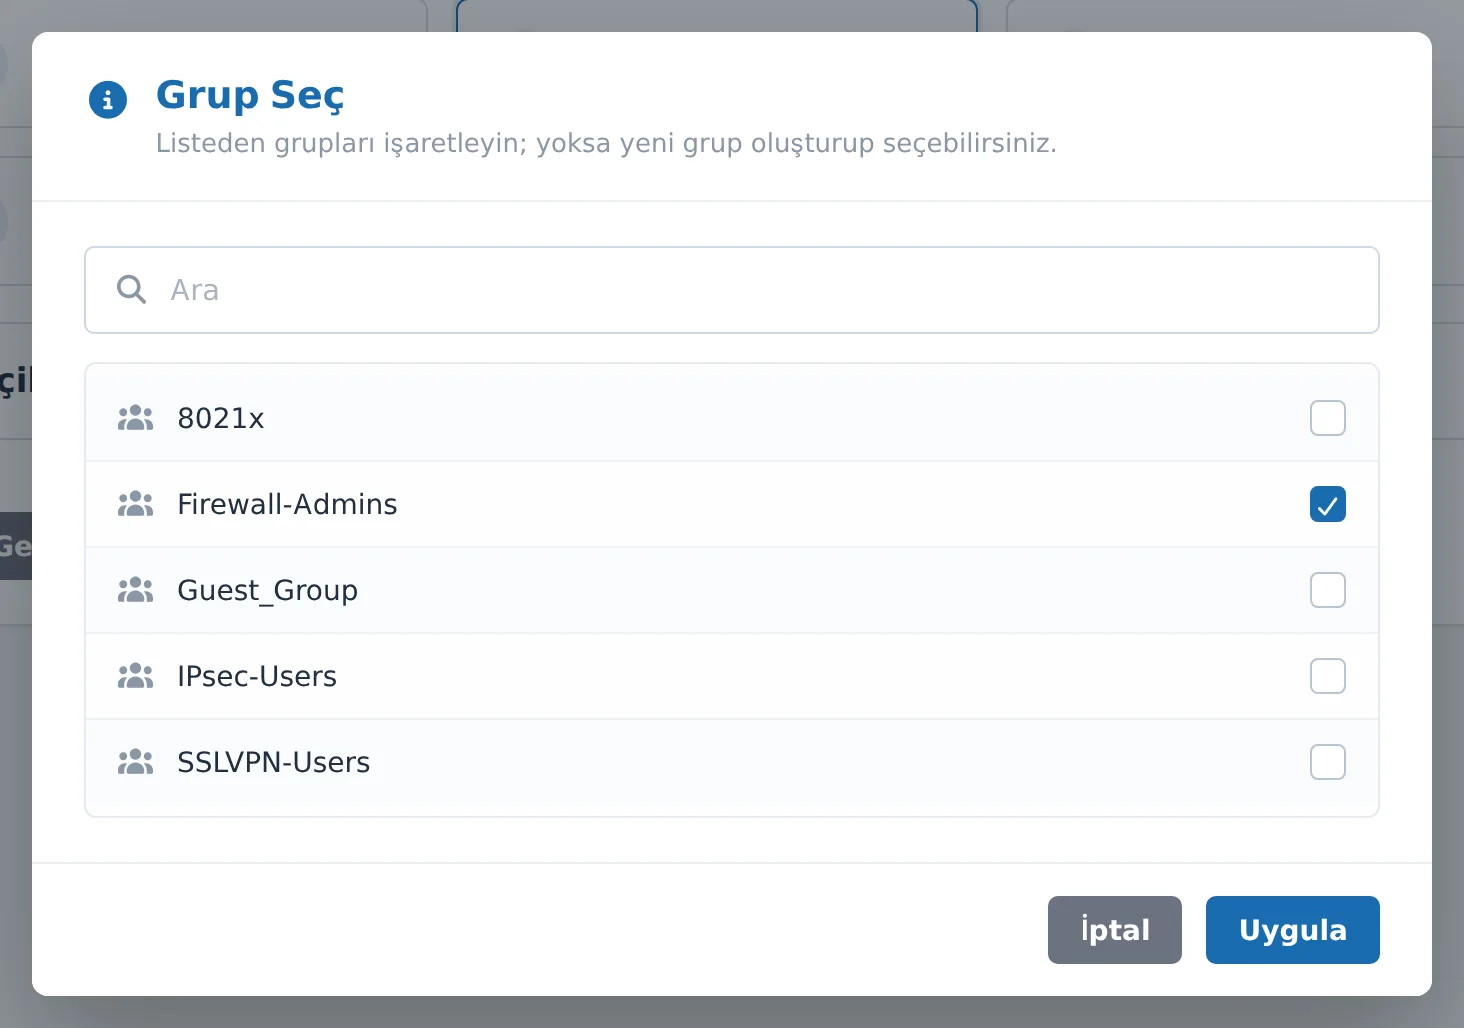
Figure 33. The Select Group window.
If there is no group — creating a new group within the wizard
The wizard's Add Group window carries one more field than the one on the Objects page, and this field is an important shortcut for the 2FA rule.
- Click the Add Group button.
- Select the group type from the Type list: User, MAC, or LDAP.
- Enter a unique name in the Group name box.
- Select the context from the Group purpose (login type) list (see the table below).
- Enter a Description, leave Active checked, and click Save. The group is created and added to the selection.
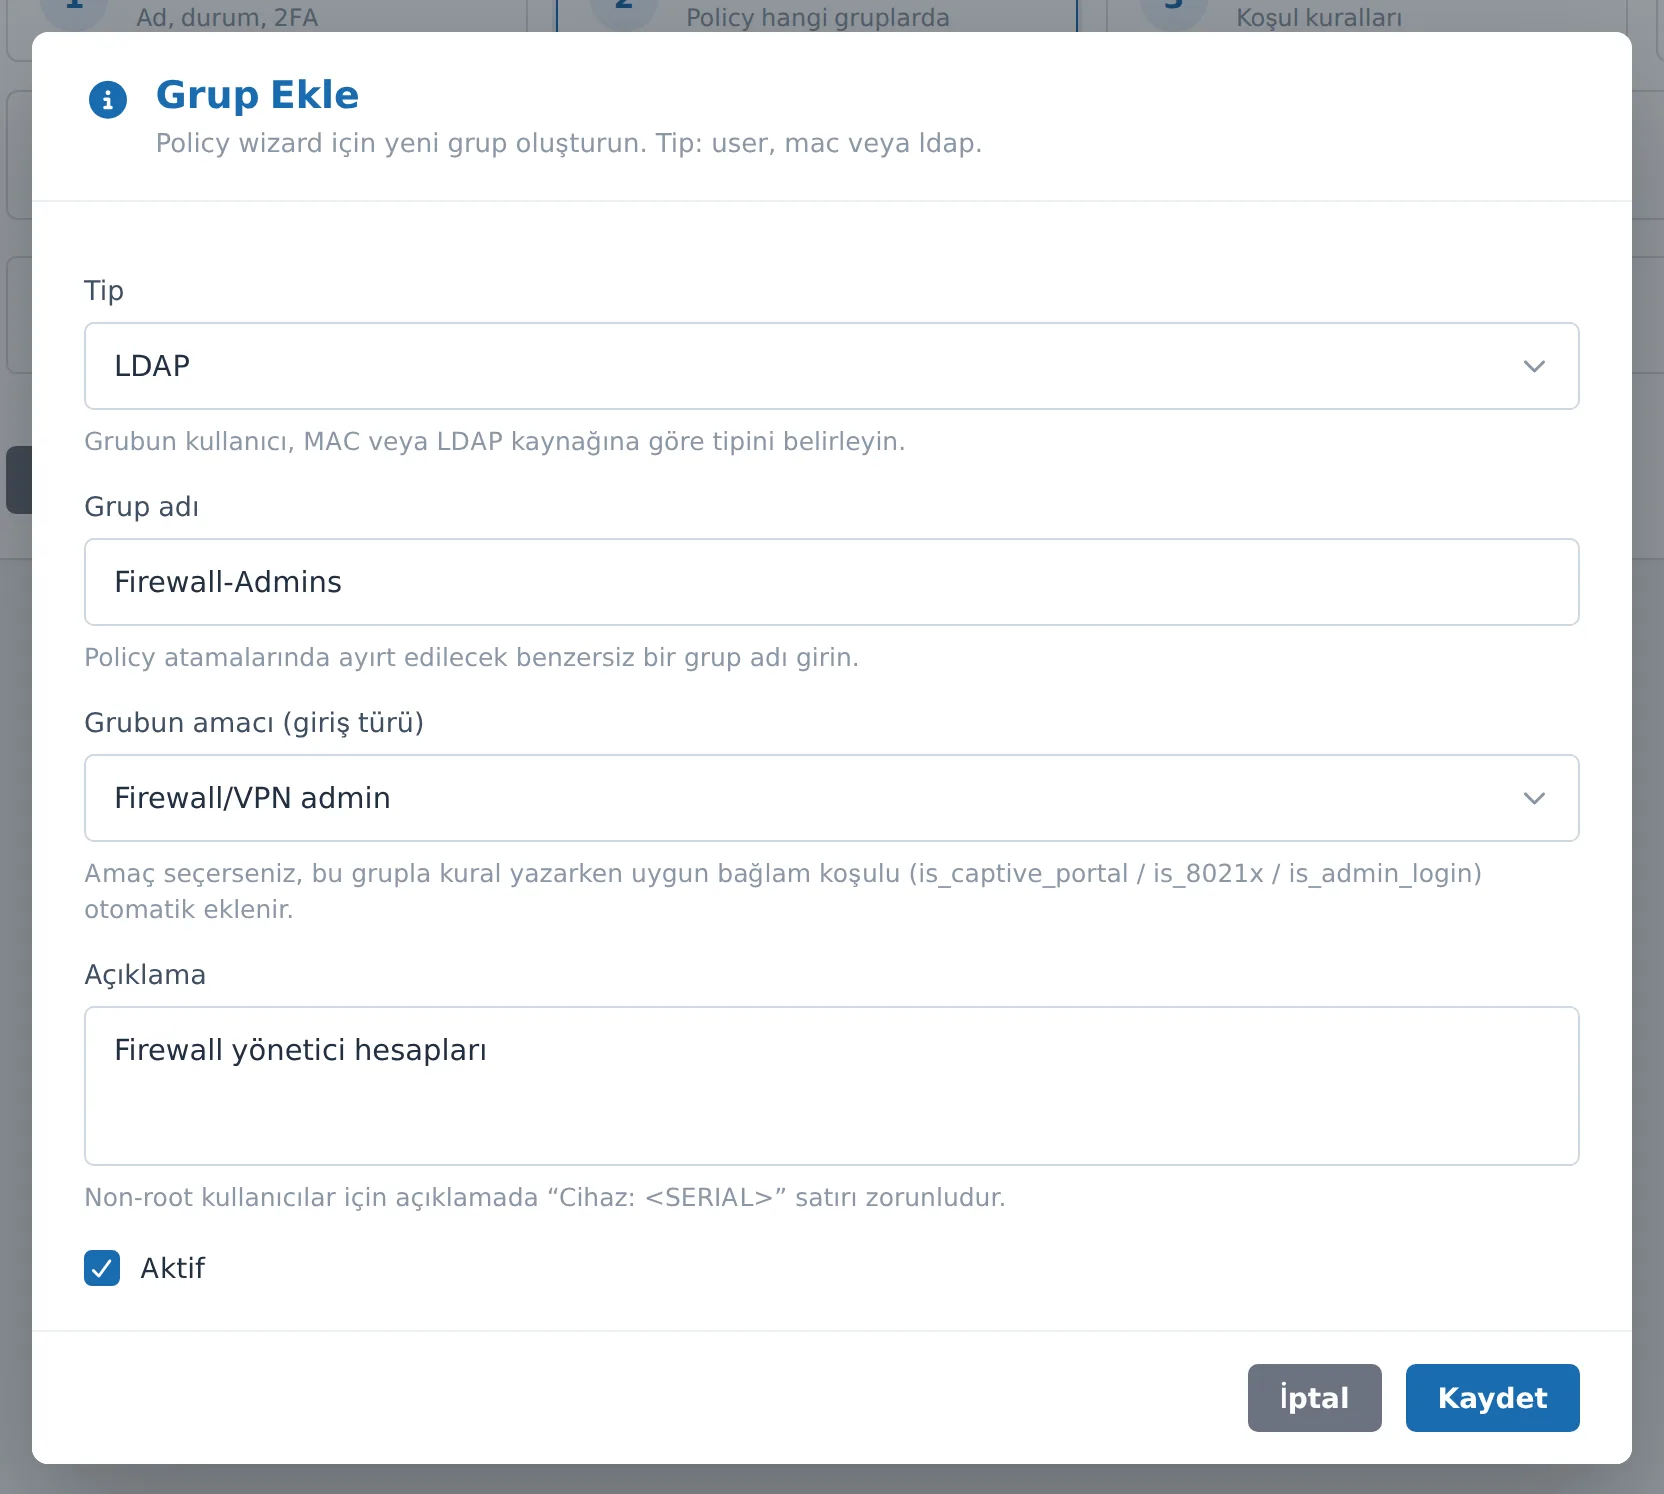
Figure 34. The Add Group window within the wizard. The "Group purpose" selection automatically adds the context condition in Step 3.
| Group purpose | Effect |
|---|---|
| Unspecified | No context condition is added automatically. |
| Guest portal | The is_captive_portal condition is added automatically when writing the rule. |
| 802.1x | The is_8021x condition is added automatically when writing the rule. |
| Firewall/VPN admin | The is_admin_login condition is added automatically when writing the rule — this is the one for firewall admin logins. |
Note: If you selected the Firewall/VPN admin purpose while creating the group, the appropriate context condition is in most cases added automatically when you move to Step 3; check it anyway.
Step 3 — Conditions (the critical step)
Conditions determine which login triggers this rule. A wrong or missing condition leads to 2FA not working at all or being triggered unnecessarily on every login. Limiting the rule to the correct context is essential.
The fastest way — login-type shortcuts
There are three shortcut buttons in the orange warning box within the card. Pressing the relevant button once adds the correct context condition with a single click and removes the other two contexts.

Figure 35. The "Which login type is this rule for?" shortcut buttons. For firewall admin logins, the one on the right is selected.
| Button | Condition added | When |
|---|---|---|
| Guest portal | is_captive_portal = true | Guest / hotspot portal logins. |
| 802.1x | is_8021x = true | Wired/wireless 802.1x (EAP) logins. |
| Firewall/VPN admin | is_admin_login = true | Firewall/VPN management (admin) logins — the main option for this guide. |
Caution: VPN user logins are different.
is_admin_logincovers only the management/admin login. SSL-VPN / IPsec users connecting remotely are not considered admins; limit these logins with the User group, NAS IP address, and/or Authentication type conditions.
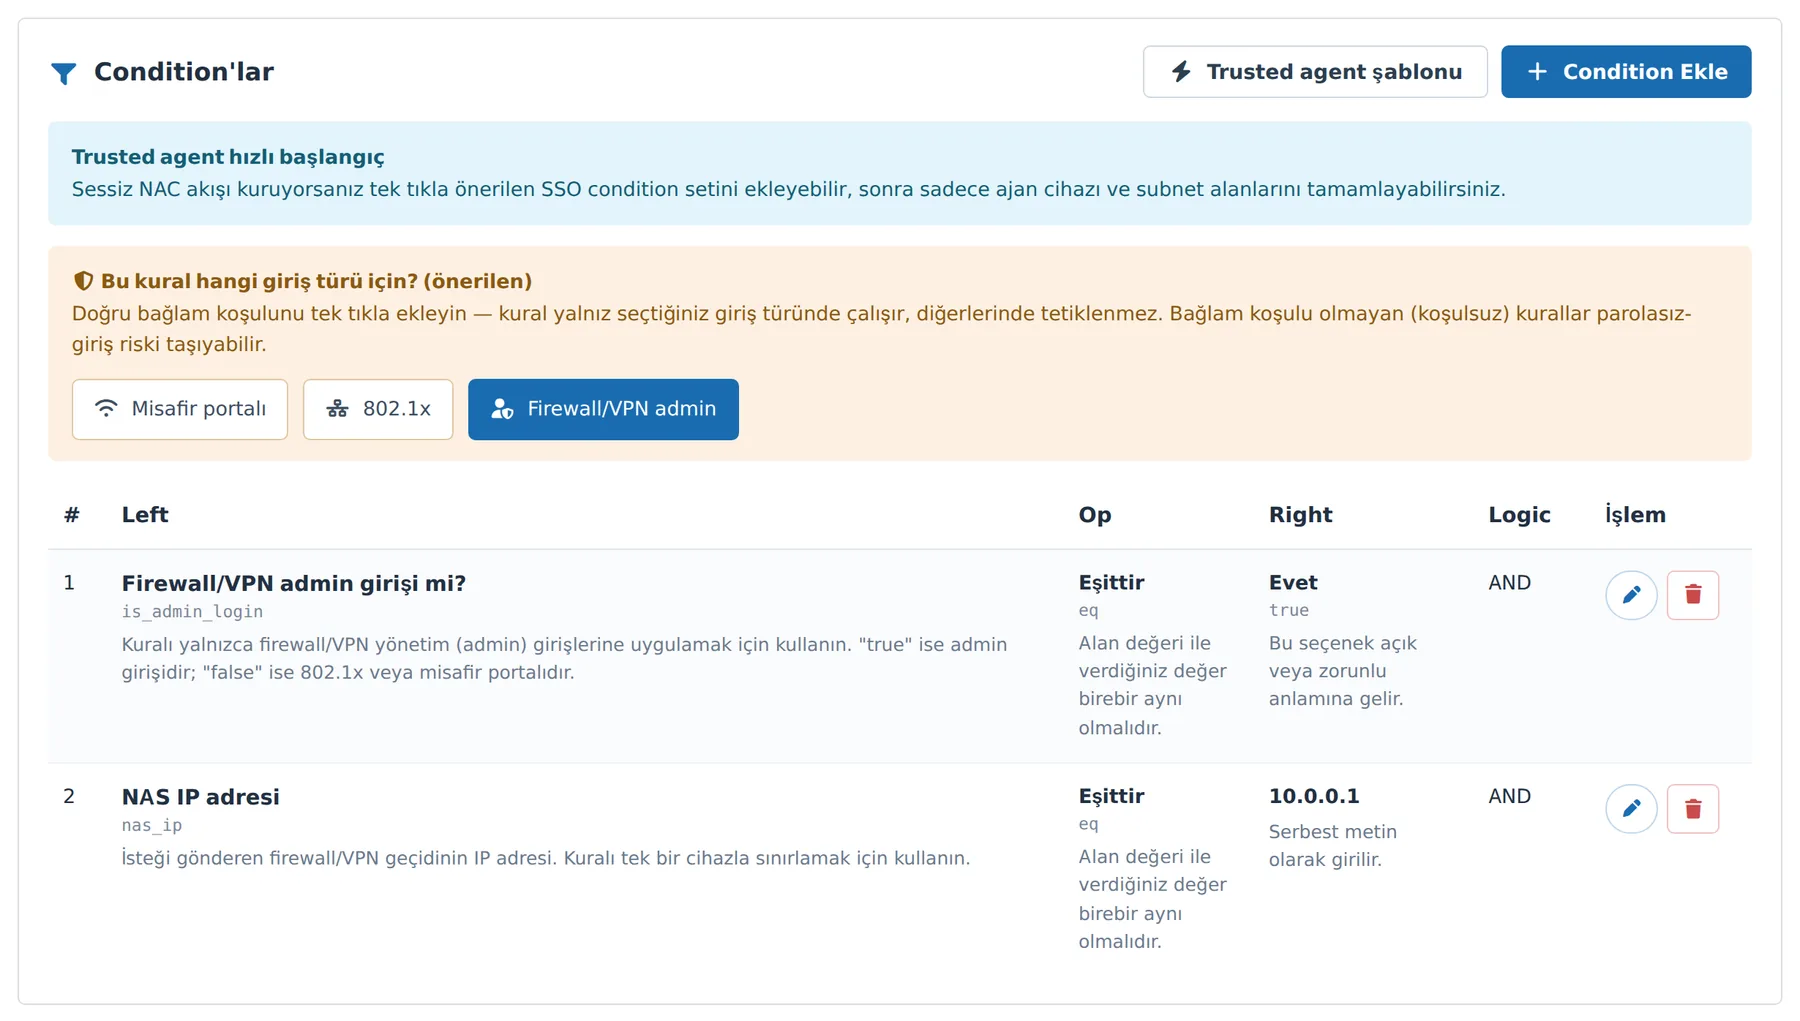
Figure 36. Step 3 — added conditions. Each row is shown together with help text explaining what the field checks.
Adding a condition manually
- Click the Add Condition button. The Condition window opens.
- Select the field to be compared from the Left operand list. What the field you select checks is explained in the blue box just below.
- Select the comparison type from the Operator list (Equals, Not equal, Contains (like), In subnet, In list …).
- Select how this condition is joined with the others from the Logic list: AND (all must be met) or OR (any one).
- Enter the value in the Right value field. If the field has possible values, a dropdown appears; otherwise free text is entered.
- The Priority field manages the evaluation order across multiple conditions; it is usually left at 0.
- Click the Save button. The condition is listed in the table below with the #, Left, Op, Right, Logic columns.
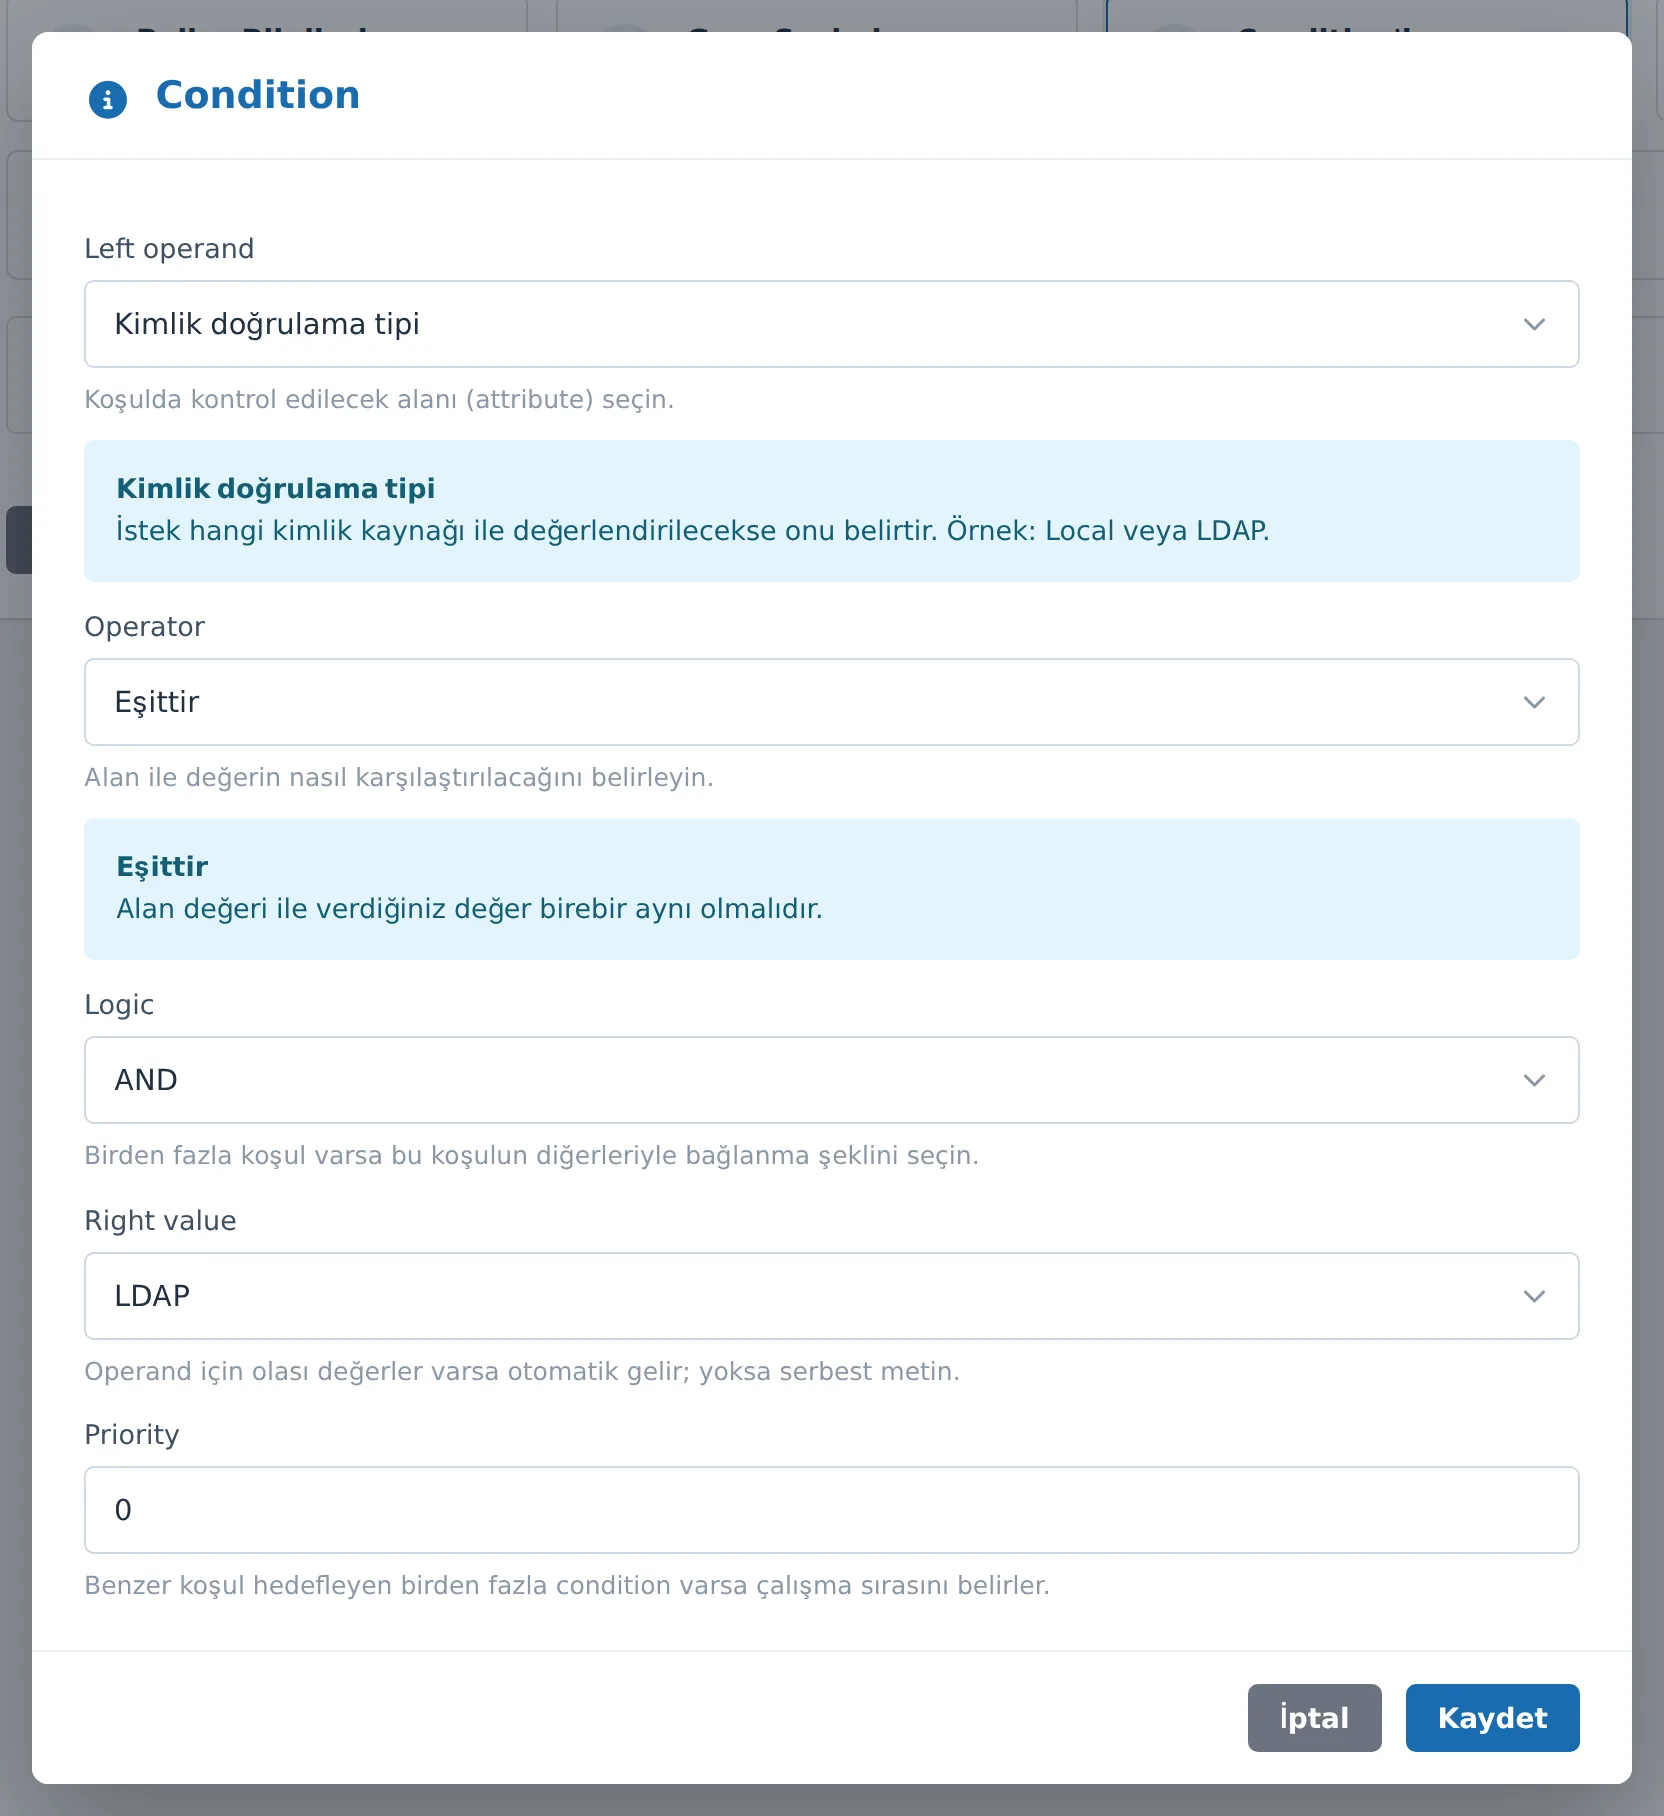
Figure 37. The Condition window. The field and operator you select are explained in the info boxes below them.
The most commonly used fields for firewall admin / VPN 2FA:
| Left operand (name in the interface) | Technical name | What it checks |
|---|---|---|
| Is it a firewall/VPN admin login? | is_admin_login | Is the login a firewall/VPN management (admin) login? It does not cover VPN end users. |
| User group | user_group | The group the user belongs to. Ideal for targeting VPN groups. |
| NAS IP address | nas_ip | The IP of the firewall sending the request. To limit the rule to a single device. |
| NAS identifier | nas_identifier | The firewall's NAS identifier; limiting by name. |
| Authentication type | auth_type | Local (application account) or LDAP (directory account). |
| Username | username | A specific username or user@domain. |
| Request IP address | request_ip | The IP the request comes from; range limiting by subnet. |
| Hour of day / Day of week | hour_of_day / day_of_week | Time-of-day or day-based limiting. |
Note: The list shows only the commonly used NAC fields. With "Show all" in the box, you can access all RADIUS attributes; the search works across all of them.
Note: The Trusted agent template button adds a ready-made SSO condition set for the silent agent/SSO flow. It is not required for the firewall admin / VPN 2FA task; it is used only when setting up agent-based silent NAC.
Step 4 — Actions (optional)
Caution: This step does not turn on 2FA. 2FA is turned on with the 2FA active box in Step 1. This step defines the additional RADIUS reply attributes to be returned to the firewall when the rule matches, and for firewall admin / VPN 2FA it can most often be left empty.
- Click the Add Action button.
- Select the attribute to be returned from the Attribute list.
- Select the application mode from the Op list: Set (
:=), Add (+=), or Remove (-=). Set is usually used. - Use Priority to set the order when the same attribute has multiple values.
- Enter the value in the Value box and click Save.
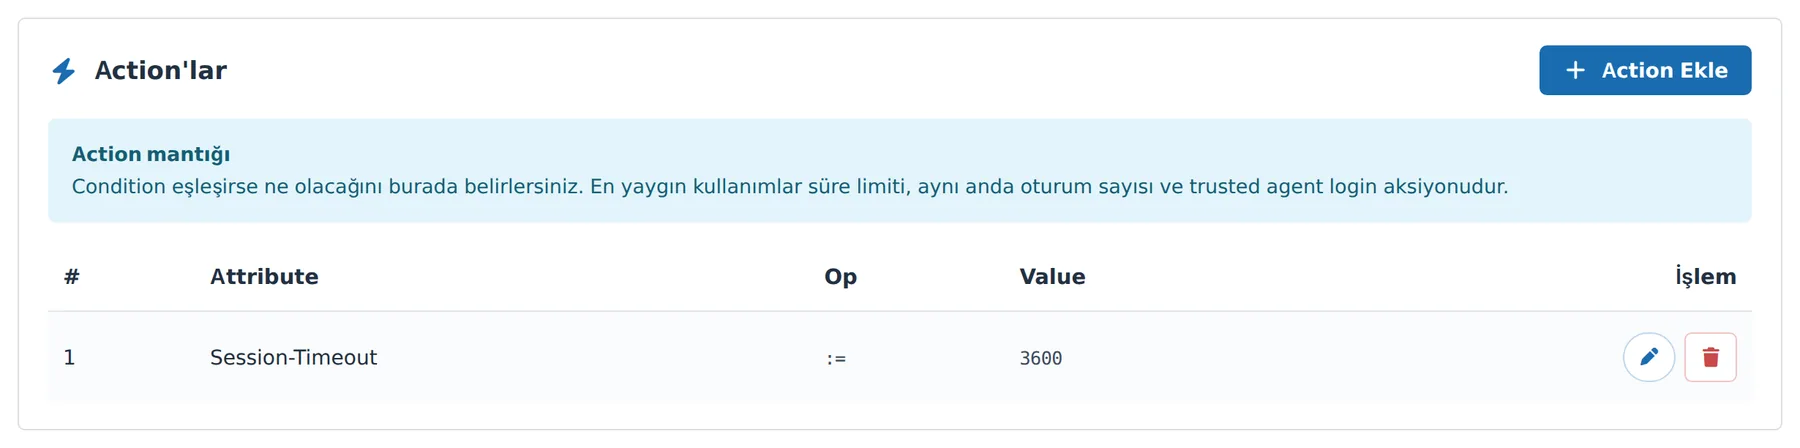
Figure 38. Step 4 — Actions. Can most often be left empty in the firewall/VPN 2FA scenario.
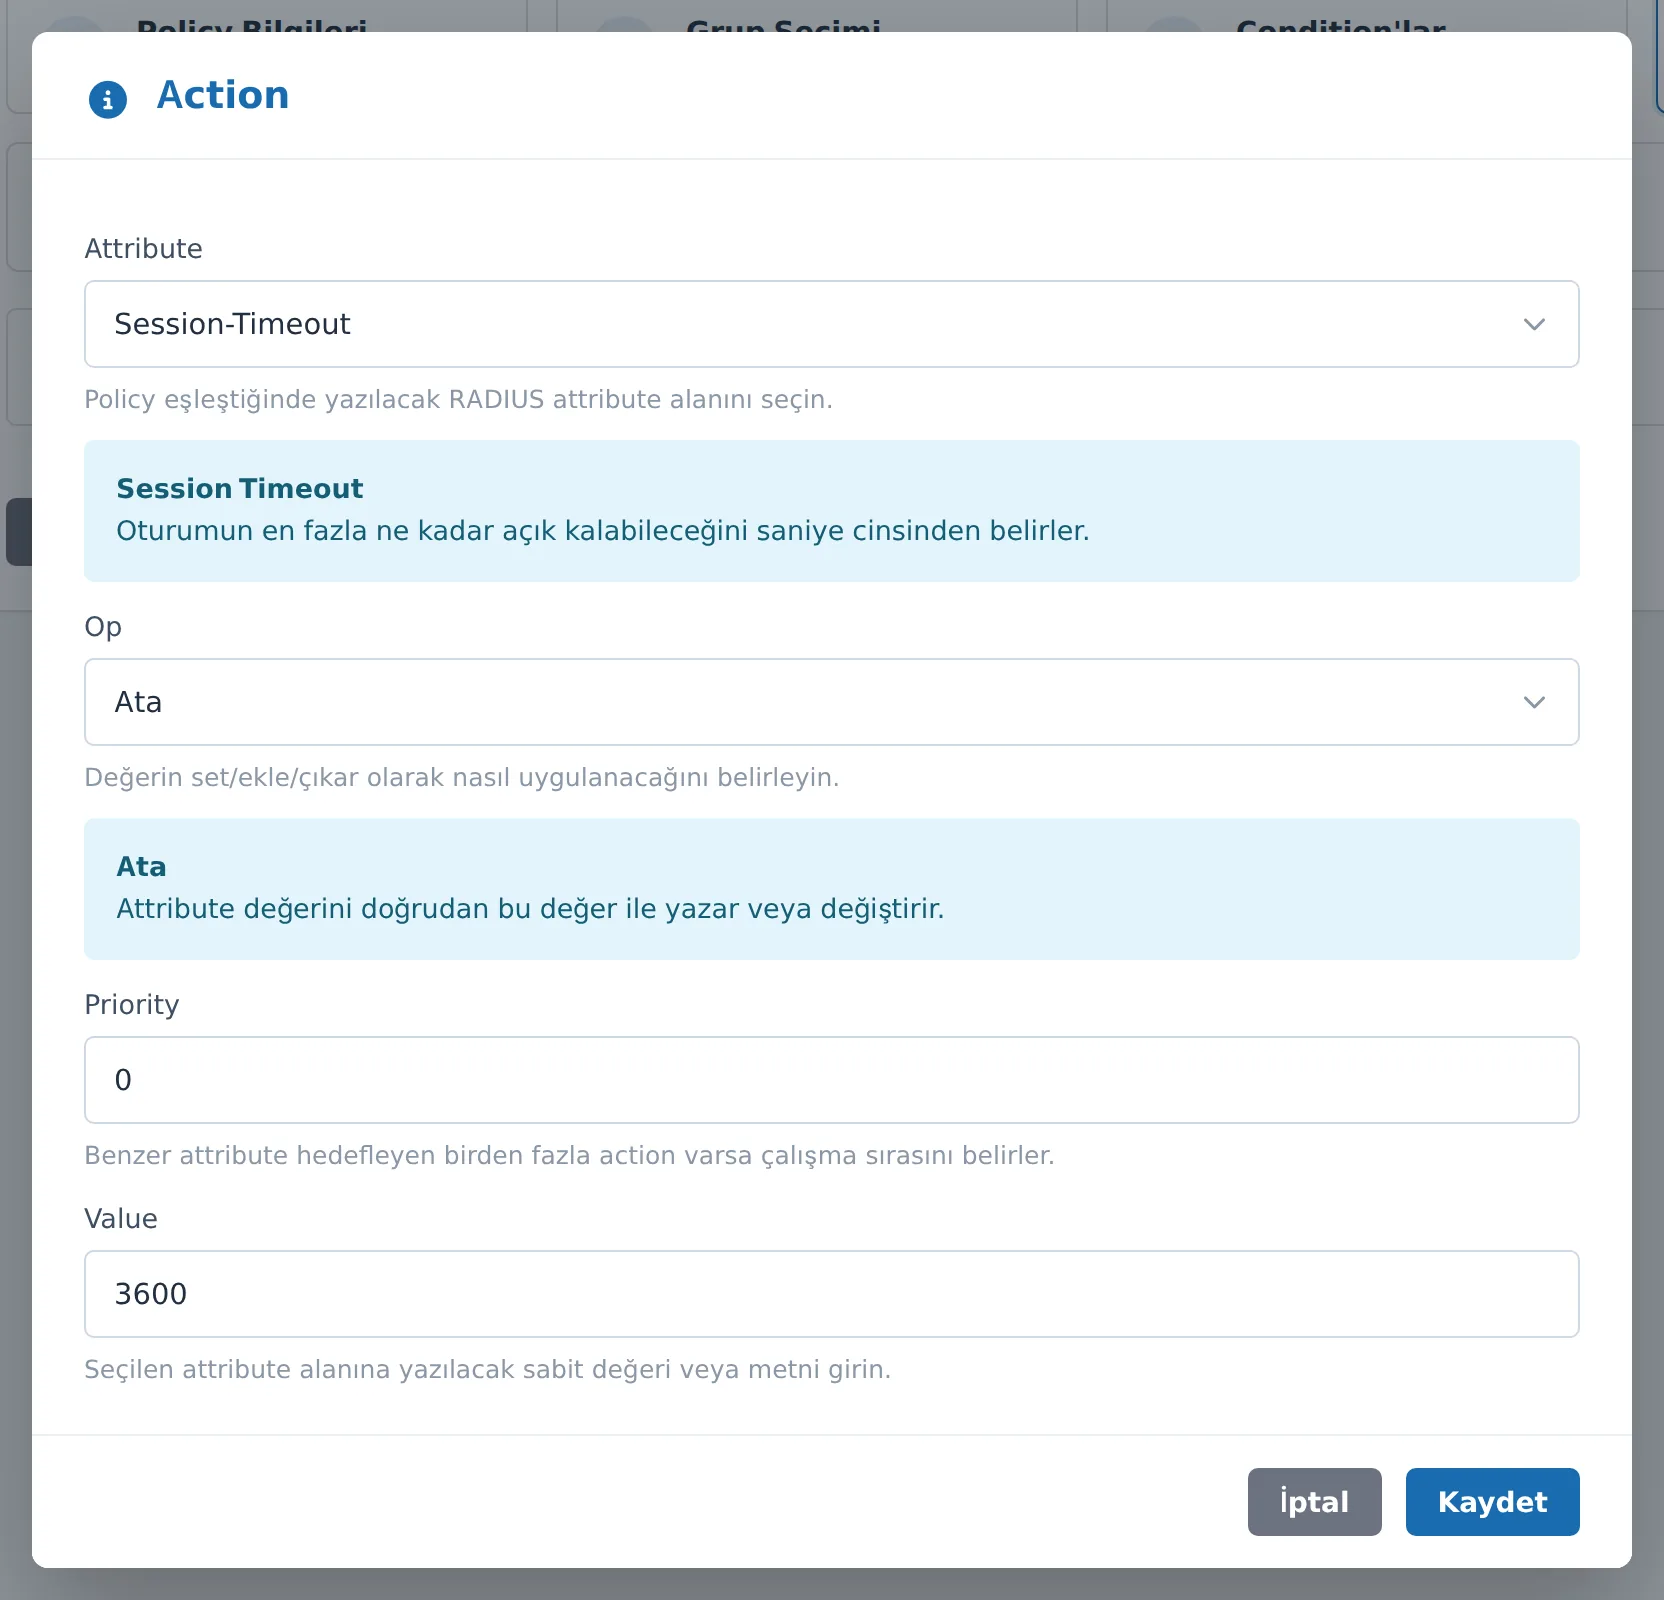
Figure 39. The Action window.
| Attribute | Function |
|---|---|
| Session-Timeout | The maximum time the session can stay open (seconds). |
| Idle-Timeout | The time after which the session closes when idle (seconds). |
| Simultaneous-Use | The number of simultaneous sessions allowed for the same user. |
Filter-Id / <Brand>-Group-Name | Assigns a group/role to the user on the firewall (for admin or VPN profile mapping). The attributes specific to brands such as Fortinet, SonicWall, Sophos, PaloAlto, and Aruba are available in the list. |
Step 5 — Summary and Save
- On the Summary step, check the Name, Description, Active, 2FA, and 2FA method values. Make sure that 2FA = Yes and the method is correct.
- Review the group / condition / action counts and lists. Verify that
is_admin_login = trueappears in a firewall admin rule, anduser_groupornas_ipin a VPN rule. - Click the Save button. If the save is successful, you return to the Rules list and the new rule appears in the table with a 2FA badge.
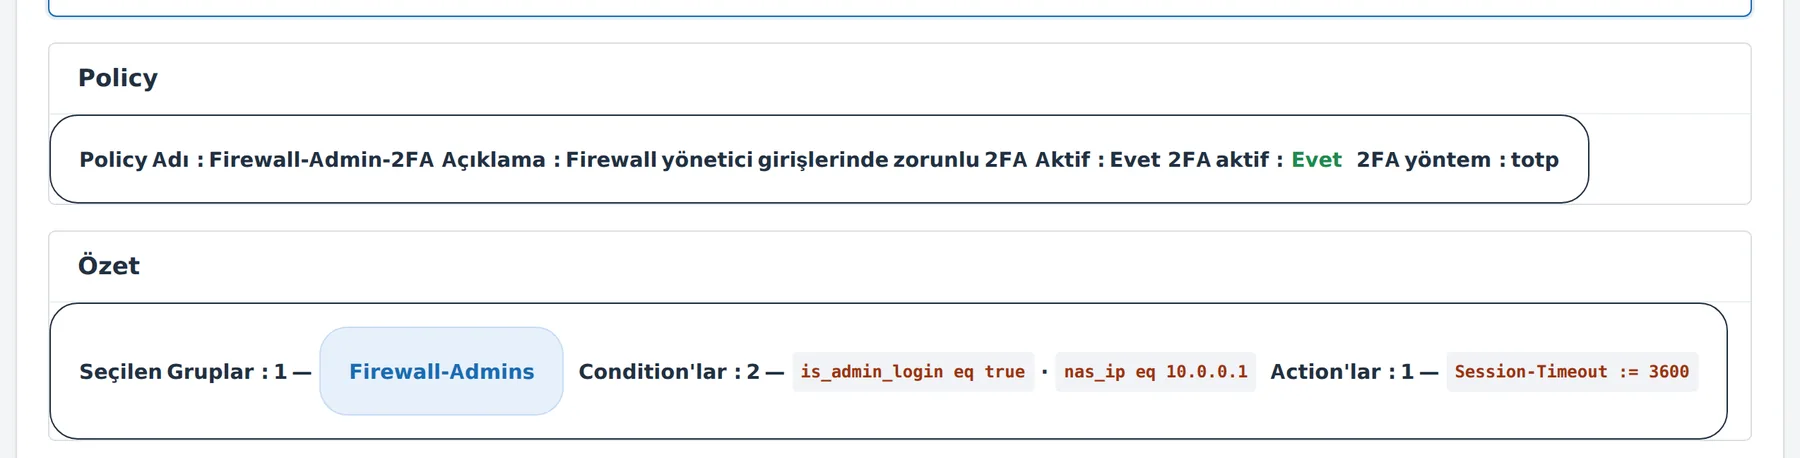
Figure 40. Step 5 — Summary. Verify that 2FA = Yes before saving.
Caution: The "No context condition" warning. If the rule has no context condition (
is_captive_portal/is_8021x/is_admin_login) or identity condition (auth_type) and 2FA is also off, the wizard warns you — such a rule matches on every login and carries a passwordless-login risk. Because you kept 2FA on, this warning normally does not appear; even so, it is recommended that you limit the rule with a context, group, or NAS-IP condition.
Tips and notes
- Priority matters. Evaluate narrow rules such as firewall admin before broad rules (lower priority = higher in the list). The first matching rule is applied.
- Admin ≠ VPN user.
is_admin_logincatches only the management login. Target VPN end-user logins with User group / NAS IP / Authentication type. - Limit to a single device. If there are many firewalls, narrow the rule with a NAS IP address condition to prevent it from triggering on the wrong devices.
- auth_type distinction. To target only local accounts, use Authentication type = Local; for AD users, use LDAP.
- An inactive rule is not evaluated. To temporarily disable a rule, uncheck the Active box instead of deleting it.
- Test after saving. Try a real login and verify that the 2FA prompt appears; if it does not, check that the conditions match the login (especially the group, NAS-IP, and context condition) and that the firewall is defined under Clients.
Sign-in Logs
Here you confirm that the setup actually works. A row is created only when the password + 2FA are completed successfully and the session is opened.
Menu: NAC Management → Monitoring → Sign-in Logs
The page lists SignLogger's RADIUS accounting records. In short: if your test login has appeared here as a row, the 2FA flow is working end to end.
Caution: This page shows only successful sessions. Logins rejected due to a wrong password or failed 2FA do not create a row here. Do not interpret rejected attempts as "not here" — this screen is a proof-of-success dashboard, not a rejection log.
Navigating to the page
- From the left menu, open the NAC Management heading.
- Click Sign-in Logs under the Monitoring group.
- On opening, the page automatically loads the last 7 days' records.
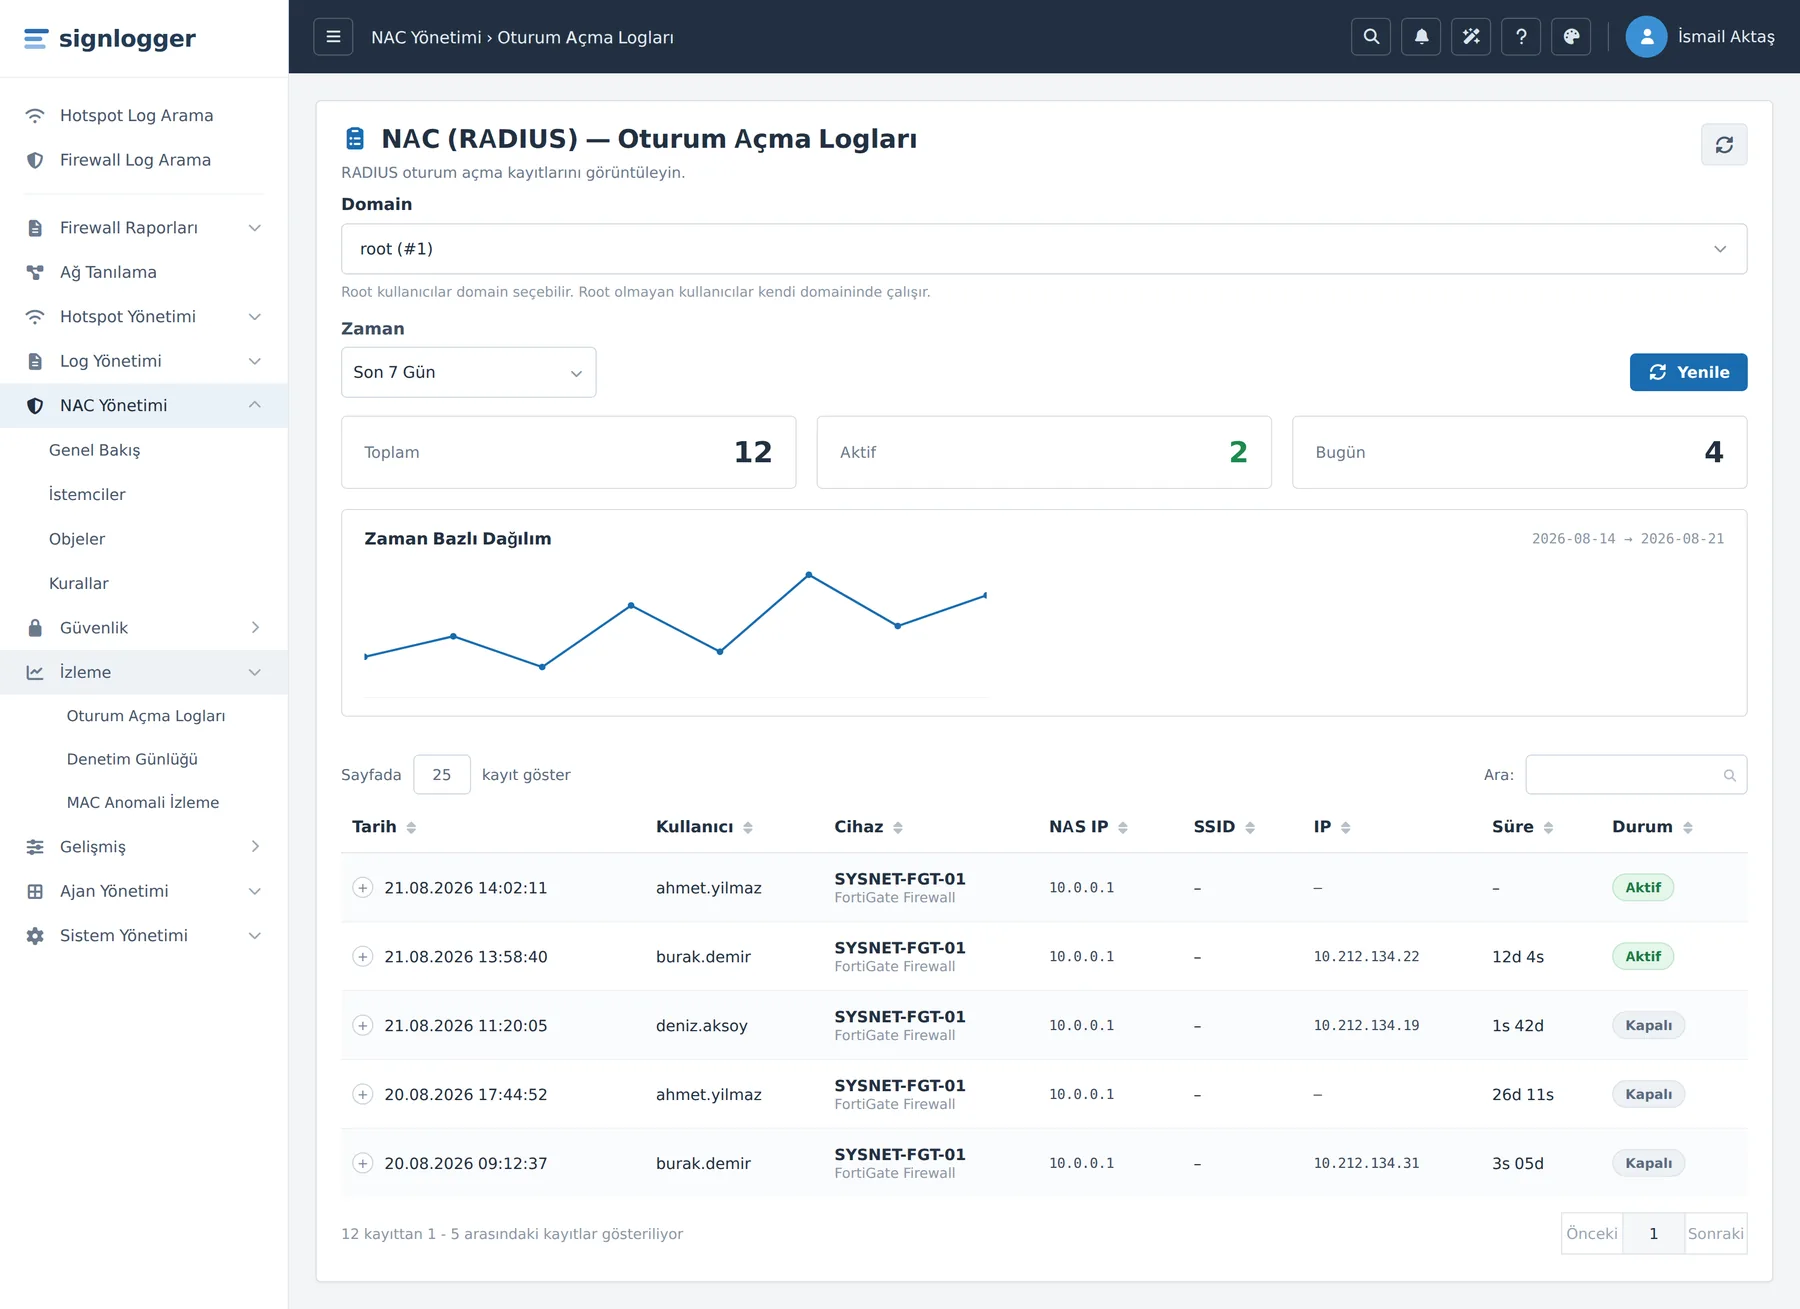
Figure 41. The Sign-in Logs page: time filter, summary cards, distribution chart, and record table.
Note: Only root (Super User) accounts see a Domain selector above the filter; for non-root accounts, the listing is automatically limited to the NAS devices in their own domain. If you are root, make sure you have selected the correct domain, otherwise your test login may fall out of scope and not appear.
Verifying a 2FA login step by step
- Set the Time dropdown to Today. The narrowest range makes it easier to find the test record you just created. (Other options: Last 7 Days, Last 30 Days.)
- Trigger the real login you want to verify: log in to the firewall admin interface with 2FA or establish a tunnel with a VPN user. Complete the password + code step.
- Click the Refresh button to refresh the list. Changing the Time box also refreshes the list automatically.
- Read the three summary cards at the top (see the table below).
- In the Time-Based Distribution chart, observe that the count rises on the day corresponding to the test moment.
- Find your test login's row in the table — the table is sorted by Date from newest to oldest by default, so your record is normally at the top.
- Verify the User, NAS IP, and Status columns on the row.

Figure 42. Summary cards: Total, Active, and Today.
| Summary card | Meaning (for 2FA verification) |
|---|---|
| Total | The total number of sessions opened in the selected time range. An increase in this number before/after the test shows that a new successful login was processed. |
| Active | The number of currently open (not-closed) sessions. A live VPN tunnel or an ongoing admin session is counted here. |
| Today | The number of sessions opened today. You quickly see whether the test you ran the same day was processed. |

Figure 43. The Time-Based Distribution chart: session count by day within the selected range.
Table columns
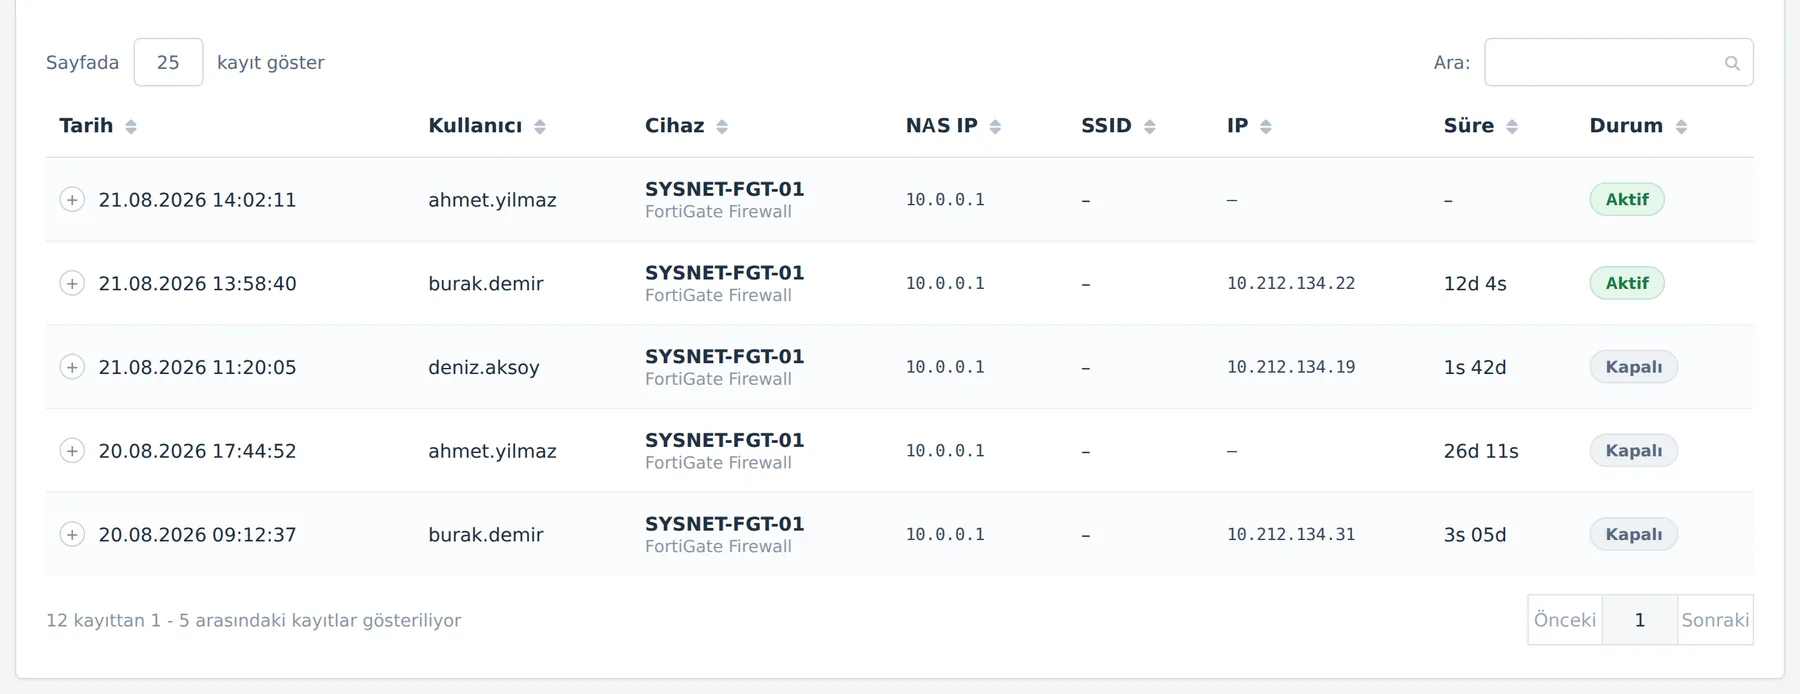
Figure 44. The record table. The User and NAS IP columns confirm that the test came from the correct source.
| Column | What it shows / how to use it in verification |
|---|---|
| Date | The session's start time. It should match the minute at which you performed your test login. |
| User | The authenticated username. This is the identity that passed the password + code step. |
| Device | The name and type of the registered device resolved from the NAS IP. If empty, that NAS IP is not yet defined in the Devices list — this does not affect the success of the login, it only reduces readability. |
| NAS IP | The IP address of the RADIUS client that relayed the login. It must be exactly the same as the IP of the device you configured for 2FA. If you see a different IP, the login came from a different NAS. |
| SSID | The Called-Station-Id value. In wireless scenarios it carries the SSID; in firewall/VPN logins it is often empty — this is normal. |
| IP | The Framed-IP assigned to the client. In VPN logins it is the client IP given to the tunnel; its being filled in shows that the user was not only authenticated but also received a tunnel. |
| Duration | The session's duration up to that moment. It may be near zero for a newly opened session. |
| Status | Active = still-open session, Closed = ended session. If you stayed connected during the test you should see Active, and if you logged out, Closed. |
Note: A row appearing here is itself proof that 2FA passed: a RADIUS session record is opened only after an
Access-Accept, and in a rule with 2FA anAccess-Acceptis not issued unless code verification succeeds.
Tips and notes
- Sort by clicking the column headers. You can click the NAS IP header to see your firewall's records together, and group your test account with User.
- There is no free-text search box on this page. Filtering is done with the Time range, column sorting, and pagination.
- If the record does not appear immediately: (1) click Refresh again — writing the accounting record can take a few seconds; (2) widen the Time range; (3) if you are root, verify that you have selected the correct Domain; (4) if the NAS IP is unexpected, check that the firewall points to this SignLogger in RADIUS and reaches it with the correct source IP.
- Make the Device column readable. If you define the NAS IP in the Devices record, it appears by device name on this screen.
- This screen is different from Windows Agent sign-in 2FA. The records here are sessions coming from firewall/VPN RADIUS clients.
- Permission warning. If the page shows a "view permission required" warning and the filters are disabled, your account does not have the
view_nacpermission.
Scenarios
Ready-made recipes for applying 2FA to three different login types on the same infrastructure. The difference is in the group and conditions you select.
All three scenarios rely on the same five links; the only things that change are the rule's conditions and the 2FA method. The table below compares the three side by side.
| Firewall admin | SSL-VPN user | IPsec user | |
|---|---|---|---|
| Group | Firewall-Admins | SSLVPN-Users | IPsec-Users |
| 2FA method | totp (or both) | both (or sms) | totp (or both) |
| Main condition | is_admin_login eq true | user_group eq SSLVPN-Users | nas_ip eq <firewall IP> |
| Additional condition (opt.) | nas_ip eq <firewall IP> | auth_type eq LDAPand/or nas_ip | user_group eq IPsec-Usersand/or auth_type |
(i) 2FA on firewall admin-panel login
Goal: Requesting a second factor after the password from administrators logging in to the firewall's management interface.
- Clients: Add the firewall as a NAS (IP/CIDR + secret).
- Firewall side: Direct admin authentication to SignLogger RADIUS (1812).
- Objects: Define the
Firewall-Adminsgroup and the administrators and enroll them in TOTP. - Rule — Step 1: 2FA active checked, 2FA method = `totp` (or
both). - Rule — Step 2: Group:
Firewall-Admins. - Rule — Step 3: With the Firewall/VPN admin button,
is_admin_logineqtrue. If there are multiple firewalls, additionallynas_ipeq<firewall IP>.
Note:
is_admin_logincatches only the management/admin login — it does not cover VPN end users.
(ii) 2FA on SSL-VPN user login
Goal: Requesting 2FA from end users connecting remotely via SSL-VPN. These are not admins.
- Clients: Add the firewall that terminates the VPN as a NAS.
- Firewall side: Direct SSL-VPN user authentication to SignLogger RADIUS.
- Objects: Create the
SSLVPN-Usersgroup and add the users or import them from LDAP and enroll them in 2FA. - Rule — Step 1: 2FA active checked, 2FA method = `both` (or
sms). - Rule — Step 2: Group:
SSLVPN-Users. - Rule — Step 3:
user_groupeqSSLVPN-Users. Optional:auth_typeeqLDAPand/ornas_ipeq<firewall IP>.
Caution: Do not use
is_admin_loginfor VPN user logins; these logins are targeted by group, NAS-IP, and identity type.
(iii) 2FA on IPsec (remote access) VPN login
Goal: Requesting 2FA from users connecting remotely via IPsec.
- Clients: Add the firewall that terminates IPsec as a NAS.
- Firewall side: Direct IPsec user authentication to SignLogger RADIUS.
- Objects: Create the
IPsec-Usersgroup, prepare the users, and enroll them in 2FA. - Rule — Step 1: 2FA active checked, 2FA method = `totp` (or
both). - Rule — Step 2: Group:
IPsec-Users. - Rule — Step 3:
nas_ipeq<firewall IP>. Optional:user_groupeqIPsec-Usersand/orauth_typeeqLDAP.
Tip: SSL-VPN and IPsec can come through the same firewall. Separate the two with distinct groups (with different
service_type/nas_identifierconditions if necessary) so that the appropriate 2FA method can be applied to each login type. Also move narrow rules (admin) above the broad rules; the first matching rule is applied.
Troubleshooting / FAQ
The root cause is most often the first broken link in the chain. Verify in order: RADIUS connectivity → rule matching → 2FA being enabled → code verification.
1. The firewall cannot connect to RADIUS / "authentication failed"
| Symptom | The login does not progress at all; the firewall errors out directly. |
| Cause | The shared secret differs on the two sides; wrong port; the firewall's source IP does not match the IP/CIDR in SignLogger. |
Solution:
- On the Clients page, verify the secret (at least 8 characters, exactly the same) and the IP/CIDR.
- Check that the server port on the firewall is 1812/udp.
- Verify that the request actually originates from the registered IP; on multi-interface devices the source IP may differ.
Note: A secret mismatch is rejected silently — you see no detail in the log. The first place to check is always the IP + secret match.
2. The password is correct but login does not happen / 2FA never starts
| Symptom | The user enters the correct password but access is denied; the code is never requested. |
| Cause | No rule matches (wrong group/condition); the user has the wrong auth_type; the user is inactive. |
Solution:
- In Rules, verify that the rule's conditions match this login: group,
nas_ip, context condition. - Use Authentication type = Local for local accounts, and LDAP for the directory.
- In Objects, check that the user is Active and in the correct group.
- Verify that the rule's Status column is Active and that its priority does not fall below a broader rule.
3. The password passes but the 2FA code is never requested
| Symptom | The user gets in directly with the password; the second factor is not requested. |
| Cause | Global 2FA is off or no method is enabled; 2FA active is not checked in the rule; the user has no 2FA enrollment. |
Solution:
- In 2FA Configuration, verify that global 2FA / Active and at least one method (TOTP/SMS) are enabled — look at the badges at the top.
- In Rules → Wizard Step 1, verify that 2FA active is checked and the method is selected; the rule's 2FA badge should appear in the list.
- In Objects, check that the user's TOTP Secret is filled in and/or the Phone is entered.
4. The TOTP code is not accepted
| Symptom | The code in the Authenticator is rejected as "invalid." |
| Cause | The phone and server clocks have drifted; the wrong or an old secret; the user scanned the QR into the wrong account. |
Solution:
- Align the server and client clocks with NTP — this is the real solution.
- Verify that the clock on the user's phone is set to automatic/network time.
- As a temporary workaround, increase the 2FA Configuration → TOTP → Window value slightly (1 → 2/3).
- If necessary, generate a new secret with Generate Secret in Objects and have the QR scanned again. The Issuer value helps the user distinguish the correct account in their app.
5. The SMS code is not accepted or never arrives
| Symptom | The SMS does not arrive, or the code that arrives is rejected. |
| Cause | The SMS provider/method does not match; the token has expired; the phone format is wrong. |
Solution:
- In 2FA Configuration → SMS, verify that the SMS Method and SMS Provider match; there should be no "no provider found" warning.
- Keep the Token Lifetime sufficient (default 300 s).
- In Objects, enter the phone in international format (
+90…).
6. 2FA works on VPN but not on admin login (or vice versa)
| Symptom | Only one of the two login types requests 2FA. |
| Cause | Admin and VPN come from different contexts; a single rule does not cover both; the priority order is reversed. |
Solution:
- Set up separate rules —
is_admin_login = truefor admin, anduser_group/nas_ipconditions for VPN. - Move the narrow (admin) rule above the broad rules — to a lower priority.
- On the firewall, verify that both admin-auth and VPN-auth are connected to the same RADIUS server.
7. I performed a test login but it does not appear in the logs
| Symptom | The login appears successful but there is no row in the Sign-in Logs. |
| Cause | The record write was delayed; the time range is narrow; the wrong domain; or the login was actually rejected. |
Solution:
- Click Refresh again; writing the accounting record can take a few seconds.
- Widen the Time (Today → Last 7 Days).
- If you are root, select the correct Domain.
- If it is still missing, the login was most likely rejected — return to items 2–5.
8. Access/permission warning; buttons disabled
| Symptom | The page opens but the Save / Add buttons are disabled and there is a yellow warning. |
| Cause | The account has no NAC permission. |
| Solution | The view_nac permission is required to view, and edit_nac to edit and save. Request the relevant NAC permissions from your system administrator. |
Quick diagnostic order
When there is a problem, proceed in this order; a lower step is not visible until the step above it is resolved:
| # | Link | How to verify |
|---|---|---|
| 1 | RADIUS connectivity | Client record (IP + secret), port 1812 on the firewall, source IP match. |
| 2 | Rule matching | Is the rule Active, do the conditions match this login, is the priority correct. |
| 3 | 2FA being enabled | Global 2FA + method badges Active, 2FA active checked in the rule. |
| 4 | User enrollment | The user has TOTP ✓ or a phone filled in, the user is Active and in the correct group. |
| 5 | Code verification | Clock synchronization (TOTP) or SMS provider/lifetime settings. |
Closing
A summary of the setup and the principles to keep in mind.
Firewall/VPN 2FA is a single chain of seven links: add the client → connect the firewall to RADIUS → enable 2FA → define the objects → enroll the users → set up the rule → test it. Each link depends on the previous one; so if you run into a problem, verifying the chain in order from the start is the fastest solution.
Once the setup is complete, administrators and VPN users are protected by a second factor alongside their passwords, and every successful login leaves a trace in the Sign-in Logs.
Five principles to keep in mind
- The only switch that turns on 2FA is the "2FA active" box in the rule. The global settings make the method available; the rule determines who is asked and on which login.
- Admin and VPN users are different.
is_admin_logincatches only the management login; VPN end users are targeted by group, NAS-IP, and identity type. - Always limit the rule with a context. Conditionless rules match on every login and lead to unexpected behavior.
- Priority order changes the outcome. The first matching rule is applied; keep narrow rules above broad ones.
- Windows agent 2FA is independent of this flow. "Windows Logon Enforcement" and "Workstation Users" are out of scope for this guide; for those, refer to the relevant agent guide.
Information to share in a support request
For situations you cannot find an answer to in this guide, contact the SYSNET support team. Sharing the following information significantly shortens the resolution time:
- The firewall/VPN device's brand, model, and software version
- The client record in SignLogger: name, IP/CIDR, type (do not share the secret)
- The state of the three badges on the 2FA Configuration screen (2FA / SMS / TOTP)
- The relevant rule's name, priority, conditions, and 2FA method
- When the problem started and the setting changes made beforehand
- Screenshots if any, and the full text of the error message on the firewall side
Caution: In support correspondence, never share the shared secret, user passwords, or TOTP secrets. These are enough to take over the entire authentication.