This guide explains, end to end, what the NAC (Network Access Control) module inside SignLogger is, how it works and how to manage it day to day. It is written for system administrators and operators; no coding knowledge is required. Real product screenshots are used throughout, so you can easily match each setting to the screen it lives on.
1. What is NAC and what is it for?
NAC is a central access-control system that decides who connects to your network, with which device and with which permissions. It answers two core questions. The first is authentication — “is this person or device really who they claim to be?” The second is authorization — “now that they are verified, which network, which VLAN and which rules may they access?”
In SignLogger, the NAC module runs on the industry-standard RADIUS protocol and a policy engine behind it. From a single user pool you can manage two major use cases at the same time. The first is the captive portal (hotspot) scenario: at guest, hotel or cafe entry points, the user signs in from a welcome page with their name, an SMS code, a room number or identity details. The second is the 802.1x scenario: staff and device access to the corporate wired or wireless network is verified over the switch or access point using EAP (PEAP / EAP-TLS).
2. How does the system work?
When a user or device wants to join the network, the request first reaches the network device (firewall, switch or access point). The network device forwards this request to SignLogger over the RADIUS protocol. SignLogger first verifies the identity (local password or LDAP/AD), asks for a second factor if required (TOTP, SMS, email), checks that the account is active and not expired, resolves the user’s group membership and evaluates the policies bound to that group. The result is either an “accept” decision (with optional extra rules such as a VLAN or a time limit) or a “reject” decision, which is returned to the network device.
Five core concepts make up this flow. The client (NAS) is your network device that sends the RADIUS request and secures it with a shared secret. The user (identity) is the account to be verified; it can be a local password account, a remote account over LDAP/AD or a MAC-based device record. The group is the set that users are collected into, and policies are bound to groups rather than to individual users. The policy (rule) is the “if these conditions are met, then do this” logic; for example, “if it is an 802.1x connection and the Staff group, assign VLAN 10.” The policy engine is the core that evaluates these conditions on every request and produces the decision.
3. Getting to know the interface and in-page help
NAC-related administration is spread across two menu headings: NAC Management (core configuration) and Hotspot Management (captive-portal-focused daily tasks). Pages in both menus follow the same logic: a short description of the page’s purpose at the top, a Domain selector below it (in multi-tenant deployments), and then the list and action buttons.
The question-mark icon in the top-right corner of every page opens a help panel specific to that page. The panel explains what the page does, why each field is required, common mistakes and the troubleshooting order. When you are unsure about a setting, this is the first place to look.
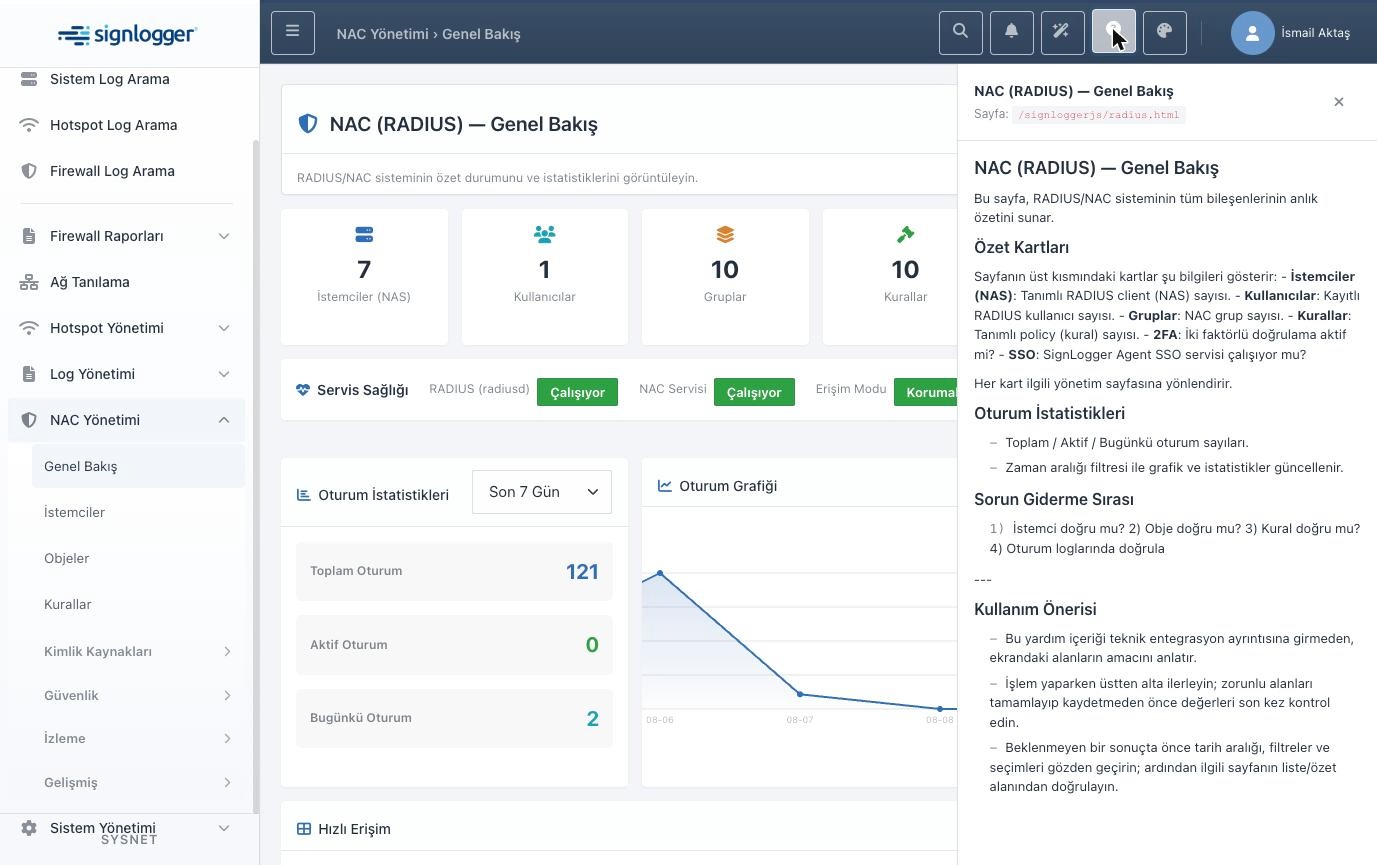
Figure 1 — The question-mark icon at the top right opens the help panel specific to the page you are on.
4. The NAC Management menu
4.1. Overview
Overview is the system’s summary dashboard. The cards at the top show the number of defined clients (NAS), registered users, groups and rules, and whether 2FA is enabled; clicking each card takes you to the related management page. The Service Health strip just below shows whether the RADIUS and NAC services are running and the access mode. The session statistics and chart in the lower section give the total, active and daily session counts for the time range you select.
When a problem occurs, the recommended review order is: first check whether the client definition is correct, then whether the object (user/group) is correct, then whether the rule is correct, and finally confirm the outcome from the session logs.
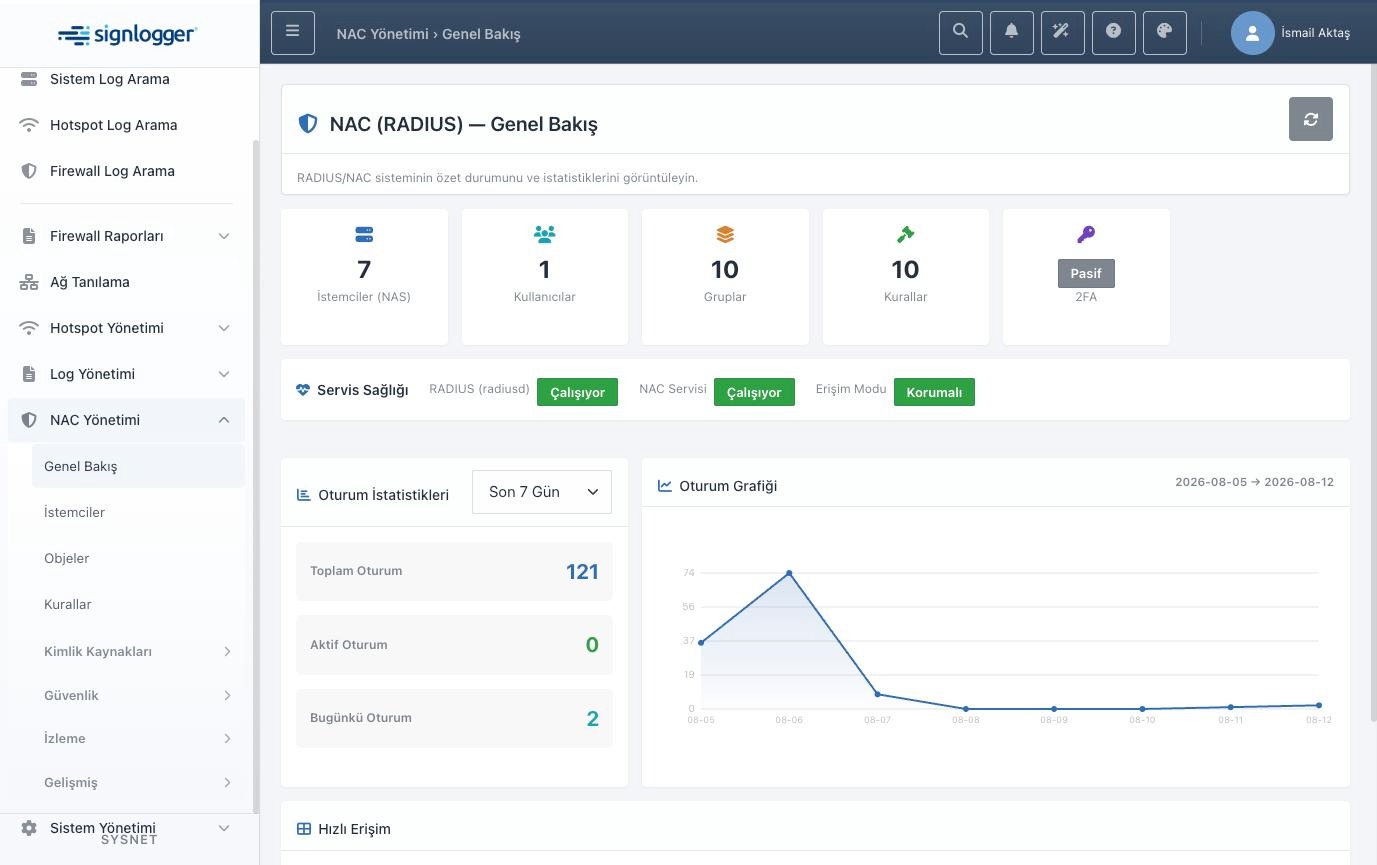
Figure 2 — NAC Overview screen: summary cards, service health and session statistics.
4.2. Clients (your network devices)
The Clients page is where you define the network devices (firewall, switch, access point) that will send RADIUS requests. The most important rule here is this: if a device is not defined here, requests coming from that device are ignored. When you deploy a new firewall, switch or access point, your first task should be to add the device here.
The list shows the client name, IP or network block, description, device type and device serial number. In multi-tenant deployments, the Domain selector at the top lets you change which customer/tenant records you see.
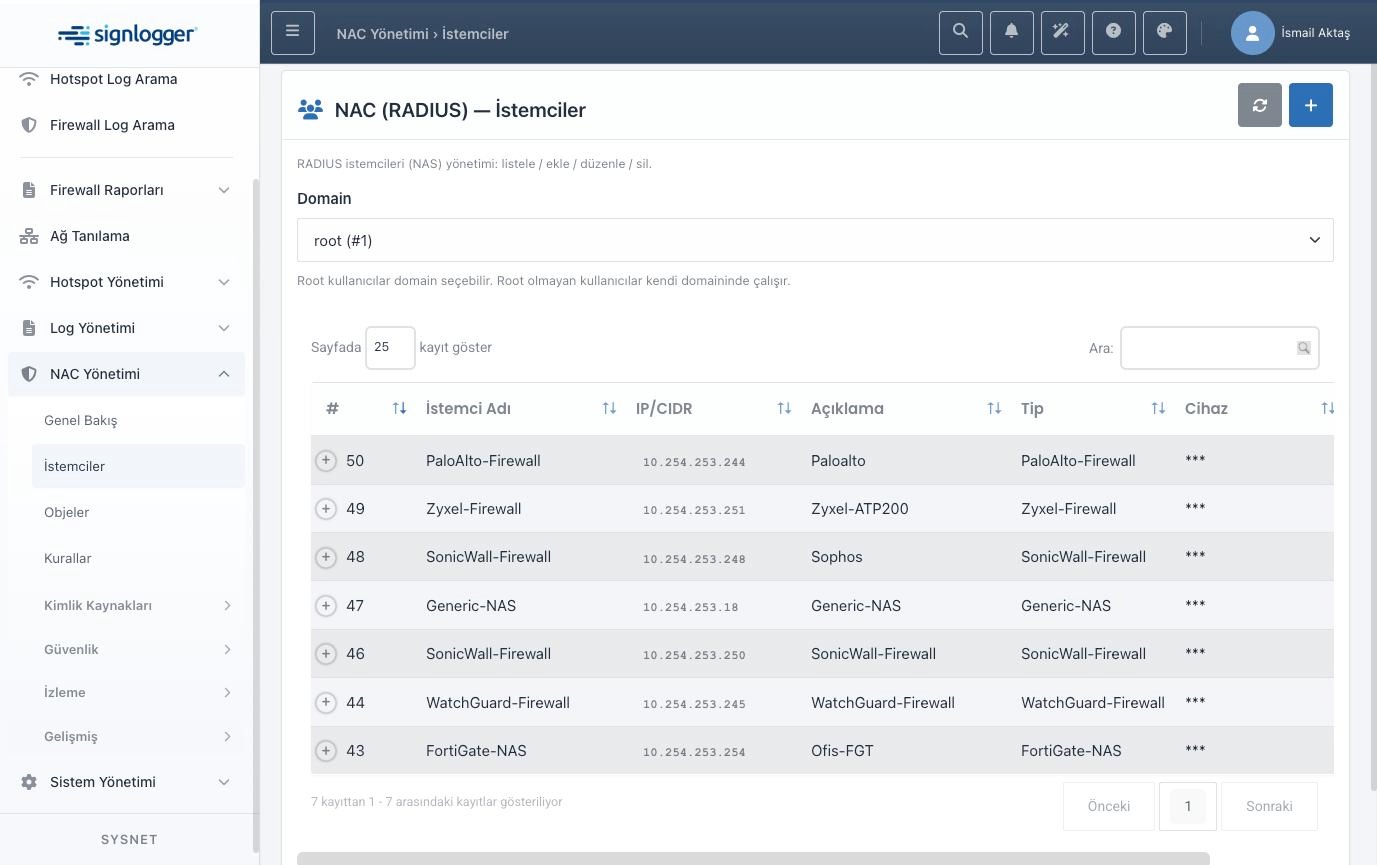
Figure 3 — Client list: defined firewalls, switches and access points. Device serial numbers are masked with *** for privacy.
The plus button at the top right opens the new-client window. The client name is simply a label that is meaningful to you. In the IP/CIDR field you enter the device’s address as seen by RADIUS, either as a single IP or as a network block. The description is an optional note. The Secret (shared secret) field is the trust key between the device and SignLogger and must exactly match the value you enter in the device’s own RADIUS settings; if left blank while editing, the existing value is kept. The Type field is for selecting the device brand/type and helps choose the correct method for operations such as session disconnection.
The two most common mistakes are: entering the wrong IP/CIDR, which makes requests appear to come from a different device, and entering a secret that differs from the one on the device, which makes authentication fail continuously.
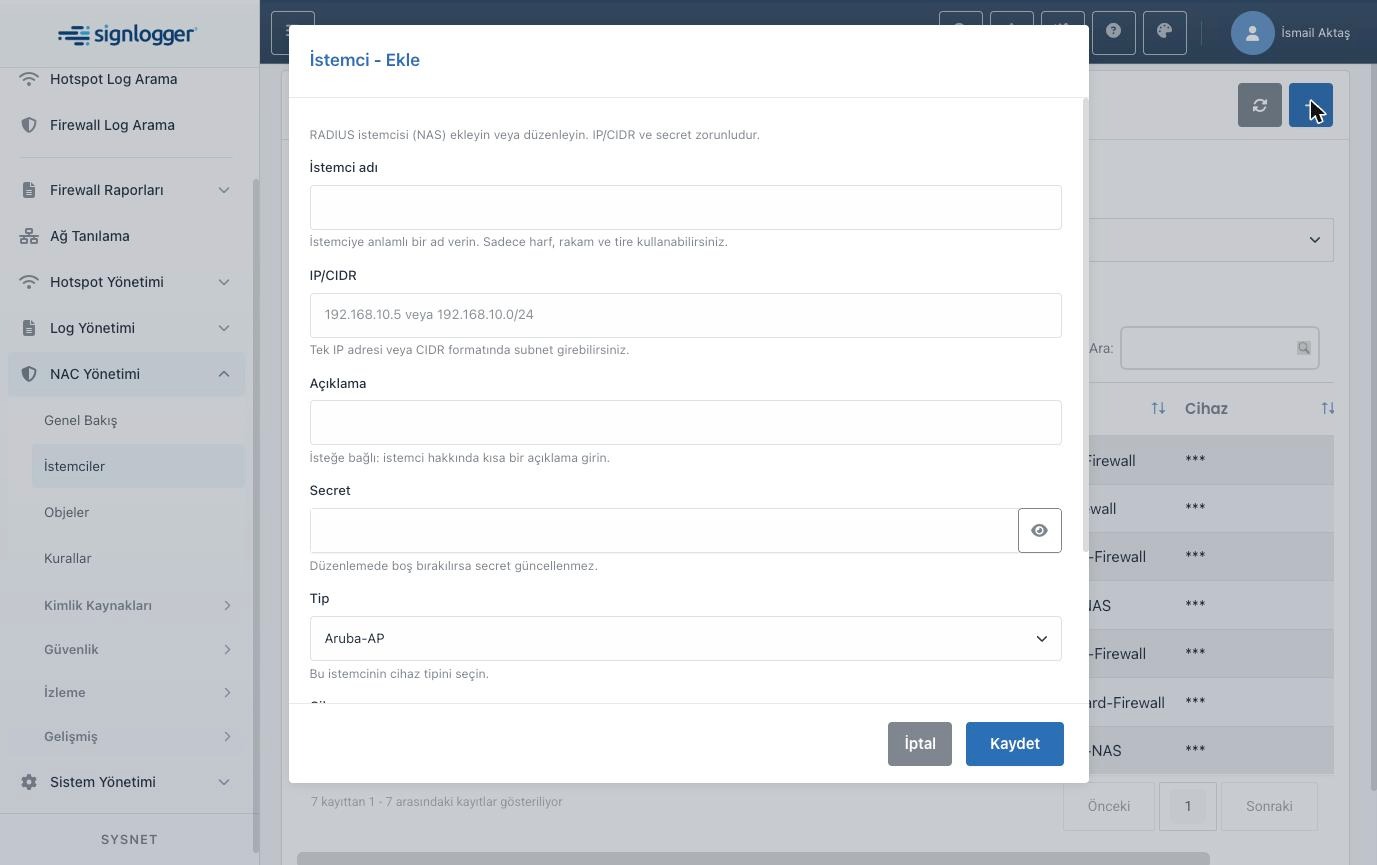
Figure 4 — Add-client window: name, IP/CIDR, description, shared secret and device type.
4.3. Objects: users, groups and devices
The Objects page is the heart of NAC. Who and which devices are recognized, which groups they belong to and which users are pulled automatically from the directory (LDAP/AD) are all managed here. The page is divided into five tabs: Local Users, Remote Users, MAC Addresses, Groups and Sync Rules.
The Local Users tab itself splits into two views. The Network User view lists staff and device accounts that will connect to the network via 802.1x. The Captive Portal User view shows guest accounts created through the portal. The key point is this: these two tabs are two different views of the same user pool; which tab an account appears in is determined automatically by the intended use and group you select when adding it.
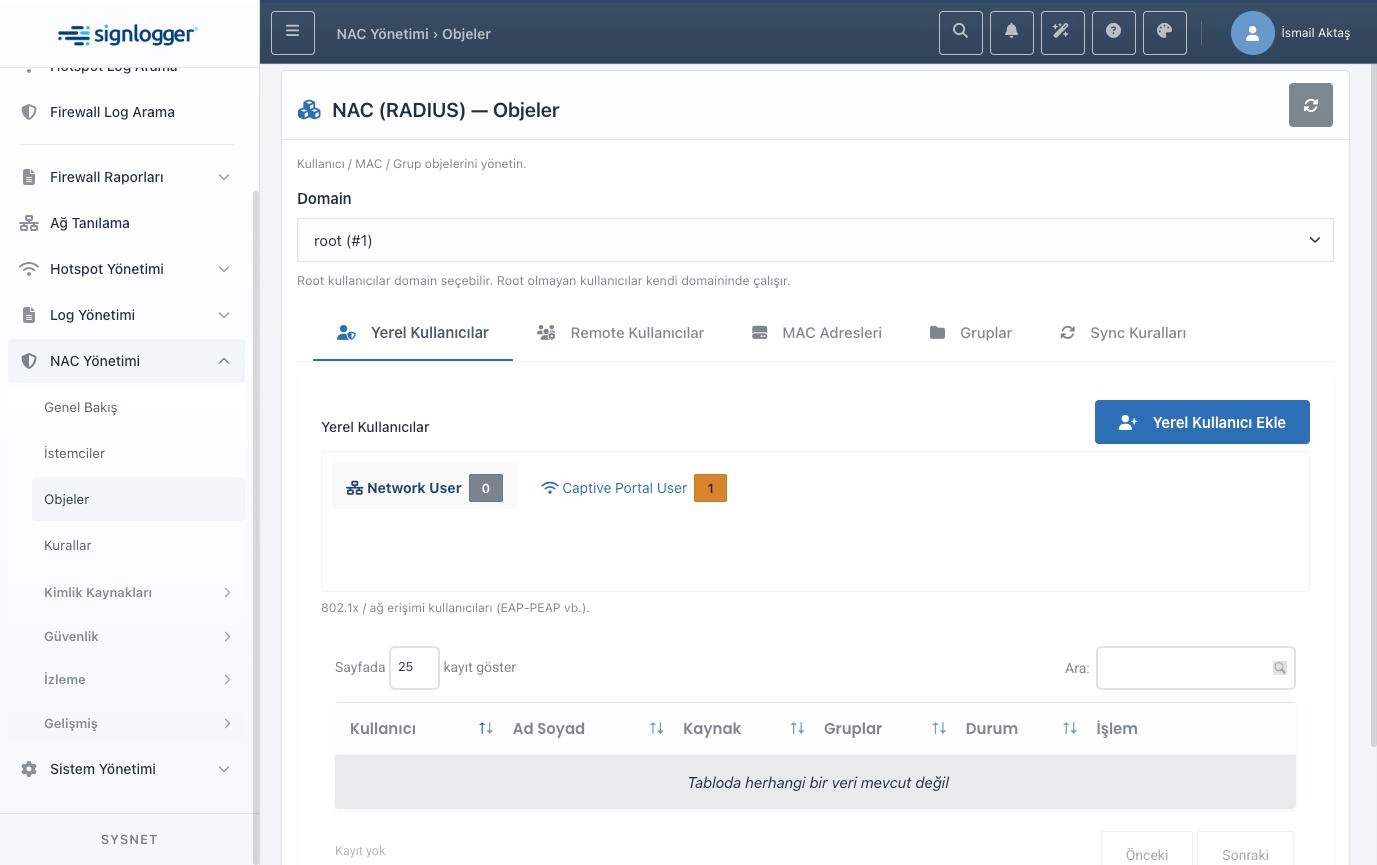
Figure 5 — Objects / Local Users: the Network User view (802.1x accounts).
The Captive Portal User view lists guest accounts. The Source column shows how the account was created (for example, automatically from the portal or added manually); the Status column shows whether the account is active. Using the buttons at the end of each row you can edit, deactivate, attach 2FA to or delete the account. Deactivating an account is more than just marking it in the list: access is cut immediately, any active session is dropped and new sign-in attempts are rejected. This is the safest method for a temporary suspension.
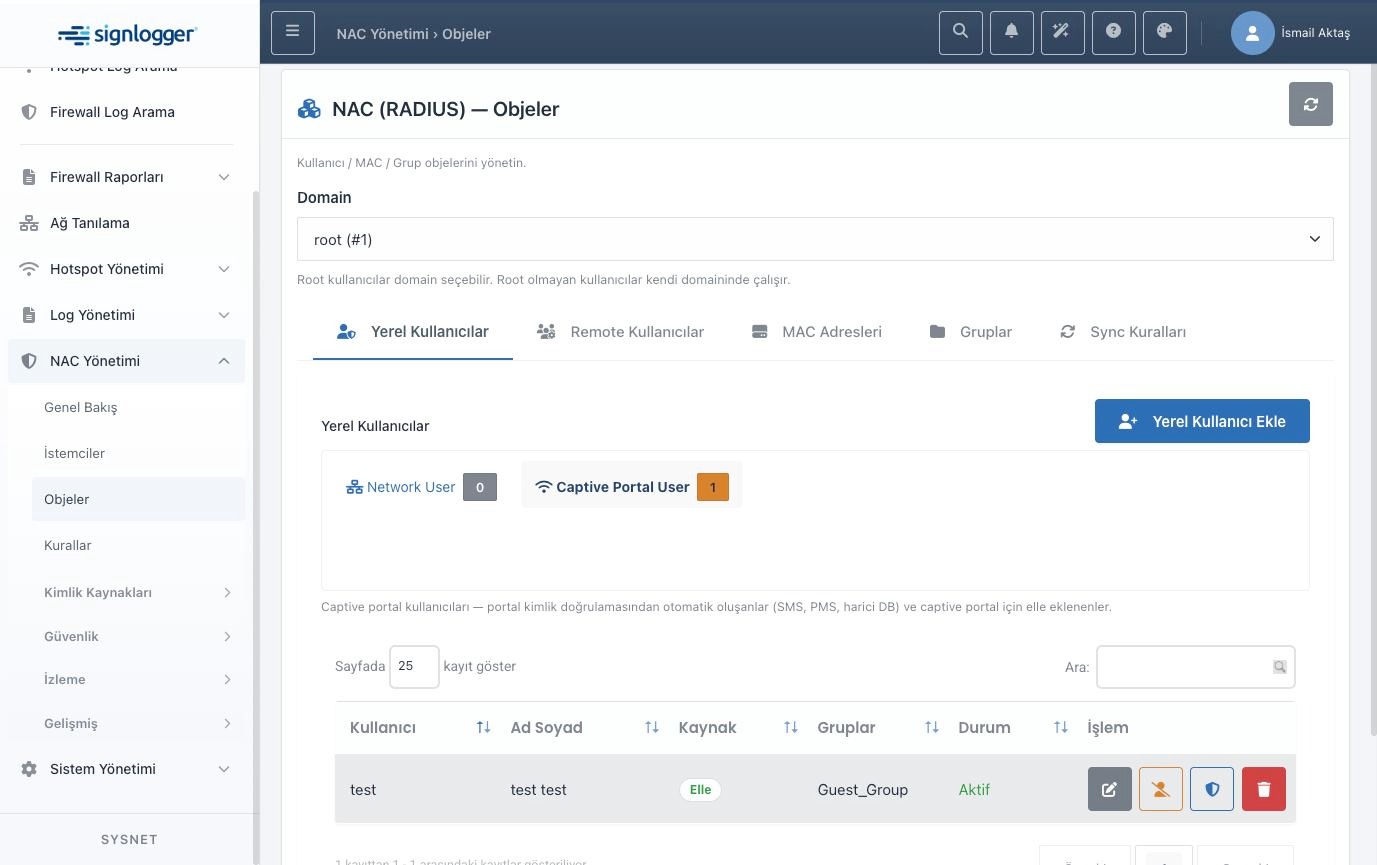
Figure 6 — Captive Portal User view: guest accounts, source and status.
When you add a new user, the window that opens first lets you choose how the identity will be defined. You can type the user manually or tick the “LDAP user” option and pick from the directory. The Intended Use field is critical: if you choose Network (802.1x) the account is used for corporate network access, and if you choose Captive Portal it is used for the guest portal and listed in the relevant tab. From the Groups field you can add the user to one or more groups; policies operate through these groups. The email and phone fields are not mandatory but are used for two-factor authentication and notifications. The password field applies only to local accounts; for an LDAP user the password is not stored in the product and the field is disabled. If you leave the password blank while editing, the existing password is unchanged.
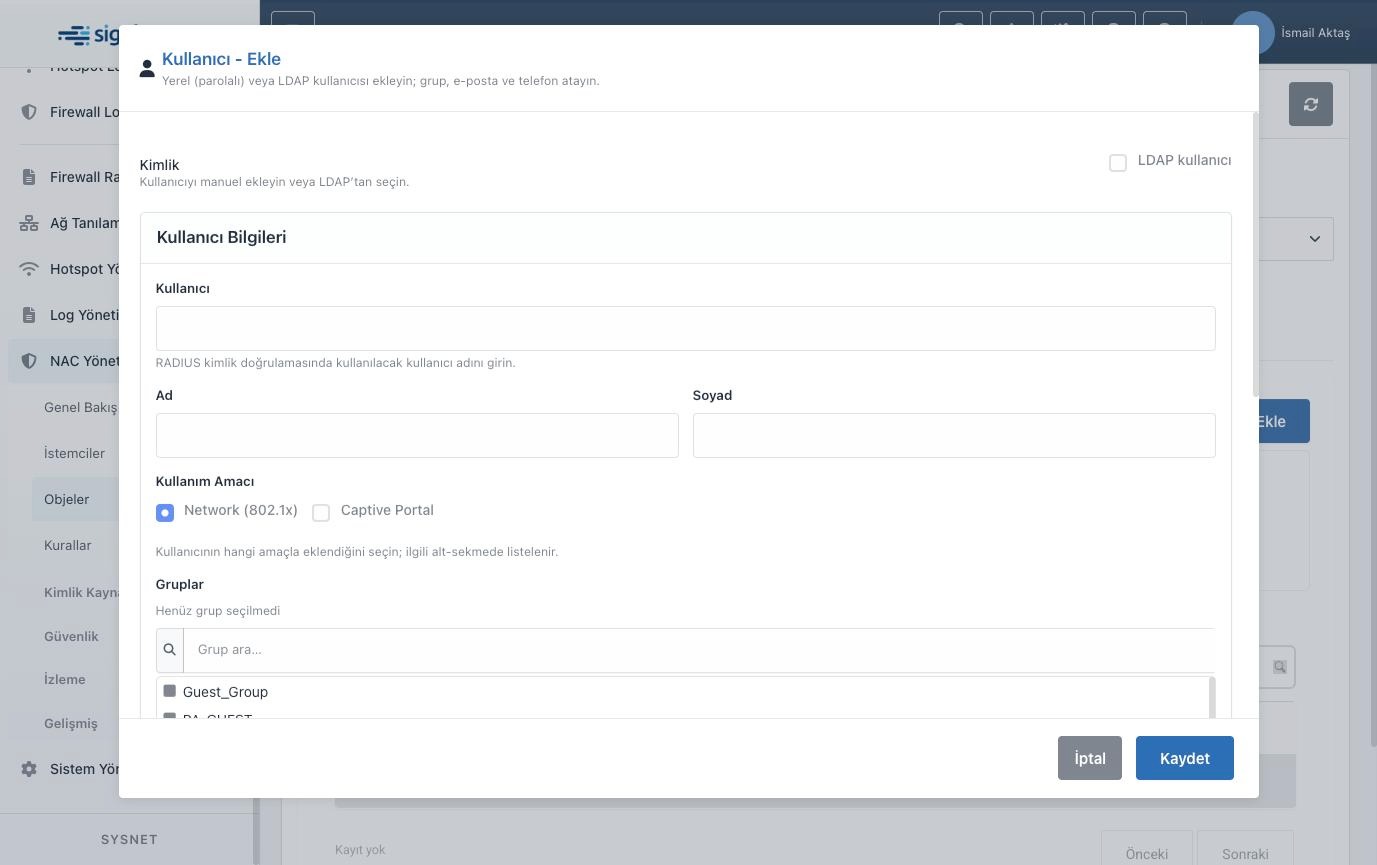
Figure 7 — Add-user window: username, full name and Intended Use selection.
The lower section of the same window holds the group selection, contact details and password fields.
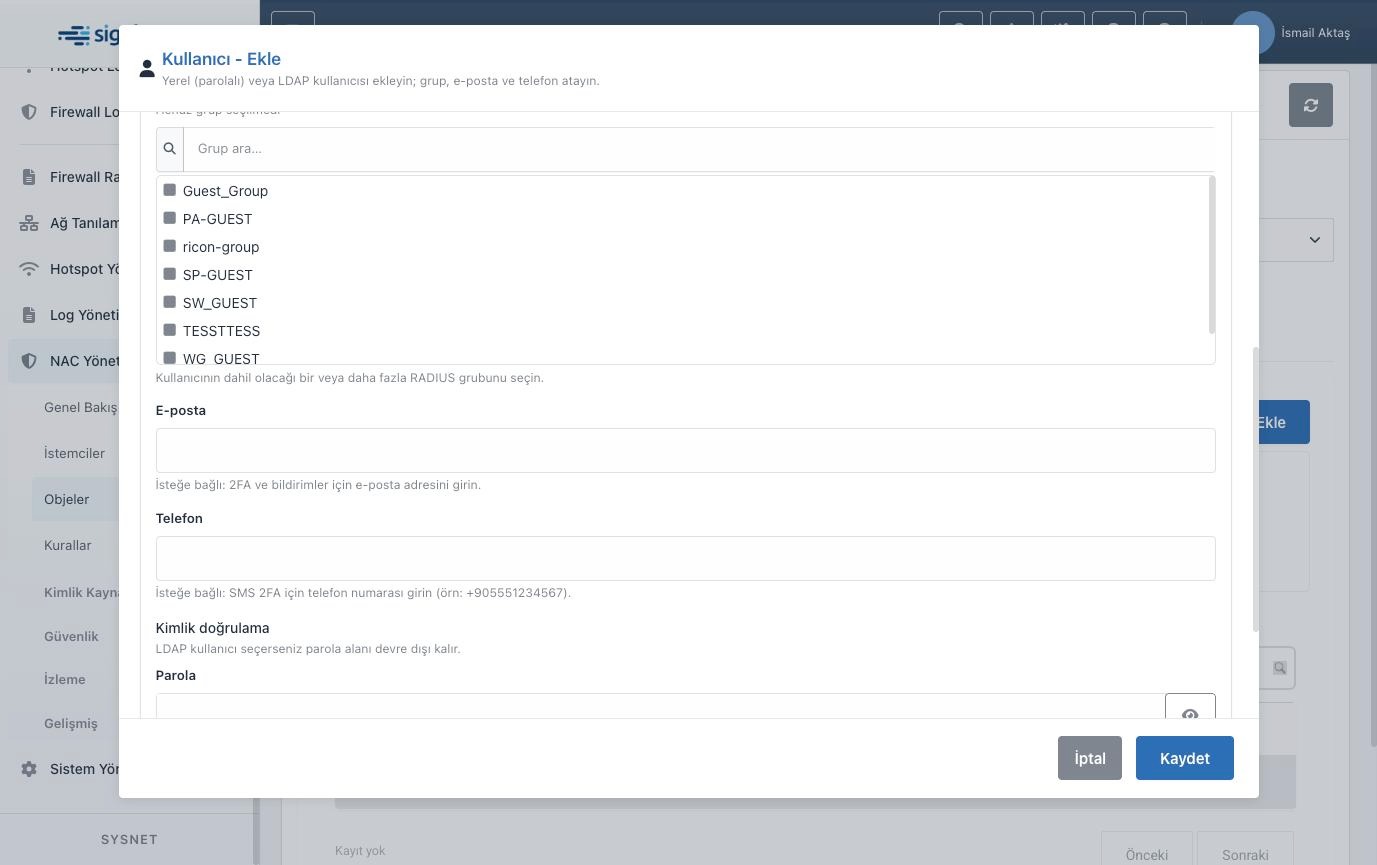
Figure 8 — Continuation of the add-user window: groups, email, phone and password.
The MAC Addresses tab lets you recognize devices that cannot enter a username and password (printers, cameras, IoT devices, etc.) by their MAC address. First create a group of the MAC type from the Groups tab, then select that group on this tab and add the MAC. The device is subject to the policy of the group it is bound to. Because the MAC address is set by the client and can be spoofed, this is a low-security method; 802.1x should be preferred for managed corporate devices.
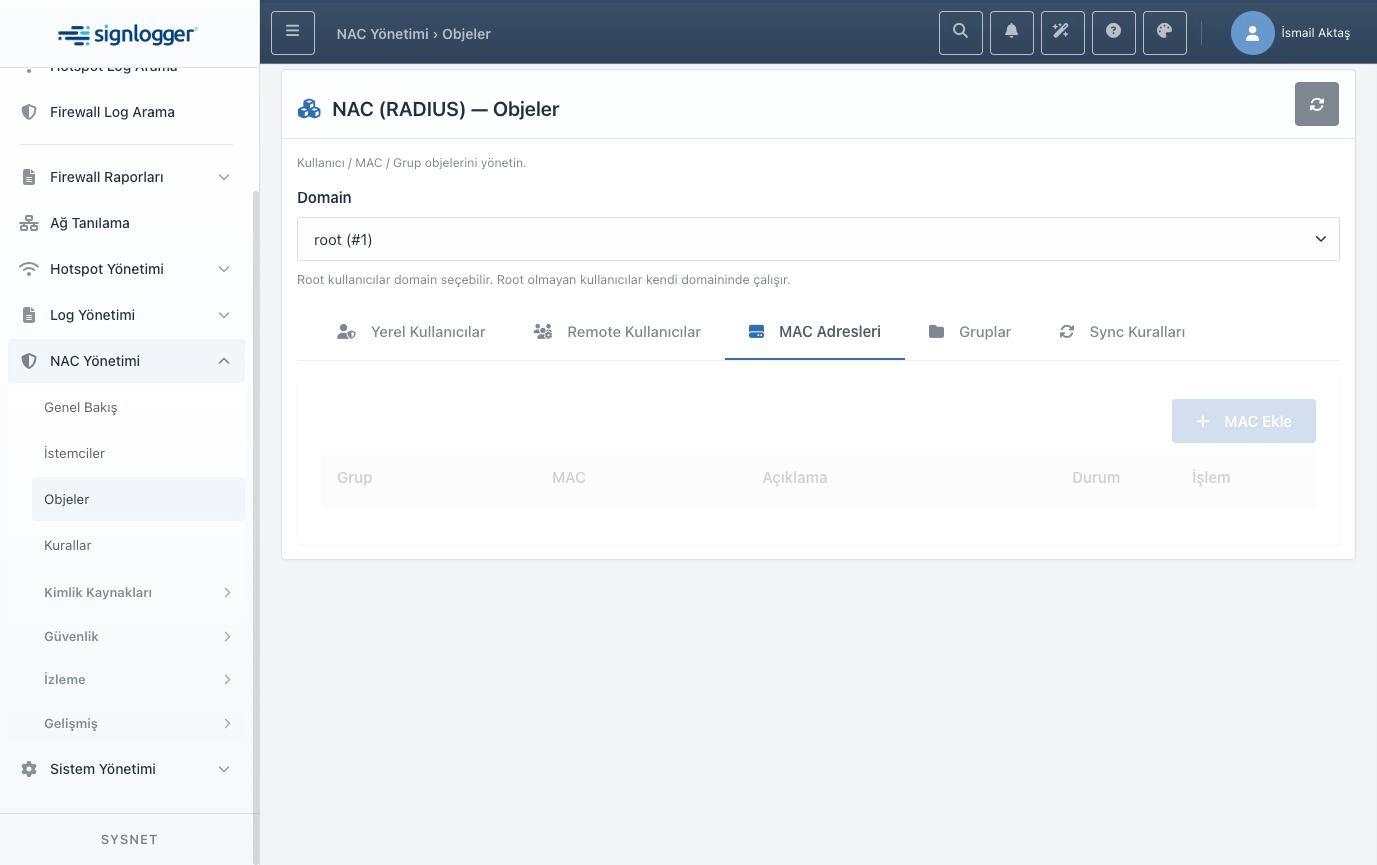
Figure 9 — MAC Addresses tab: MAC records for device-based recognition.
The Groups tab is where you manage the group names you will reference in rules. A group’s type can be user, MAC or LDAP. It is important that the group name is unique and written exactly the same way in rules; a misspelled group name causes the rule to never match and the problem to go unnoticed. Groups set to inactive are not considered during rule evaluation.
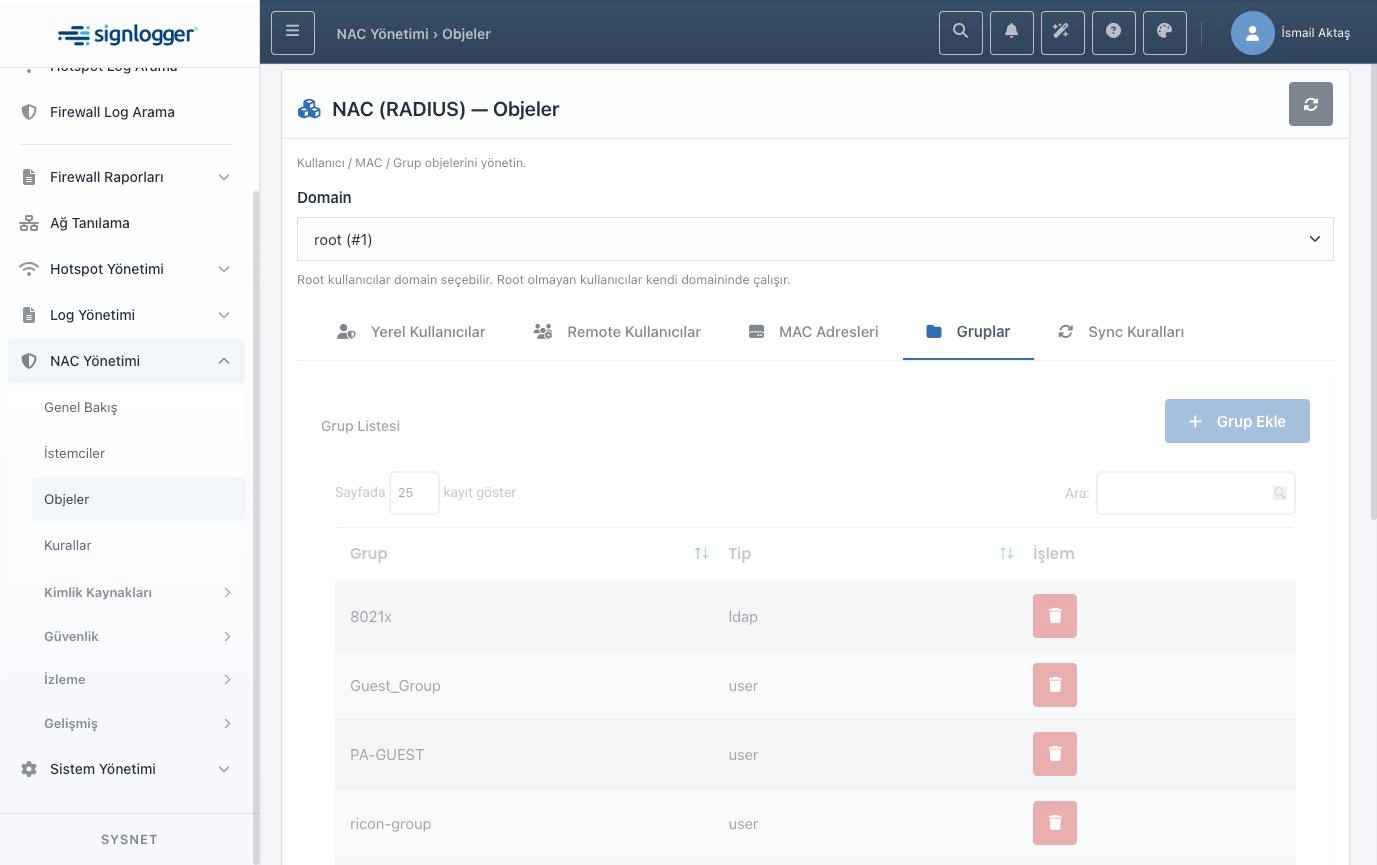
Figure 10 — Groups tab: group names and types (user, mac, ldap).
The Sync Rules tab lets you automatically import the members of a group or organizational unit from Active Directory or LDAP into NAC. When creating a rule, you choose which LDAP connection to use, whether the scope is a single group, an OU or the entire directory, and optionally the target NAC group. After saving, the sync button on the row imports the members; running it again refreshes the list according to the current membership at the source. This way, changes in the directory are reflected in NAC automatically and you do not have to manage users one by one in rules.
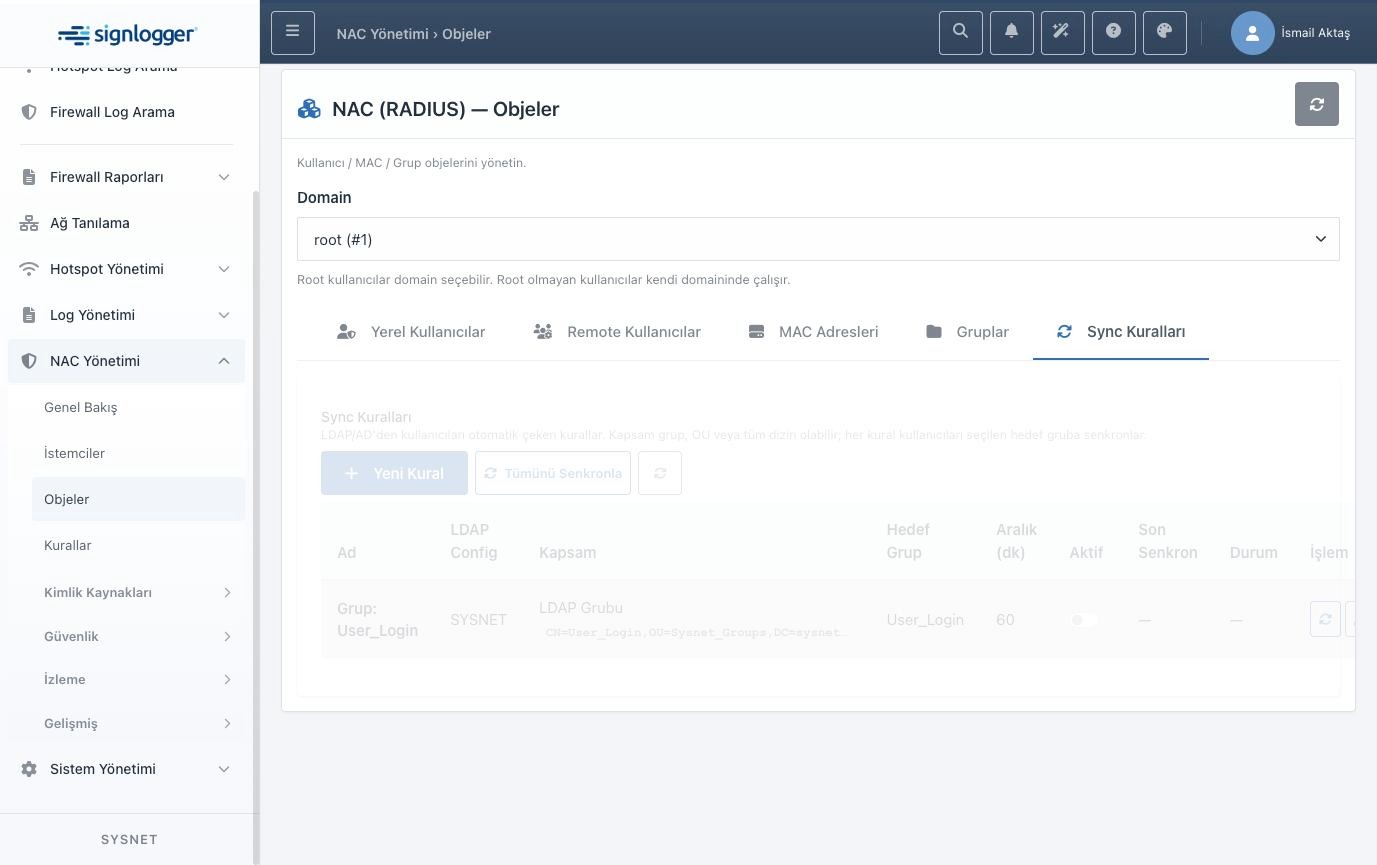
Figure 11 — Sync Rules: automatic user import from an LDAP/AD group into a NAC group.
4.4. Rules and the Rule Wizard
The Rules page is where you build the access logic. A rule applies the actions you define when the conditions are met on a request coming to the groups you selected. Rules are evaluated in priority order, and a lower priority value is processed first. A user who matches no rule may be rejected according to the deployment’s fail-closed default behavior; for this reason, exceptions must be ruled explicitly. Inactive rules and inactive groups are not evaluated.
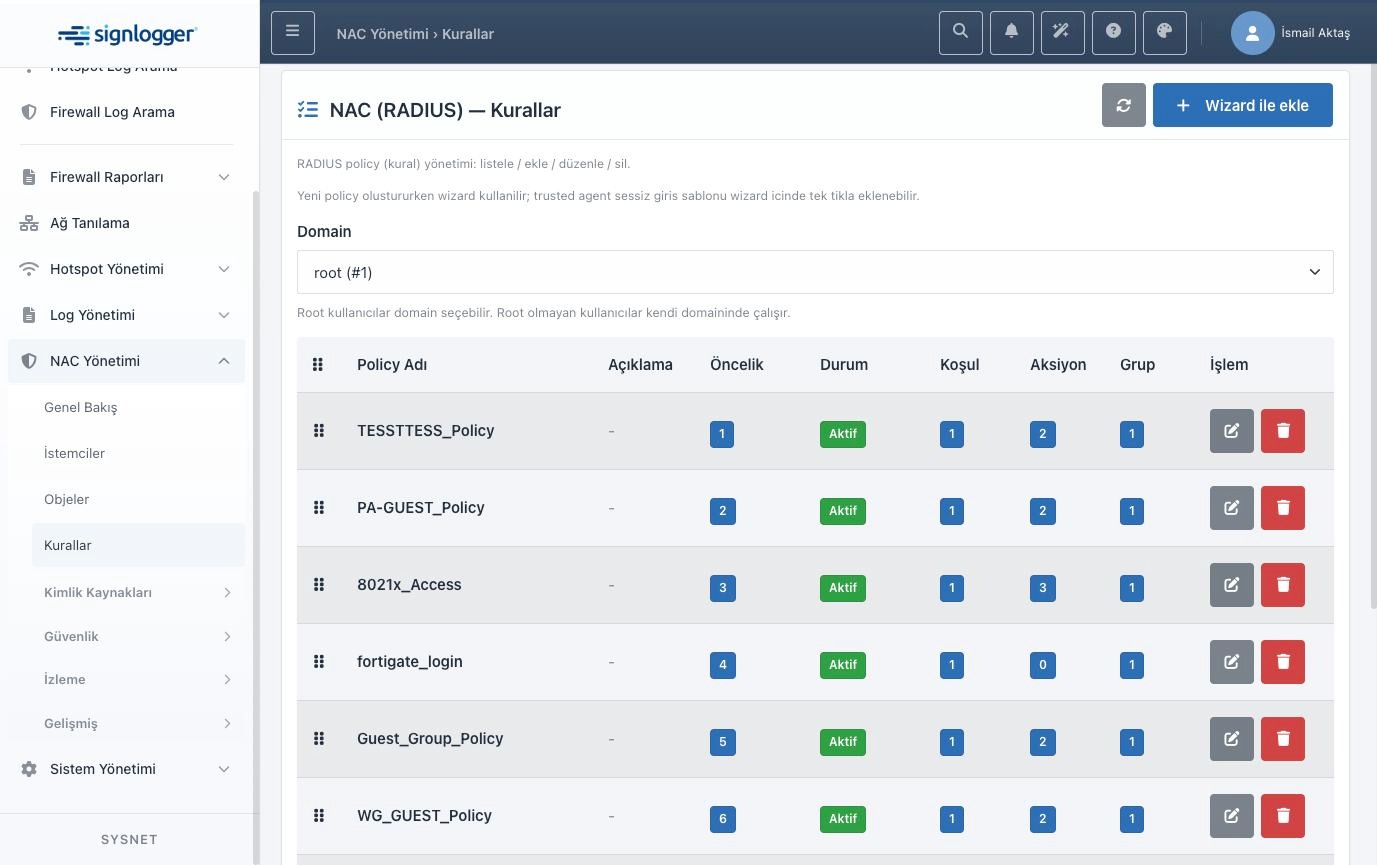
Figure 12 — Rule list: priority, status, condition/action/group counts.
The easiest way to create a rule is the Rule Wizard at the top right. The wizard has five steps: rule details, group selection, conditions, actions and summary. In the first step you give the rule a meaningful name, write an optional description, decide whether it will be active and choose whether two-factor authentication is required for this rule.
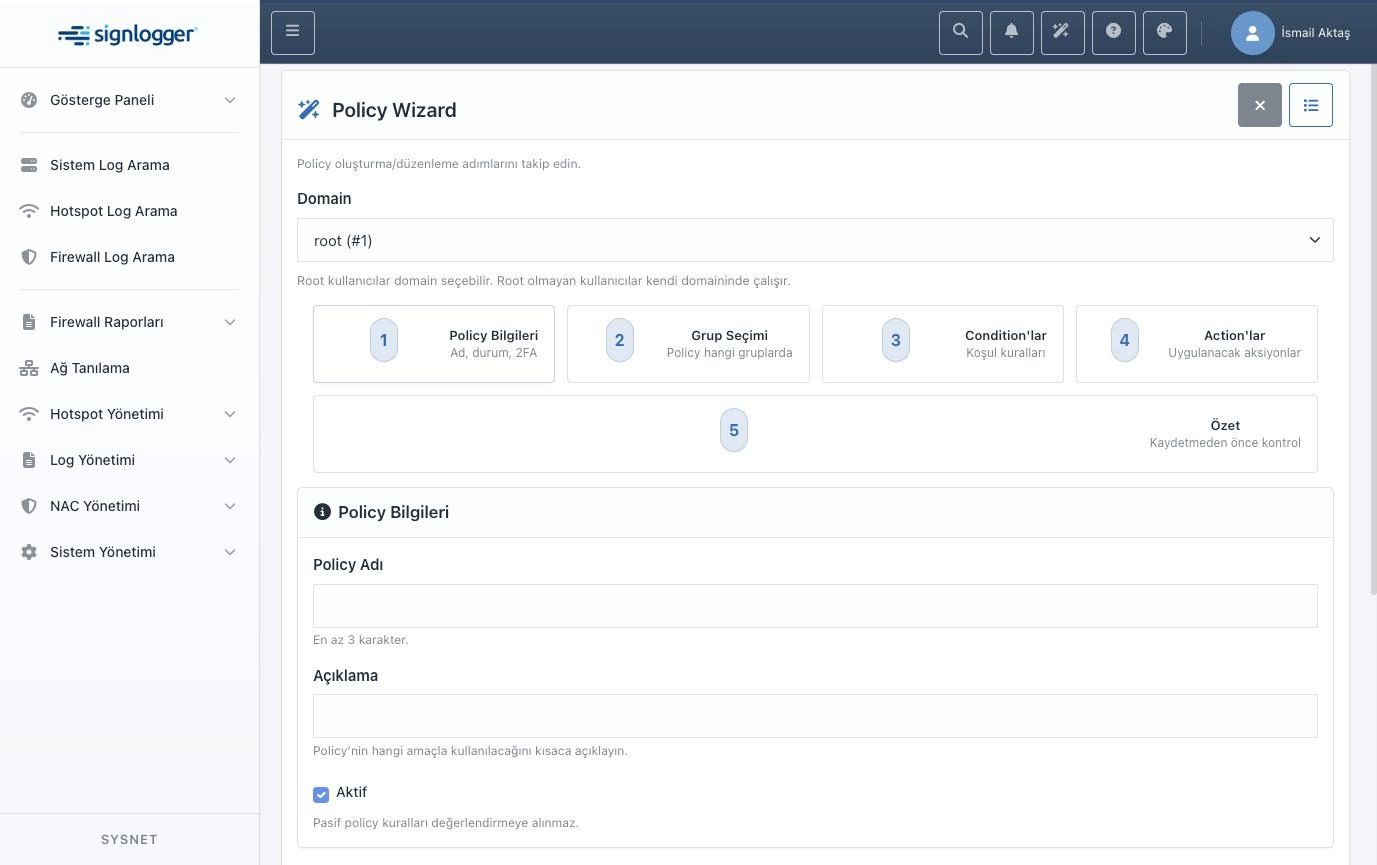
Figure 13 — Rule Wizard, step 1: rule details and the 2FA option.
In the second step you choose which groups the rule will apply to. It is strongly recommended to select the group name from the list rather than type it by hand; a misspelled group name causes the rule to silently never match. If needed, you can also create a new group from the same screen.
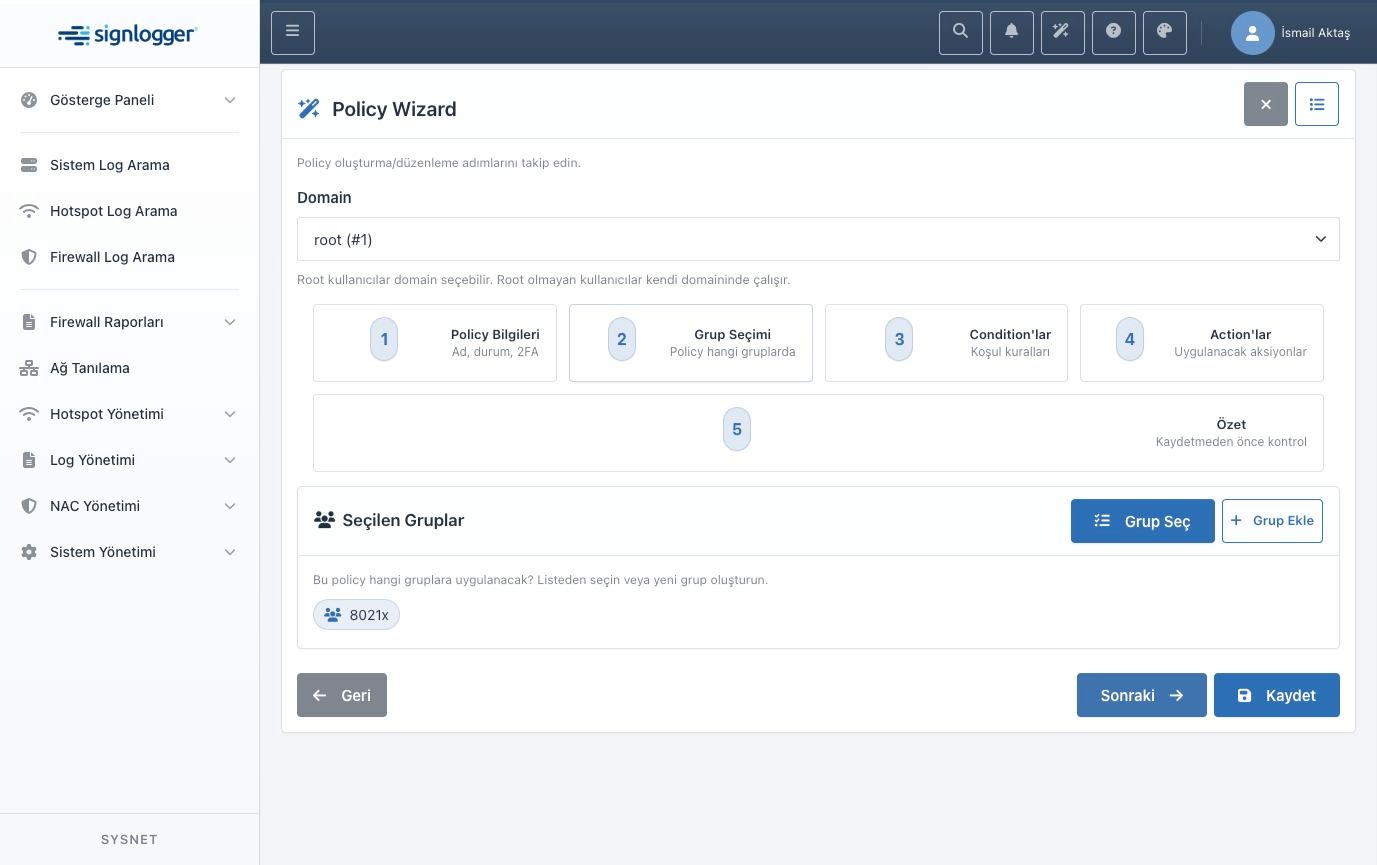
Figure 14 — Rule Wizard, step 2: the groups the rule will apply to.
The third step is conditions. A condition consists of the field to check, a comparison operator and a value. The field selector is searchable and each row explains what that field does; even if you do not know its technical name, you can find the right one. Among the most commonly used fields are the user group, username, the MAC address of the connecting device, the SSID connected to, the IP of the network device sending the request, the device brand and time/day information. Operators work as equals, not equals, contains, greater than, less than, in/not in a list, and belongs to a specific network block. When there are multiple conditions, the AND connective requires all of them to be met, while the OR connective makes any one of them sufficient.
The most practical helper in this step is the shortcuts that add, in one click, which login type the rule applies to: guest portal, 802.1x or firewall/VPN administrator login. Rules without a context condition may be triggered on other login types as well, leading to unexpected access.
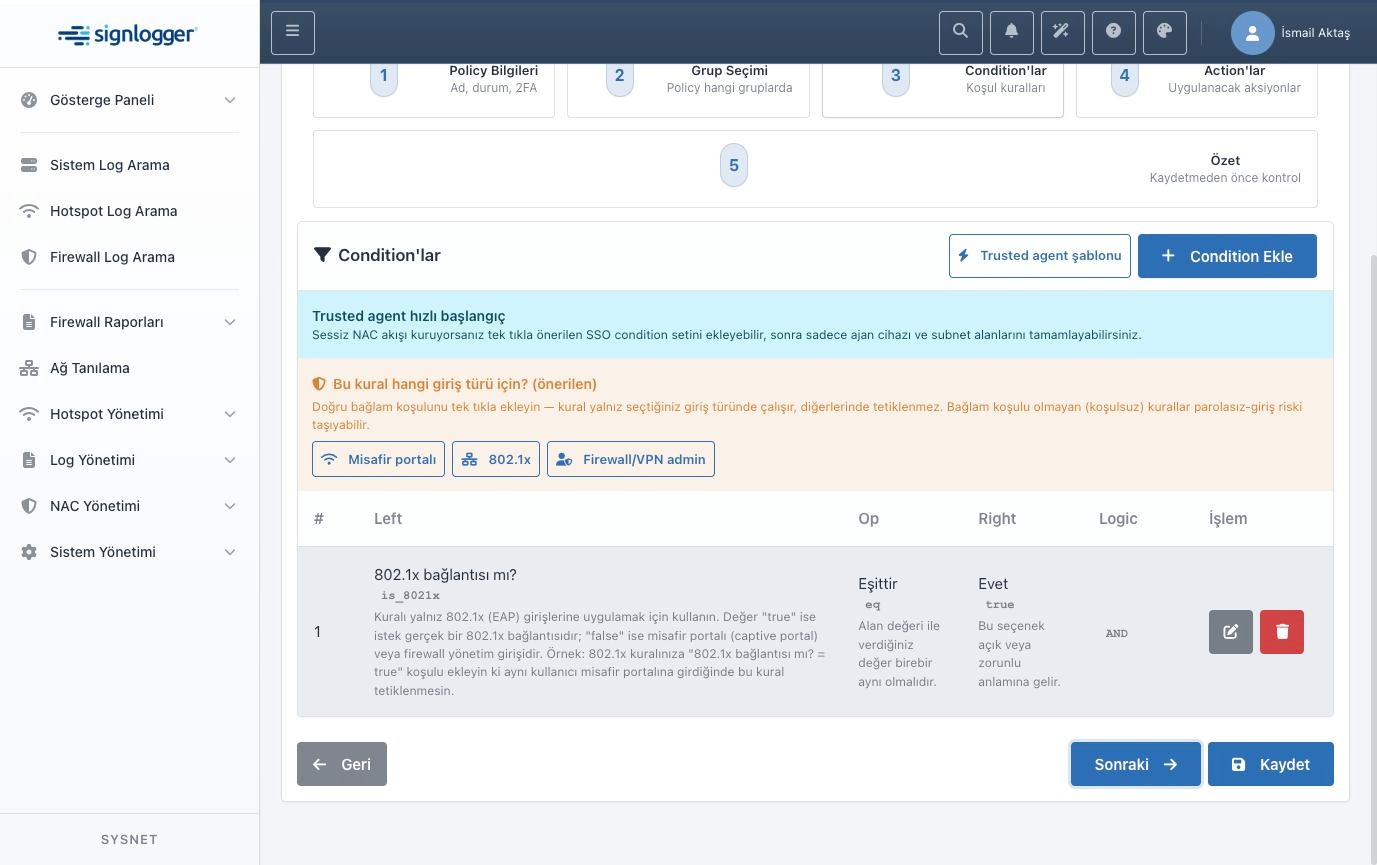
Figure 15 — Rule Wizard, step 3: conditions and login-type shortcuts.
The fourth step is actions: here you define what happens when the conditions match. The most common uses are VLAN assignment, maximum session duration, idle timeout, the number of concurrent sessions the same user may open, and silent sign-in with a trusted agent. Each action has a priority value; if there are multiple actions for the same attribute, this value determines the order in which they are applied.
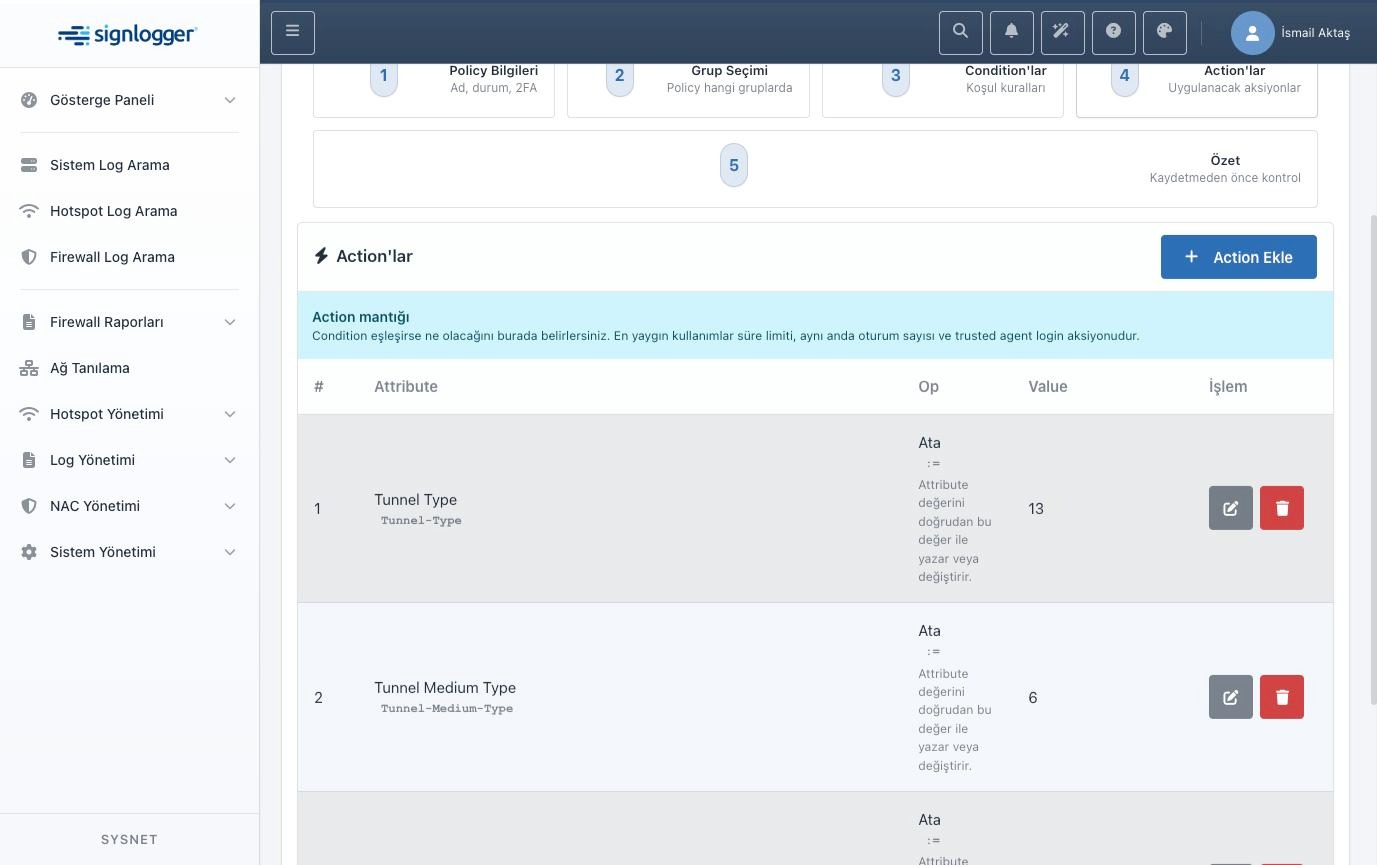
Figure 16 — Rule Wizard, step 4: the actions to apply (VLAN assignment in the example).
The fifth step is the summary. Before saving, you see and check the selected groups, the number of conditions and actions and the 2FA status on a single screen. A wrong group selection or a missing context condition is easiest to catch here.
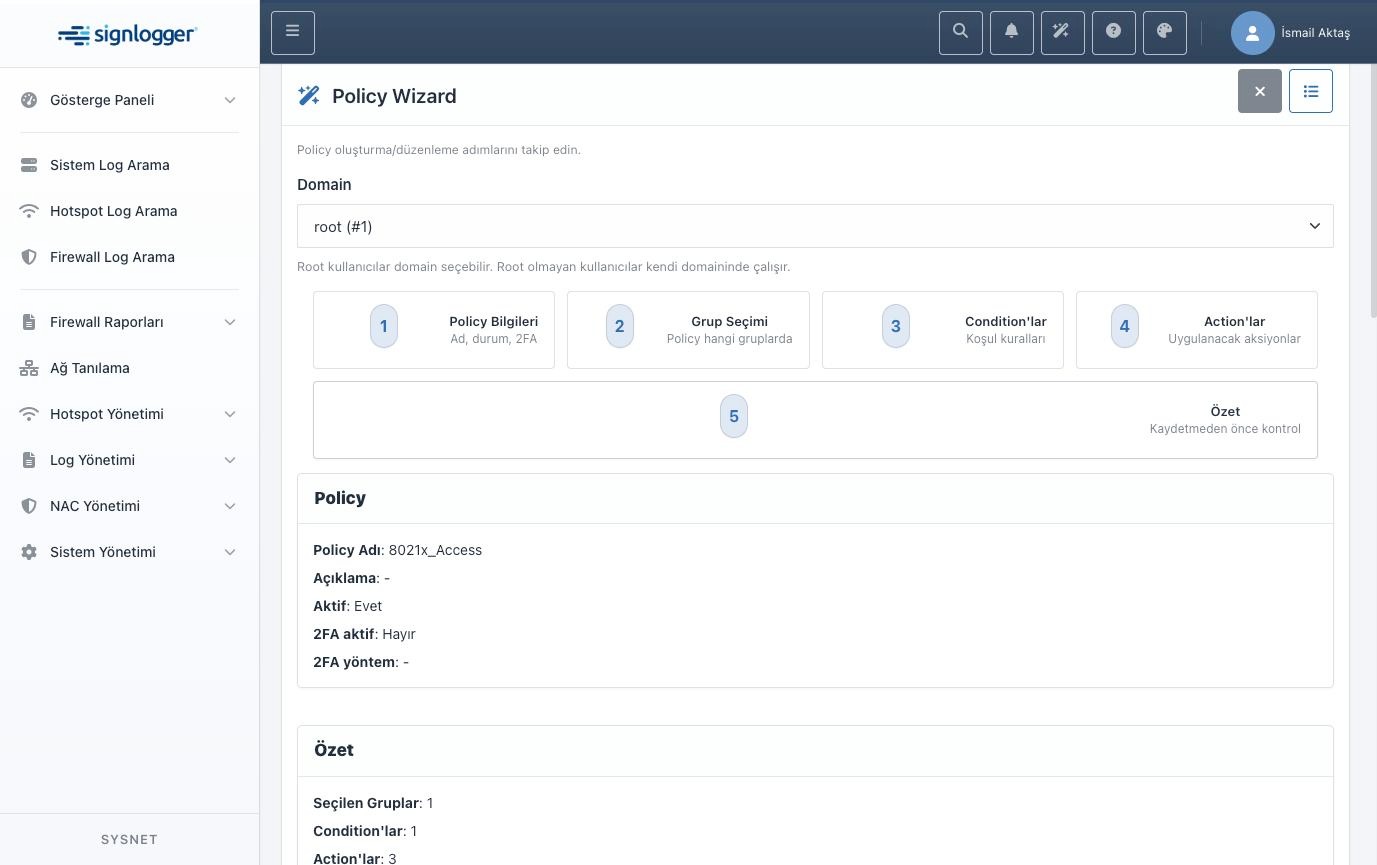
Figure 17 — Rule Wizard, step 5: summary check before saving.
4.5. Identity Sources: LDAP / Active Directory
On the LDAP page you define the connections to your directory servers. The server address and port, the secure-connection option (LDAPS or StartTLS — the two should not be selected at the same time), the account credentials used to bind to the directory and the search bases are all entered here. Multiple LDAP definitions are supported and one can be marked as the default. After saving, it is recommended to verify the connection with the test button on the row, then pull the user and group lists to confirm that the search filters work correctly.
These definitions are used in three places: remote users imported from the directory, synchronization rules and sign-in with an AD account on the captive portal. For an AD user’s password to be verified in 802.1x, the server must be joined to the Active Directory domain; the “Save and Join” option on the page performs this setup in a single step and shows the result on screen step by step. In multi-domain environments, using global catalog ports prevents referral-related rejections.
If the connection is established but the user or group list comes back empty, the search base or filter is usually wrong, the binding account has limited permissions, or a wrong organizational unit was selected.
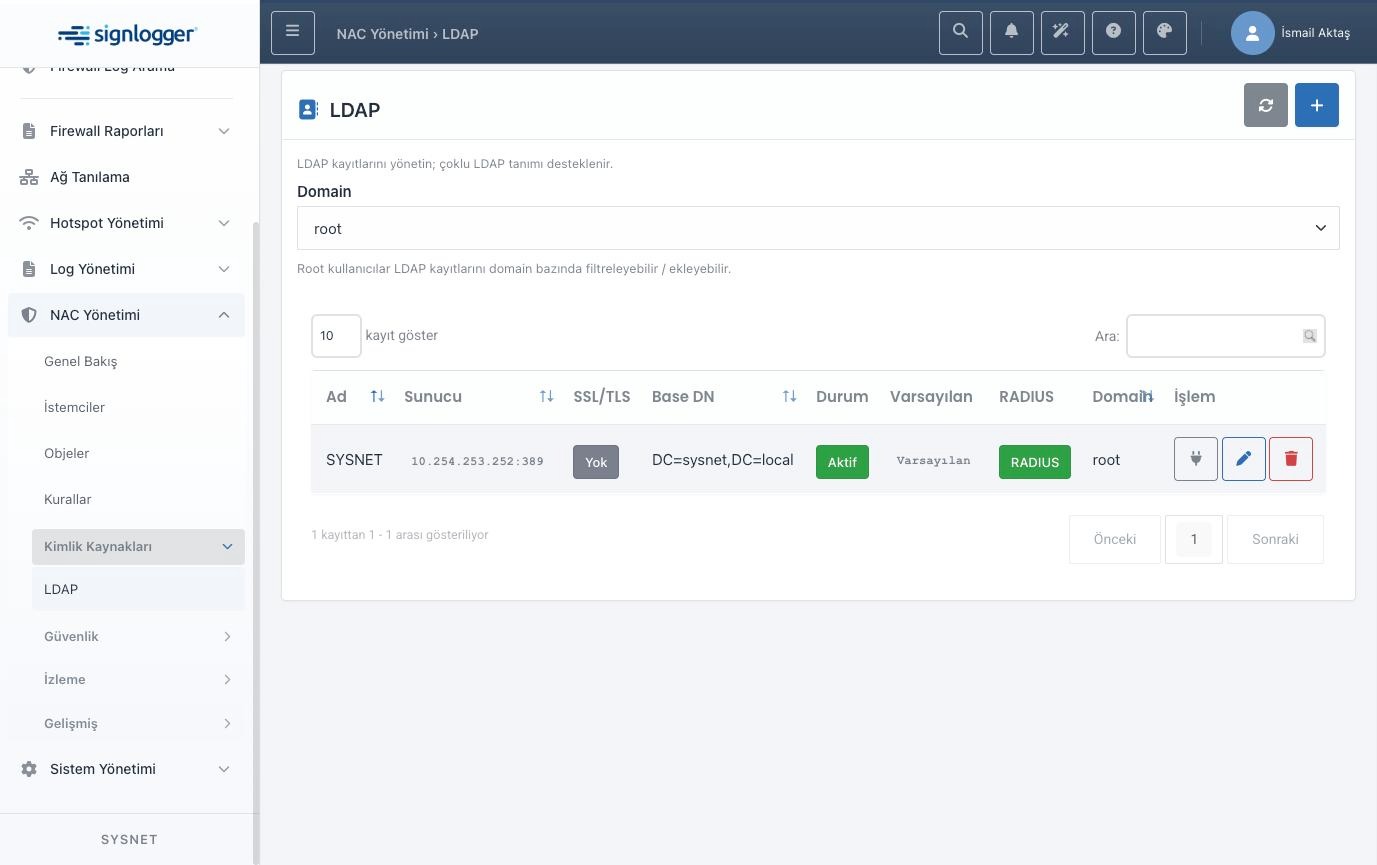
Figure 18 — LDAP definitions: server, Base DN, status and default markers.
4.6. Security: two-factor authentication (2FA)
The 2FA Configuration page holds the system-wide settings for the second factor. On the General tab you enable or disable the 2FA engine and select the mail server used to send codes by email. The Methods tab holds the details of SMS and app-based (TOTP) verification: for SMS, the delivery method and provider, the code length and validity period; for TOTP, the name shown in the authenticator app, the accepted time window and the code-generation interval.
User-specific information (phone number and TOTP key) is not held on this page but in the 2FA window of the user’s row in the Objects section. An important point: for 2FA to work in a session, both the general setting on this page and the 2FA option of the relevant rule must be enabled.
You should also know where 2FA works and where it does not. It works in interactive logins where the user can be asked for a code — firewall administrator login, VPN, captive portal, and so on. In contrast, in 802.1x/EAP network-port authentication, because the protocol cannot ask the user for a code mid-conversation, 2FA is automatically skipped. This is not a bug but designed behavior: the same user can connect without a code in 802.1x while being asked for a code on a firewall administrator login.
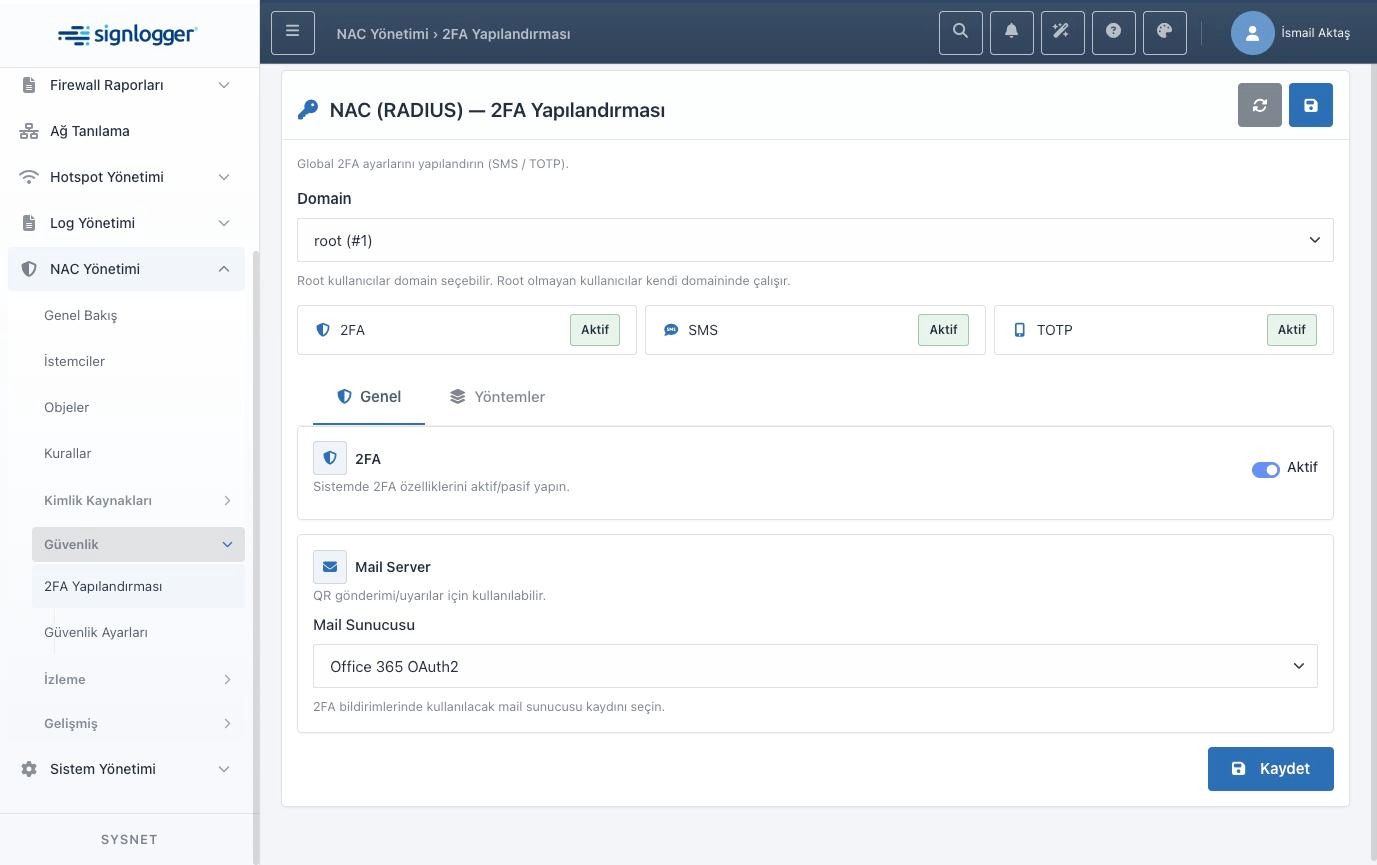
Figure 19 — 2FA Configuration / General: enabling/disabling 2FA and selecting the mail server.
On the Methods tab, the SMS and TOTP settings are arranged as separate cards.
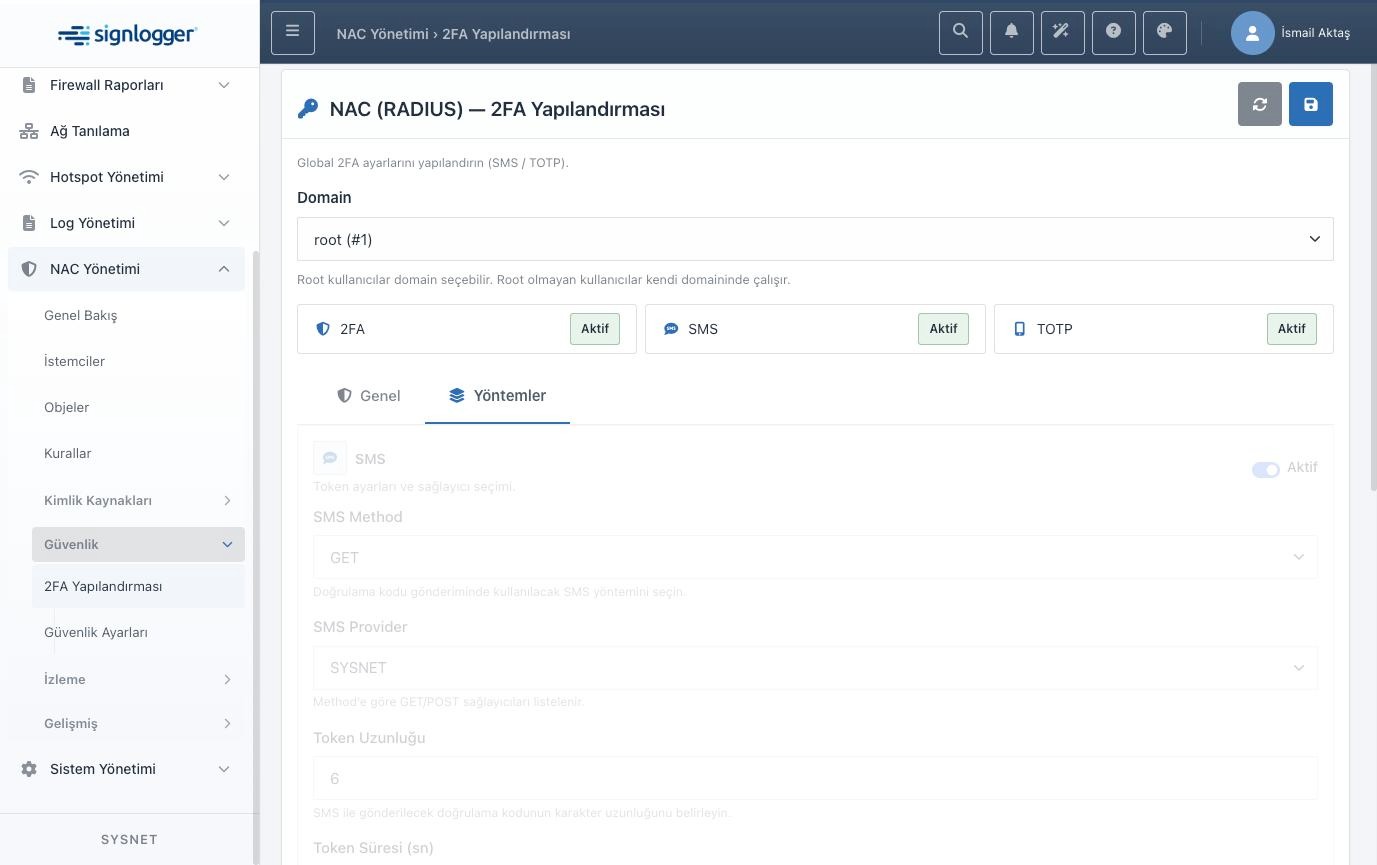
Figure 20 — 2FA Configuration / Methods: SMS provider, token length and validity.
4.7. Security Settings: brute-force protection
This page protects against repeated failed sign-in attempts. When protection is on, if failed attempts exceed the threshold within the window you set, the relevant username and/or device is locked for a certain period. You can choose whether counting is done per username, per device MAC address or both; at least one must be enabled. The lower section of the page lists the users and devices that are currently locked; the lock lifts automatically when the period expires, and you can also unlock manually from here if needed. Changing the settings does not remove existing locks.
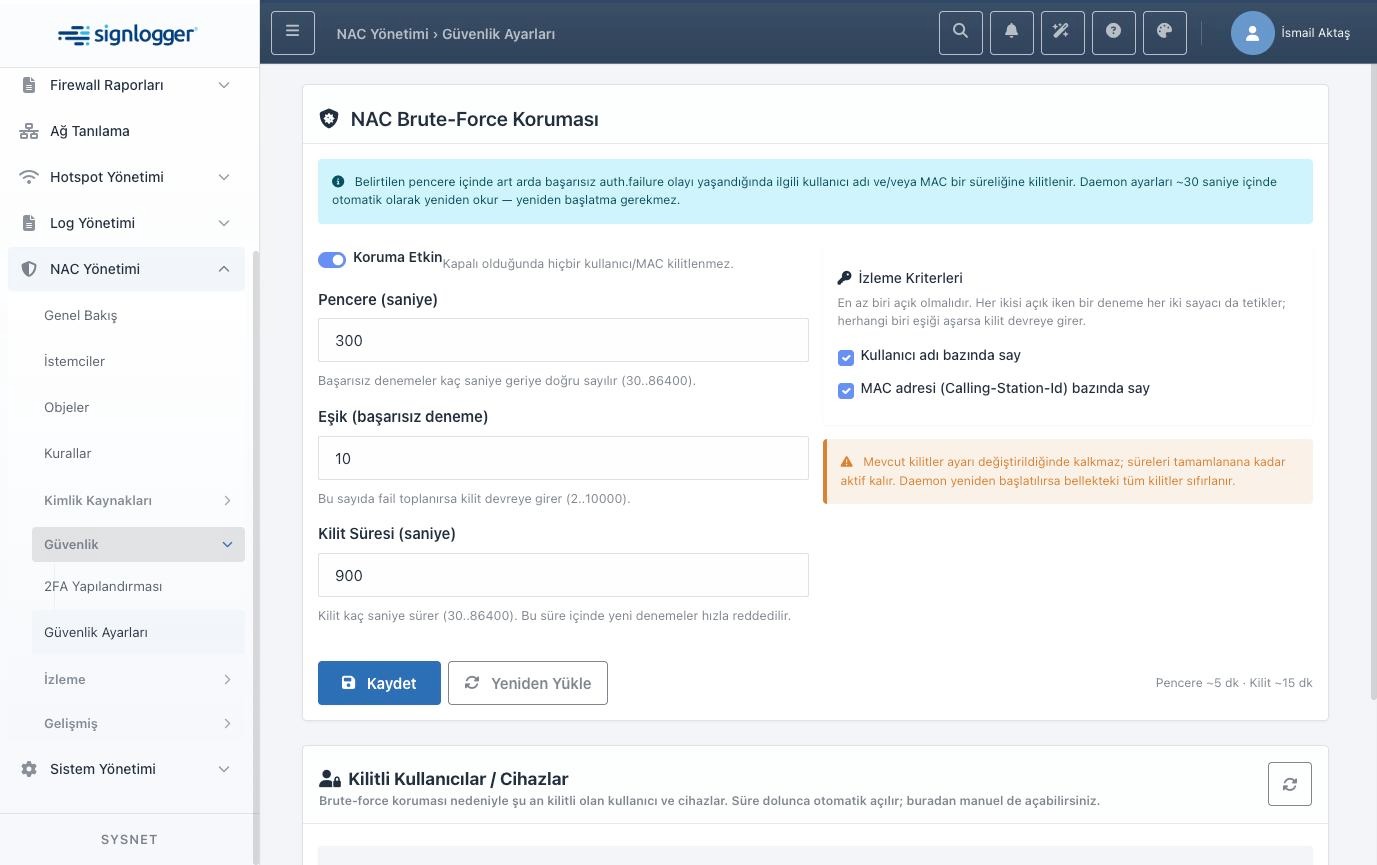
Figure 21 — Brute-force protection: window, threshold, lock duration and tracking criteria.
4.8. Monitoring: logs, audit and anomalies
The Sign-in Logs page is the first stop for the “what happened?” question. Every authentication attempt is listed here with its date, user, connected device, NAS IP, SSID and duration. The time-range selector and summary cards at the top show the total, active and daily session counts. If a user enters the correct password but still cannot get in, look here first: the reason for rejection is here. The most common causes are the account being inactive or expired, the user being in the wrong group, or the device not being defined in Clients or the shared secret not matching.
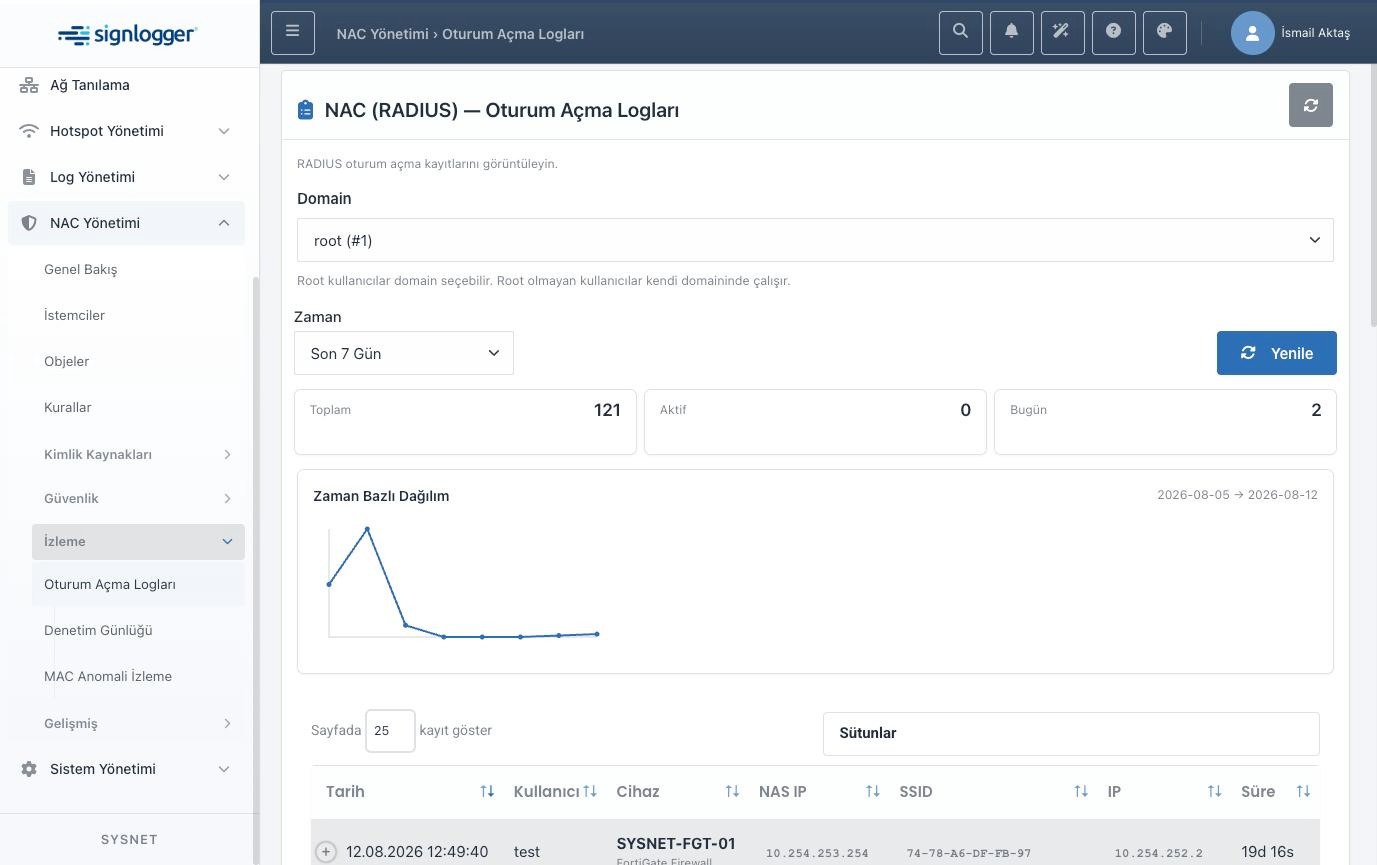
Figure 22 — Sign-in Logs: time range, summary cards and the detailed record list.
The Audit Log tracks administrative and security events: which rule matched, which sign-in succeeded or failed, whether 2FA was requested, which setting was changed. The cards at the top summarize counts such as total events, failed authentications, 2FA events and policy rejections. You can filter by date range, severity, event type and user, export the result and set the retention period.
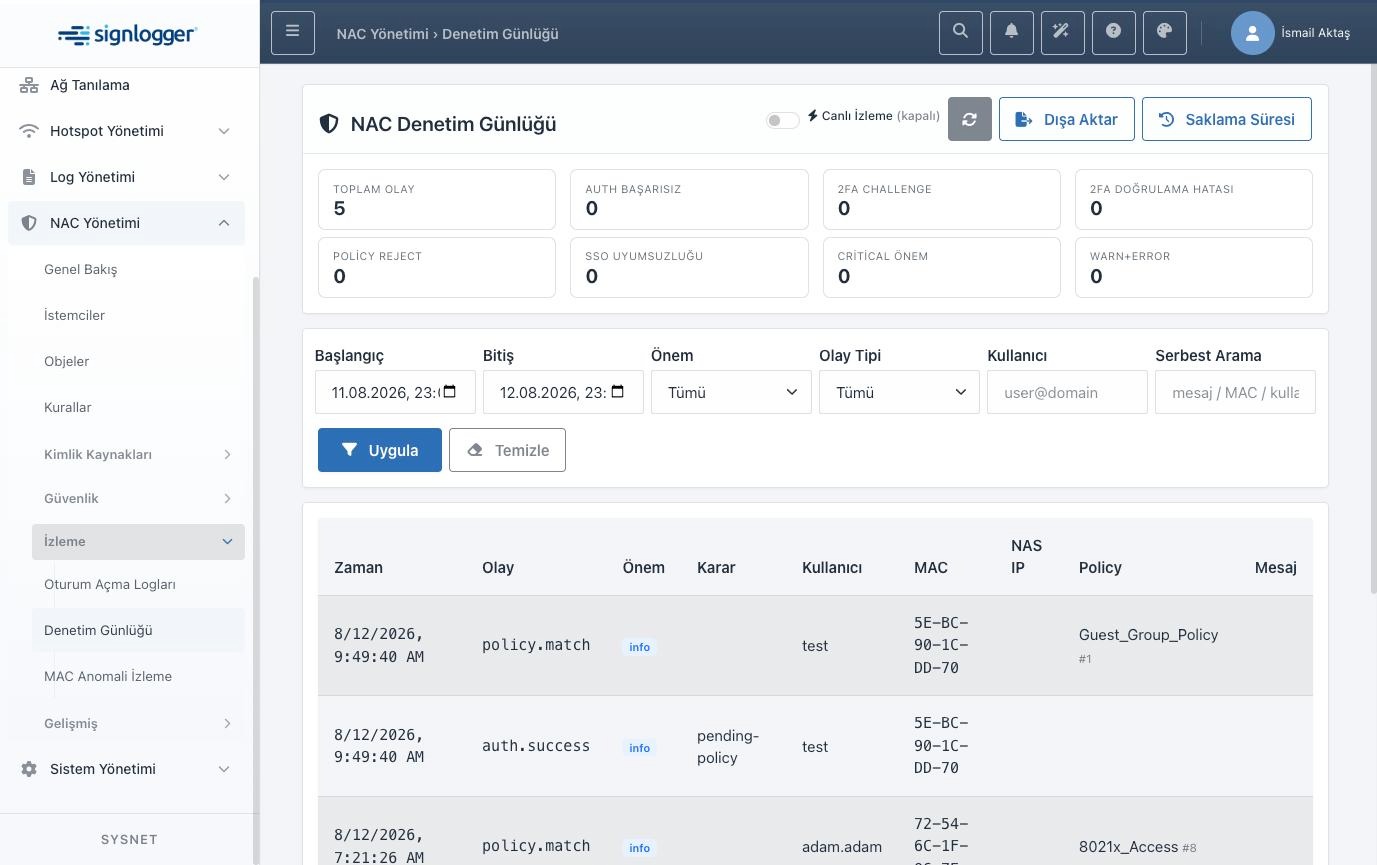
Figure 23 — NAC Audit Log: event summaries, filters and the event list.
The MAC Anomaly Monitoring screen detects MAC spoofing, the natural weakness of MAC-based access. The screen is read-only; it affects no session and only observes. It produces three types of signal. Seeing the same MAC address in open sessions on different devices or with different IPs at the same time is a critical indicator of cloning. The same MAC signing in on another device within a very short time is flagged as “impossible travel.” The third is informational: because the randomized MAC addresses used by modern phones change periodically, permanent MAC lists are unreliable for these devices.
The recommended methods for real protection are: use 802.1x on managed corporate devices, authenticate guest and personal devices through the portal on every session instead of adding them to a list, and limit the number of concurrent sessions for the same identity in rules.
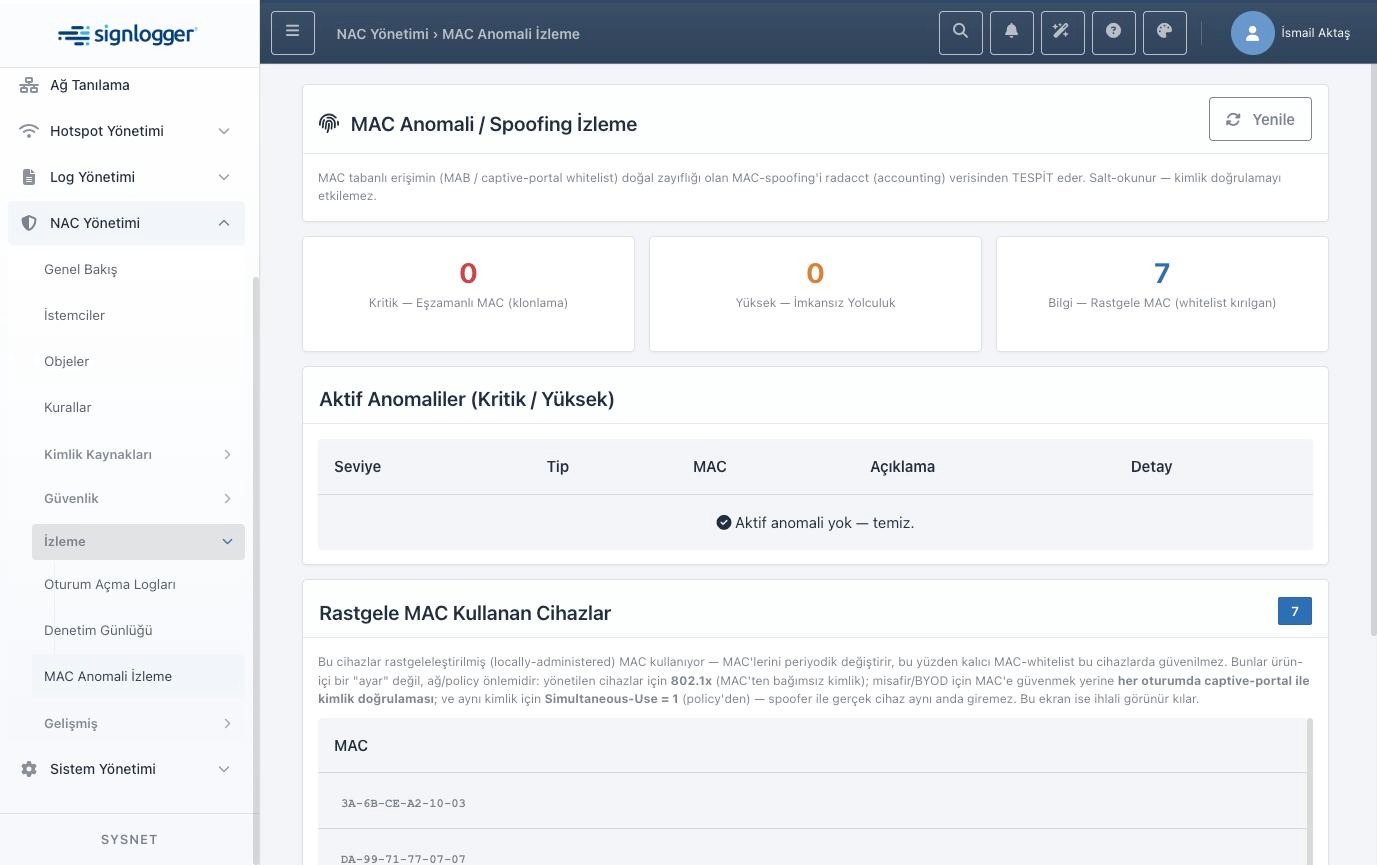
Figure 24 — MAC Anomaly / Spoofing Monitoring: critical, high and informational findings.
4.9. Advanced: device brand and session agent
Device Brand Management holds the catalog that identifies a device’s manufacturer from the first part of the MAC address (OUI). This information helps both to distinguish device types in inventory and to use the “device brand” condition in rules. When you see an unknown prefix, you can add a definition manually here.
The NAC Session Agent page contains the session sources, active sessions and resolution/debug screens for silent (single sign-on) scenarios. The key setting here is the global toggle that determines whether SSO conditions are considered in rules; when it is off, SSO conditions are ignored during rule evaluation. Turning this setting on does not grant access on its own — silent sign-in only works with the conditions and actions explicitly defined in the relevant rule.
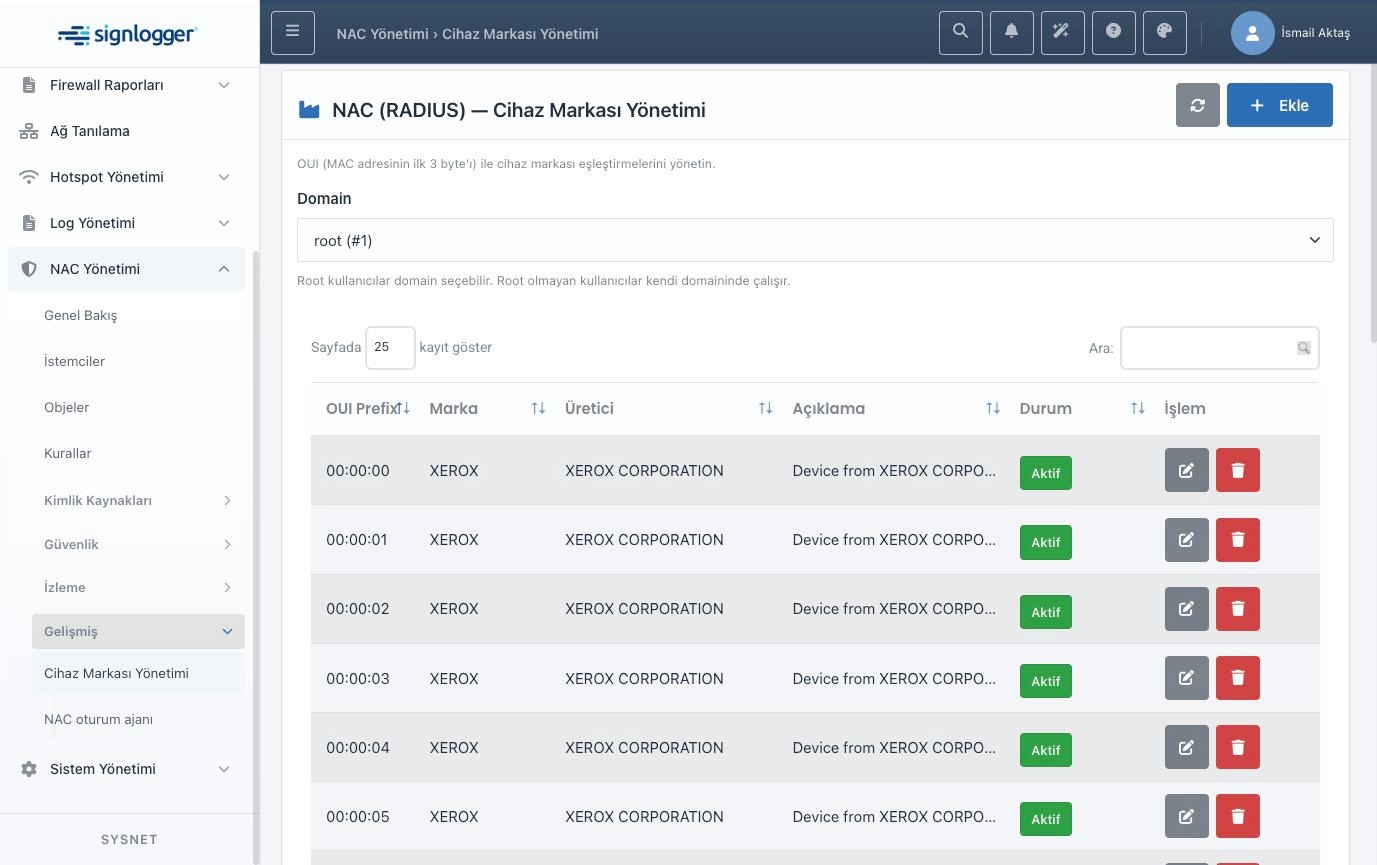
Figure 25 — Device Brand Management: OUI prefixes and manufacturer mappings.
The session agent page’s tabs are divided into sources, active sessions, resolution, agent commands and user logs.
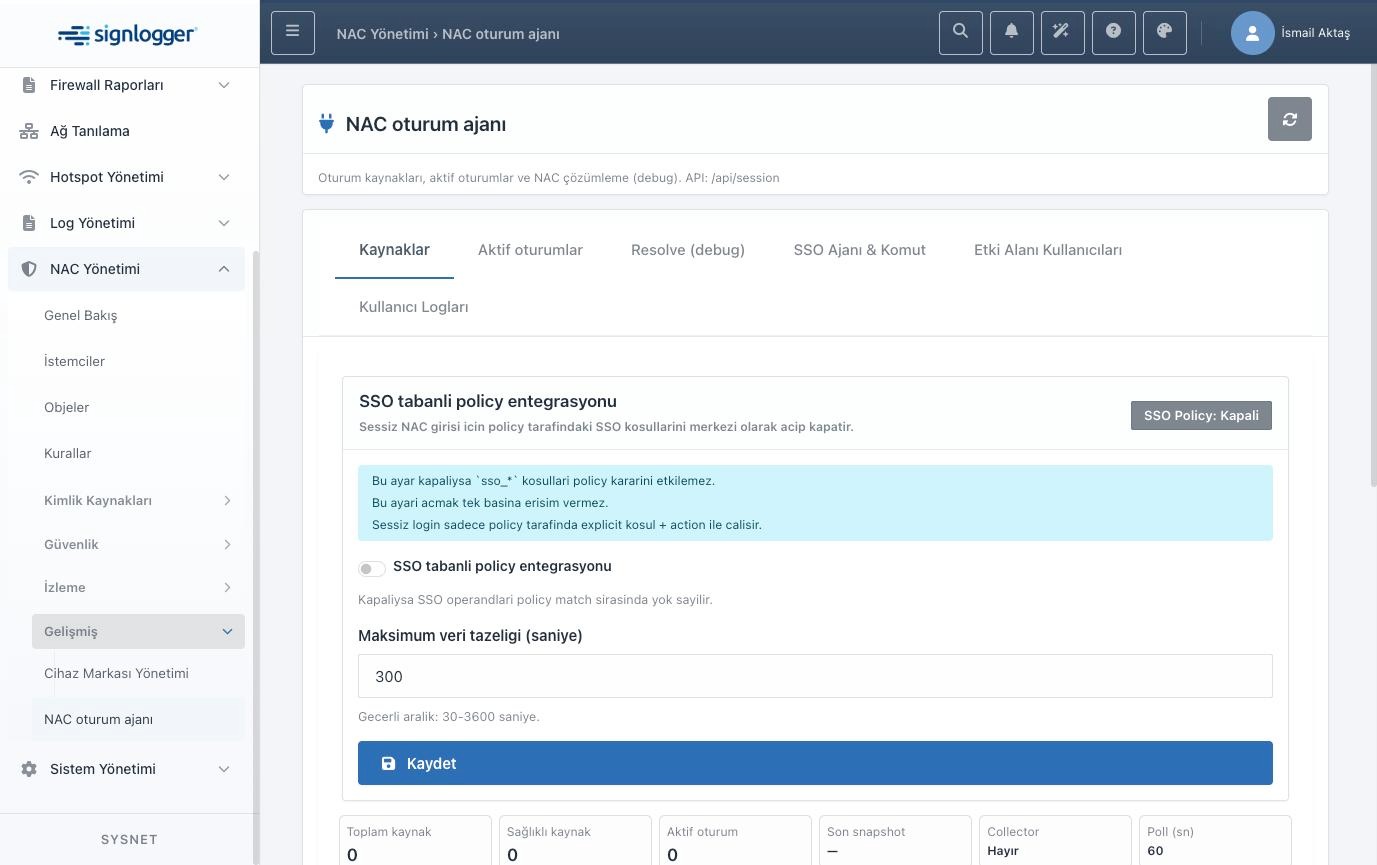
Figure 26 — NAC session agent: SSO-based policy integration and source status.
5. Hotspot Management (the captive portal side)
You do not need to go into the NAC section to manage the guest network day to day. The pages under the Hotspot Management heading access the same data through a simpler interface. The Hotspot Users page here and the Captive Portal User tab under NAC use the same canonical source; a change you make in one appears in the other.
The Overview page summarizes, on a single screen, the number of users currently online, the number of defined portals, created guest accounts, approval methods, whitelist records and database connections.
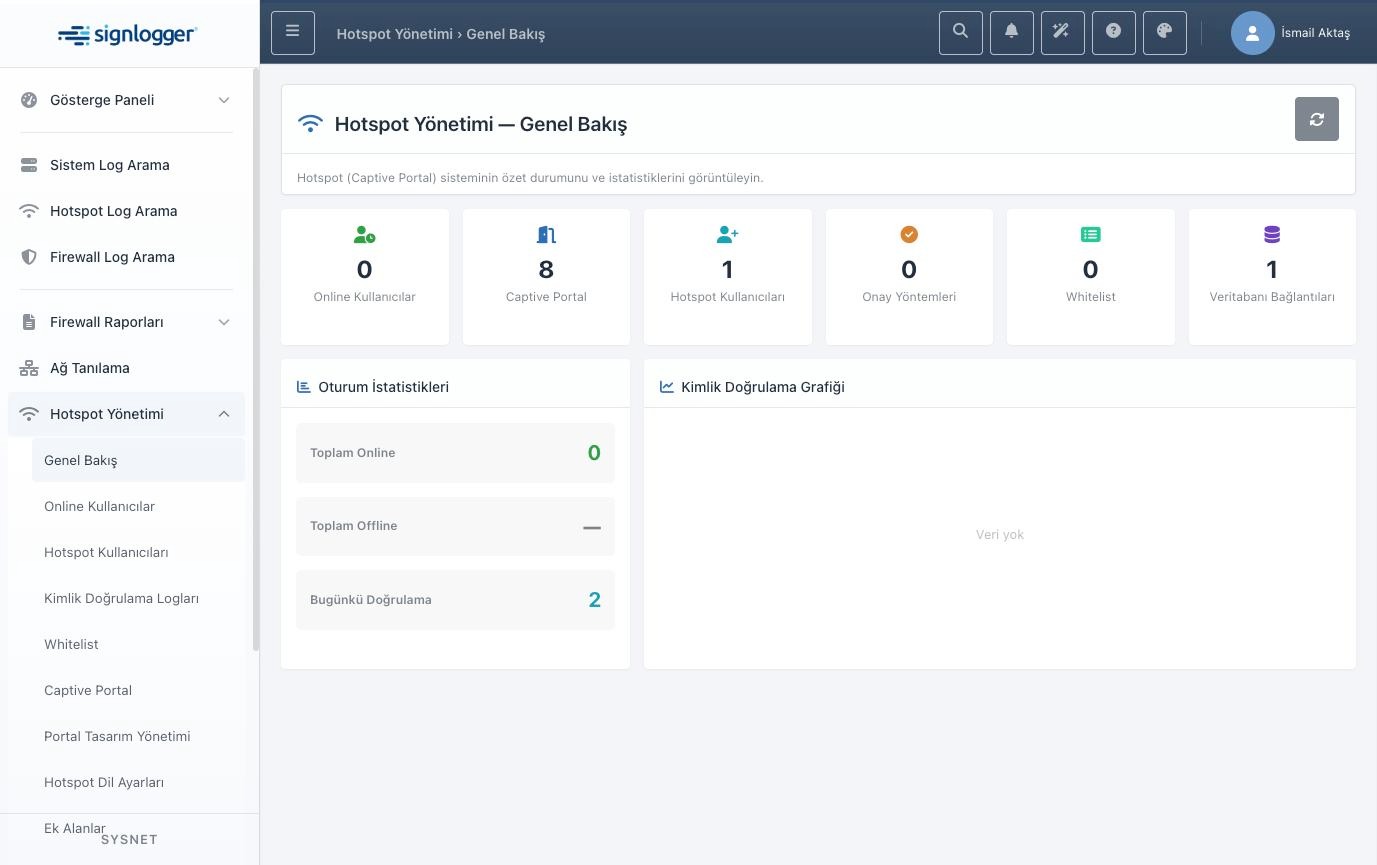
Figure 27 — Hotspot Management Overview: summary cards and the authentication chart.
The Online Users page shows the sessions currently connected. The table includes information such as username, full name, login method, IP, connected device, group and start time. The Offline tab lists ended or expired sessions. If you have permission, you can select a row and end the session instantly; this is the most practical way to cut a suspicious connection or clean up after testing. How a session is dropped depends on the device brand.
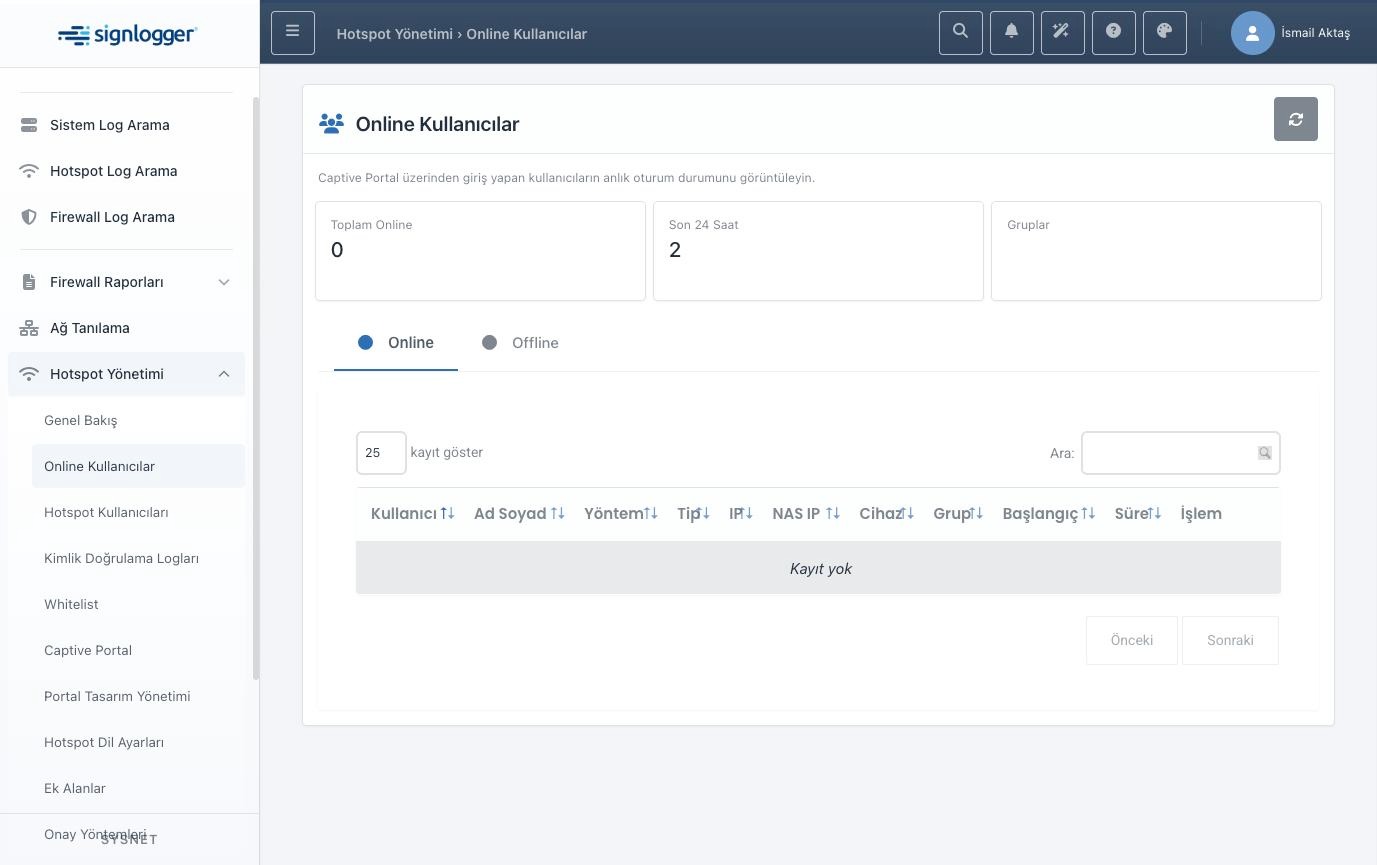
Figure 28 — Online Users: live sessions and session termination.
The Hotspot Users page is where you manage the accounts created through the portal. The list shows the username, full name, the account’s source (created manually or arrived from the portal), its group and its status. Using the buttons at the end of each row you can edit, temporarily deactivate or delete the account.
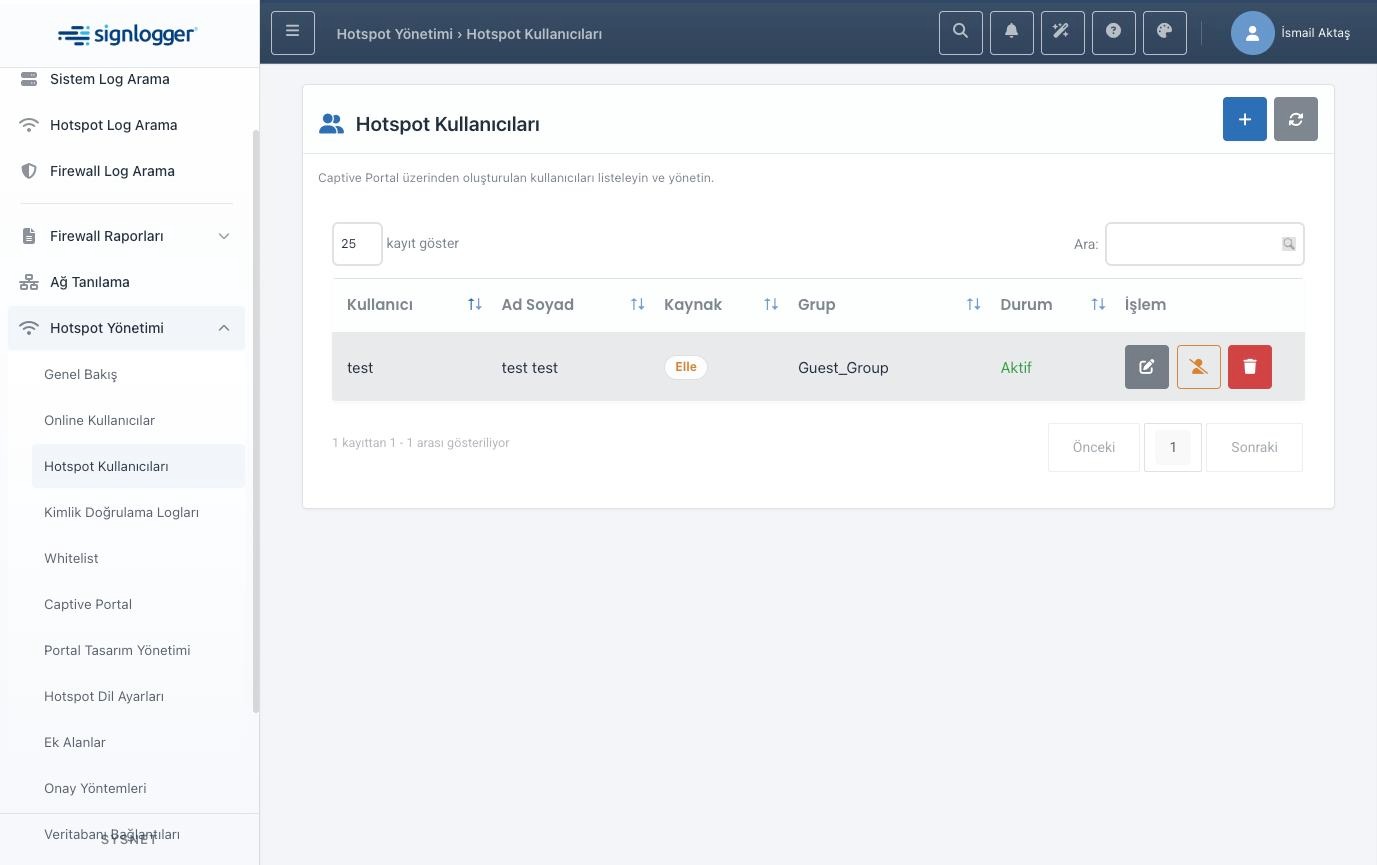
Figure 29 — Hotspot Users: the list of guest accounts and action buttons.
Adding a new guest account is very simple: enter the first and last name, set a unique username, choose which portal and group the account will belong to, enter the password twice and save. Using the eye icon next to the password field you can check what you typed. The Portal/Group selection matters; a wrong choice prevents the user from signing in on the expected portal. If you leave the password field blank while editing, the existing password is kept.
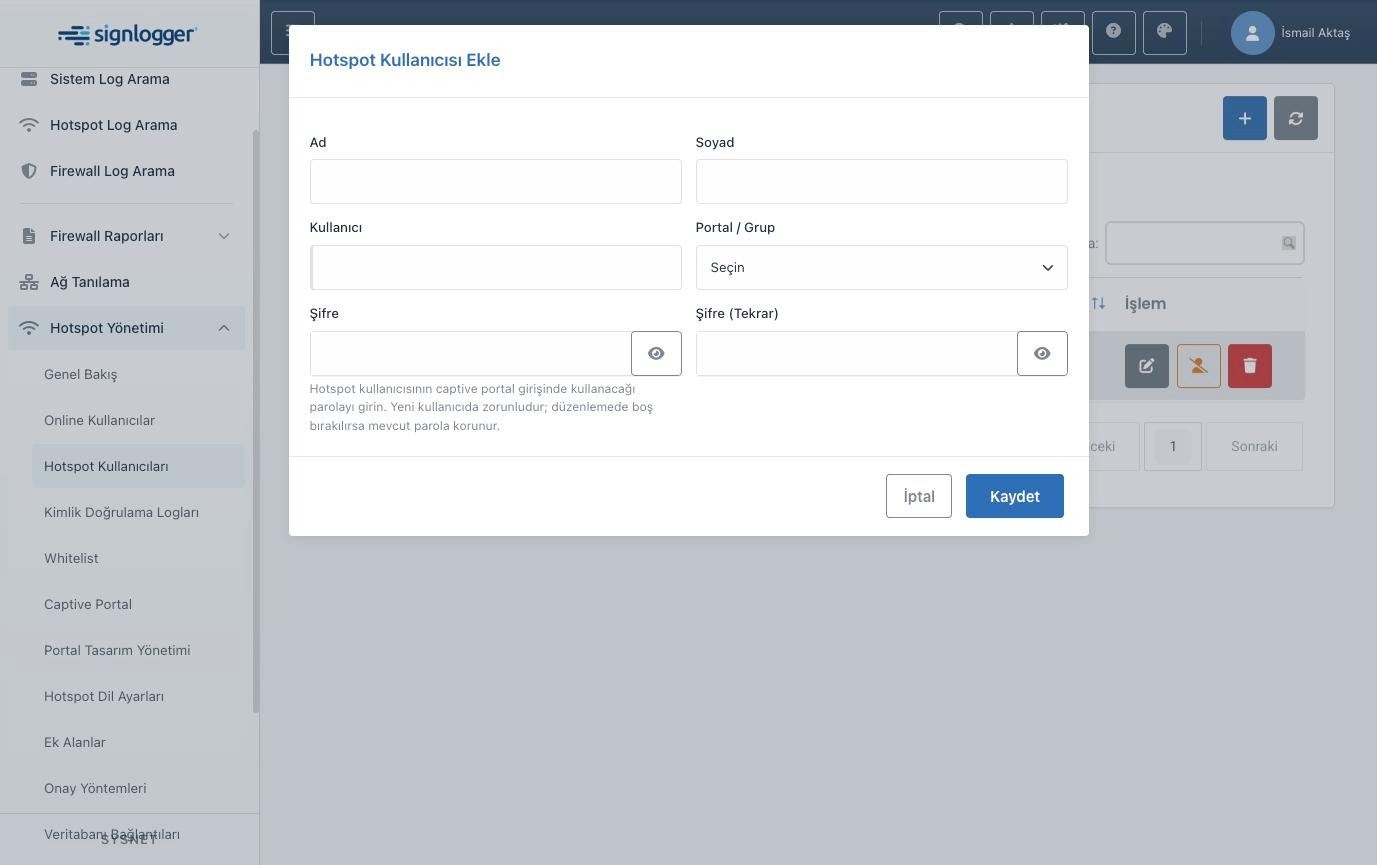
Figure 30 — Add Hotspot User window: full name, username, portal/group and password.
The Whitelist page lets specific devices access the network without ever going through the portal. First you choose which SSID it will work for, then enter the device’s MAC address and, optionally, the owner’s name. To add an entry, a single SSID must be selected from the list; while “All” is selected, adding does not work. For many devices you can do a bulk upload with a CSV or XLSX file, and validate the file first in dry-run mode.
Remember that a whitelist is low-security by nature: MAC addresses can be spoofed and, because modern phones use random MACs, permanent records are unreliable. Use the whitelist for fixed devices such as printers and IoT; put guests through the portal.
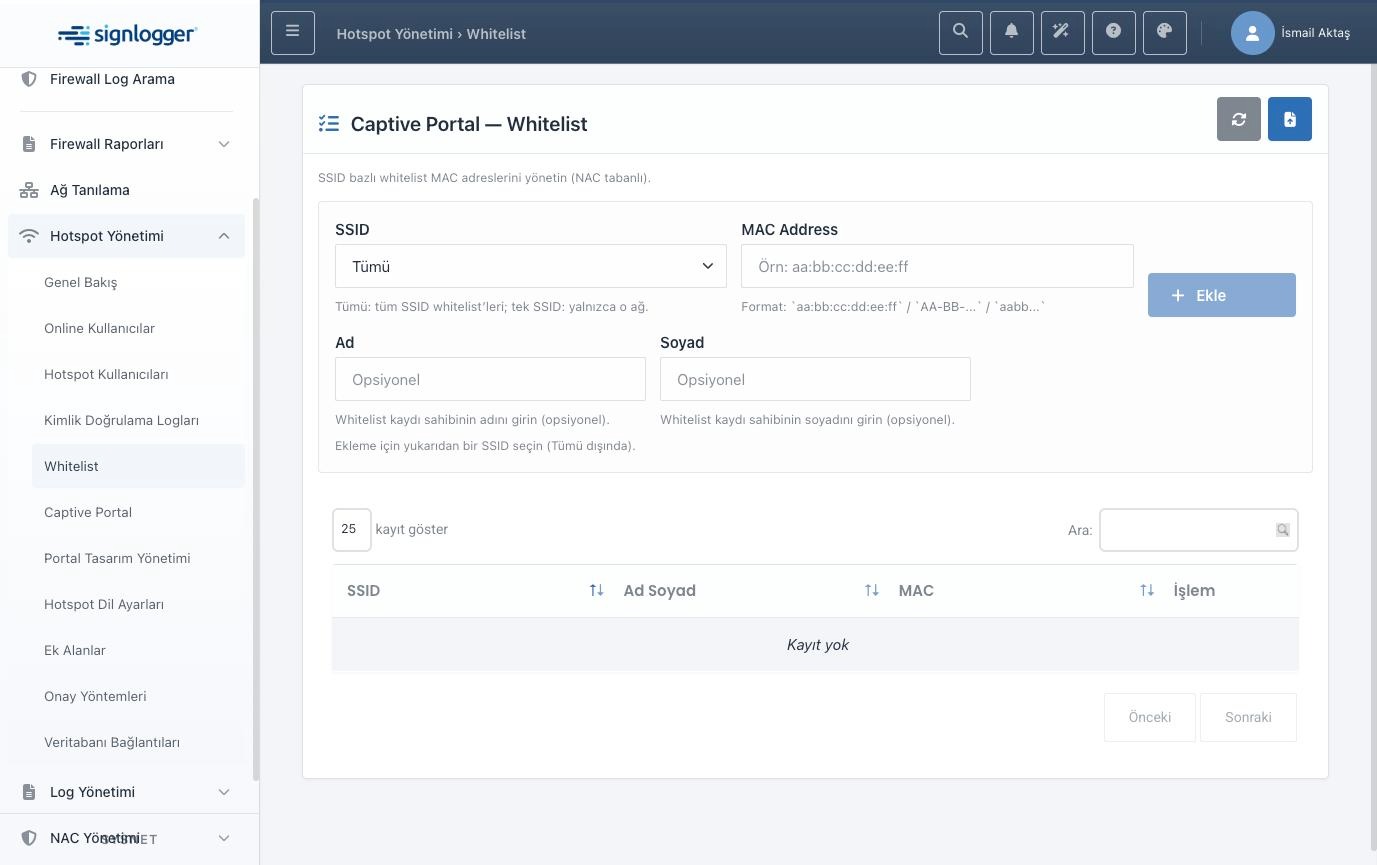
Figure 31 — Captive Portal Whitelist: SSID-based MAC whitelist.
On the Captive Portal page you define the welcome pages. Each record is bound to a device and a location; the portal’s name, default language, allowed firewall IPs, guest network block and post-login redirect address are set here. By uploading logo and background images you can adapt the portal to your corporate identity.
From the verification-methods section you choose which login types the portal will accept: username-password, form approval, SMS verification or sign-in with an LDAP/AD account. With LDAP sign-in, the user’s password is not stored in the product; the directory is consulted only at the moment of verification. The most common issue in this scenario is that the portal’s RADIUS Group setting does not exactly match the user’s group name in the directory; in that case access is rejected even with the correct password. Using a separate directory group for guests is the cleanest solution.
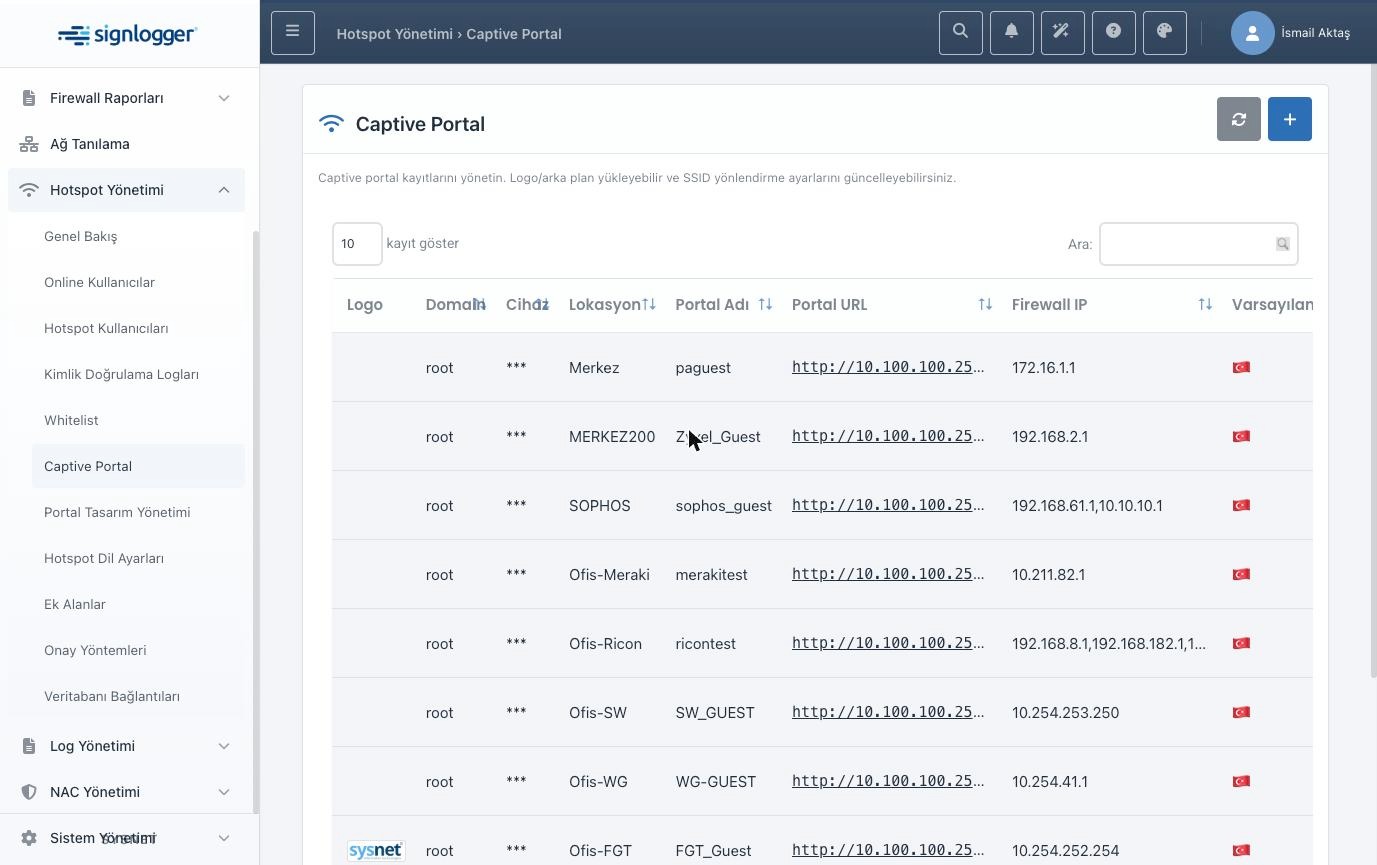
Figure 32 — Captive Portal records: device, location, portal name and portal address.
The Approval Methods page determines how a guest registration is approved, per SSID. There are three options: approval off, user approval or administrator approval. If administrator approval is selected, the name and email address of the people who can approve for that SSID are defined on a separate tab. If user approval is selected, a list is entered so that only addresses from trusted email domains are accepted. Only one approval method can be active for an SSID at a time.
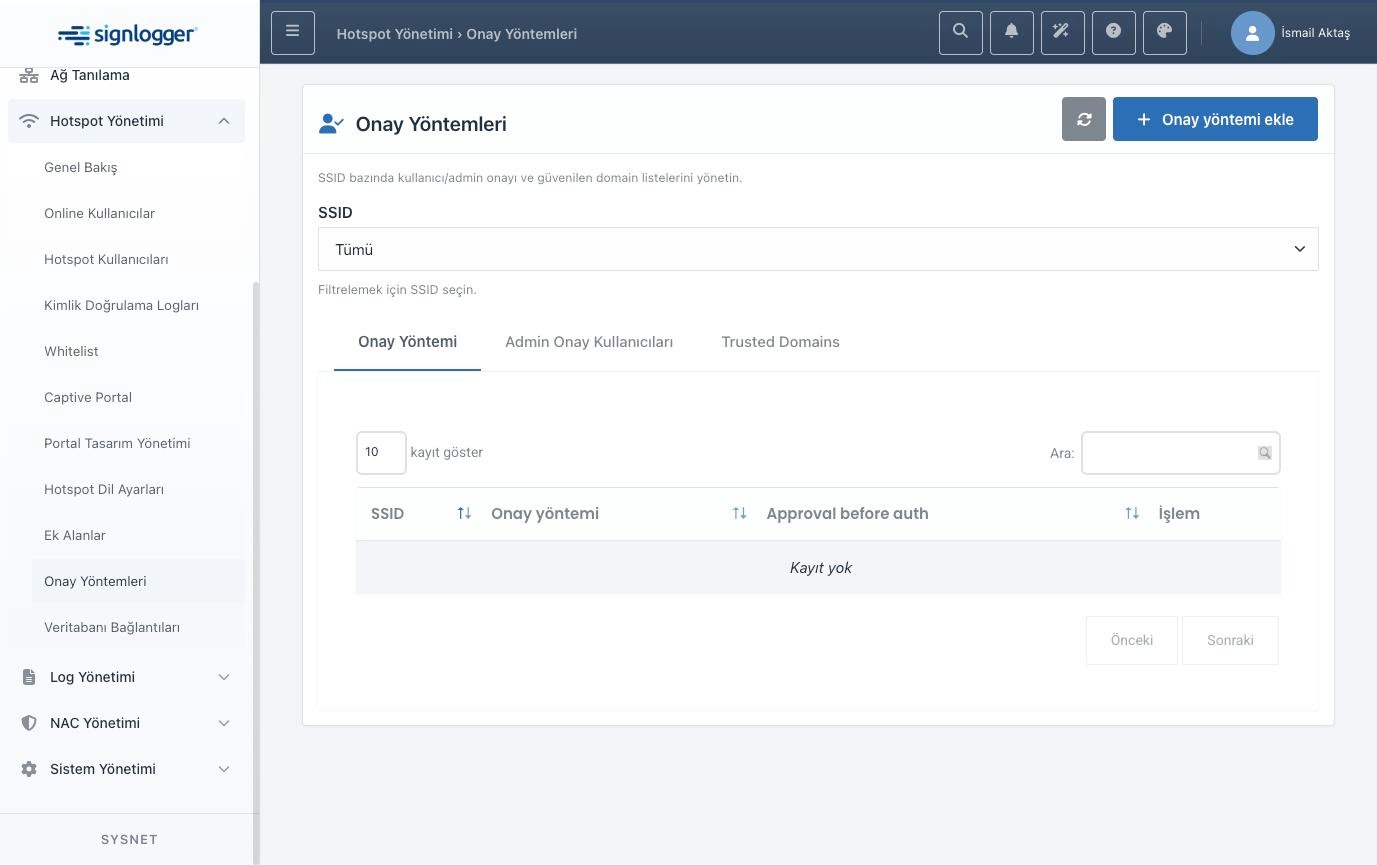
Figure 33 — Approval Methods: SSID-based approval type, administrator approvers and trusted domains.
6. Understanding the user types
There are four identity types in the system, and which one you choose depends on the intended use. Network Users are verified with a local password and are for staff or devices that connect to the corporate network over 802.1x; they are managed from the Network User view in the Objects section. Captive portal users are for guest, hotel or cafe entry points and can be managed both from the Objects section and from the Hotspot Users page. Remote users are verified in LDAP or Active Directory; the password is not held in the product, and the record only carries group membership and the 2FA link. MAC records are for devices that cannot enter a username; printers, cameras and IoT devices are typical examples.
Which list a user appears in is determined automatically by the intended use and group you select when adding them. Accounts assigned to captive portal groups are listed in the Captive Portal User view, and the rest in the Network User view.
7. Typical workflows
7.1. Introducing a new network device
Open the Clients page under NAC Management and press the plus button. Enter the device’s IP address or network block, set a shared secret, choose a recognizable description and the correct device type, and save. Then, in the device’s own management interface, point to SignLogger’s IP address as the RADIUS server and enter the exact same shared secret.
7.2. Adding a guest user
Open the Hotspot Users page under Hotspot Management and press the add button. Enter the first name, last name and a unique username, choose the correct portal and group, type the password twice and save. The user can now sign in from the portal with these details. You can do the same from the Captive Portal User view on the Objects page under NAC Management.
7.3. Adding and authorizing an 802.1x network user
First create a suitable group from the Groups tab on the Objects page. Then add the user from the Local Users tab; choose Network (802.1x) as the Intended Use and tick the group you created. In the final step, bind a policy to this group from the Rules page: define the user group and the 802.1x context as conditions, and a VLAN assignment or access grant as the action.
7.4. Cutting off a user’s access
Find the user on the Objects or Hotspot Users page and deactivate them. Access is cut immediately; any open session is dropped. If you want to remove them permanently, use delete; but for temporary suspensions, deactivation is a safer and reversible method. To drop a device from the network instantly, you can end the session from the Online Users page.
7.5. LDAP / Active Directory integration
Define and test the connection from the LDAP page under Identity Sources. Then, from the Sync Rules tab on the Objects page, map a group or organizational unit in the directory to a NAC group and run the synchronization. Alternatively, you can import only selected users as remote users. Remember that if the AD password will be verified in 802.1x, the server must be joined to the domain.
7.6. Introducing a device by MAC
Create a group of the MAC type from the Groups tab on the Objects page, then select that group on the MAC Addresses tab and add the device’s MAC address. For guest devices that only need to bypass the portal, you can use the Whitelist page under Hotspot Management.
8. Security and multi-tenant deployment notes
In multi-tenant deployments, each administrator sees and manages only the devices, groups and users of the tenant they are authorized for; out-of-scope operations are rejected. Thanks to role-based authorization, a hotspot operator can manage only guest accounts and cannot access all of NAC.
Deactivating an account is not just a visual change in the list; verification is rejected at the RADIUS level. This is why it is the safest method for temporary suspensions. Enable the second factor for critical accounts, and remember that all administrative changes are written to the audit log.
9. Supported network devices
The NAC module is designed to work with common firewall, switch and access point brands at both the authentication and the session-disconnection level. Examples include FortiGate, Palo Alto, Sophos, SonicWall, WatchGuard, Zyxel, Aruba, Ruckus and Cisco/Meraki products. How a session is terminated depends on the device brand; the product selects the appropriate method itself. In cloud-based solutions, because the access grant is issued on the cloud side, it is not a problem for the device to be behind any firewall; what matters is that the client can reach both the portal and the relevant cloud service.
10. Frequently asked questions and tips
The user enters the correct password but cannot connect
First look at the Sign-in Logs; the reason for rejection is written there. The most common causes are the account being inactive or expired, the user being in a group that does not match the policy, and the device not being defined in Clients or the shared secret not matching the one on the device.
A rule appears to never match
Usually the group name is misspelled. In the Rule Wizard, select the group from the list instead of typing it by hand. Also check that the rule or group is not inactive, and verify the priority order.
Do Hotspot Users and NAC Objects show different data?
No. Both look at the same canonical source; a change you make in one appears instantly in the other.
Why is 2FA not requested in 802.1x?
This is expected behavior. In the 802.1x/EAP flow the user cannot be asked for a code mid-conversation, so the second factor is skipped. 2FA works in interactive flows such as firewall administrator login, VPN and the portal.
Can I drop a device from the network immediately?
Yes. On the Online Users page under Hotspot Management you can select the relevant session and end it. If you do not want the user to reconnect, also deactivate their account.