About This Guide
If you are reading this guide for the first time, start here: it summarizes on a single page what the module does, who it is for, and which section you should read and when.
What does Agent Management do?
The Agent Management module lets you manage your fleet of SignLogger agents installed on Windows machines from a single, central location. Instead of connecting to each machine in the field one by one, you view, group, apply policy to, and license every agent from here.
Agents perform four core functions:
| Function | What it does |
|---|---|
| Log collection | Collects Windows event logs (Security / System / Application) and sends them to the SignLogger server. |
| 2FA verification | Enforces second-factor verification at Windows sign-in (TOTP / SMS); supports emergency-access and exemption scenarios. |
| Zero-touch deployment | With the same signed MSI plus a single EnrollToken, machines register themselves automatically at startup. No per-machine manual work is required. |
| Licensing | Agents are licensed one by one or automatically from a license pool reserved exclusively for agents. |
Who is it for?
This guide is written for the IT and system administrators who set up the agent fleet and operate it day to day. It targets users who can distribute software via Windows Group Policy (GPO) or SCCM and who have a privileged account on the server side.
Prerequisites
Before starting the steps in this guide, make sure the following are ready:
| Prerequisite | Description |
|---|---|
| Super User privilege | To see the entire module, you need root domain / Super User privilege. If your privileges are insufficient, you will see a dash (—) on the cards and a "Try again with Super User" warning. |
| Pre-Shared Key (PSK) | A Pre-Shared Key must be defined so that agents can register with the server. When it is not defined, no agent can register. |
| Deployment infrastructure | For zero-touch deployment, it must be possible to push the MSI and EnrollToken to the machines in the field via GPO or SCCM. |
| MSI package | You must have the signed SignLoggerAgent.msi file provided by SYSNET. |
How should this guide be read?
| Your situation | Section you should read |
|---|---|
| I am setting up the system from scratch | Follow the Quick Start section from beginning to end. It brings the fleet online in 9 steps. |
| I want to learn a specific screen | Go to the relevant page in the Page Guides section. Every control, every button, and every badge is explained one by one. |
| I need to perform a specific task | See the short recipes in the Common Operations section. |
| I am experiencing a problem | Go to the Troubleshooting / FAQ section. Each entry follows a symptom → cause → solution format. |
Notations used in this guide
Three types of information boxes are used throughout the text:
Note: Provides additional information, a behavior explanation, or a detail worth keeping in mind.
Caution: Indicates situations that require attention and that, if done incorrectly, may cause a service outage or a security vulnerability.
Tip: Offers a suggestion and best-practice advice to make your job easier.
About the screenshots
The screenshots in this guide were prepared with sample data so that they can show all states of the interface (populated tables, different badges, pop-up windows). In your own installation, agent names, numbers, dates, and license keys will be different; the layout, controls, and buttons of the screens are the same.
What do the colors in the panel mean?
Throughout the SignLogger interface, colors carry a consistent meaning; when reading a status, look at the color first:
| Color | Meaning | What you should do |
|---|---|---|
| Green | Good / active | No action needed. This is the expected, normal state. |
| Yellow | Attention / missing | Not blocking, but something is missing (e.g. an unlicensed agent, an unhealthy source). Address it soon. |
| Red | Blocking issue | A condition that halts operation (e.g. PSK not set, agent offline). Resolve it as a priority. |
| Gray / dash (—) | No data or no permission | First try the Refresh button. If it persists, check your permissions. |
Glossary
The concepts used throughout the guide. Whenever you get stuck on a term, you can return to this page.
| Term | Meaning |
|---|---|
| Agent | A small software service installed on a Windows machine that collects event logs and sends them to SignLogger, and optionally enforces 2FA. |
| Pre-Shared Key (PSK) | Pre-Shared Key. The shared secret required for agents to register with the server for the first time. While it is not defined, no agent can register. It must be at least 8 characters. |
| EnrollToken | The registration key given to machines via GPO/installation in zero-touch deployment; it carries the server host, port, and certificate fingerprint information. |
| agent_token | The identity token issued to each agent uniquely after registration is completed. If it is revoked, the agent is forced to register again. |
| Policy Version (policy_version) | The release number of the collection/whitelist policy. It increments by one with each change; agents pull the most recently published version. |
| Enroll / Registration | The process by which an agent identifies itself to the server using the PSK (and, in deployment, the EnrollToken) and enters the inventory. |
| 2FA Mode (Off / Monitor / Enforce) | The strictness of the second factor at Windows sign-in. Off = not prompted. Monitor = prompted but not blocked on failure. Enforce = sign-in is blocked on failure (fail-closed). |
| Break-glass | Emergency-access account. It bypasses 2FA only at the physical console; it is still blocked over RDP, and every use generates a security alarm. |
| Tamper Protection | Protection of the agent against unauthorized stopping, removal, or configuration changes on the local machine. Managed with an unlock password. |
| Offline TOTP | A pre-registered user "seed" that lets the agent verify a TOTP code locally even when it cannot reach the server. |
| Heartbeat | The agent's "I am online" signal. If no signal arrives within the specified time, the agent is considered offline. |
| Poll interval | The frequency (in seconds) at which the agent collects logs and pulls policy from the center. |
| device_id (Device No) | The device number used in license assignment. It is created when the agent registers for the first time; without it, no license can be assigned. |
| Inherit | Inheriting a setting from a higher level (the agent type default or the global policy). It means "the group does not interfere." |
Quick Start
The shortest way to bring the fleet online from scratch when there are no agents yet. Nine steps; each step tells you which page and tab to go to. For detailed explanations of the steps, refer to the relevant page guide.
Deployment flow — overview
Setup consists of four logical stages. Do not break the order: each stage uses the output of the previous one.
| # | Stage | Where it is done | Result |
|---|---|---|---|
| 1 | Prepare the connection | Agent Settings → Connection | The PSK is defined and the listening port is set. Agents become able to register. |
| 2 | Set up deployment | Agent Settings → Deploy Agent | The host is saved, the EnrollToken is generated, and the MSI + token go to the field via GPO. |
| 3 | License the agents | Agent Licenses | Keys are added to the pool; licenses are assigned to registering agents. |
| 4 | Apply policy | Agent Groups + Agents | Groups are created, roles and 2FA are defined, and agents are assigned to groups. |
Step 1 — Set the Pre-Shared Key (PSK)
The Pre-Shared Key is the shared secret that agents use when registering with the server. No agent can register until it is defined, which is why this is the first step.
- In the left menu, click Agent Management → Agent Settings.
- The page opens on the Connection tab. Find the Pre-Shared Key (PSK) section.
- In the New shared secret box, type a strong password at least 8 characters long.
- If you want to verify what you typed, click the eye icon next to the box to make the text visible.
- Click the Save button.
- Confirm that the Status information in the header reads set ✓ (green). For security, the box is cleared automatically.
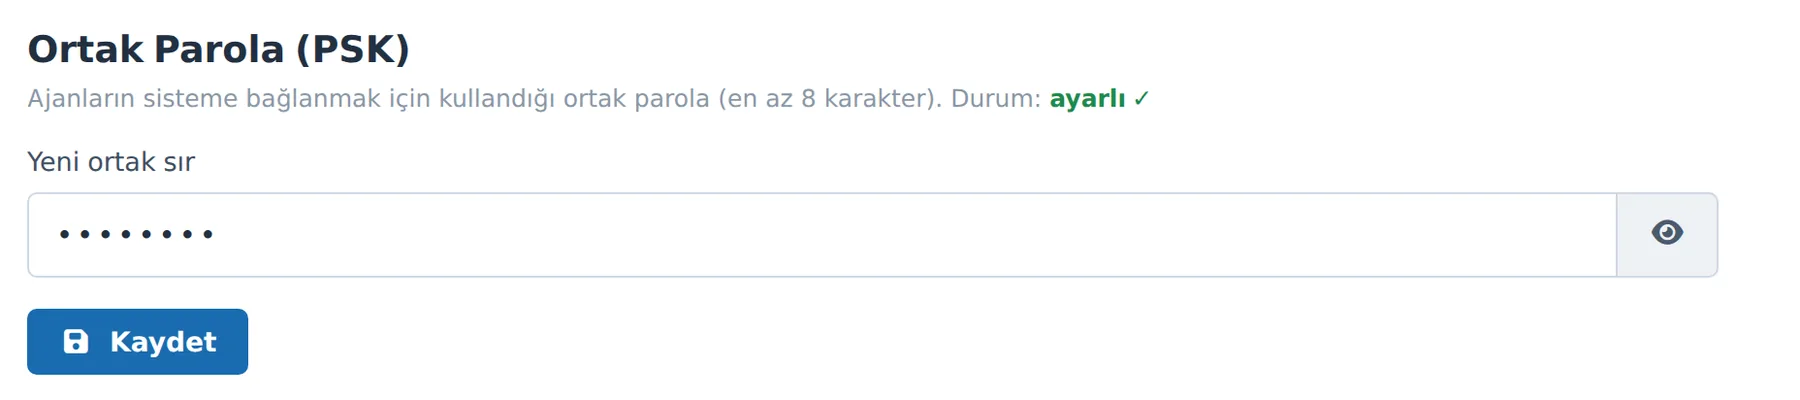
Figure 1. Agent Settings → Connection tab, Pre-Shared Key (PSK) section. When the status is "set ✓", agents can register.
Caution: If you later change the Pre-Shared Key, already-registered agents are not affected; however, agents that will newly register, or that must re-register because their token was revoked, must know the new key.
Step 2 — Verify the connection port
- On the same Connection tab, look at the Connection Port section.
- Check the value in the Listening port box. The default is 8443.
- If you need to change it, type the new port (between 1–65535) and click Save.
- Confirm that the new value appears in green on the Active port: line below the box.
Caution: When you change the port and save, the service restarts automatically to apply the new port; a brief interruption may occur during this time. Some ports are reserved by the system (for example 80, 443, 1812, 514). If you enter a reserved port, the change is rejected.changerestarts automatically
Note: When you change the port, the EnrollToken's version increments automatically, so newly registering agents learn the new port. However, you must update the token value in the GPO manually (see Step 5).
Step 3 — Save the server host address
- Switch to the Agent Settings → Deploy Agent tab.
- If there are yellow warning boxes at the top of the page (no PSK / no host / certificate fingerprint not ready), resolve them first.
- In the SignLogger host (IP/FQDN) box, type the server address that agents will connect to. Example:
10.100.100.253orsignlogger.firma.local. - Click the Save button next to it. You should see the message "Agent deployment settings saved."
- If you wish, you can type a label identifying your organization in the Tenant/Org label box (optional, for information only).
Note: If you leave the host box empty and save, the server's auto-detected IP address is used. Using a fixed, correctly resolving FQDN keeps you unaffected by future IP changes.
Step 4 — Copy the EnrollToken
- On the same Deploy Agent tab, find the EnrollToken box. The box is read-only; the version v… information is shown above it.
- Click the Copy button next to the box. You will see the message "Token copied."
- On the Meta line just below, check that the host / port / cert-fp information is correct.

Figure 2. The EnrollToken box, the Copy/Reissue buttons, and the Meta line summarizing the token contents.
Caution: If the Meta line reads "(no pin)" instead of a cert-fp, the token was generated without server certificate pinning, and protection against man-in-the-middle (MITM) attacks is weak. If possible, refresh the token with Reissue once the fingerprint is ready.
Step 5 — Deploy the MSI and EnrollToken via GPO
This step is done once per customer/organization. The MSI is static: the same signed package goes to all machines, and no machine-specific parameter is required.
- In Group Policy Management, edit the relevant GPO.
- Assign the MSI: at Computer Config → Policies → Software Settings → Software Installation, Assign the
SignLoggerAgent.msifile. - Add a Registry Preference: create a new value under Computer Config → Preferences → Windows Settings → Registry.
- Enter the following key/value pair and paste the token you copied in Step 4 into the Value data field.
Key   : HKLM\SOFTWARE\SYSNET\SignLoggerAgent
Value : EnrollToken
Type  : REG_SZ
Data  : <the token you copied from the page>
Alternative — installation via command line / SCCM. If you will use SCCM or a manual installation instead of GPO, use the following command (replace <token> with the value you copied):
msiexec /i SignLoggerAgent.msi /qn ENROLLTOKEN=<token>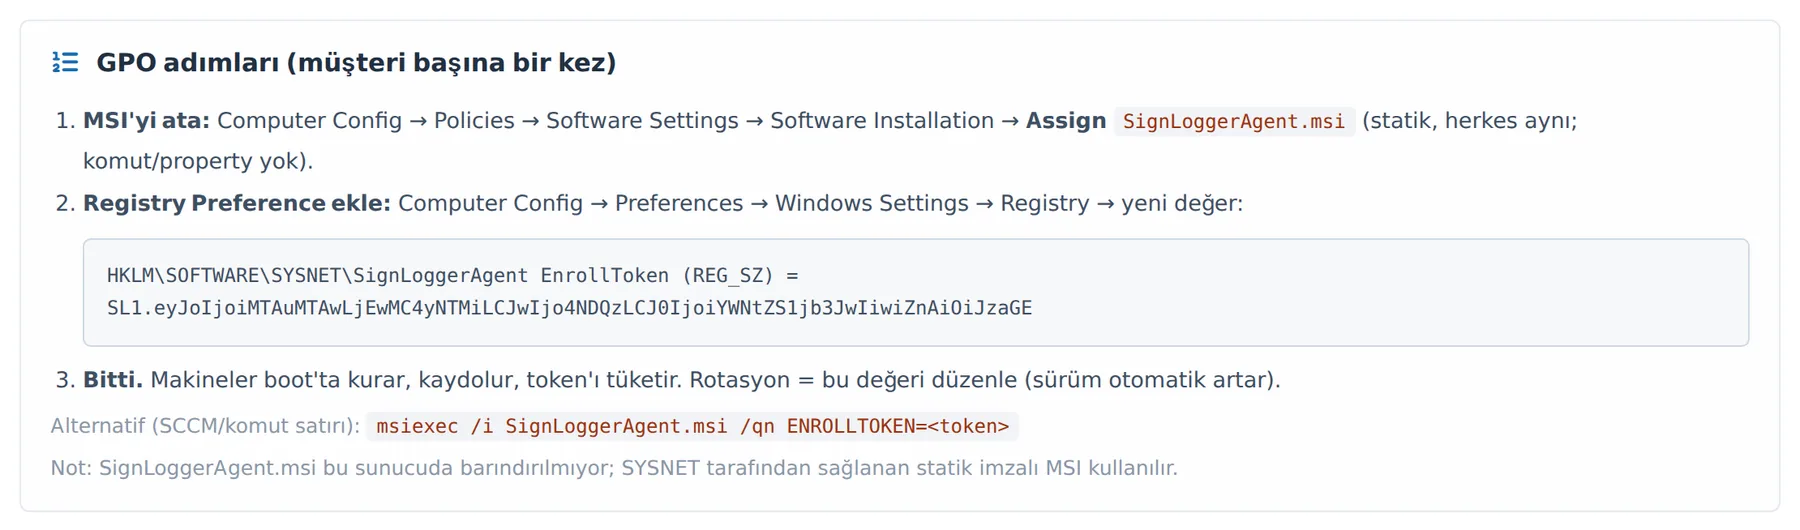
Figure 3. The GPO steps at the bottom of the Deploy Agent tab and the command-line alternative.
Step 6 — Wait for the machines to register automatically
At startup, the target machines install the MSI, register themselves with the EnrollToken + PSK, and consume the token. No per-machine manual work is required.
Note: The arrival of registrations depends on the machines restarting and on the GPO application cycle. For testing, you can run
gpupdate /forceon a target machine and restart it.
Step 7 — Verify that the agents have arrived
- In the left menu, open the Agent Management → Agents page. Registering machines start to appear in the table.
- If the list looks empty, click the Refresh button (cycle icon) at the top right of the card.
- On the Agent Management → Overview page, watch the Total Agents count increase and check the online breakdown.
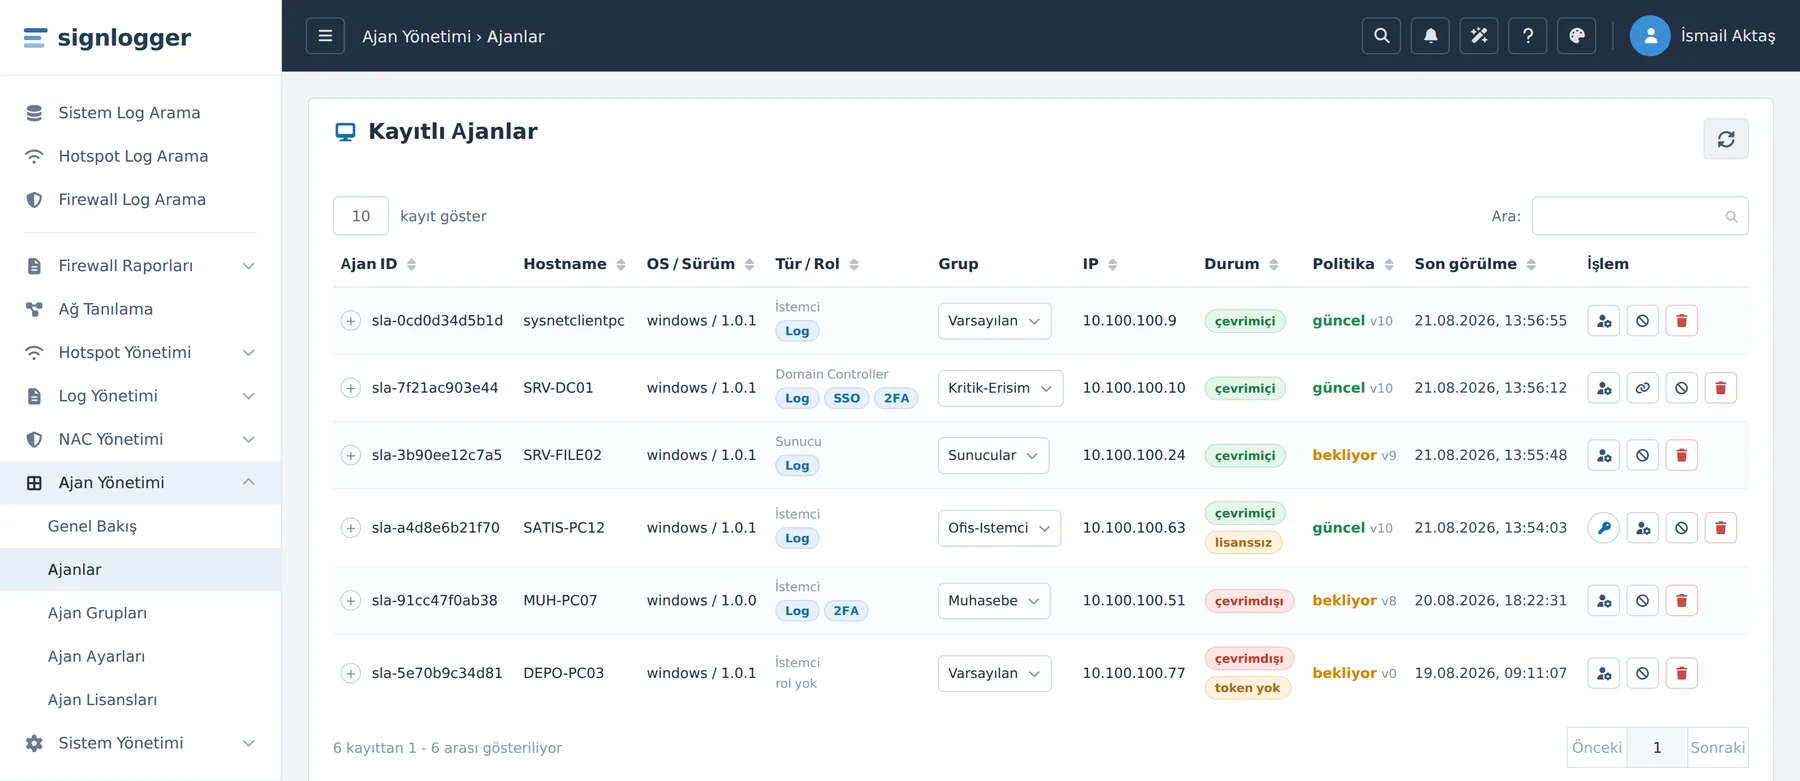
Figure 4. The Agents page: registering machines are listed in the inventory. New agents initially arrive with an "unlicensed" badge.
Step 8 — Assign licenses
- Open the Agent Management → Agent Licenses page.
- On the License Pool tab, click the Add License Key button; paste your keys, one per line.
- Before saving, verify how many keys will be added with Preview, then click Add to Pool.
- To grant a license, switch to the Unlicensed Agents tab and click the Assign button on the relevant agent's row.
- If the number of agents is large and constantly growing, instead of assigning one by one, turn on the Enable automatic assignment toggle on the License Pool tab.
Tip: Before turning on automatic assignment, make sure there are enough Assignable keys in the pool. If the pool runs empty, new agents silently remain unlicensed.
Step 9 — Add to a group and apply policy / 2FA
- On the Agent Management → Agent Groups page, create a group with New Group (e.g.
Servers,Accounting). - In the window that opens, set the roles (Log Collection, 2FA), the 2FA enforcement mode, the logs to collect, and tamper protection.
- Click Save.
- Return to the Agents page and select the relevant group from the drop-down list in each agent's Group column.
- After a few minutes, use Refresh to confirm that the value in the Policy column has changed from pending to current.
Note: Group and global policy changes are not instantaneous; agents pull the new policy on their next poll/heartbeat cycle. The default poll interval is 120 seconds.
Deployment checklist
At the end of setup, make sure all of the following items are checked:
| ✓ | Check | Where to verify |
|---|---|---|
| ☐ | Pre-Shared Key (PSK) set ✓ | Overview → SHARED SECRET (PSK) card |
| ☐ | Listening port correct and active | Agent Settings → Connection → "Active port" |
| ☐ | Host address saved, no yellow warnings | Agent Settings → Deploy Agent |
| ☐ | EnrollToken generated, Meta information correct | Agent Settings → Deploy Agent → Meta line |
| ☐ | GPO Registry value matches the current token | Group Policy Management |
| ☐ | Agents visible in the inventory, online | Agents page + Overview |
| ☐ | No agent still has the unlicensed badge | Agents page → Status column |
| ☐ | Agents assigned to the correct groups | Agents page → Group column |
| ☐ | Policy column shows current | Agents page → Policy column |
| ☐ | Global collection policy published | Agent Settings → Global Collection Default |
Page Guides
This section covers the five pages in the Agent Management menu one by one. For each page it explains: where to go, what appears on the screen, what each control does, and the steps for typical operations.
Where is it in the menu?
When you click the Agent Management heading in the left menu, five sub-pages appear. The entire module requires root domain / Super User privilege.
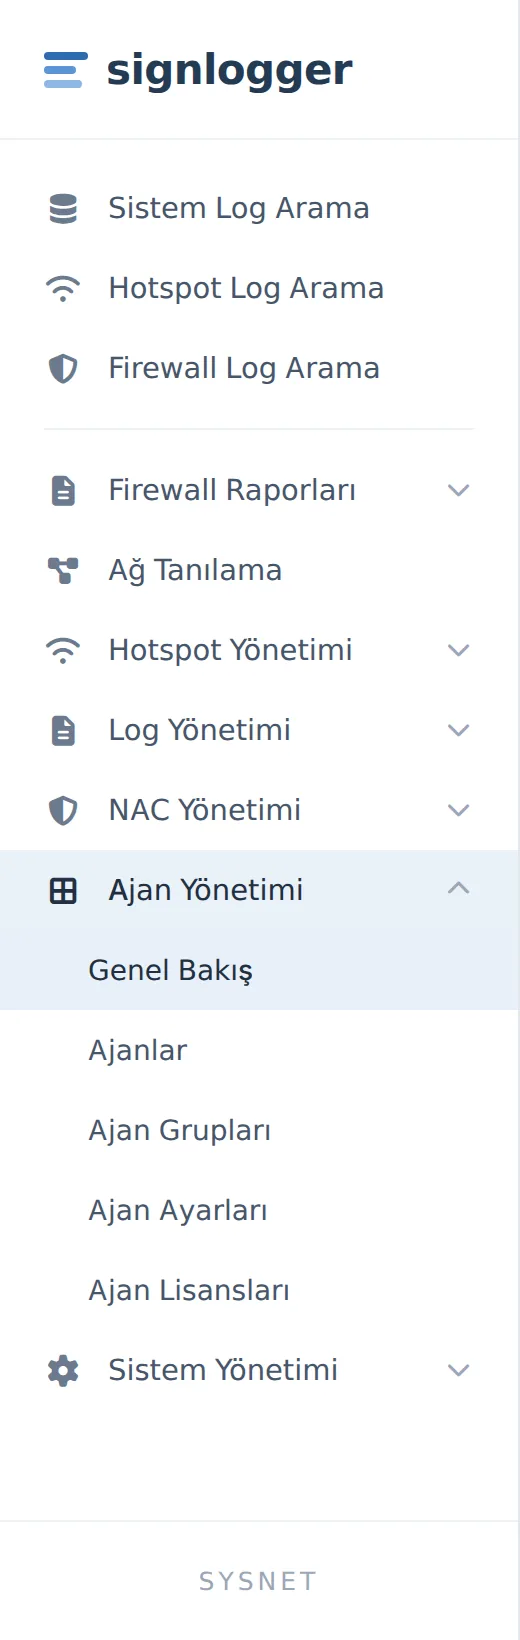
Figure 5. The Agent Management heading and its five sub-pages in the left menu.
| Page | Type | What it is used for |
|---|---|---|
| Overview | Read-only | Summarizes the current state of the fleet on a single screen. No settings are changed here. |
| Agents | Inventory + operations | The list of registered agents. Group assignment, role editing, token revocation, license assignment, registration deletion. |
| Agent Groups | Policy | Roles, 2FA enforcement, break-glass, logs to collect, and tamper protection are defined at the group level. |
| Agent Settings | Global settings | Connection (PSK + port), global collection policy, and zero-touch deployment (EnrollToken). |
| Agent Licenses | License pool | A pool of license keys reserved exclusively for agents, and assignment operations. |
Note: If you see a dash (—) instead of a value on a page and a yellow "This module requires root domain scope. Try again with Super User." warning appears, your privileges are not sufficient to see this scope. Sign in with a Super User account.
Overview
Summarizes the current state of the fleet on a single screen: how many agents there are, how many are online, whether the shared secret is set, and the health of the sources collecting sessions.
The Overview page only displays information — no setting is changed here; all values are read-only cards. For the places where you need to make changes, the page directs you to the relevant section. It is recommended that you begin your daily check on this page.
Going to the page
- In the left menu, click the Agent Management heading.
- From the sub-menu that opens, click Overview.
- When the page opens, you see a card titled Windows Agents — Overview at the top, with summary cards in two rows below. Values load automatically as soon as the page opens.
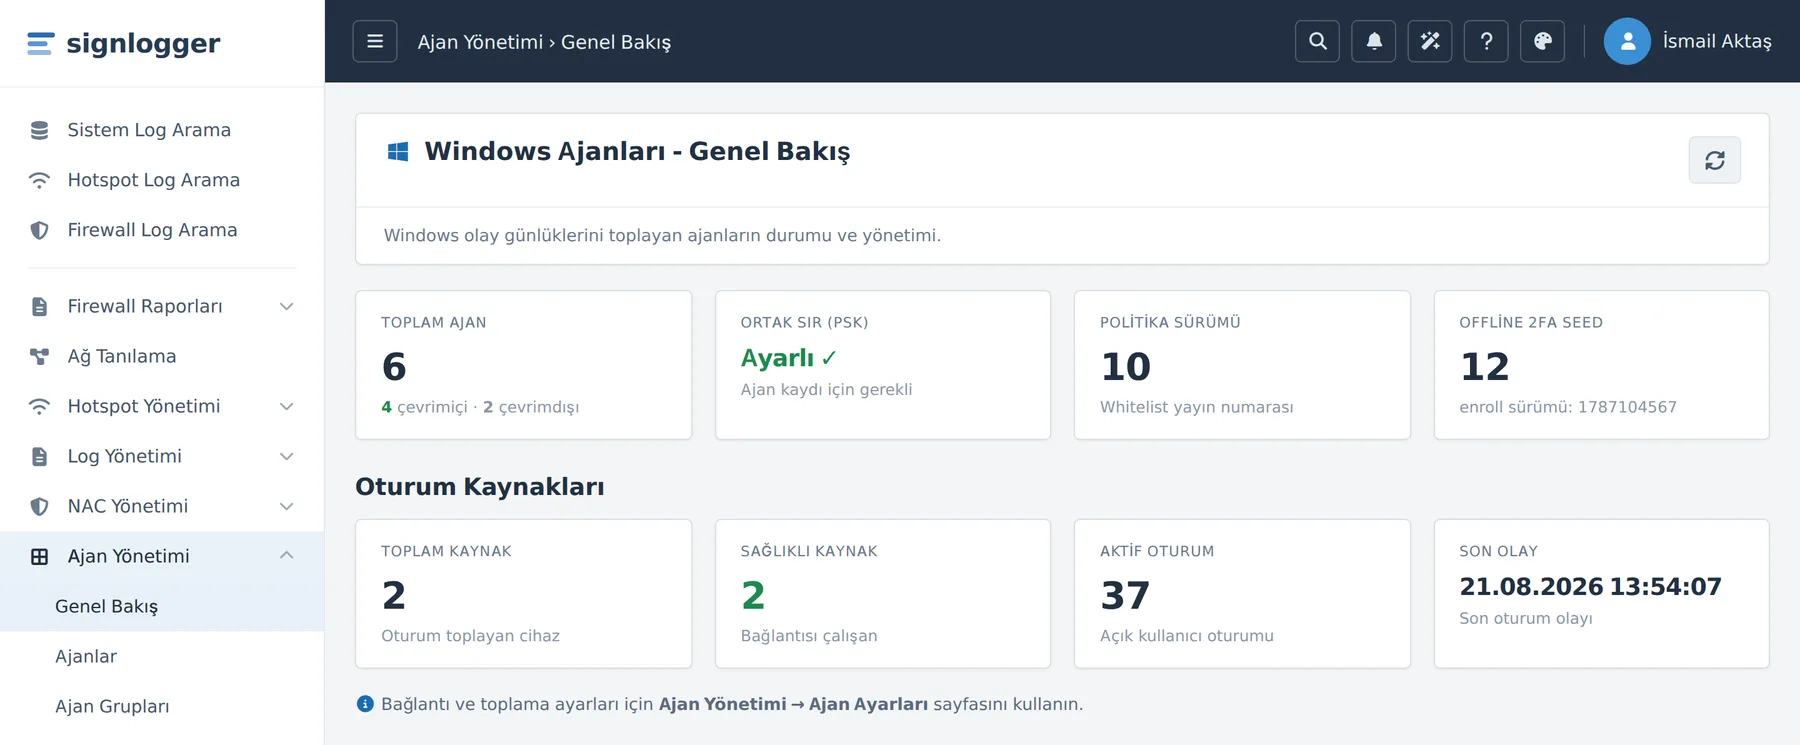
Figure 6. The entire Overview page: the agent fleet cards at the top and the Session Sources cards at the bottom.
Refreshing the data
- Click the refresh button (circular arrow / sync icon) at the right of the top header card.
- Both the agent counters at the top and the Session Sources cards at the bottom are recalculated and updated.
Note: The page values do not stream live automatically. When you want to see the most up-to-date state, use the refresh button or re-enter the page.
Top row — Agent fleet cards
The four cards in the top row summarize the general state of the agents and the registration/policy infrastructure.

Figure 7. Top row: Total Agents, Shared Secret (PSK), Policy Version, and Offline 2FA Seed cards.
| Card | What it shows | How to interpret it |
|---|---|---|
| Total Agents | The total number of agents registered in the system. Below the card there is also an X online · Y offline breakdown. | The online count is shown in green. An agent is considered online if it has sent a heartbeat within the specified time, and offline otherwise. If the offline count is higher than expected, the agent service may have stopped on the relevant machines. |
| Shared Secret (PSK) | Whether the shared secret required for agents to register with the server is set. | If it is Set ✓ (green), new agents can register. If it is NOT SET (red), no agent can register. |
| Policy Version | The release number of the collection/whitelist policy in effect. | This number increments by one with each policy change. Agents pull the most recently published version; this value is the reference number of the current policy distributed to the fleet. |
| Offline 2FA Seed | The number of user "seeds" defined for offline 2FA. The enroll version value is also shown below it. | Gives the number of users (with completed registration) for whom a TOTP code can be verified even without server access. "enroll version" is the current version number of the registration token. |
Caution: If the Shared Secret (PSK) card appears NOT SET (red), agents cannot register with the server at all and the fleet cannot grow. The shared secret is not defined from this page but from the Agent Management → Agent Settings → Connection tab. It must be at least 8 characters.
Bottom row — Session Sources cards
The four cards under the Session Sources heading show the state of the sources that collect user session (login / logout) information. This generally covers agents in the Domain Controller role.

Figure 8. Bottom row: Total Sources, Healthy Sources, Active Sessions, and Last Event cards.
| Card | What it shows | How to interpret it |
|---|---|---|
| Total Sources | The number of devices (sources) that collect session information. | Indicates how many separate sources are sending session data. |
| Healthy Sources | The number of sources whose connection is working without problems. | If all sources are healthy, the value is shown in green; if some are unhealthy, in yellow. If you see yellow, some sources have lost their connection or stopped sending data. |
| Active Sessions | The number of user sessions currently open. | Gives the total number of users currently signed in on the machines in the fleet. |
| Last Event | The time of the most recently received session event. | Shows when the most recent session activity arrived. If you hover the mouse pointer over it, the exact value appears as a tooltip. If the value is very old, the session collection flow may have stopped. |
Note: If the Healthy Sources count is lower than Total Sources, or if Last Event points to a very old time, there is a break in the session collection chain. Check the agent service and network connection of the source device.
Where to go from here
The Overview only shows status; to take action, go to the relevant pages. There is also a navigation line at the very bottom of the page.
| What you want to do | Go to |
|---|---|
| Shared secret (PSK), port, collection policy, agent deployment | Agent Management → Agent Settings |
| View individual agents, grouping, role editing, registration deletion | Agent Management → Agents |
| Group policy, 2FA enforcement, tamper protection | Agent Management → Agent Groups |
| License pool and license assignment | Agent Management → Agent Licenses |
Tips and notes
- Initial setup order. When you first enter the page, first make sure the Shared Secret (PSK) card is Set ✓; otherwise agents do not appear at all. Then watch the Total Agents count increase to confirm that registrations are arriving.
- Colors carry status. Green = good, yellow = attention, red = blocking issue. Neutral (colorless) numbers are informational only; base your decisions on the colored indicators.
- A dash (—) is not always an error. If a card shows a dash, either that data has not loaded yet or your privileges are not sufficient to see that section. First try the refresh button.
- Rise in offline agents. If the offline count in the "X online · Y offline" breakdown has spiked suddenly, there may be a widespread network or service problem; check the agent service on the relevant machines.
- Note the policy version. When tracking whether a policy change has propagated to the fleet, comparing the version number before and after the change makes your job easier.
Agents
The central inventory of all Windows agents that have registered with the shared secret. All per-agent operations are carried out from this page.
On this page you see each agent's online/offline status and its license and policy compliance. You also assign the agent to a group, turn its roles (Log / 2FA) on and off, revoke its token, assign a license, or delete the registration entirely.
Going to the page
- In the left menu, click Agent Management → Agents.
- When the page opens, a card titled Registered Agents and the agent table below it load.
- To refresh the list manually, click the Refresh button (cycle icon) at the top right of the card.
Figure 9. The Registered Agents table. Each row represents one agent.
Note: If no agents are registered yet, the table reads "No registered agents. When an agent is installed and registers with the shared secret, it appears here." This is not an error; the installation has not yet reached the field.
Table columns
Each row represents one agent. The meaning of the columns:
| Column | What it shows |
|---|---|
| Agent ID | The agent's unique identifier (shown as code). It is the value that identifies the agent in operations. |
| Hostname | The computer name of the machine on which the agent is installed. |
| OS / Version | The operating system and the version of the agent software (in the form OS / Agent Version). |
| Type / Role | At the top, the agent type (Client, Server, or Domain Controller); below it, the active role badges: Log, SSO, 2FA. If there is no role, it reads "no role". |
| Group | The agent group to which the agent belongs. It appears as a drop-down list; you can change it directly from here. |
| IP | The agent's primary IPv4 address. |
| Status | An online (green) / offline (red) badge. Additional labels: (no token) if it has no token, unlicensed (yellow) if it is unlicensed. |
| Policy | Shows whether the agent's collection policy is current or pending, and the policy version applied on the agent (such as v0, v3). "pending" means the agent has not yet received the most recently published policy. |
| Last seen | The date/time the agent last reached the server. Shown in local time format; if never seen, "—". |
| Action | Agent-specific action buttons. For details, see the "Action buttons" heading in this section. |
Tip: The table can be filtered from the search box above it and sorted by clicking the column headers. When the page opens, rows are sorted by status by default. The Group and Action columns contain actions and are therefore not sortable.
Reading the status and role badges
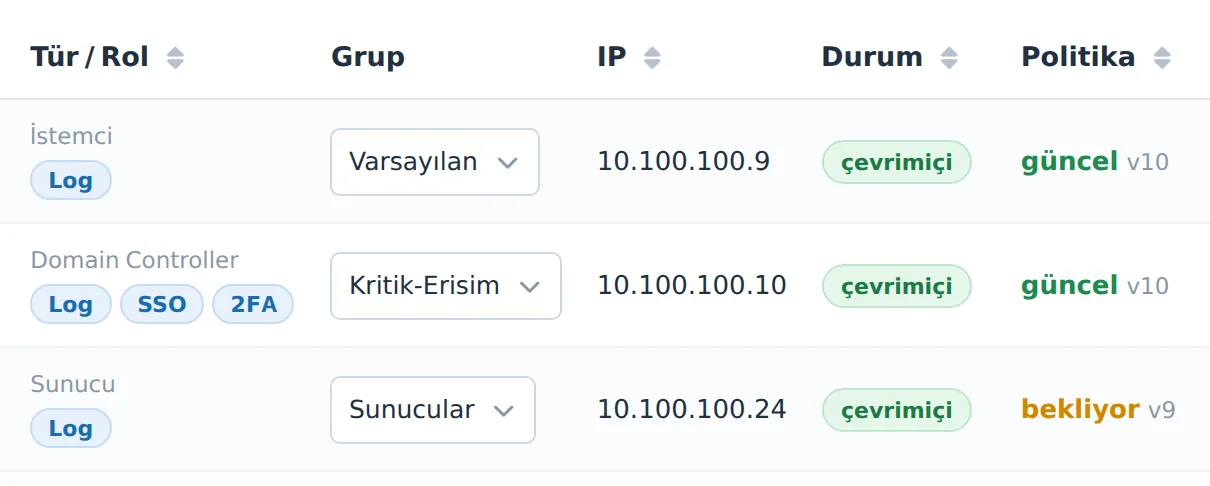
Figure 10. A close-up view of the status, policy, and role badges.
| Badge | Meaning |
|---|---|
| online (green) | The agent is actively communicating with the server. |
| offline (red) | No signal (heartbeat) has arrived from the agent for a while. The machine may be off or the service may have stopped. |
| (no token) | The agent registration exists but has no valid registration token; the agent must re-register with the PSK. |
| unlicensed (yellow) | No license has been assigned to the agent yet; it is awaiting assignment from the Agent Licenses pool. |
| current / pending | Whether the collection policy on the agent matches the latest version at the center. |
| Log / SSO / 2FA | The roles active on the agent. A role is a capability turned on and off by the server; it is managed from the center, not in the field. |
Assigning an agent to a group
A group is the management unit from which an agent inherits its roles and policy. Assignment is done with a single click and saved immediately.
- On the relevant agent's row, open the drop-down list in the Group column.
- Select the group you want to move the agent to.
- The change is saved the moment the selection is made; a success/failure notification appears at the top and the table is refreshed.
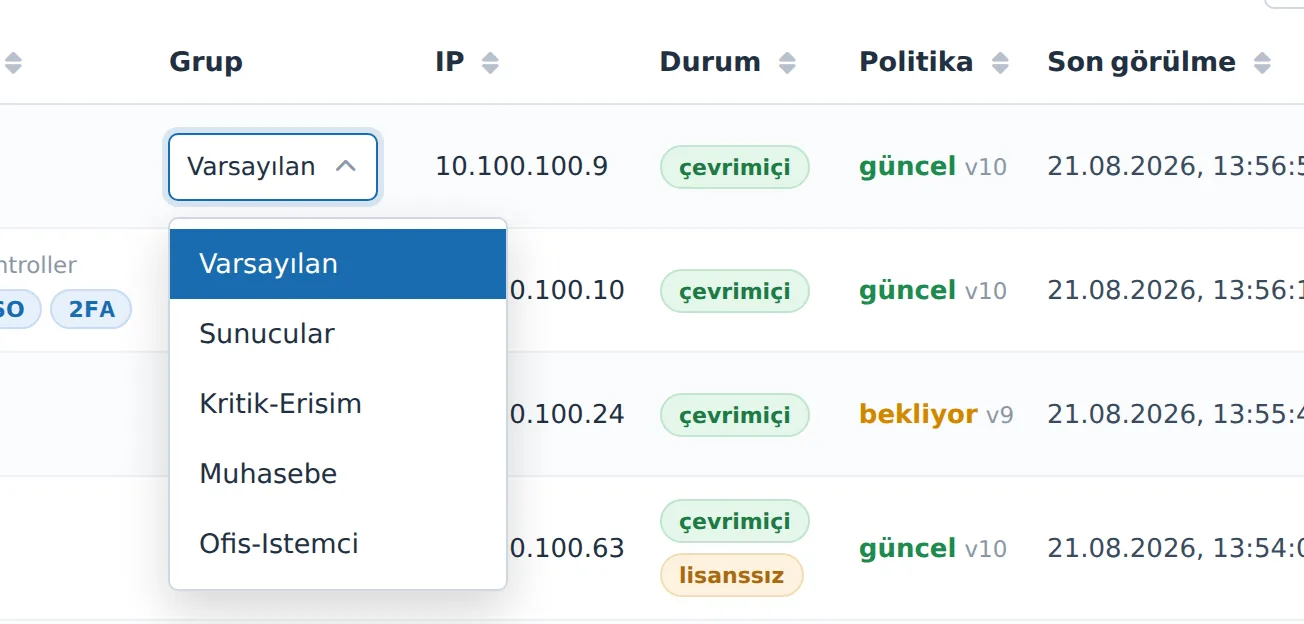
Figure 11. The drop-down list in the Group column. It is saved the moment a selection is made.
Note: If the group list is empty (no groups are defined), only the group name appears in this column as plain text and cannot be changed. First create groups from the Agent Management → Agent Groups page.
Action buttons (per agent)
The buttons in the Action column change according to the agent's state; some buttons appear only when the relevant condition is met.
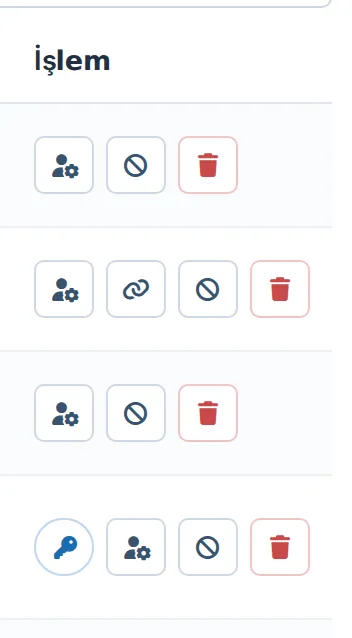
Figure 12. The buttons in the Action column.
| Button | What it does |
|---|---|
| Assign from Pool (key icon) | Appears only on agents that are unlicensed and have a device number (device_id). Assigns a suitable key from the license pool to this agent. |
| Edit roles (user/gear icon) | Opens the Agent Roles window where you edit the agent's Log and 2FA roles. |
| Bind to DC session source (chain icon) | Appears only on agents of type Domain Controller that have a session API. Binds this DC as a session source for NAC session correlation. |
| Revoke token (ban icon) | Revokes the agent's registration token; the agent is forced to register again. |
| Delete registration (trash bin, red) | Removes the agent registration from the inventory entirely. |
Assigning a license to an agent from the pool
- On the unlicensed agent's row, click the Assign from Pool button.
- In the confirmation window that opens ("Assign a license from the pool?"), click Assign.
- The button spins during the operation; the result notification appears at the top and the table is refreshed.
Caution: If the agent has no device number (device_id), a license cannot be assigned and you receive a warning. The device number is created when the agent registers properly for the first time.
Revoking the token (re-registration)
Use this when an agent's credential (token) has been leaked or when you are re-commissioning the machine.
- On the relevant row, click the Revoke token (ban icon) button.
- In the confirmation that opens — "Revoke the token? — the agent will be forced to register again." — click Revoke.
- The agent's token becomes invalid. The agent may appear with the (no token) badge until it re-registers with the shared secret on its next attempt.
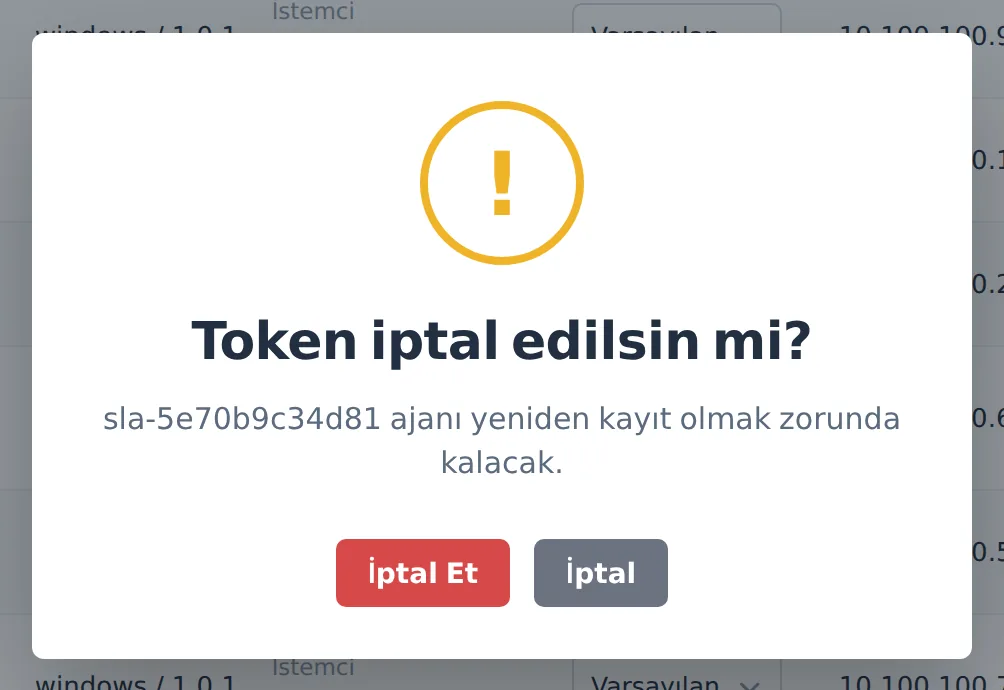
Figure 13. The token revocation confirmation window.
Caution: This operation does not delete the agent; it only invalidates its identity. For the agent to reconnect, a valid PSK must be defined on the server and the agent must be able to re-register with this PSK.
Deleting an agent registration
- On the relevant row, click the Delete registration (trash bin, red) button.
- In the confirmation that opens ("Delete the agent registration?"), click Delete.
- The agent is removed from the inventory and drops off the table.
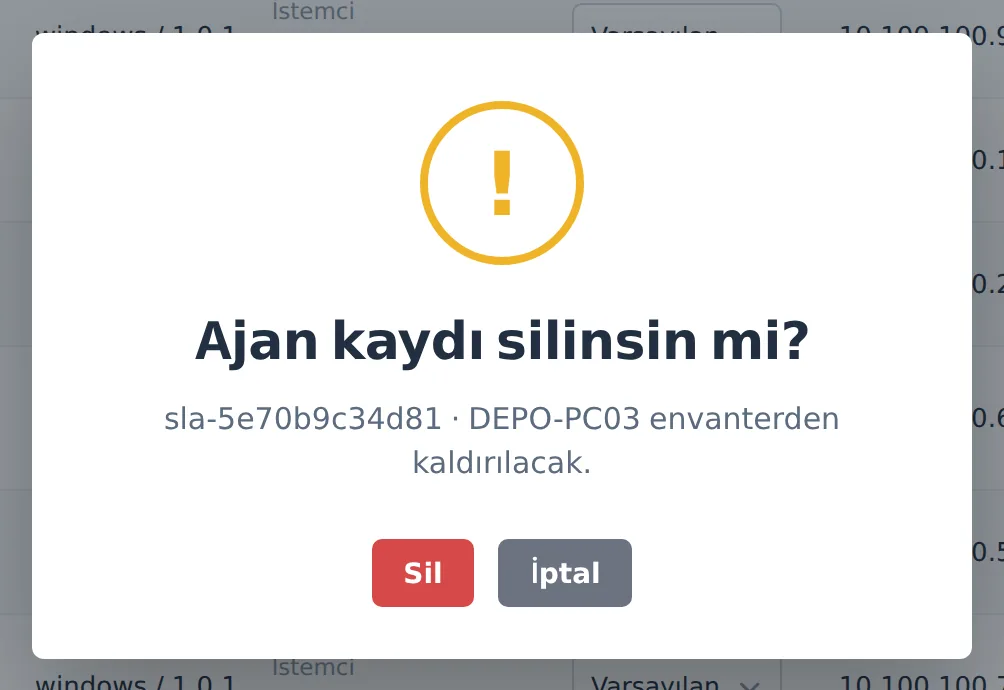
Figure 14. The agent registration deletion confirmation window.
Caution: Deletion is permanent. However, if the agent software is still installed on the machine and the shared secret is valid, the agent can re-register and return to the list as a new registration. To remove the machine permanently, also uninstall the agent on the target machine.
The Agent Roles window
The Edit roles button opens the Agent Roles window where you set role exceptions specific to that agent. Roles are under server control and are delivered to the agent via policy.
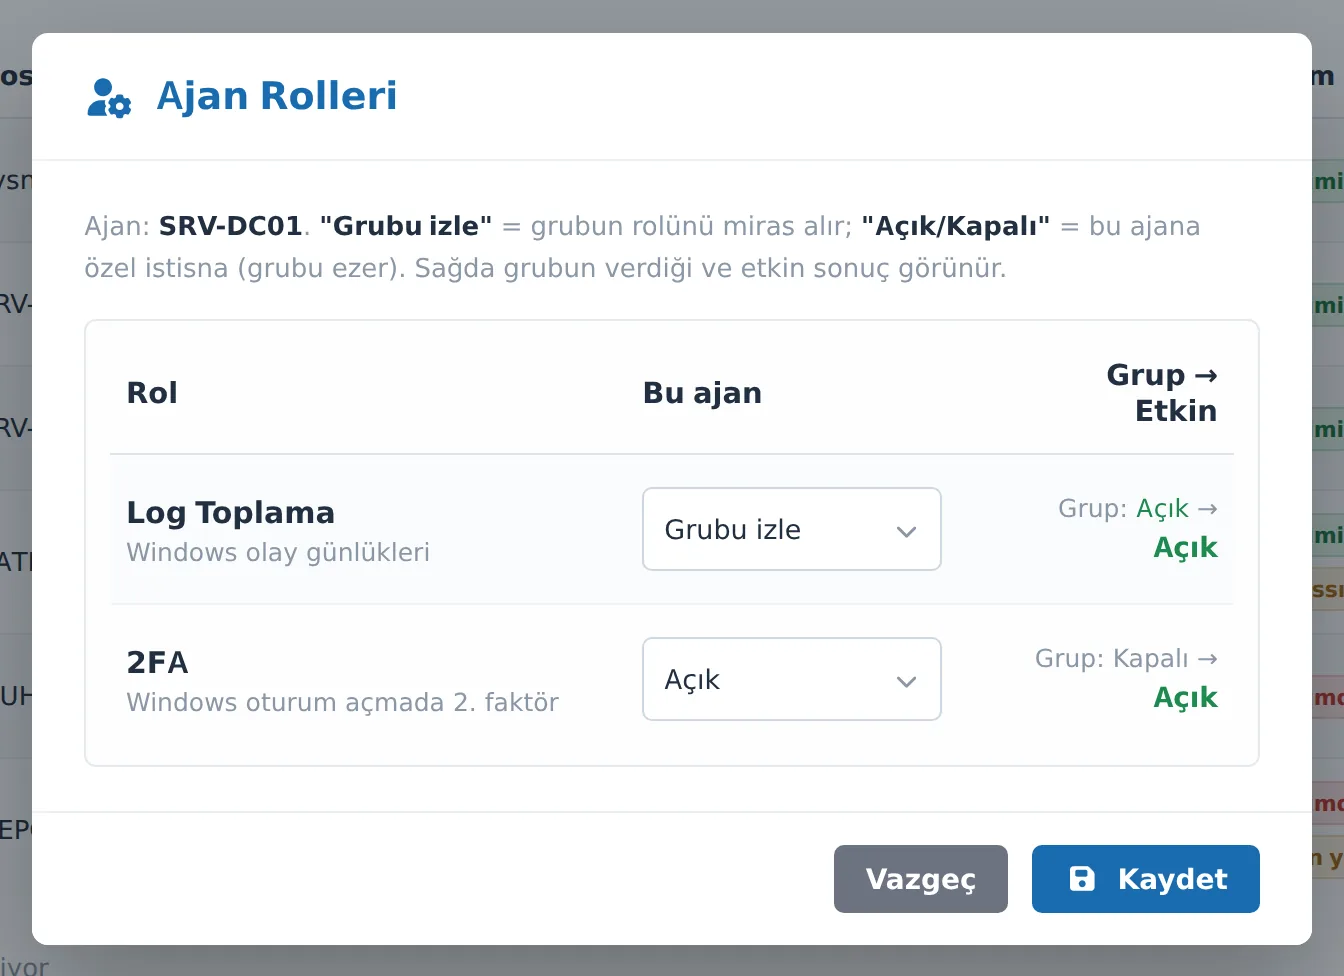
Figure 15. The Agent Roles window: a "Follow group / On / Off" selection for each role and a "Group → Effective" summary on the right.
- On the relevant row, click the Edit roles button.
- At the top of the window it shows which agent you are editing (Agent: hostname).
- For each role, select a value from the drop-down list on the left (see the table below).
- On the right of each row, the Group → Effective information appears: the value provided by the group and the effective result of your selection. As you change the selection, this information updates instantly.
- To apply the changes, click Save. To cancel, click Cancel or close the window.
- If the save is successful, the window closes, a notification appears, and the table is refreshed.
| Option | Meaning |
|---|---|
| Follow group | The agent inherits that role from the setting of the group it belongs to. This is the default option. |
| On | Forcibly enables the role for this agent (overrides the group setting). |
| Off | Forcibly disables the role for this agent (overrides the group setting). |
The editable roles:
| Role | What it is for |
|---|---|
| Log Collection | Collection of Windows event logs (Security / System / Application). |
| 2FA | Second-factor verification at Windows sign-in. |
Note: When you select "Follow group", the custom exception defined for this agent is removed and the role returns to the group default. If you want to change the default of a role across the whole group, edit the group from the Agent Groups page instead of a single agent.
Tips and notes
- The Refresh button brings the most up-to-date state without reloading the page. The online/offline and "Last seen" values are real-time; refresh regularly.
- Agents on which you see the unlicensed badge may not fully perform log/2FA functions. License them with Assign from Pool or in bulk from the Agent Licenses page.
- Agents whose policy remains pending are usually offline or have not yet pulled the latest policy; they update automatically once the agent comes back online. If an agent stays "pending" for hours, check its online status.
- The Type / Role column shows the type automatically (Client / Server / Domain Controller), but the roles (Log / 2FA) are managed from the center — turn them on and off from here, not in the field.
- Do not look for bulk settings here. The shared secret, collection policy, groups, license pool, and agent deployment are managed on the relevant sub-pages of the Agent Management menu. This page is only for the inventory of registered agents and per-agent operations.
Agent Groups
Manage Windows agents as groups, which are the policy unit. Roles, 2FA enforcement, exempt accounts, logs to collect, and tamper protection are defined here.
The settings you define on this page are applied automatically to all agents that are members of the group. Each agent belongs to only one group; agents not assigned to any group take the settings of the Default group.
Open the page by clicking Agent Management → Agent Groups in the left menu.
Note: Each time you save a group setting, the system advances the group's policy version. Agents pull the new policy on their own at their next periodic check; you do not need to touch each agent individually.
1. Page layout and group list
When the page opens, the existing groups are listed in a table.
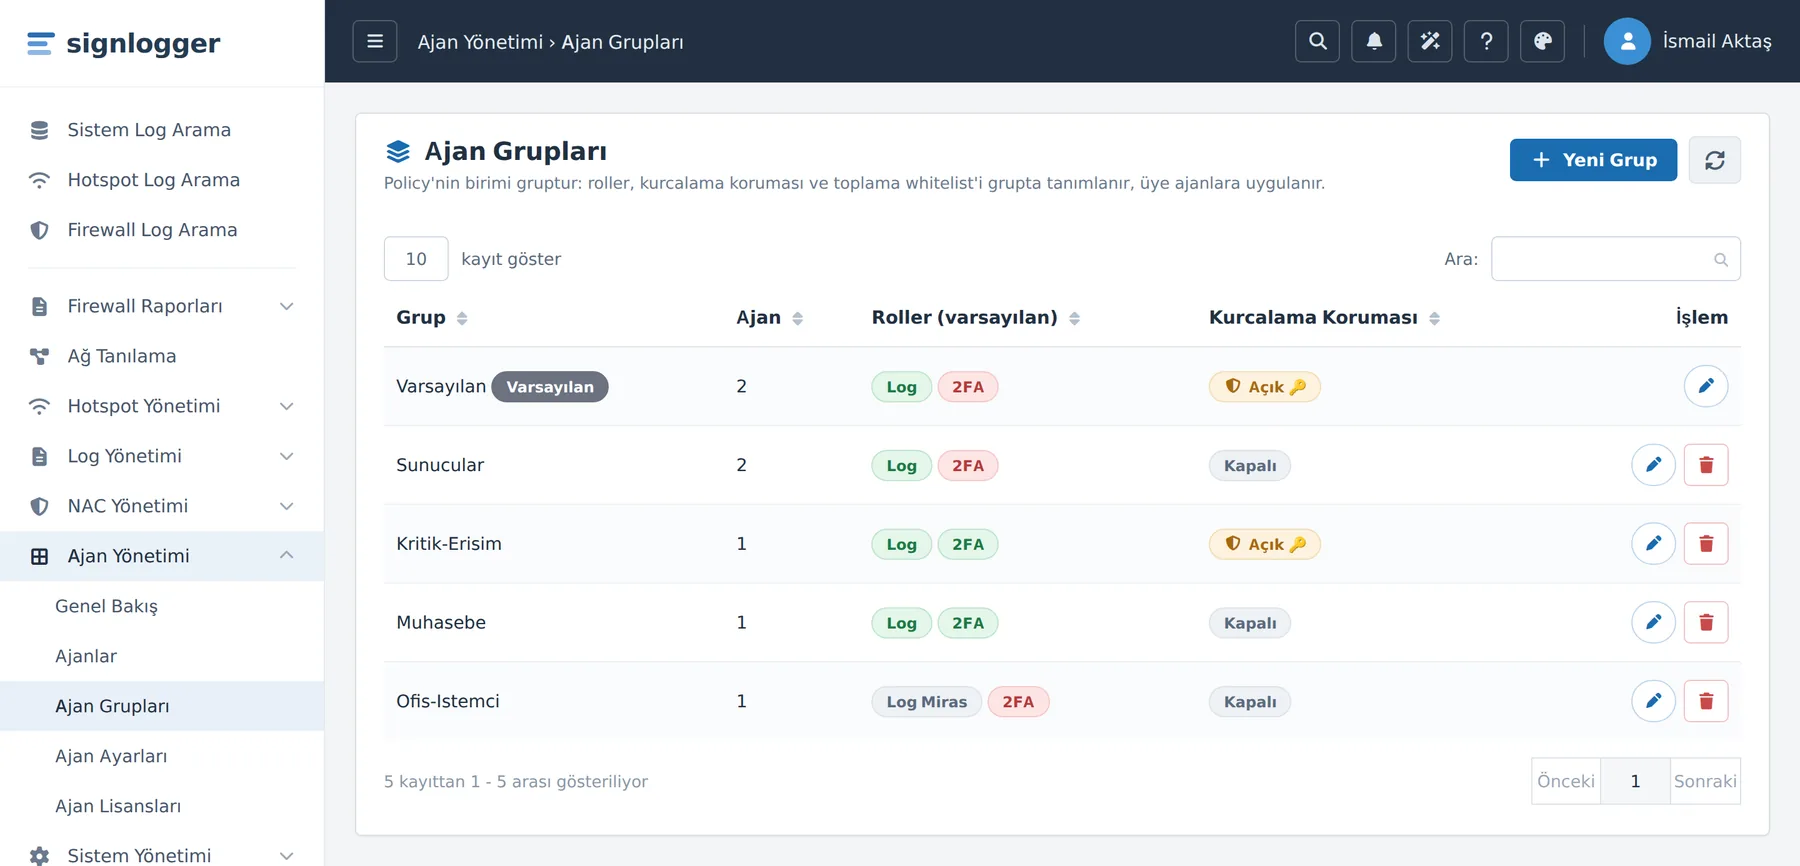
Figure 16. The Agent Groups list. The Default group is marked with a badge and cannot be deleted.
| Column | Description |
|---|---|
| Group | The name of the group. In the system group, a Default badge appears next to the name. |
| Agents | The number of agents that are members of this group. |
| Roles (default) | The group's role defaults as badges: Log and 2FA. The badge shows an "On", "Off", or "… Inherit" (default per agent type) state. |
| Tamper Protection | Tamper protection for the group is either On (key icon ? = removal/unlock password set) or Off. |
| Action | Per-row buttons: pencil (edit) and trash bin (delete). The delete button is not shown on the Default group. |
The two buttons at the top right of the card:
| Button | What it does |
|---|---|
| New Group | Opens an empty group creation window (modal). |
| Refresh (rotating arrow icon) | Reloads the list from the server. For example, use it to update the counts after an agent's group has changed. |
2. Creating a new group
- Click the New Group button at the top right. An editing window titled Group opens.
- In the Group name box, type a name that is meaningful within your organization (e.g.
Servers,Accounting,Critical-Access). - Configure the settings you want in the five sections below (Roles, 2FA Enforcement, Break-glass, Logs to Collect, Tamper Protection).
- At the very bottom, click the Save button. The window closes and the new group appears in the list.
Note: When a new group is first opened, it comes with safe defaults: roles Inherit, log collection Inherit global on, 2FA enforcement Off. Change them according to your needs.
Editing an existing group
- In the list, click the pencil icon on the relevant group's row. The window opens filled with the group's current values.
- Update the fields you want to change.
- Click the Save button.
Caution: The name of the Default group cannot be changed; while editing, the Group name box is disabled (gray). You can change all other settings (roles, 2FA, logs, tamper) on the Default group as well.
3. The group window — settings section by section
The window consists of five settings sections from top to bottom. We explain each section in turn.
3.1 Roles (group default)
This section determines which core functions the agents in the group will run. Each selector has three states.
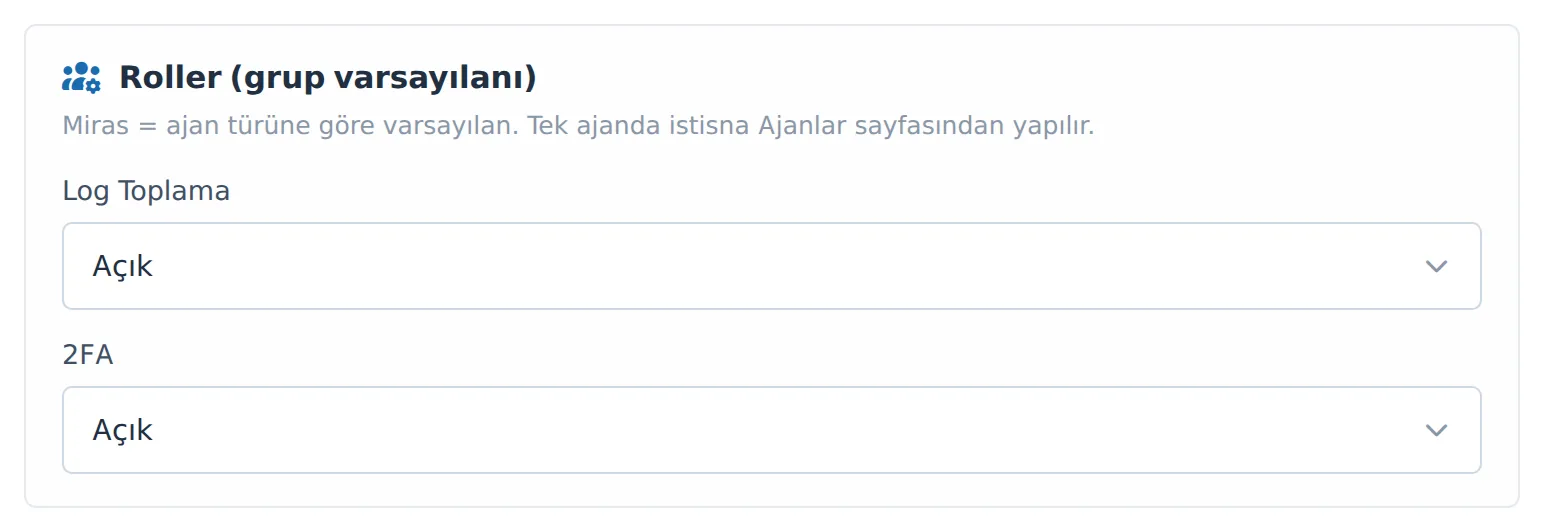
Figure 17. The group window — Roles section.
| Field | Options | Meaning |
|---|---|---|
| Log Collection | Inherit / On / Off | The agent collecting Windows event logs and sending them to the center. Inherit = the agent type's default applies. |
| 2FA | Inherit / On / Off | The agent enforcing two-step verification at Windows sign-in. If this role is off, the 2FA Enforcement and Break-glass settings below have no effect on that group. |
Steps:
- Select the state you want from the Log Collection drop-down list.
- Select the state you want from the 2FA drop-down list.
Note: Inherit means "the group does not interfere, the agent type default applies." If a single agent needs an exception, you do it from the Agents → Edit roles window, not from the group page.
3.2 2FA Enforcement
This section determines how strictly two-step verification is enforced on agents that have the 2FA role on.
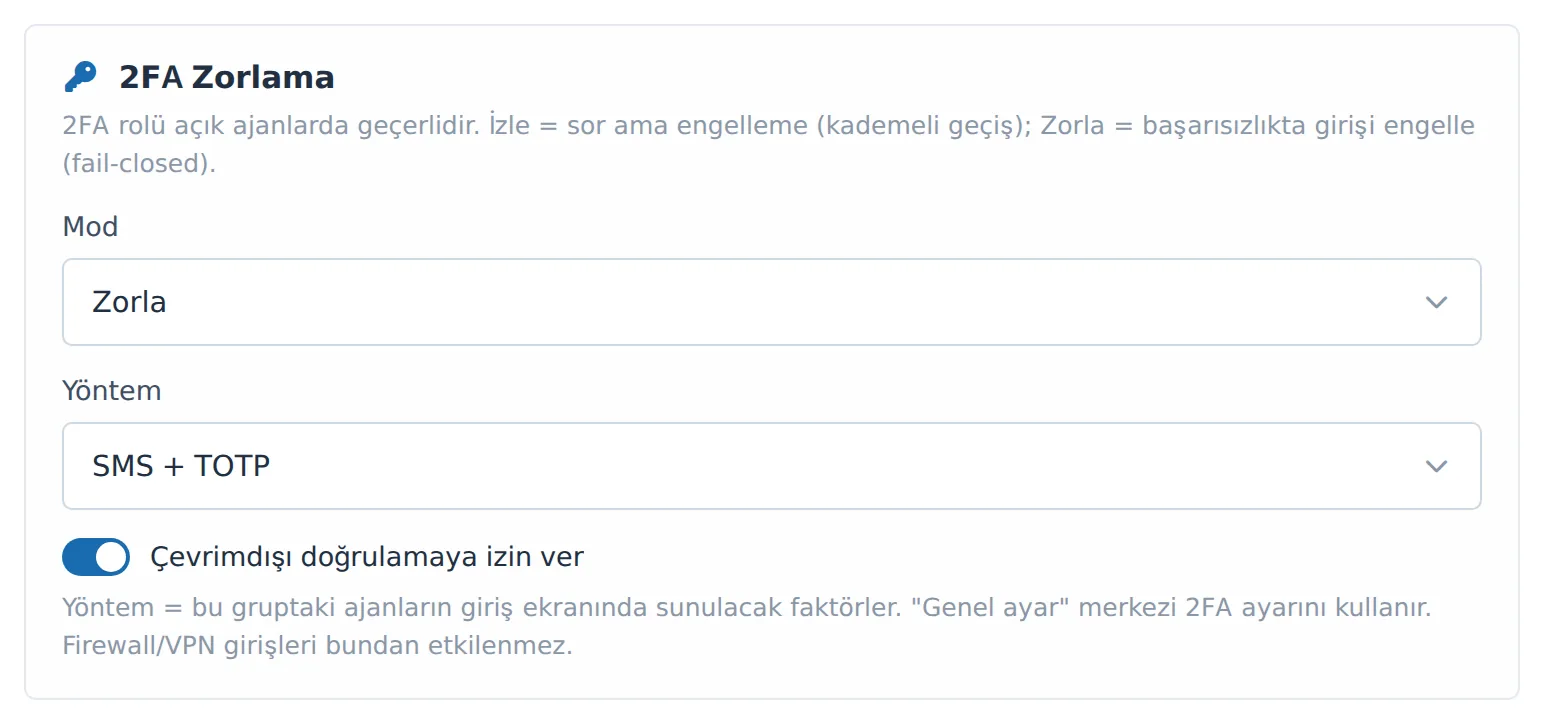
Figure 18. The group window — 2FA Enforcement section: Mode, Method, and the offline verification toggle.
| Field | Options | Meaning |
|---|---|---|
| Mode | Off / Monitor / Enforce | Off = 2FA is not requested. Monitor = 2FA is prompted but sign-in is not blocked on failure (for a phased transition). Enforce = sign-in is blocked if 2FA fails (fail-closed). |
| Method | Global setting (central 2FA) / TOTP only (Authenticator) / SMS only / SMS + TOTP | The verification factors that will be offered on the sign-in screen of the agents in this group. If Global setting is selected, the central 2FA configuration is used. |
| Allow offline verification | On / Off (toggle switch) | Whether sign-in is allowed via local/cached verification when the agent cannot reach the center. |
Steps:
- Select a mode from the Mode list.
- Select the factors from the Method list, or leave it at Global setting (central 2FA) to use the central setting.
- If you do not want sign-in blocked in an offline scenario, leave the Allow offline verification toggle on.
Tip: When rolling out a new 2FA deployment, start with Mode = Monitor first. After users get used to it and exemptions have settled, switch to Enforce. Starting directly with Enforce leads to unprepared users being unable to sign in.
Note: These settings affect only Windows agent sign-ins. Firewall or VPN logins are not affected by this 2FA method.
3.3 Break-glass / Exempt Accounts
This section manages, from the center, the exemption of specific accounts from 2FA and the emergency-access scenario. The center is authoritative; a local administrator cannot secretly add an exempt account on the agent. The settings are effective only on agents with the 2FA role on.
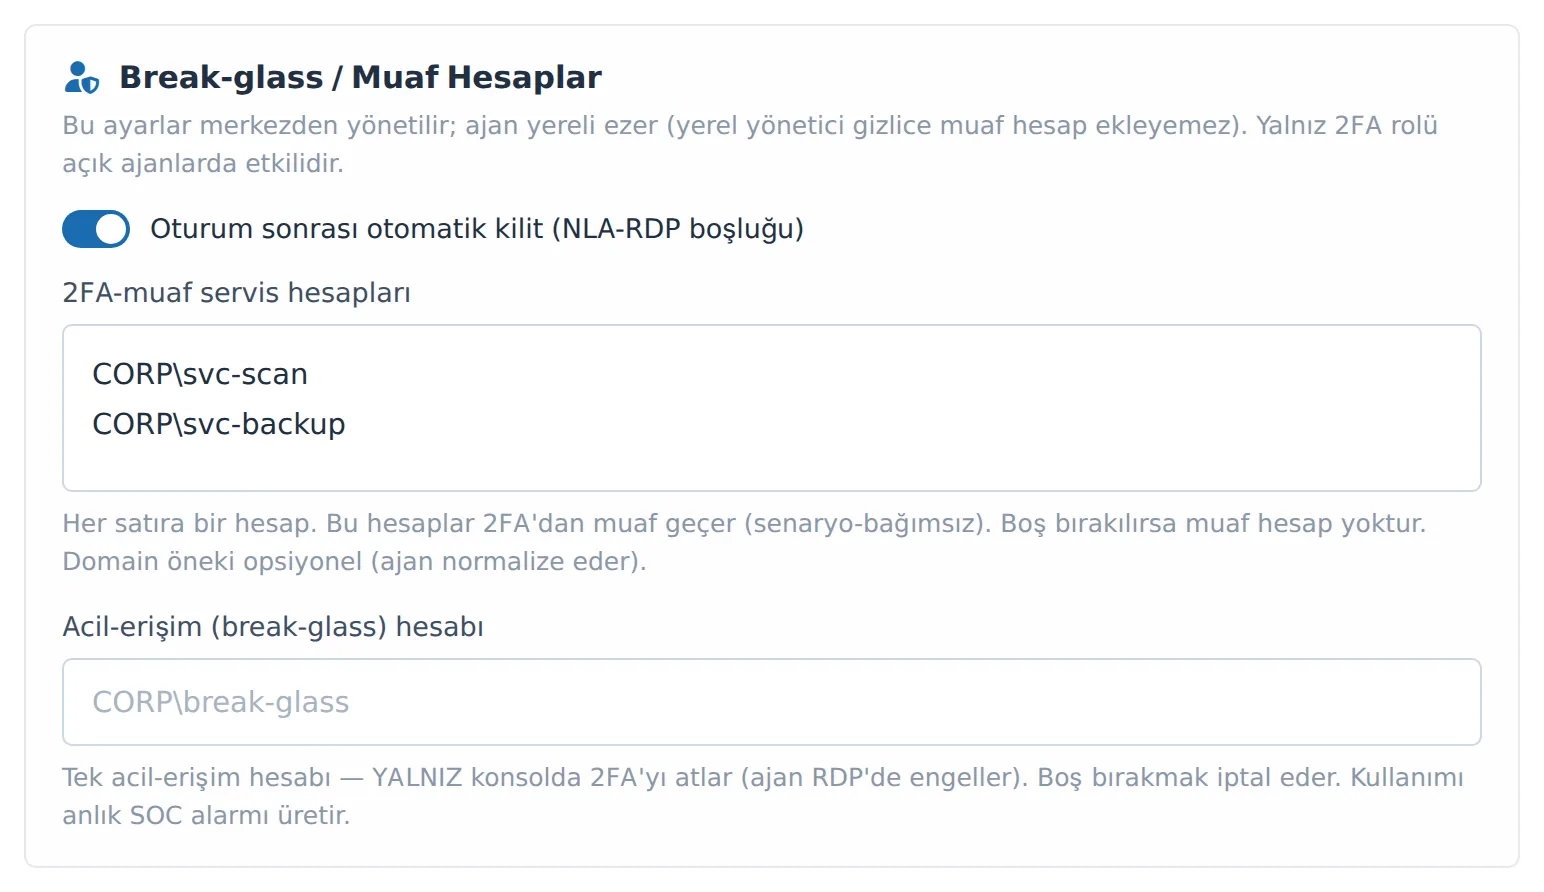
Figure 19. The group window — Break-glass / Exempt Accounts section.
| Field | Type | Meaning |
|---|---|---|
| Auto-lock after sign-in (NLA-RDP gap) | Toggle switch | When on, in scenarios where 2FA can be bypassed such as RDP with NLA, the agent locks the screen immediately after sign-in, thereby making 2FA mandatory. |
| 2FA-exempt service accounts | Multi-line text | One account per line. Accounts written here pass 2FA-exempt (regardless of scenario). Empty = no exempt accounts. |
| Emergency-access (break-glass) account | Single-line text | A single emergency-access account. This account bypasses 2FA only at the physical console; over RDP the agent still blocks it. Leaving it empty cancels this account. |
Steps:
- If you want to close the RDP-based 2FA-bypass gap, turn on the Auto-lock after sign-in toggle.
- In the 2FA-exempt service accounts box, write the service accounts to be exempted, one per line (e.g.
CORP\svc-scan). The domain prefix is optional; the agent normalizes the account name. - If you want to define an emergency-access account, write the account in the Emergency-access (break-glass) account box (e.g.
CORP\break-glass).
Caution: Every use of the emergency-access account generates an instant security (SOC) alarm. Define this account only for a genuine emergency and keep exempt service accounts to a minimum — each exempt account is a security exception.
Note: These three fields are always sent to the center when saving. Emptying a field and saving clears / cancels that setting.
3.4 Logs to Collect
This section determines which Windows event log channels the agents in the group will collect.

Figure 20. The group window — Logs to Collect section. When "Inherit global" is on, the three toggles below are disabled.
| Field | Type | Meaning |
|---|---|---|
| Inherit global | Toggle switch | When on, the group uses the global "Collection Policy" in Agent Settings. When you turn it off, you make a selection specific to this group (overriding the global setting). |
| Security | Toggle switch | Collection of the Windows Security log (sign-in/sign-out, privilege events). |
| System | Toggle switch | Collection of the Windows System log (service, driver, system events). |
| Application | Toggle switch | Collection of the Windows Application log (application events). |
Steps:
- If you want to use the global collection policy, leave the Inherit global toggle on. In this case, the Security / System / Application toggles below are dimmed and disabled.
- To make a selection specific to this group, turn off the Inherit global toggle. The three toggles below become active.
- Turn on the toggles for the channels you want to collect and turn off the ones you do not.
Note: If you save while inherit is on, the group-specific log selection is not saved; the group continues to follow the global policy. If you want to guarantee a specific channel for the group, turn off inherit and make your selection.
3.5 Tamper Protection
This section manages the protection of the agent against unauthorized interference on the local machine.
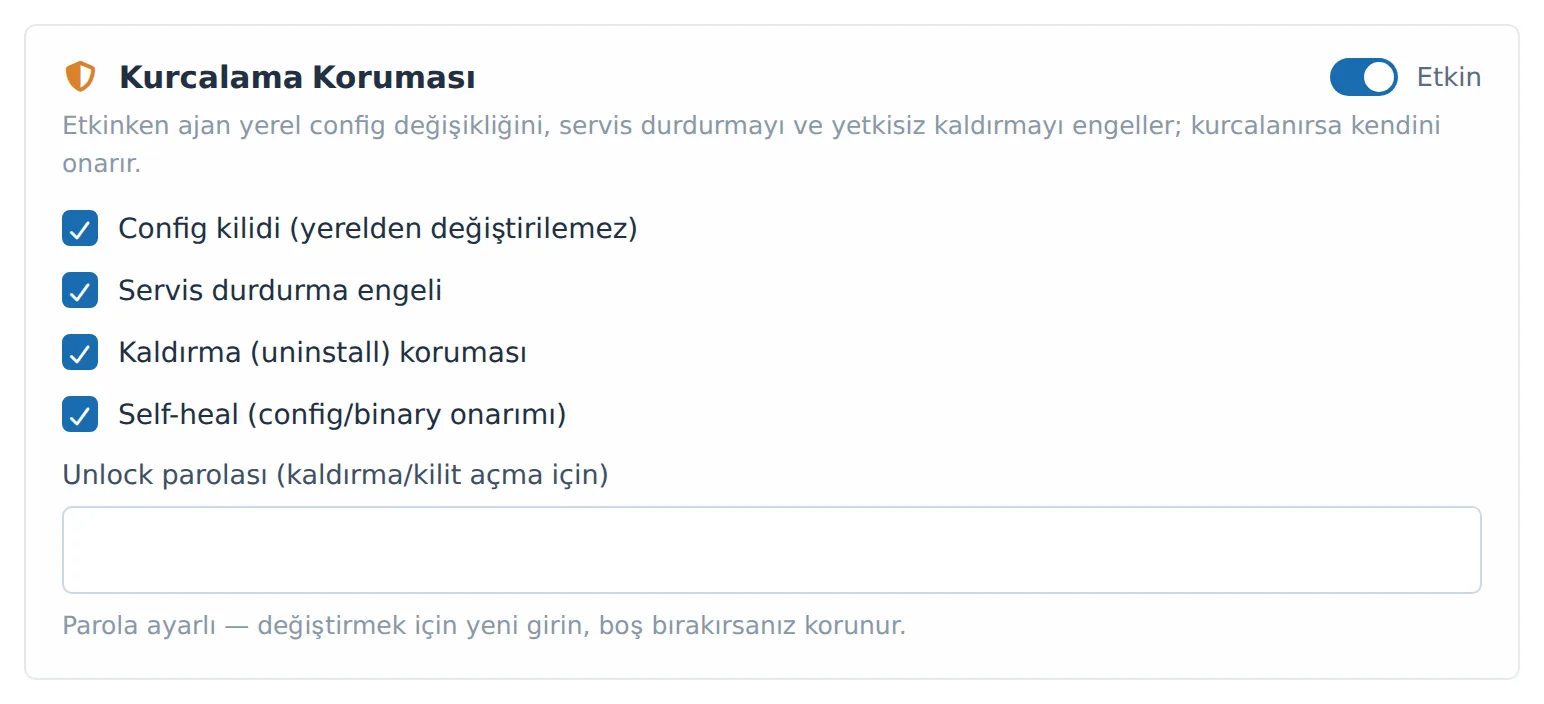
Figure 21. The group window — Tamper Protection section and the unlock password box.
| Field | Type | Meaning |
|---|---|---|
| Enabled | Toggle switch | The master switch for tamper protection. When off, all options below are dimmed (not applied). |
| Config lock (cannot be changed locally) | Toggle switch | Prevents the agent configuration from being changed from the local machine. |
| Service-stop prevention | Toggle switch | Prevents unauthorized stopping of the agent service. |
| Uninstall protection | Toggle switch | Prevents unauthorized removal of the agent. |
| Self-heal (config/binary repair) | Toggle switch | If tampering is detected, the agent self-heals by restoring its corrupted configuration and files. |
| Unlock password | Password box | The password required to turn off or remove the protection in an authorized manner. |
Steps:
- To activate the protection, turn on the Enabled toggle. The options below become active.
- Leave the protection options you want (Config lock, Service-stop prevention, Uninstall protection, Self-heal) on or turn them off.
- In the Unlock password box, enter a password for authorized removal / unlocking.
- Read the current state of the password from the information text just below the box.
| Information text | Meaning |
|---|---|
| "No password." | No password has been set yet. |
| "Password set — enter a new one to change it; if left empty it is preserved." | A password is already defined. |
Caution: If you leave the unlock password box empty, the existing password is preserved (not deleted). To change the password, enter a new value. If a group's row in the list shows Tamper Protection as "On ?", an unlock password is set on that group.
Tip: Keep the unlock password in your corporate password vault. Without this password, it becomes difficult to remove or unlock protected agents in an authorized manner.
4. Saving the settings
- After configuring all sections in the window as you wish, click the Save button at the very bottom.
- If successful, you see a confirmation notification, the window closes, and the list is updated.
- If you want to cancel, click the Close button or the close (X) icon at the top right of the window; no changes are saved.
Note: After saving, agents receive the new policy at their next periodic check; it is not instantaneous. If you made a bulk change, wait a few minutes and confirm the agent counts and states with Refresh.
5. Deleting a group
- On the row of the group you want to delete, click the trash bin icon.
- In the "Delete the group?" confirmation window that opens, read the warning text: "Member agents will be moved to the Default group."
- To confirm, click the Delete button.
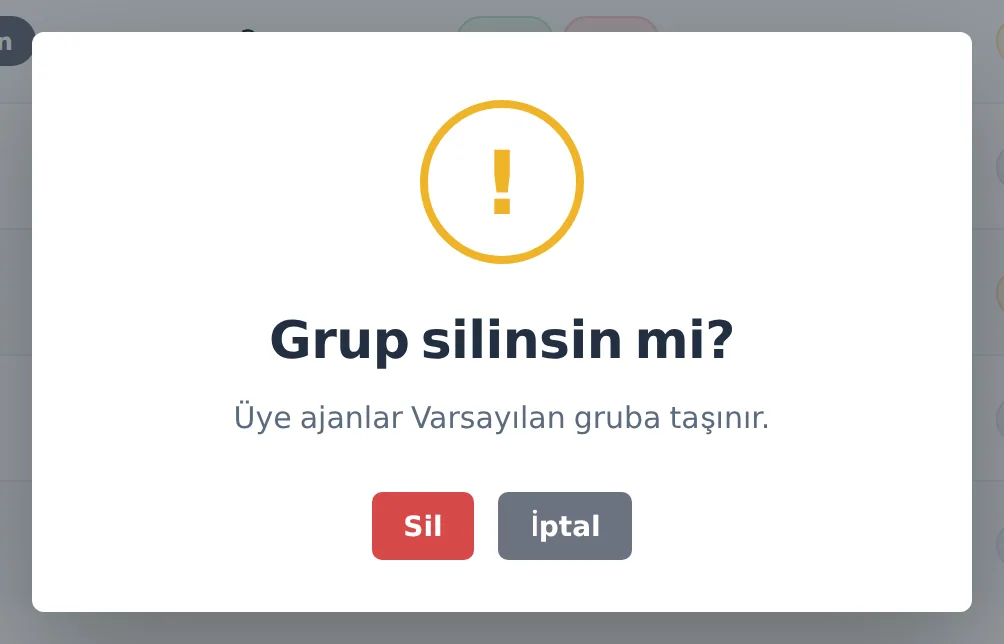
Figure 22. The group deletion confirmation window.
Caution: When you delete a group, the agents that are members of it are not lost; they are automatically moved to the Default group and begin to take the Default group's policy. This may mean an unexpected policy change — before deleting, check the Default group's settings. The Default group itself cannot be deleted.
Tips and notes
- Use the inheritance logic. The Inherit option for roles and the Inherit global option for logs make central management easier. Turn off inheritance and provide a custom value only in the groups that need an exception — that way, when you change the global policy, all inheriting groups update automatically.
- Roll out 2FA gradually. When enabling 2FA for a new group, start with Mode = Monitor first; switch to Enforce once user habits and exemptions have settled.
- Keep exemptions to a minimum. 2FA-exempt service accounts and the emergency-access account are each a security exception; define only those that are truly necessary.
- Group = policy unit. An exception specific to a single agent (e.g. 2FA off only on that machine) is made per agent from the Agents page, not from the group page.
- Verify after a change. A few minutes after saving, use Refresh to check the agent counts and the role/tamper badges to confirm that the policy is as you expect.
- Build groups by role and risk level. For example, a distinction such as
Servers(log only, 2FA off),Critical-Access(2FA Enforce + tamper protection on),Office-Client(log + 2FA Monitor) makes management markedly easier.
Agent Settings
Manage how agents connect to SignLogger, which logs they collect, and how they are deployed to the field, all from one place.
Settings are divided into three tabs: Connection, Global Collection Default, and Deploy Agent. You apply your changes with the relevant Save / Publish button on the tab where you made them; each tab is saved independently of the others.
To go to the page: In the left menu, click Agent Management → Agent Settings. When the page opens, three tab headings appear; Connection is open by default. You switch by clicking the heading of the tab you want.
Note: This module works only with root domain / Super User privilege. If you see a yellow "root domain scope required" warning on the page, sign in again with an account that has Super User privilege.
1. Tab — Connection
This tab has two independent sections: Connection Port (the network port that agents connect to) and Pre-Shared Key (PSK) (the shared secret that agents use when registering with the system). Each section has its own Save button.
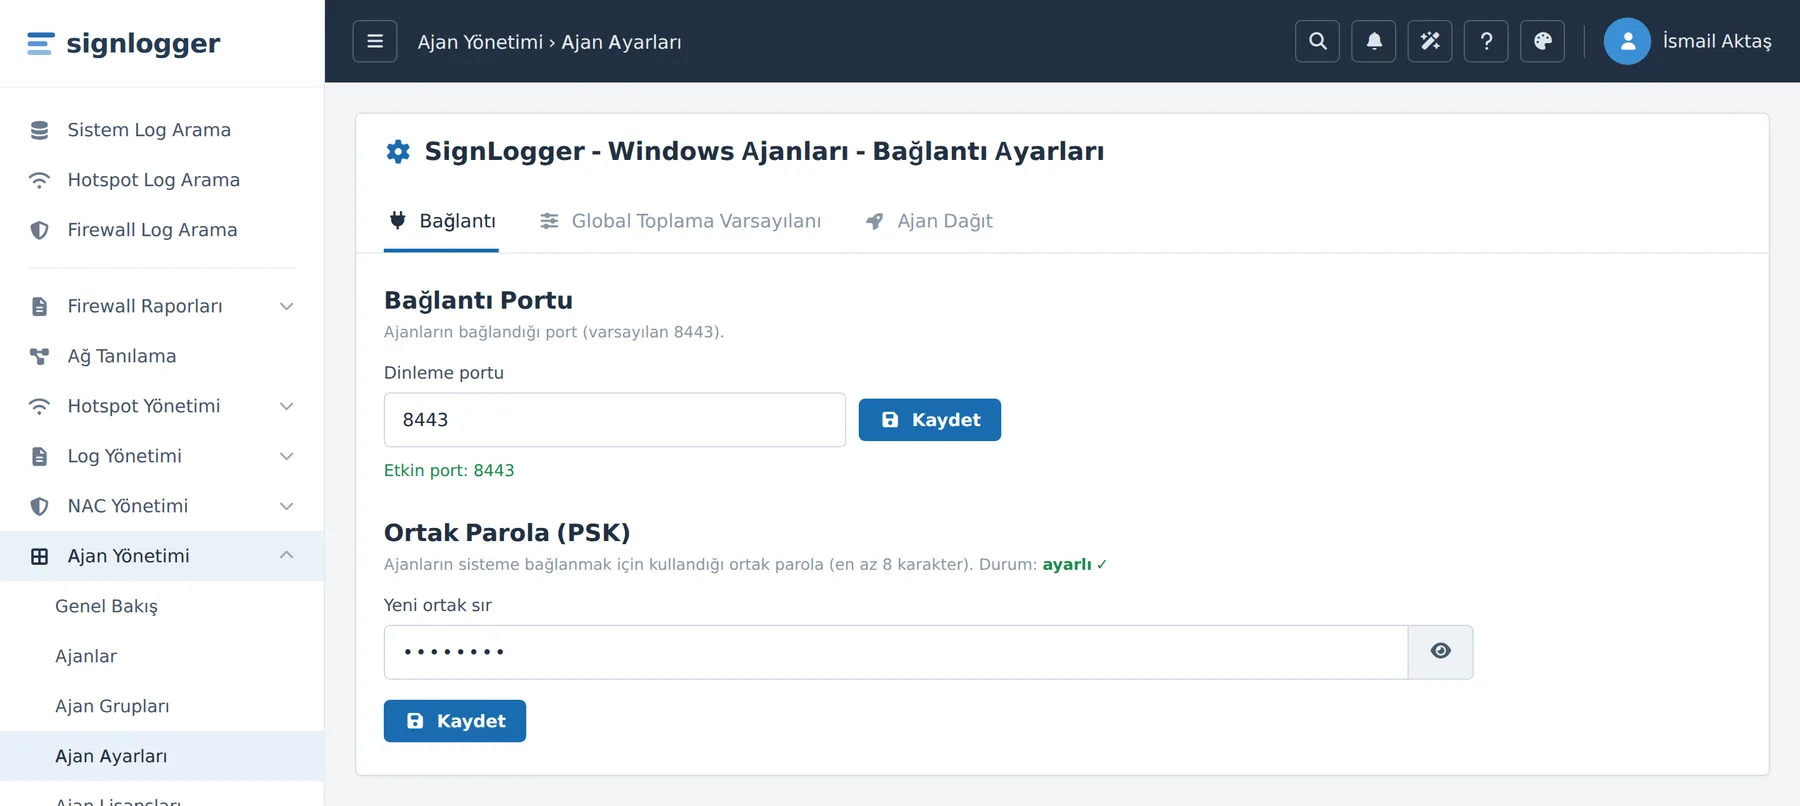
Figure 23. Agent Settings — Connection tab: the Connection Port and Pre-Shared Key (PSK) sections.
Connection Port
Determines the listening port that agents use to connect to SignLogger. The default value is 8443.
- While on the Connection tab, type the port number you want to use (between 1–65535) in the Listening port box under the Connection Port heading.
- Click the Save button.
- Confirm that the current/active port is shown in green on the status line below the box (Active port: …).
Caution: When you change the port and save, the service restarts automatically to apply the new port. A brief interruption may occur during this time, and you will see the message "Port saved. Restarting the service automatically to apply the new port…". If you save the same port value again, no restart occurs.
Note: Some ports are reserved by the system and are not accepted (for example 80, 443, 1812, 514). If you enter a reserved port, the change is rejected and you see an error message indicating which ports are forbidden. When you change the port, the version of the agent deployment token (EnrollToken) increments automatically, so agents learn the new port.
Pre-Shared Key (PSK)
This is the shared secret (Pre-Shared Key) required for agents to connect to the system and register. Until this value is set, no agent can register.
Figure 24. The Pre-Shared Key (PSK) section. When the status is "set ✓", agents can register.
- Look at the Status information in the header row (see the table below).
- In the New shared secret box, type a strong password at least 8 characters long.
- If you want to verify the password, click the eye-icon (Show/Hide) button next to the box to switch the text between visible and hidden.
- Click the Save button. When successful, a confirmation message appears and, for security, the box is cleared; the status becomes set ✓.
| Status | Meaning |
|---|---|
| set ✓ (green) | The shared secret is defined. To change it, simply enter a new value. |
| NOT SET — agents cannot register (red) | No shared secret has been defined yet; agents cannot connect. |
Caution: When you change the Pre-Shared Key, agents already registered with this key are not affected; however, agents that will newly register or that need to re-register must know the new key. Keep this value consistent with the agent deployment process (the Deploy Agent tab).
Controls on the Connection tab — summary:
| Control | Function |
|---|---|
| Listening port box | The port number that agents connect to (1–65535, default 8443). |
| Save (Connection Port) | Saves the port; if it changed, restarts the service automatically. |
| New shared secret box | The new PSK value (at least 8 characters). |
| Show/Hide (eye button) | Switches the entered password between plain text and hidden. |
| Save (Pre-Shared Key) | Updates the PSK and clears the box for security. |
2. Tab — Global Collection Default
This tab determines the default log collection policy for all agent groups. This setting is the top of the collection (whitelist) hierarchy: groups that leave their whitelist as "Inherit global" (for example the Default group) use the values here. If a group makes its own custom setting, this becomes irrelevant for that group.
When you open the page, the current values load automatically; at the top, the policy in effect is shown as Version: v….
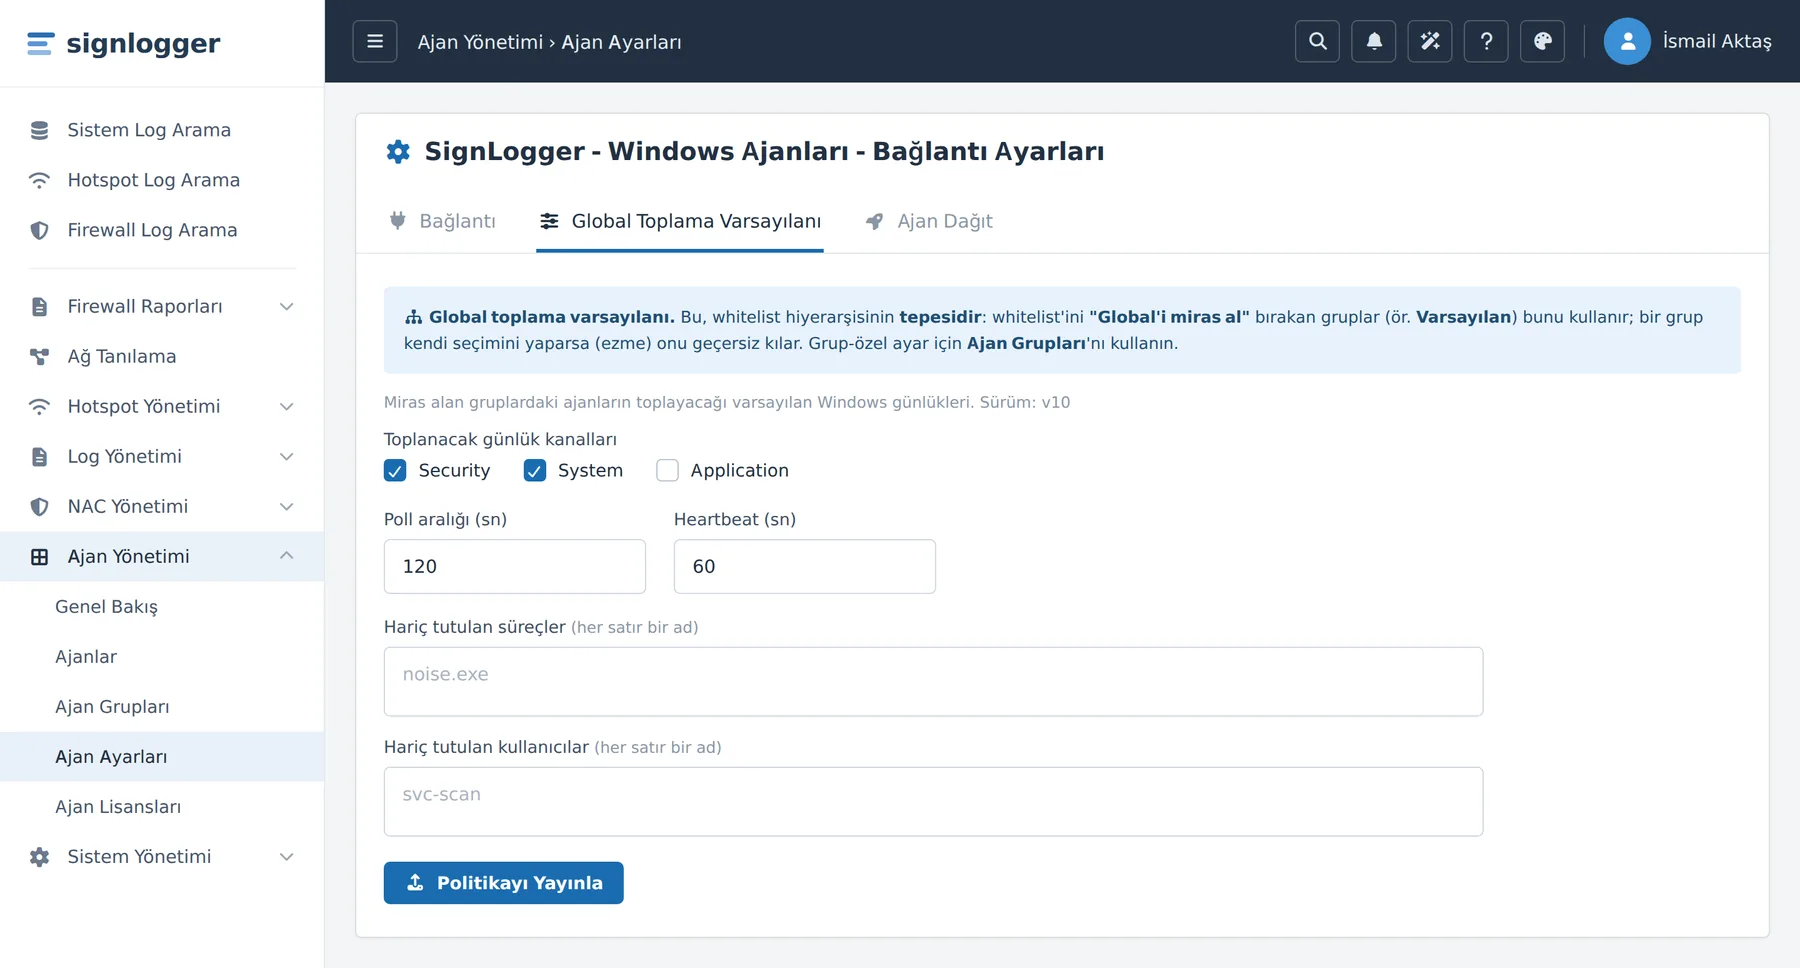
Figure 25. The Global Collection Default tab: channel selection, poll/heartbeat intervals, and exclusion lists.
- Under the Log channels to collect heading, check which Windows event logs will be collected: Security, System, Application.
- In the Poll interval (s) box, enter, in seconds, how often the agent will collect logs (default 120).
- In the Heartbeat (s) box, enter, in seconds, how often the agent will send its "I am online" signal (default 60).
- In the Excluded processes box, write the process names you want to exclude from collection, one name per line (example:
noise.exe). - In the Excluded users box, write the user names you want to exclude from collection, again one name per line (example:
svc-scan). - To apply all settings, click the Publish Policy button. When successful, the message "Policy published (v…)" appears and the version number increments by one.
| Control | Function | Default |
|---|---|---|
| Security / System / Application boxes | Selects the Windows log channels to collect. | Security and System on, Application off |
| Poll interval (s) | The frequency of log collection and policy pulling (seconds). | 120 |
| Heartbeat (s) | The frequency of sending the "online" signal (seconds). | 60 |
| Excluded processes | Process names to exclude from collection (one name per line). | empty |
| Excluded users | User names to exclude from collection (one name per line). | empty |
| Publish Policy | Saves all settings and publishes a new version. | — |
Note: After the "Publish" operation, the new version of the policy is applied to the agents in groups that inherit global on the next poll/heartbeat cycle. If a group has been given its own custom collection setting, that group is not affected by this global change.
Tip: Setting the poll interval too short (e.g. 15 s) increases network and server load; setting it too long causes events to reach the center late. For most organizations, the default of 120 seconds is a balanced value.
3. Tab — Deploy Agent
This tab is for zero-touch deployment. The idea is this: The same static, signed SignLoggerAgent.msi is installed on all machines; each organization places a single EnrollToken value in its own GPO. At startup, machines register themselves automatically with this token — no per-machine manual work is required.
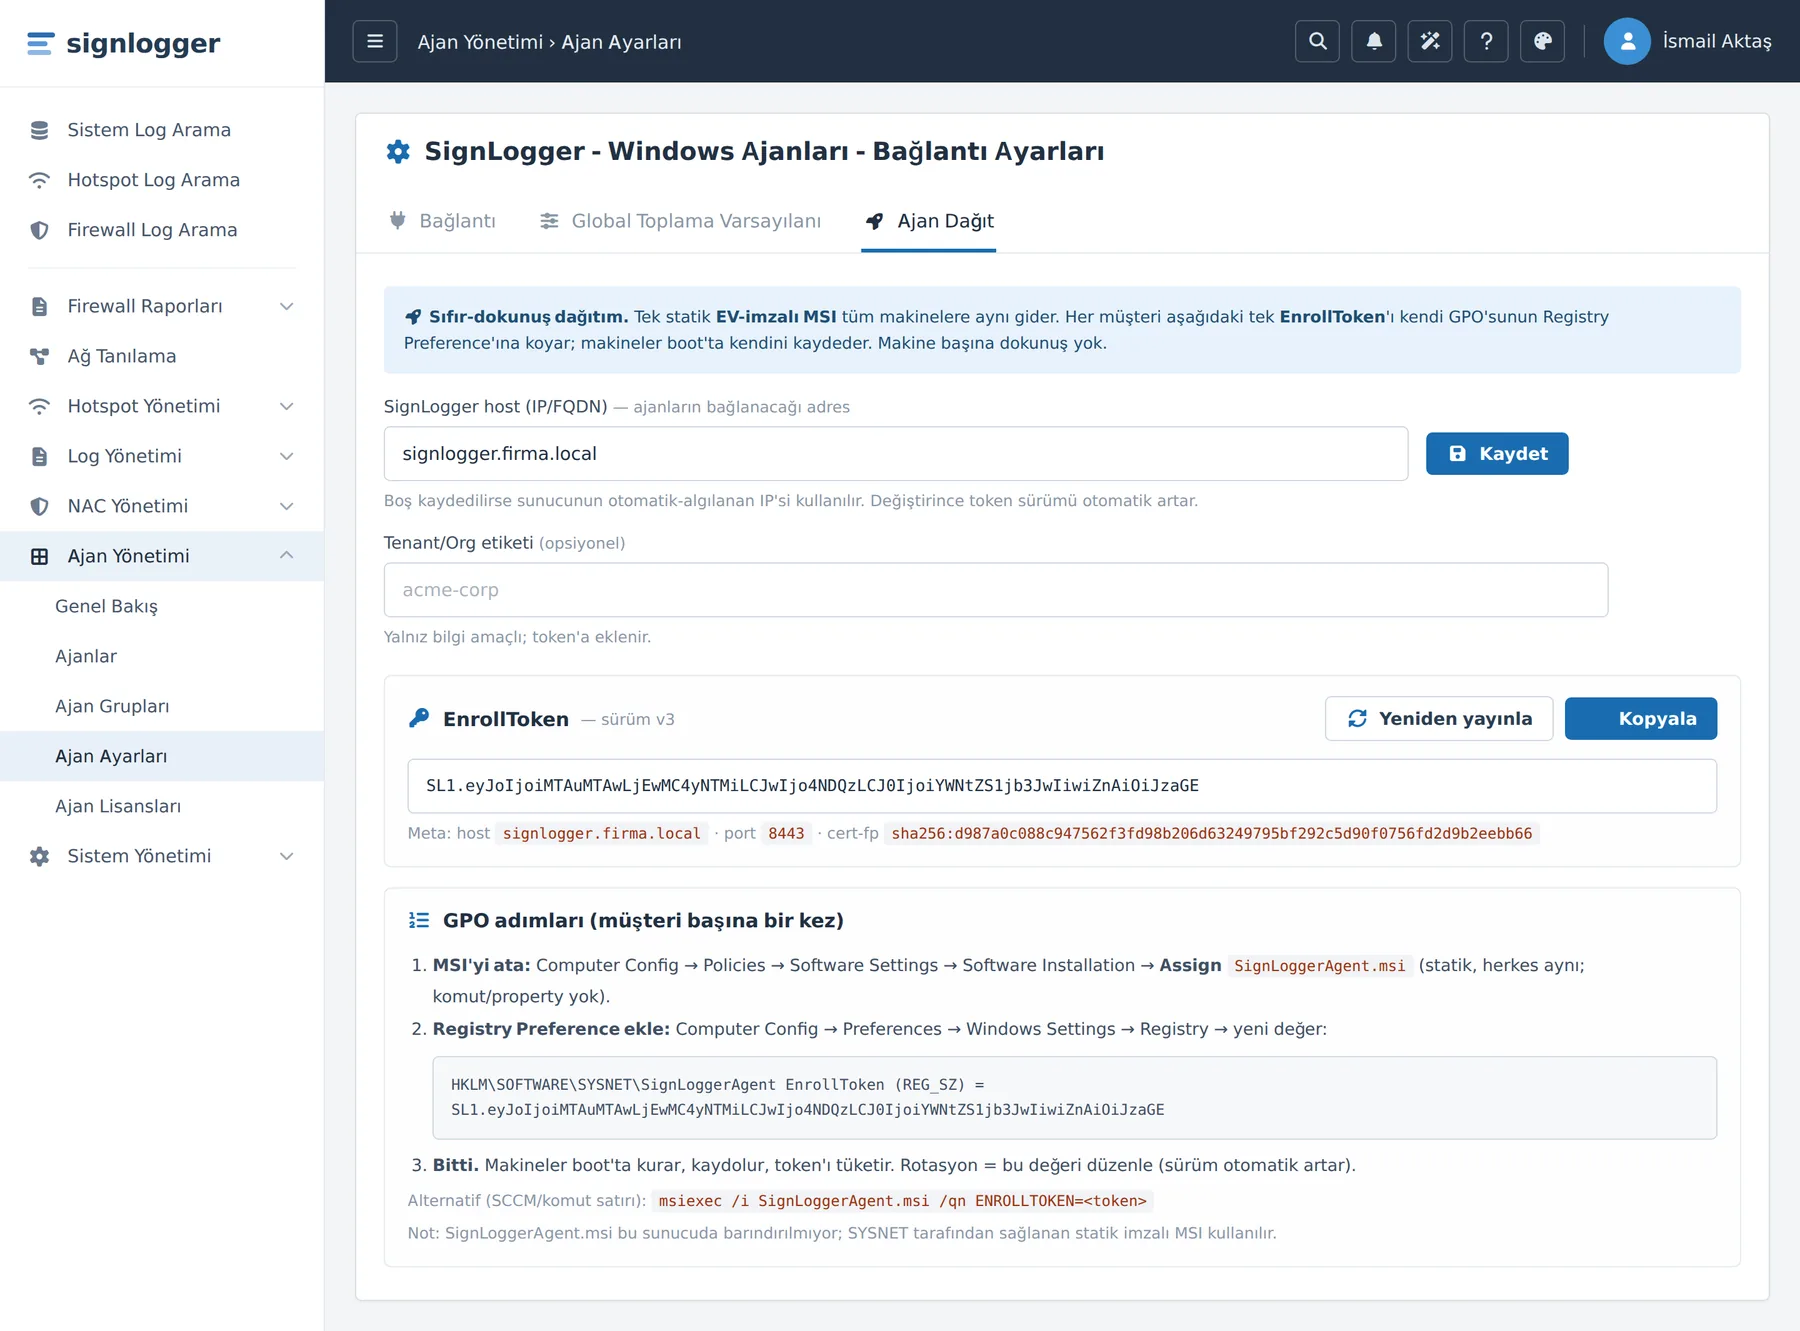
Figure 26. The Deploy Agent tab: host address, tenant label, EnrollToken, and GPO steps.
Caution: At the very top of the tab, if there is a missing configuration, yellow warning boxes appear (PSK not defined / host not set / server certificate fingerprint not ready yet). A token generated without resolving these warnings may not be fully secure.
Step A — Save the SignLogger host address
- In the SignLogger host (IP/FQDN) box, type the server address that agents will connect to (example:
10.100.100.253orsignlogger.firma.local). - Click the Save button next to the box. The confirmation message "Agent deployment settings saved." appears.
Note: If you leave this field empty and save, the server's auto-detected IP address is used. When you change the host address, the token version increments automatically (agents learn the new address).
Step B — (Optional) Tenant / Org label
- In the Tenant/Org label box, you may optionally type a label identifying the organization (example:
acme-corp).
Note: This field is for information only and is added to the token; it is not mandatory.
Step C — Get and copy the EnrollToken
In this section, the EnrollToken appears in a read-only box, and the version number (version v…) is shown above it. The Meta line below it summarizes the connection information contained in the token.
Figure 27. The EnrollToken box, the Copy / Reissue buttons, and the Meta line.
- To copy the value in the EnrollToken box to the clipboard, click the Copy button. You will see the message "Token copied." (If the token is empty, the button is disabled.)
- If you want to regenerate the token — for example in case of a suspected leak or a required rotation — click the Reissue button. A new token is generated and the version number increments ("Token reissued (version incremented).").
The fields on the Meta line:
| Field | Meaning |
|---|---|
| host | The SignLogger address embedded in the token (IP/FQDN). |
| port | The port that agents connect to (the value from the Connection tab). |
| cert-fp | The server certificate fingerprint (pinning against MITM). If it reads "(no pin)", the fingerprint is not ready yet. |
Caution: Reissue replaces the old token with a new one. If you do not update the old token value in your GPO with the new token, machines that have not yet registered will fail with the old token. When you perform a rotation, be sure to also update the Registry value in the GPO.
Step D — Deployment via GPO (once per organization)
The GPO steps section at the bottom of the tab gives the instructions for applying the token to the field.
Figure 28. The GPO steps and the command-line alternative.
- Assign the MSI: In Group Policy, follow the path Computer Config → Policies → Software Settings → Software Installation and Assign the
SignLoggerAgent.msifile. (The MSI is static; it goes to everyone the same way, with no additional command or property required.) - Add a Registry Preference: Create a new value under Computer Config → Preferences → Windows Settings → Registry and paste the token you copied in Step C.
- Done. At startup, machines install the MSI, register with the token, and consume the token. When a rotation is needed, you simply edit this Registry value with the new token.
HKLM\SOFTWARE\SYSNET\SignLoggerAgent
  EnrollToken (REG_SZ) = <the token value from the page>
Alternative — installation via command line / SCCM
If you will use SCCM or a manual installation instead of GPO, you can use the following command (replace <token> with the value you copied):
msiexec /i SignLoggerAgent.msi /qn ENROLLTOKEN=<token>Note: An informational note may appear at the bottom of the section: if
SignLoggerAgent.msiis not hosted on this server, the static signed MSI provided by SYSNET is used. Make sure you obtain the MSI separately.
Controls on the Deploy Agent tab — summary:
| Control | Function |
|---|---|
| SignLogger host (IP/FQDN) + Save | Saves the address that agents connect to (empty = auto-detected IP). |
| Tenant/Org label | Optional, informational label; added to the token. |
| EnrollToken (read-only) | The registration key to be deployed to the field. |
| Reissue | Generates a new token, increments the version (rotation). |
| Copy | Copies the token to the clipboard. |
| Meta: host / port / cert-fp | A summary of the token contents (connection and certificate pinning information). |
Tips and notes
- Suggested order. In the initial setup, first set the PSK and port on the Connection tab, then save the host and generate the token on the Deploy Agent tab. If the PSK is not defined, a yellow warning appears at the top of the Deploy Agent tab and agents cannot register.
- Take the warnings seriously. A deployment made without resolving the yellow warnings on the Deploy Agent tab (no PSK / no host / certificate fingerprint not ready) is incomplete or less secure. In the "(no pin)" state, the token is generated without MITM protection.
- Versioning logic. Changing the port or host, or reissuing the token, increments the version number. Registered agents receive the new version automatically on the poll cycle; however, the Registry value in the GPO must be updated manually.
- Global or group? The Global Collection Default affects only groups in the "Inherit global" state. If a specific group needs a custom collection rule, edit that group from the Agent Groups page.
- Security hygiene. Share the PSK and EnrollToken over secure channels; the token is a sensitive value once copied to the clipboard. In case of a suspected leak, rotate with Reissue and update the GPO value.
Agent Licenses
Manage the bulk pool of license keys reserved exclusively for Windows agents, and assign licenses to registered agents.
You add keys to the pool in bulk; you assign licenses from the pool to registered but unlicensed agents, one by one or automatically. The keys here are separate from the general License Management and are not used anywhere else.
Note: This module works only within root domain scope and with Super User privilege. If you see a "This module requires root domain scope" warning, sign in again with a privileged account.
Going to the page
- In the left menu, open the Agent Management heading.
- Click the Agent Licenses link.
- When the page opens, you see a pool summary card at the very top, with two tabs below (License Pool and Unlicensed Agents).
Pool summary (top card)
The card titled Agent Licenses at the very top of the page summarizes the current state of the pool with four colored badges. These values are for information only; no operation is performed from here.

Figure 29. The pool summary card: Total, Assignable, Assigned, and Revoked badges.
| Badge | Meaning |
|---|---|
| Total | The number of all license keys added to the pool (including keys in every state). |
| Assignable | The number of keys not yet bound to any agent and ready for assignment. |
| Assigned | The number of keys bound to an agent (device) and in use. |
| Revoked | The number of keys that have been revoked and can no longer be assigned. |
- To update the numbers, click the cycle (refresh) icon at the top right corner of the card. This button reloads both the pool list and the unlicensed agents.
Tab 1 — License Pool
This tab is open by default. It consists of two sections: the Automatic Assignment toggle at the top and the License Keys in the Pool table below.
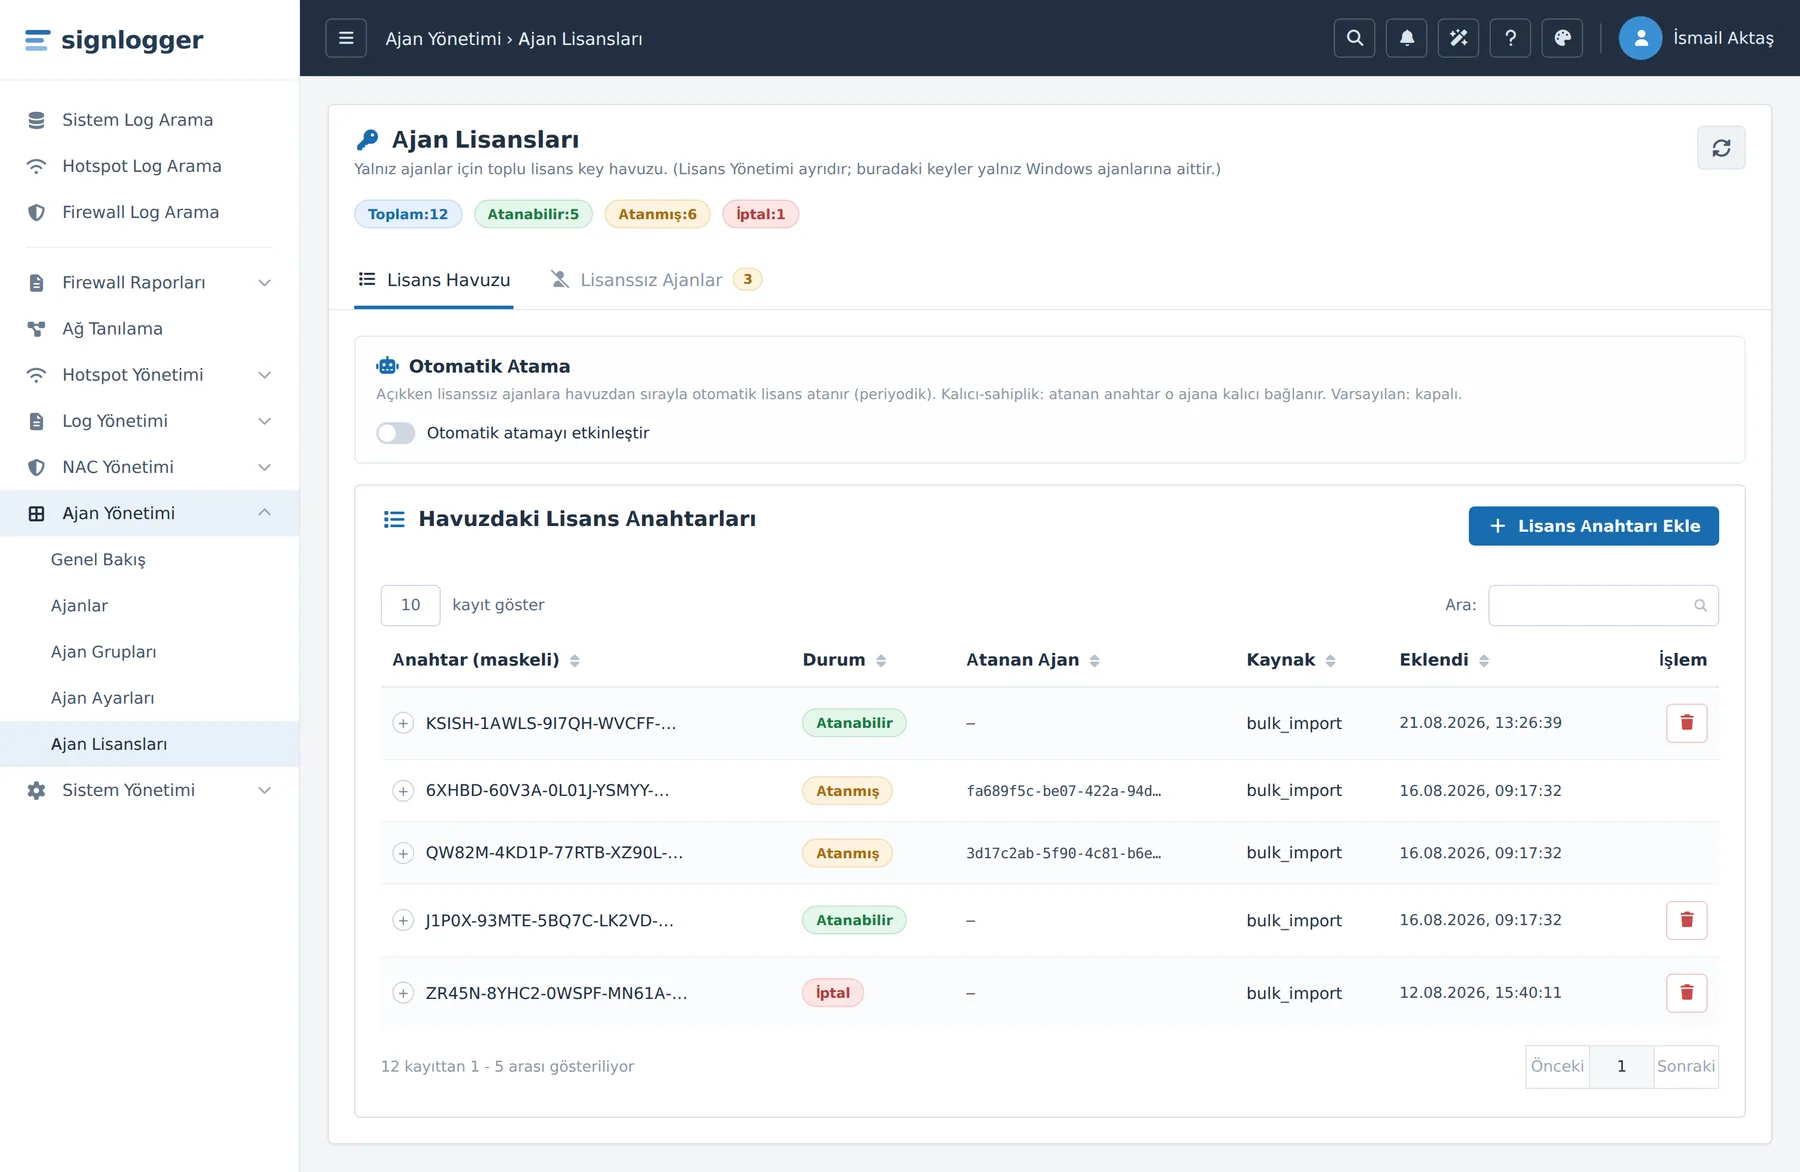
Figure 30. The License Pool tab: the Automatic Assignment toggle and the list of keys in the pool.
Automatic Assignment
This card turns on and off the automatic, sequential, and periodic assignment of licenses from the pool to unlicensed agents. It is off by default.
- To turn on automatic distribution, move the Enable automatic assignment toggle (the sliding button on the right) to the on position.
- To turn it off, click the same toggle again.
- The setting is saved immediately; a confirmation message appears on the screen.
Caution: When automatic assignment is on, permanent-ownership is applied: a key assigned to an agent is permanently bound to that agent and is not reclaimed automatically. Make sure there are enough Assignable keys in the pool; otherwise, new agents silently remain unlicensed.
License Keys in the Pool (table)
Each key in the pool is listed as one row in this table.
| Column | Description |
|---|---|
| Key (masked) | The license key, shown in masked form for security. Keys are stored encrypted in the database; the full text is not shown here. |
| Status | The key's status: Assignable (green), Assigned (yellow), or Revoked (red). |
| Assigned Agent | If the key is bound to an agent, that device's number (device no); otherwise "—". |
| Source | How the key entered the pool (e.g. bulk import). |
| Added | The date/time the key was added to the pool. |
| Action | The button to revoke the key. This button is not shown on Assigned keys (a key in use cannot be revoked). |
To remove a key from the pool (revoke):
- Click the red trash bin (Revoke) icon in the Action column of the relevant row.
- In the confirmation window that opens ("Revoke the key?"), confirm with the Revoke button.
- The key moves to the Revoked state and is no longer offered for assignment. To cancel, click the second (gray) button in the window.
Note: A key assigned to an agent cannot be revoked; the revoke button never appears on these rows. If you want to free up such a key, the relevant agent's license/token state must first be dealt with.
Adding a license key to the pool
New keys are added in bulk through a pop-up window.
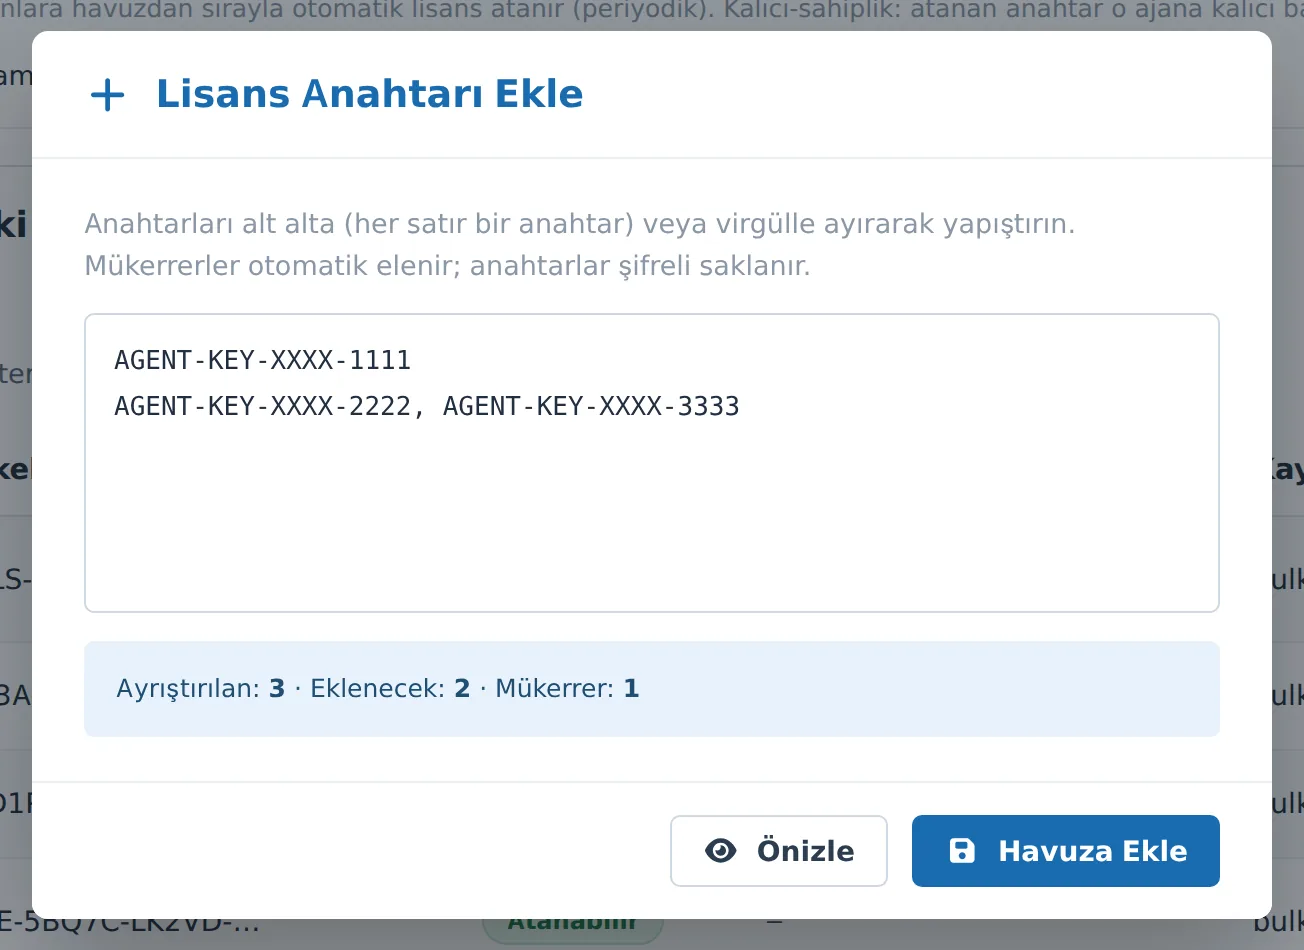
Figure 31. The Add License Key window. The Preview button shows the parsing result before saving.
- Click the Add License Key button at the top right of the License Keys in the Pool card. The Add License Key window opens.
- Paste your keys into the large text box. You can write one key per line or separate the keys with a comma. Duplicate keys are eliminated automatically; keys are stored encrypted.
- (Recommended) Before saving, click the Preview button. The system parses the text you entered and shows, at the bottom of the window, how many keys were parsed, how many will be added, and how many are duplicates. This step writes nothing to the pool; it is for verification only.
- If you are confident in the result, click the Add to Pool button. The keys are written to the pool, the window closes, and the table and summary badges are updated.
- To cancel, use the close (X) icon at the top right.
| Button | What it does |
|---|---|
| Preview | Parses the input and shows the result (parsed / to be added / duplicate). Does not write to the pool. |
| Add to Pool | Permanently adds the new (non-duplicate) keys to the pool. |
Tip: For large lists, always use Preview; you see duplicate and erroneous lines before writing them to the pool.
Tab 2 — Unlicensed Agents
This tab lists together both agents that are registered but have no license and agents that have sent a license query to the server but have not yet registered. The yellow number badge on the tab heading shows how many unlicensed agents there are.
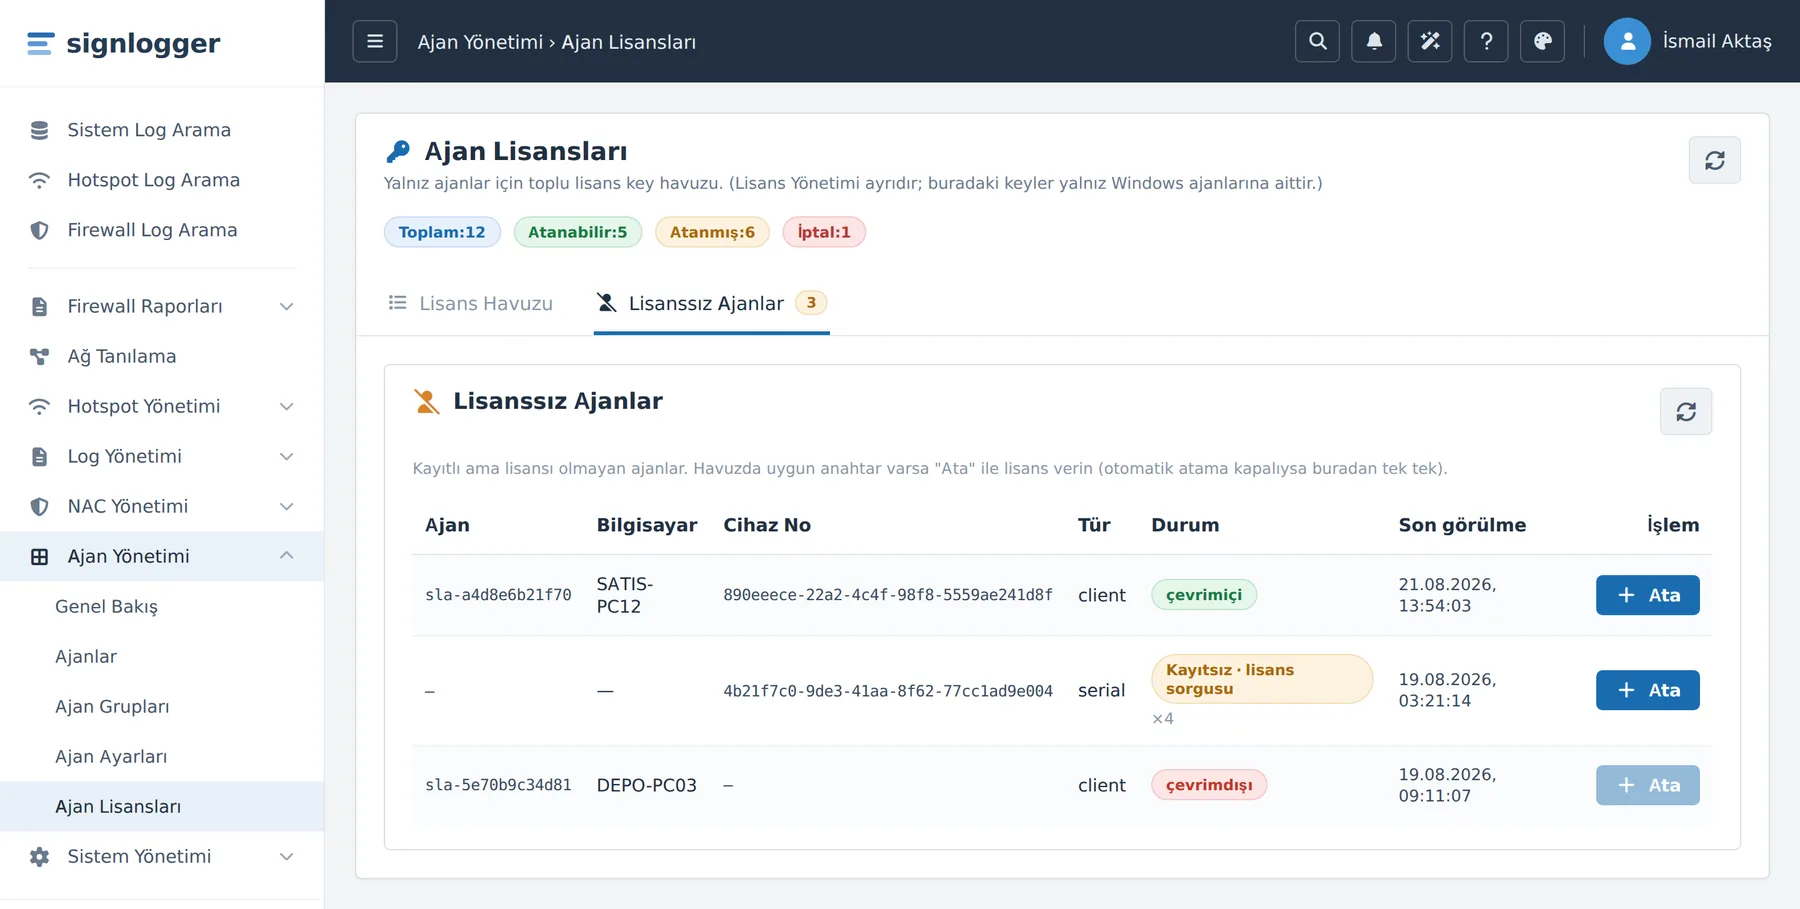
Figure 32. The Unlicensed Agents tab. Each row has a blue "Assign" button; if Device No is empty, the button is disabled.
- To switch to the tab, click the Unlicensed Agents heading at the top.
- To refresh the list, click the refresh (cycle) icon at the top right of the card.
| Column | Description |
|---|---|
| Agent | The agent's identity (agent_id). |
| Computer | The name of the machine on which the agent is installed. |
| Device No | The device number used in license assignment (device_id). If empty, no license can be assigned. |
| Type | The agent type (e.g. client / server). |
| Status | online / offline (for registered agents) or Unregistered · license query (agents that have not yet registered and have only sent a license query; the ×N next to it shows the query count). |
| Last seen | The date/time of the last communication from the agent. |
| Action | The button to assign a license from the pool (Assign). If there is no device number, the button is disabled. |
To assign a license to an agent from the pool:
- On the relevant agent's row, click the blue Assign button in the Action column.
- In the confirmation window that opens, confirm the operation. The system selects a suitable key from the pool and validates it via License Management.
- If validation is successful, the key is bound to this agent; the agent is now considered licensed, drops off the list, and the pool summary is updated.
Note: The Assign operation works "reuse-first": if a key was previously bound to the same device, no new key is spent and the existing key is reused. This way, even if you assign to the same agent a second time, no key is wasted from the pool.
Caution: Licenses cannot be assigned to agents whose Device No is empty; on these rows the Assign button is disabled. The button becomes active once the agent registers properly with the server and reports its device number.
Tips and notes
- Pool and assignment are separate concepts. Adding a key to the pool does not assign it to an agent. After adding, you must grant the license to the relevant agent with Assign (or turn on Automatic Assignment).
- One by one or automatic? If you have a small number of agents, saying Assign one by one from the Unlicensed Agents tab is more controlled. If the number of agents is large and constantly growing, you can turn on Automatic Assignment and leave the process to the system.
- The "Unregistered · license query" rows are agents that have not yet registered with the server but have begun asking for a license. They usually wait for the installation/registration process to complete; once registration is completed with the shared secret (PSK), they are listed as normal agents.
- Keep enough "Assignable" stock. When automatic assignment is on and the pool runs empty, new agents silently remain unlicensed. When you see the Assignable badge in the pool summary running low, add new keys.
- Treat revocation as irreversible. A revoked key is closed to assignment. To avoid revoking one by mistake, read the confirmation window carefully.
Common Operations
Short recipes for the most frequently needed operations. Each recipe specifies which page and tab to use.
Enabling 2FA on a group
- On the Agent Groups page, edit the relevant group with the pencil icon.
- In the Roles section, select 2FA = On (or leave it as Inherit to use the agent type default).
- In the 2FA Enforcement section, set Mode = Enforce. For a phased transition, it is recommended to start with Monitor first.
- Select the Method (Global setting / TOTP only / SMS only / SMS + TOTP) and, if necessary, set the Allow offline verification toggle.
- Click Save.
- To target specific machines, assign those agents to this group on the Agents page. If a single-agent exception is needed, set the 2FA role to On or Off from the Agents → Edit roles window.
Defining a break-glass / exempt account
- On the Agent Groups page, edit the relevant group (the group's 2FA role must be on).
- In the Break-glass / Exempt Accounts section, write one account per line in the 2FA-exempt service accounts box (e.g.
CORP\svc-scan). - If necessary, write a single account in the Emergency-access (break-glass) account box (e.g.
CORP\break-glass). - Optionally, turn on the Auto-lock after sign-in (NLA-RDP gap) toggle.
- Click Save.
Caution: Every use of the break-glass account generates a security alarm. Define it only for genuine emergencies and keep exempt accounts to a minimum.
Zero-touch GPO deployment
- On Agent Settings → Connection, set the PSK and the port.
- On Agent Settings → Deploy Agent, save the host and get the EnrollToken with Copy.
- In the GPO, Assign the
SignLoggerAgent.msi. - With a Registry Preference, write the token to the
HKLM\SOFTWARE\SYSNET\SignLoggerAgent\EnrollTokenvalue. - At startup, machines install and register automatically; they appear on the Agents page.
Token renewal / rotation
- On Agent Settings → Deploy Agent, click the Reissue button; a new token is generated and the version increments.
- Get the new token with Copy.
- Update the Registry EnrollToken value in the GPO with the new token.
Caution: If you do not update the value in the GPO, machines that have not yet registered will fail with the old token. Registered agents are not affected by this.
Note: Changing the port or host also increments the token version automatically. Changing the PSK does not affect existing registered agents; however, agents that will newly register or re-register must know the new PSK.
License assignment
| Method | Steps |
|---|---|
| One by one | On the Agent Licenses → Unlicensed Agents tab, say Assign on the relevant agent. Alternatively, use the Assign from Pool button on the row on the Agents page. |
| Automatic | On the Agent Licenses → License Pool tab, turn on the Enable automatic assignment toggle. |
In both ways, make sure there are enough Assignable keys in the pool; if necessary, add new keys with Add License Key.
Removing a machine from the fleet entirely
- Uninstall the agent software on the target machine. If Tamper Protection is on for the group, the unlock password is requested during removal.
- On the Agents page, click the Delete registration (trash bin) button on the relevant row and confirm.
- Check the state of the license key bound to the agent from the Agent Licenses → License Pool tab.
Note: Deleting the registration alone is not enough: if the agent is still installed on the machine and the PSK is valid, the agent returns to the list as a new registration. Therefore, remove it in the field first, then delete the registration.
Daily / weekly check routine
| Frequency | Check | Where |
|---|---|---|
| Daily | Is there a sudden increase in the offline agent count? | Overview → Total Agents card |
| Daily | Are the session sources healthy and is the last event current? | Overview → Session Sources |
| Weekly | Are there any unlicensed agents left? | Agent Licenses → Unlicensed Agents |
| Weekly | Are there enough Assignable keys in the pool? | Agent Licenses → pool summary |
| Weekly | Are there agents whose policy remains pending? | Agents → Policy column |
| Monthly | Are the exempt account and break-glass lists still valid? | Agent Groups → Break-glass section |
| Monthly | Is an EnrollToken rotation needed? | Agent Settings → Deploy Agent |
Troubleshooting / FAQ
Common situations are given in a symptom → cause → solution format.
Agent does not appear in the list
| Symptom | The agent was installed on the machine but does not appear at all on the Agents page. |
| Cause | The agent could not register (enroll) — usually the PSK does not match, no PSK is defined on the server, or the EnrollToken / host / port is wrong. |
Solution:
- On Agent Settings → Connection, confirm that the Pre-Shared Key (PSK) status is set ✓.
- On the Deploy Agent tab, check that the host/port and Meta (cert-fp) information is correct; resolve the yellow warnings.
- Verify that the GPO Registry EnrollToken value on the machine matches the current token on the page.
- On the Agents page, click Refresh; the registration may not have arrived yet.
"shared_secret (shared secret) is not defined on the server"
| Symptom | Agents cannot connect. On Overview, the Shared Secret (PSK) card is NOT SET (red), or there is a yellow "no PSK" warning on the Deploy Agent tab. |
| Cause | No PSK has been defined. While no PSK is defined, no agent can register. |
| Solution | In the Agent Settings → Connection → Pre-Shared Key (PSK) section, type at least 8 characters in the New shared secret box and click Save. Once the status is set ✓, retry the agents for registration. |
Agent unlicensed
| Symptom | On the Agents page, the agent has an unlicensed (yellow) badge; log/2FA functions may not work fully. |
| Cause | No license has been assigned to the agent from the pool yet; or the agent has no device number (device_id). |
Solution:
- Make sure there are Assignable keys in the pool (Agent Licenses pool summary). If not, add them with Add License Key.
- Say Assign from the Unlicensed Agents tab, or use Assign from Pool on the Agents row. Alternatively, turn on Automatic Assignment.
- If Device No is empty, the Assign button is disabled; wait for the agent to register properly with the server and report its device number (it is created once registration is completed).
User stuck at 2FA
| Symptom | A user cannot sign in at Windows sign-in because of 2FA. |
| Cause | The mode is Enforce and the user cannot provide the second factor; or offline verification is off while the agent cannot reach the center. |
Solution:
- In a phased transition, set the group to Mode = Monitor; return to Enforce once ready (Agent Groups).
- If sign-in is blocked in an offline scenario, turn on the Allow offline verification toggle (the group's 2FA Enforcement section).
- If it is an account that genuinely needs to be exempt, such as a service account, add it to the Break-glass / Exempt Accounts section.
- In a genuine emergency, use the Emergency-access (break-glass) account only at the physical console — it does not work over RDP.
- If an exception is needed on a single machine, set the 2FA role to Off on that agent with Agents → Edit roles.
EnrollToken not being applied (as if the version did not increment)
| Symptom | You changed the host/port or renewed the token, but the agents seem to be running with the old settings. |
| Cause | The version increment happens on the server; however, unless the GPO Registry EnrollToken value is updated manually, new machines use the old token. |
Solution:
- On the Deploy Agent tab, confirm that the version v… value has incremented (if necessary, Reissue).
- Update the
HKLM\SOFTWARE\SYSNET\SignLoggerAgent\EnrollTokenvalue in the GPO with the new token you obtained from the page with Copy. - Registered agents receive the version change automatically on the poll cycle; wait and confirm with Agents → Refresh.
Connection problem after a port change
| Symptom | After changing the port, there was a brief interruption, or agents cannot connect to the new port. |
| Cause | On a port change, the service restarts automatically; also, agents need to learn the new port via the EnrollToken. |
Solution:
- On Agent Settings → Connection, confirm that the Active port value on the status line is the port you expect.
- Make sure you have not entered a reserved port (e.g. 80, 443, 1812, 514); if it is rejected, check the forbidden ports in the error message.
- Check that the new port is open from the agents to the server on the firewall.
- Since the token version increments automatically when the port changes, reflect the current token from Deploy Agent into the GPO Registry value; this is how new machines learn the new port.
Policy stays in the "pending" state
| Symptom | On the Agents page, the Policy column of one or several agents has shown pending for a long time. |
| Cause | The agent is offline or has not yet pulled the latest policy. Policies are applied on the poll cycle, not instantaneously. |
Solution:
- Check the agent's Status column. If it is offline, verify that the machine is on and connected to the network and that the agent service is running.
- If it is online yet pending, wait for the length of the Poll interval (default 120 s) and click Refresh.
- If the Last seen value is very old, the agent cannot reach the server at all; check the port and firewall rules.
Dash (—) on the cards and a "Try again with Super User" warning
| Symptom | Dashes (—) appear instead of values on the pages, and a yellow permission warning appears. |
| Cause | This module requires root domain scope; the account you signed in with does not have sufficient privilege to see this scope. |
| Solution | Sign out and sign in again with an account that has Super User privilege. If you see dashes despite having the privilege, first try the Refresh button; the data may not have loaded yet. |
Cannot remove an agent with tamper protection on
| Symptom | You cannot stop the agent service or uninstall the software on the target machine. |
| Cause | Tamper Protection is enabled on the group the agent belongs to (service-stop prevention / uninstall protection). |
| Solution | Perform an authorized removal with the group's Unlock password. If you do not know the password, edit the relevant group from the Agent Groups page and set a new unlock password; the change reaches the agent on its next poll cycle. Alternatively, you can move the agent to a group with tamper protection off. |
An agent deployed via GPO is not reinstalled after a manual uninstall
| Symptom | You deployed the agent (signed MSI) via Group Policy (GPO); then you uninstalled it manually from the machine. The same GPO does not reapply the package — the agent is not reinstalled automatically. |
| Cause | Windows’ GPO software-installation engine records that the package was installed successfully before and does not treat a manual (user) uninstall as a reinstall trigger. The client machine assumes the policy has already been applied and does not query the package again; because the uninstalled application’s registry traces remain on the machine, the GPO is not re-triggered. |
Solution:
- Clean the registry (most effective): On the machine, under
HKEY_LOCAL_MACHINE\SOFTWARE\Microsoft\Windows\CurrentVersion\Group Policy\AppMgmt, delete the application’s GUID key and restart the computer. On the next policy refresh, the GPO reinstalls the package. - Redeploy: In the GPO console, right-click the software package and try All Tasks → Redeploy application. (This does not always work; the registry cleanup above is more reliable.)
- Define a new GPO: If needed, create a new GPO with an updated package/version and reassign it to the target machine.
Tip: If you plan to permanently remove the agent from a machine and redeploy it, cleaning the
AppMgmtGUID key above first is the most reliable way to make the GPO push the package again.
Closing
A summary of the guide and the core principles to keep in mind.
This guide covers the five pages of the Agent Management module (Overview, Agents, Agent Groups, Agent Settings, Agent Licenses) end to end. In practice, the flow is clear:
| # | Stage | What you do |
|---|---|---|
| 1 | Prepare the connection | With the PSK and port, enable agents to reach the server. |
| 2 | Deploy | Set up zero-touch GPO/SCCM deployment with the EnrollToken. |
| 3 | License | Assign licenses from the pool to arriving agents, or turn on automatic assignment. |
| 4 | Apply policy | Define roles, 2FA, logs, and tamper protection through groups. |
| 5 | Monitor | Regularly check the Overview cards and the Agents table. |
Five principles to keep in mind
- Read the colors. Green = good, yellow = attention, red = blocking. Base your decisions on the colored indicators.
- Changes are not instantaneous. Group and global policy changes are applied on the next poll/heartbeat cycle. A few minutes after saving, confirm with Refresh.
- Use inheritance. The "Inherit" option for roles and the "Inherit global" option for logs make central management easier. Define an exception only when it is truly needed.
- Minimize security exceptions. Exempt accounts, the break-glass account, long-lived tokens, and a weak PSK are each a risk. Review them regularly.
- Keep the GPO and server in sync. The token version increments automatically on the server; the Registry value in the GPO must be updated manually. Do not forget this after every rotation.
Where to turn
For situations whose answer you cannot find in this guide, or for technical support requests regarding the product, contact the SYSNET support team. Sharing the following information in your support request shortens the resolution time:
- The SignLogger version and the Policy Version number (from the Overview page)
- The relevant agent's Agent ID, Hostname, OS / Version, and Last seen information
- The full text of the error or warning shown on the screen (a screenshot if possible)
- When the problem started and any setting changes made beforehand