Introduction
On Zyxel USG FLEX H series firewalls, SignLogger integration lets you keep legally compliant authentication records for guest wireless or wired users. This document walks through configuring log delivery on the device, defining a separate interface for guest users, and finally pairing the captive portal configuration with SignLogger — with screenshots at every step.
Step 1: Configuring Log Delivery to SignLogger (Log & Report > Log Setting)
To forward the device's system and security logs to a central syslog server (SignLogger), configure the Remote Syslog Server settings:
- Open Log & Report > Log Setting from the left menu.
- In the Log Category Setting table, mark which categories (Authenticate, Security, System, Security Services, VPN, License, Network) go to Remote Server 1/2 as Normal or Debug.
- In the Remote Syslog Server section at the bottom, select the Remote Server 1 tab.
- Enable Active.
- Set Log Format to CEF/Syslog (or another format as needed).
- Enter the SignLogger server's IP or name in Server Address (e.g.
172.17.250.30). - Enter the listening port in Server Port (e.g.
514). - Pick a Log Facility (e.g. Local 7) and save.
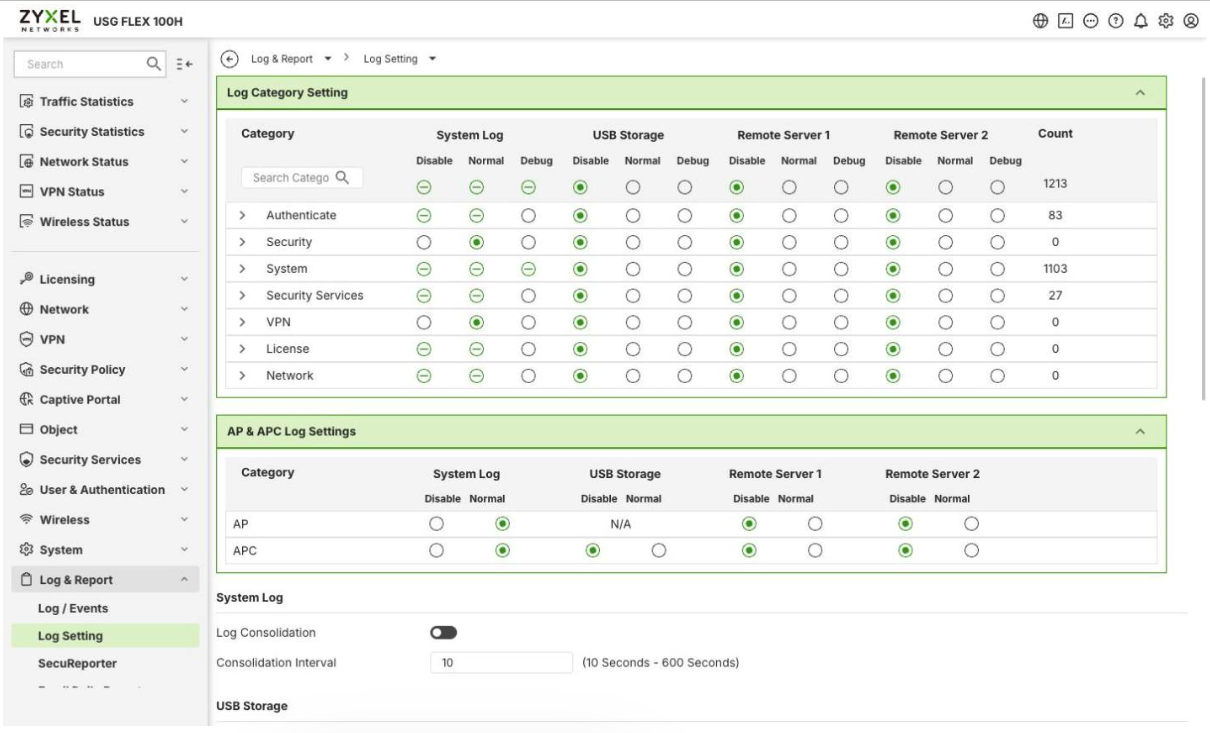
Screenshot 1: Log & Report > Log Setting — Log Category Setting and AP & APC Log Settings tables.
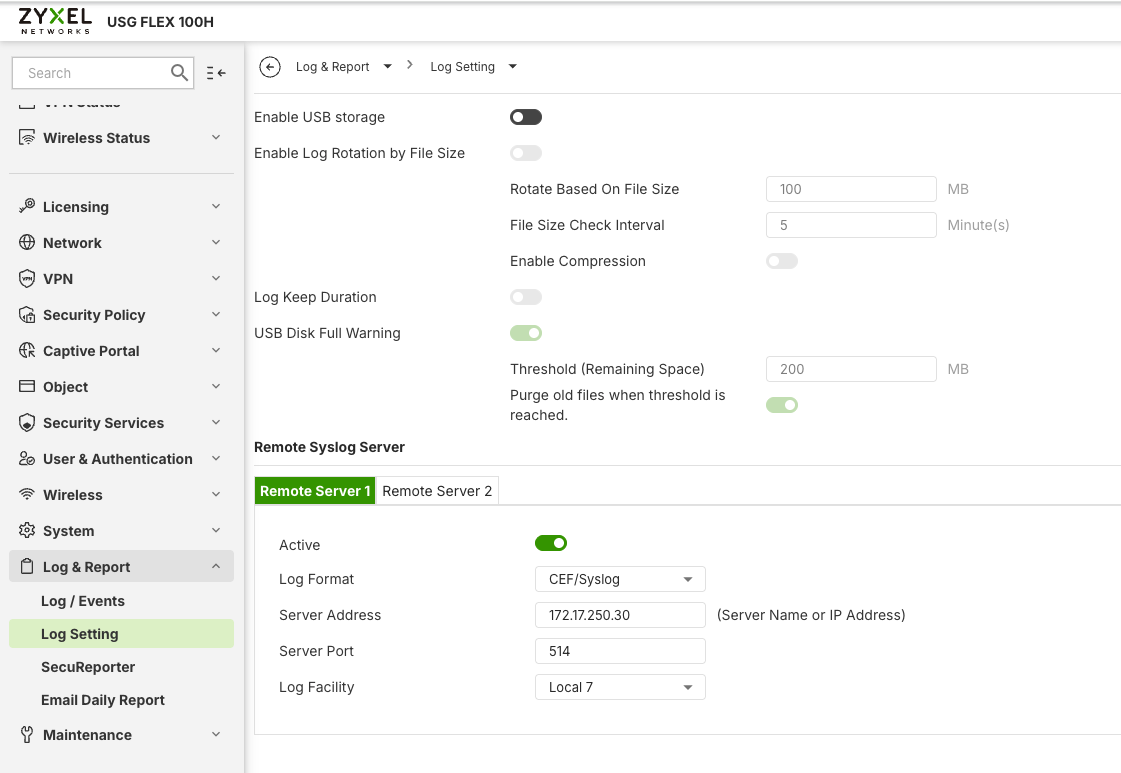
Screenshot 2: Remote Syslog Server (Remote Server 1) configuration.
Step 2: RADIUS Server Settings under User Authentication
For the "RADIUS/SignLogger" sign-in method selected in the captive portal policy to work, that RADIUS server must be defined under the device's User Authentication settings:
- Go to User & Authentication > User Authentication > AAA Server.
- Under RADIUS Server, add a new server with Add (e.g. name:
SignLogger). - Enter the SignLogger IP in Server Address (e.g.
10.100.100.253) and1812in Authentication Port. - Enter the same shared secret defined on the SignLogger side in Key.
- Enter the device's interface IP in NAS IP Address (e.g.
10.254.253.251) and adjust Timeout if needed. - Leave Group Membership Attribute at Vendor-Specific(26) and save.
- The RADIUS server created here becomes selectable under Sign-in Method > Sign-on With in the Authentication Policy of Step 4.
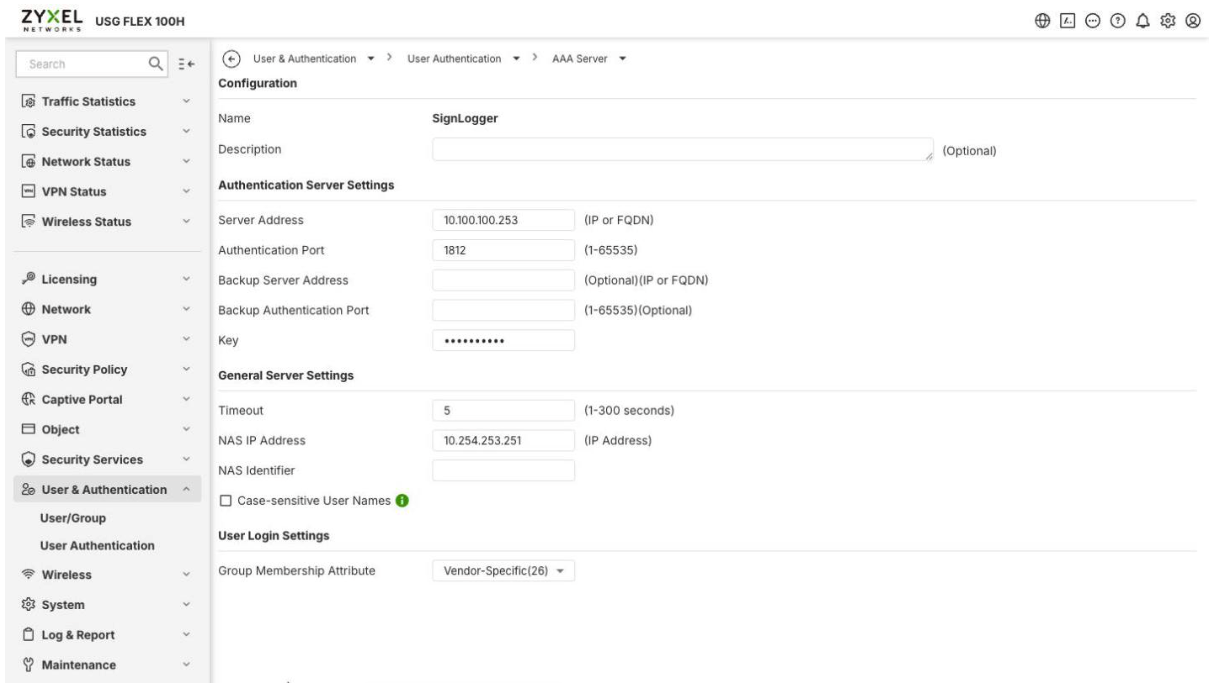
Screenshot 3: AAA Server — RADIUS Server (SignLogger) configuration.
Step 3: Creating the Guest Interface
The captive portal policy needs a dedicated interface carrying guest traffic:
- Go to Network > Interface > Interface.
- Under Internal, click Add to create a VLAN interface.
- Set Interface Type to VLAN and name it, e.g.
Guest. - Leave Zone as LAN.
- Select the physical port under Member and assign a VLAN ID.
- Under Address Assignment choose Use Fixed IP Address and enter the guest subnet (e.g.
192.168.2.1/24). - Save.
Once created, this interface (Guest) is selected in the Incoming field of the Authentication Policy in Step 4, binding the captive portal rule to this network.
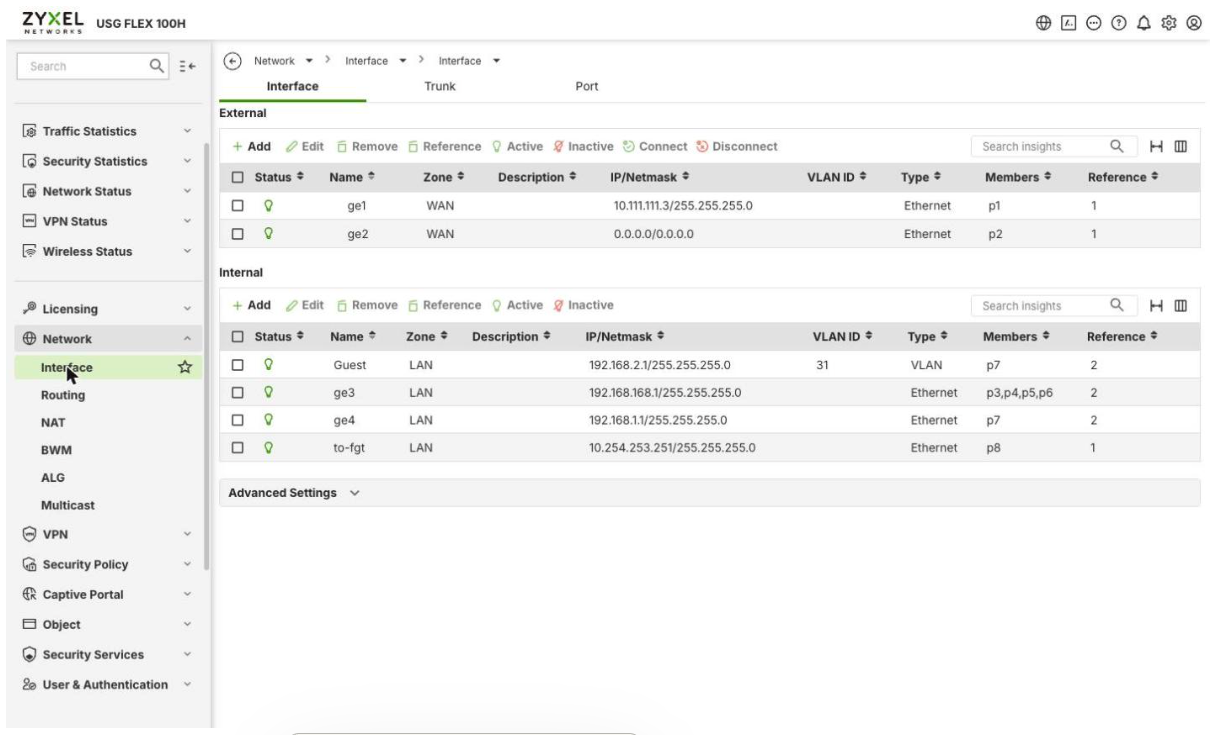
Screenshot 4: Guest VLAN interface (VLAN 31, 192.168.2.1/24).
Step 4: Captive Portal Authentication Policy
Guest sign-in records reach SignLogger through the authentication policy under Captive Portal:
- Go to Captive Portal > Authentication Policy > Policy.
- Make sure the Enable switch is on.
- Edit the existing policy row or create one with Add.
- In Incoming, select the guest interface created in Step 3.
- Source Address and Destination Address can remain
any. - Add the services that must be reachable before the portal (DNS and TCP-8080) to the Exempt List.
- If needed, enable Walled Garden for exceptions such as the management IP.
- Under Sign-in Method, tick Sign-on With and choose RADIUS/SignLogger from the list.
- Set Portal Type to External and enter the SignLogger page address in the URL field.
- Optionally set the post-login redirect under Advanced Settings.
- Save with Apply.
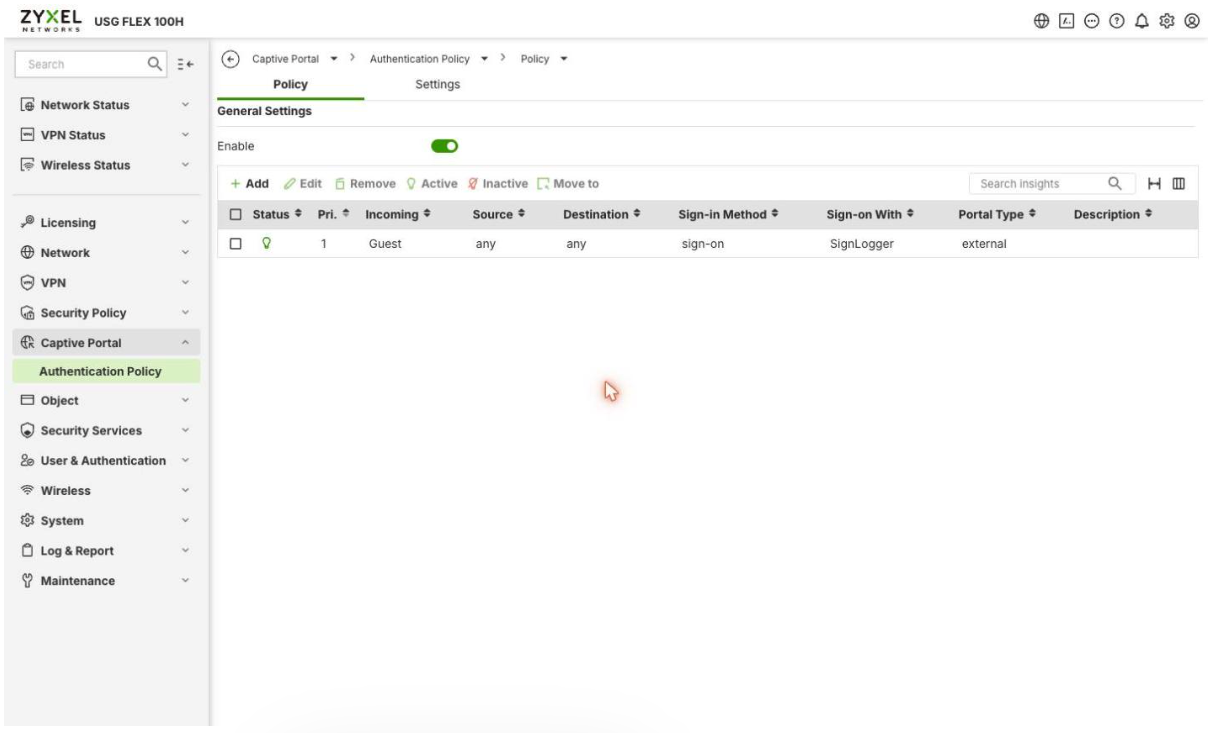
Screenshot 5: Guest rule and the SignLogger sign-on setting.
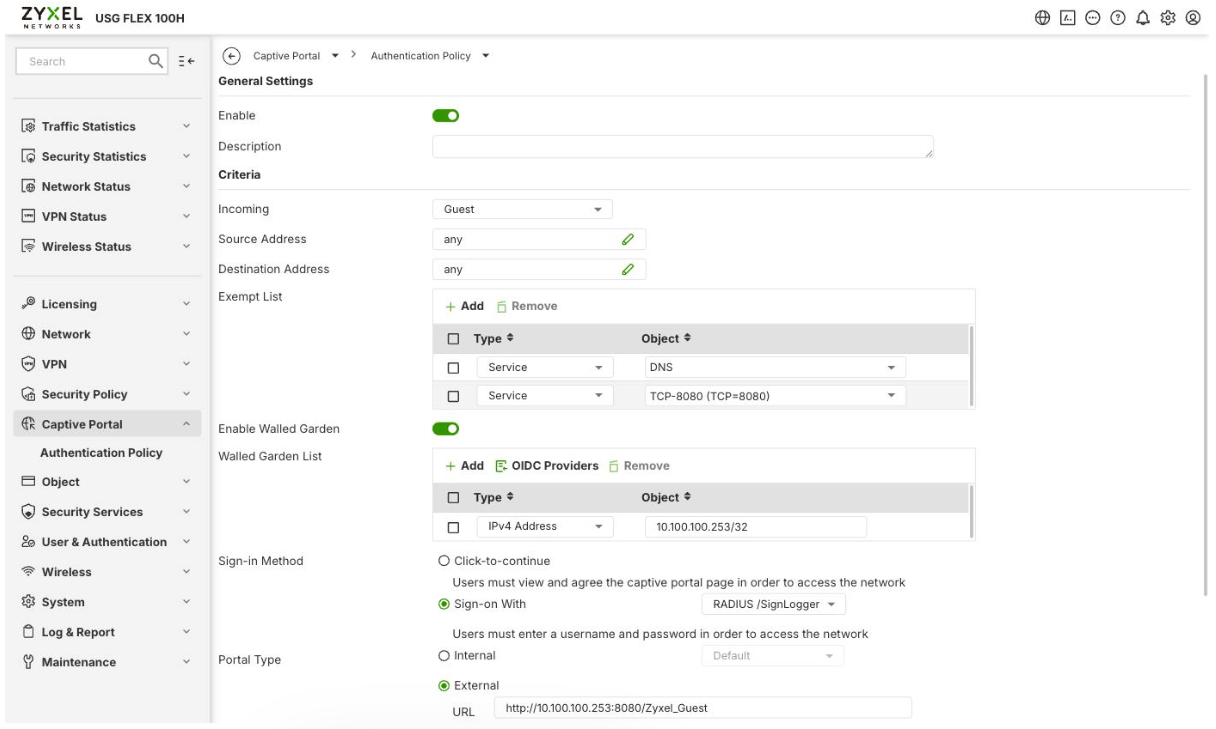
Screenshot 6: Criteria, Walled Garden and Sign-in Method settings.
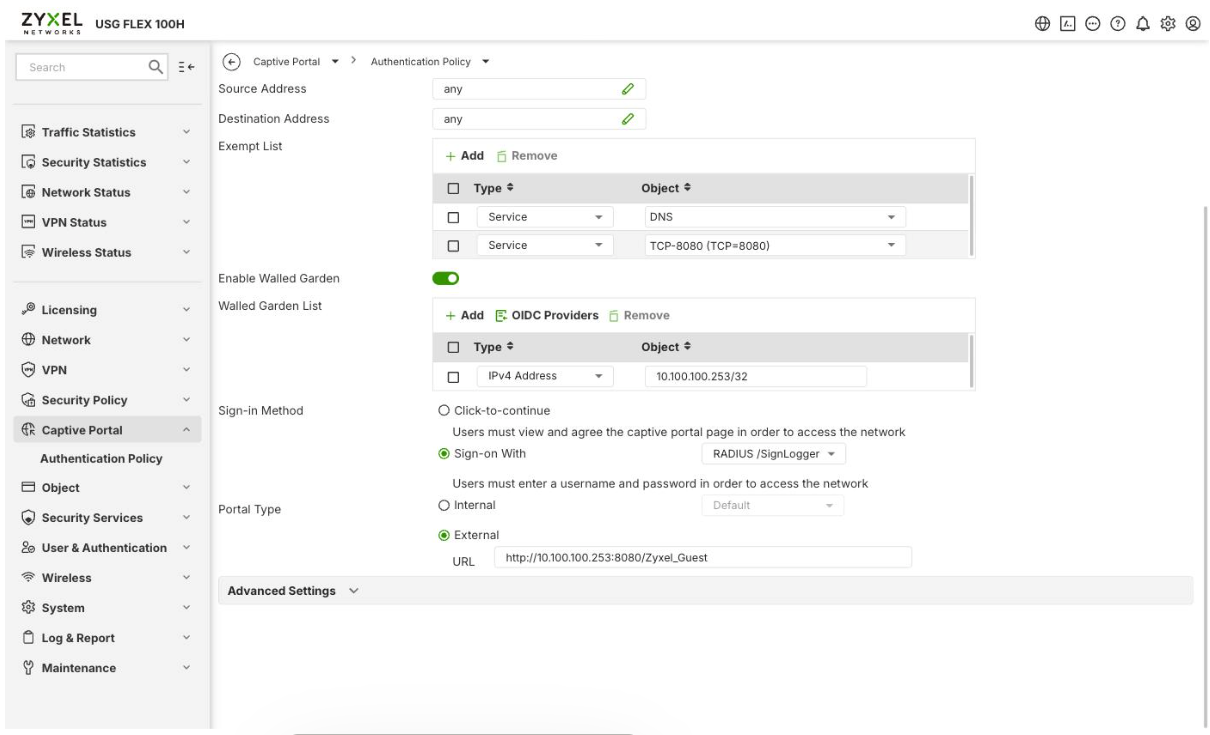
Screenshot 7: Sign-in Method, Portal Type (External URL) and Advanced Settings.
Step 5: Captive Portal Server Settings
- Switch to Captive Portal > Authentication Policy > Settings.
- Leave the Server Address value
6.6.6.6exactly as it is. This address is the internal reference address of the device's captive portal service and must match the configuration on the SignLogger side. - Confirm HTTP is enabled and the HTTP Port (default 1080) is correct.
- Manage HTTPS and certificate settings here if required.
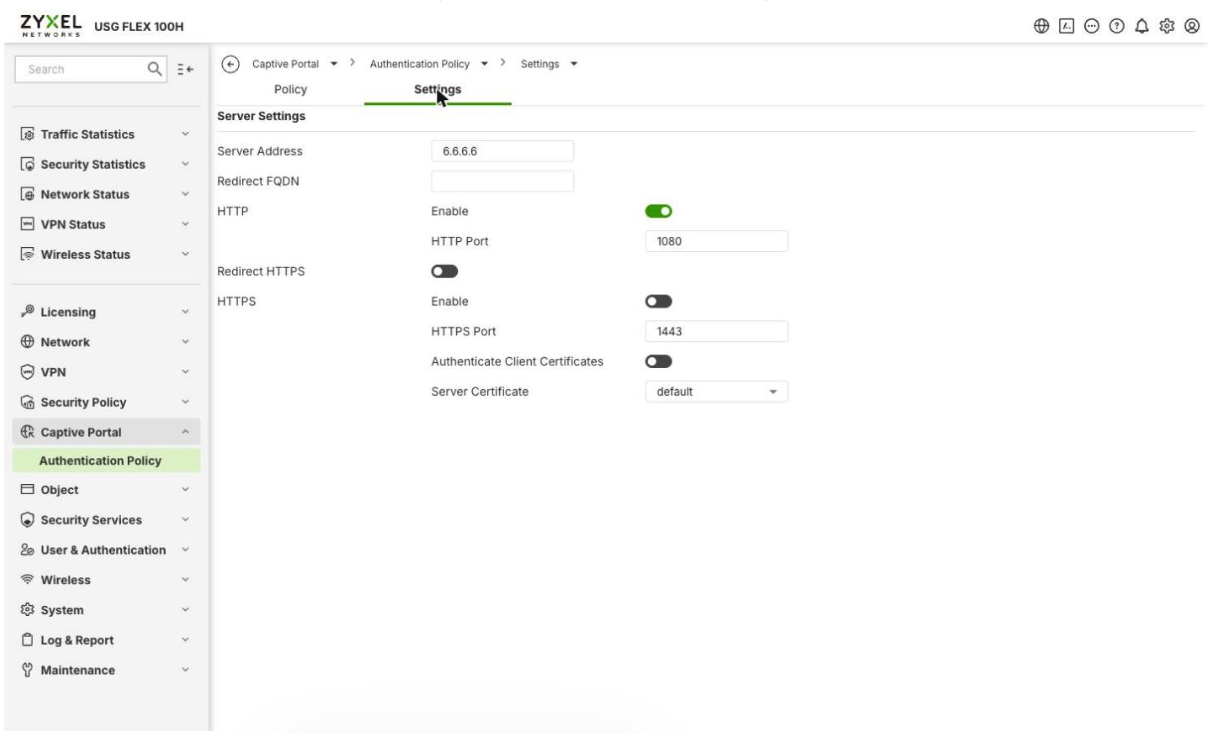
Screenshot 8: Settings — Server Address 6.6.6.6.
Step 6: Entering the Firewall IP on the SignLogger Side
The 6.6.6.6 value seen on the Zyxel must also be defined in SignLogger so the two systems recognize each other:
- Sign in to the SignLogger management panel.
- Open the Captive Portal settings.
- Enter
6.6.6.6in the Firewall IP field. - Save, and wait for the SignLogger service to restart if required.
Verification
After completing the configuration, connect a client to the guest network (Guest VLAN) and confirm it is redirected to the defined external portal page, and that the user record appears in the SignLogger panel after sign-in.
Conclusion
SignLogger integration on Zyxel USG FLEX H devices is completed by configuring log delivery, defining a dedicated guest VLAN interface, and matching the captive portal server address (6.6.6.6) on both the Zyxel and SignLogger sides. Applying these steps in order ensures guest sign-in records are kept completely and in line with regulations.