This guide explains, end to end, how to configure RADIUS-based captive portal authentication for a guest network on a FortiGate firewall. The configuration has four parts: (1) defining the RADIUS server on the FortiGate, (2) creating a User Group (Guest_Group) for guest users, (3) enabling the captive portal on the guest interface, and (4) writing the firewall policies that govern guest access. IP addresses, secrets and other sensitive values are masked in the screenshots. Steps are based on FortiOS 7.6.
1. Defining the RADIUS Server on the FortiGate
For guest users to be authenticated through the captive portal, define the RADIUS server that will receive the FortiGate's authentication requests under User & Authentication > RADIUS Servers. Click Create new (or select an existing server and click Edit) and fill in:
- Name: a descriptive name (e.g.
guest-radius) referenced later in the user group and captive portal settings. - Authentication method: Default lets the FortiGate try supported methods automatically; Specify lets you pick PAP, CHAP, MS-CHAP or MS-CHAP-v2 manually. SignLogger authenticates captive portal requests with PAP.
- NAS IP: the source (NAS) IP the FortiGate uses in RADIUS requests. If empty, the egress interface IP is used. The client definition on the RADIUS server must match this IP.
- Include in every user group: adds this server to all user groups automatically — usually left off in guest scenarios.
- Primary Server – IP/Name: IP address or FQDN of the primary RADIUS server (SignLogger).
- Primary Server – Secret: the shared secret between the FortiGate and the RADIUS server; it must match exactly on both sides.
- Connection status / Test Connectivity / Test User Credentials: verify reachability and a sample user login. A working connection shows "Successful".
- Secondary Server (optional): a second RADIUS server for redundancy.
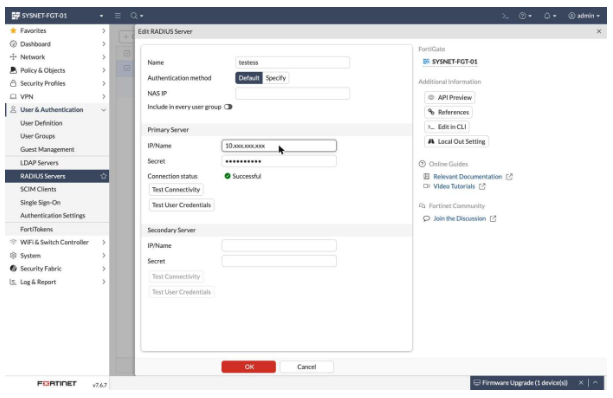
Figure 1 — FortiGate RADIUS server definition (IP and secret masked).
2. Creating the Guest User Group (Guest_Group)
Next, create the User Group that determines which users are authorized in captive portal authentication. Because the group is referenced both in the captive portal settings and in firewall policies, create it before the captive portal step. Create it under User & Authentication > User Groups:
- Name: the group name (here
Guest_Group). - Type: select Firewall — the type usable in firewall policies and interface authentication.
- Members (local): local users would go here; since authentication happens via RADIUS, leave it empty.
- Remote Groups: the mandatory field binding the group to the RADIUS server. Click Add, choose the RADIUS server defined earlier as Remote Server, and enter the group name returned by RADIUS (
Guest_Group) as Group Name. Users authenticated by RADIUS are mapped into this group by the returned group attribute.
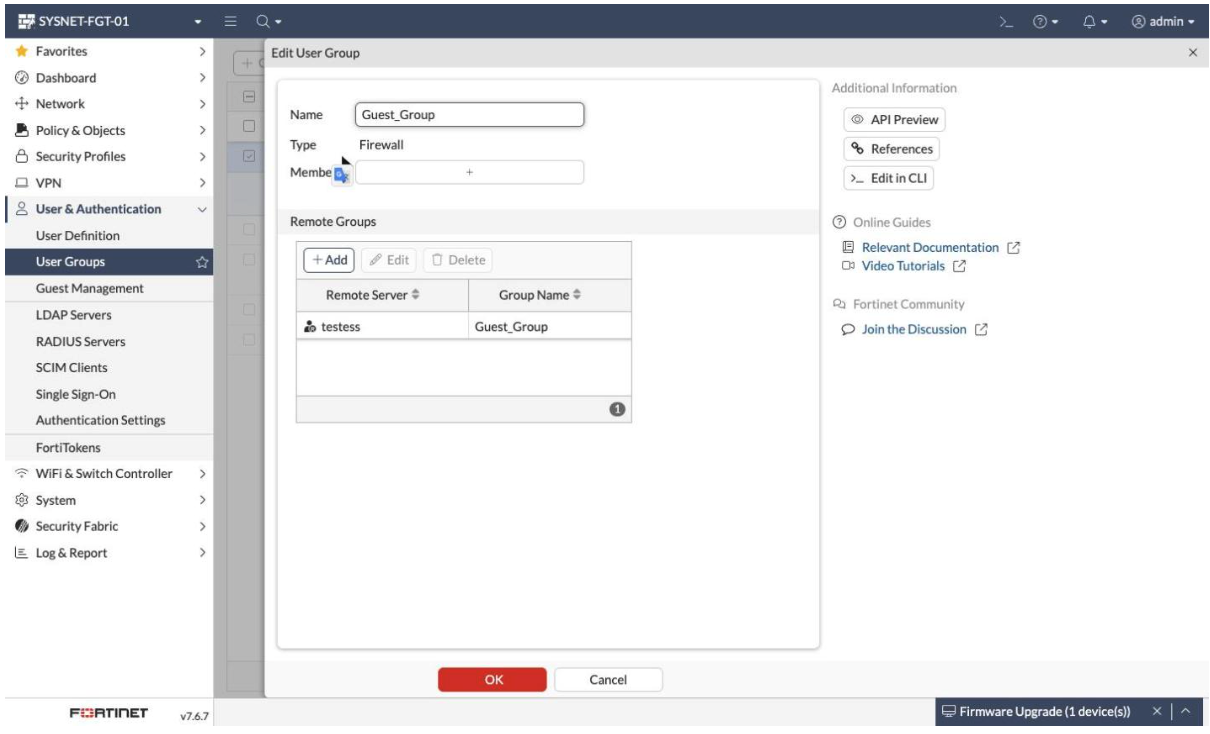
Figure 2 — Guest_Group and the RADIUS remote group mapping.
3. Enabling the Captive Portal on the Guest Interface
Enable the captive portal on the interface carrying guest traffic so users are redirected to a sign-in page. The portal can be defined on a wired VLAN/physical interface or on a Wi-Fi SSID. In this environment guest traffic flows over a VLAN interface named Misafir (VLAN ID 11 on the LAN), and the settings live in the interface's Network section:
- Security mode: must be set to Captive Portal — the other portal fields only appear after this is selected.
- Authentication portal: Local uses the FortiGate's own page; External uses an external portal URL. Here External is selected and the field contains the PORTAL URL generated in SignLogger (e.g.
http://10.x.x.x:8080/FGT_Guest…) — paste the address exactly as produced on SignLogger's portal screen. - User access: Restricted to Groups allows only selected groups; Allow all admits every authenticated user. Restricted to Groups is recommended to keep guest access under control.
- User groups: add the guest group (
Guest_Group) so only its authenticated members pass. - Redirect after Captive Portal: Original Request sends users to the address they first requested; Specific URL sends them to a fixed page.
- Network Exemptions: destinations reachable before authentication. The SignLogger portal server (e.g. the
SignLogger-New-Hotspotaddress object) and DNS must be exempted — without these the user cannot even reach the sign-in page, so treat them as mandatory.
On systems with FortiAP (wireless), where the captive portal is configured depends on the SSID mode. The critical rule: in tunnel mode the SSID is itself the interface — configure the portal directly on that SSID/interface (traffic is carried to the FortiGate in the CAPWAP tunnel, giving strong policy control). In bridge mode the SSID and interface differ — traffic is switched locally, and the portal is usually defined in the SSID security settings (typically with an external portal). This guide's example uses a wired VLAN interface; in wireless setups the fields are similar but their location follows the tunnel/bridge choice.
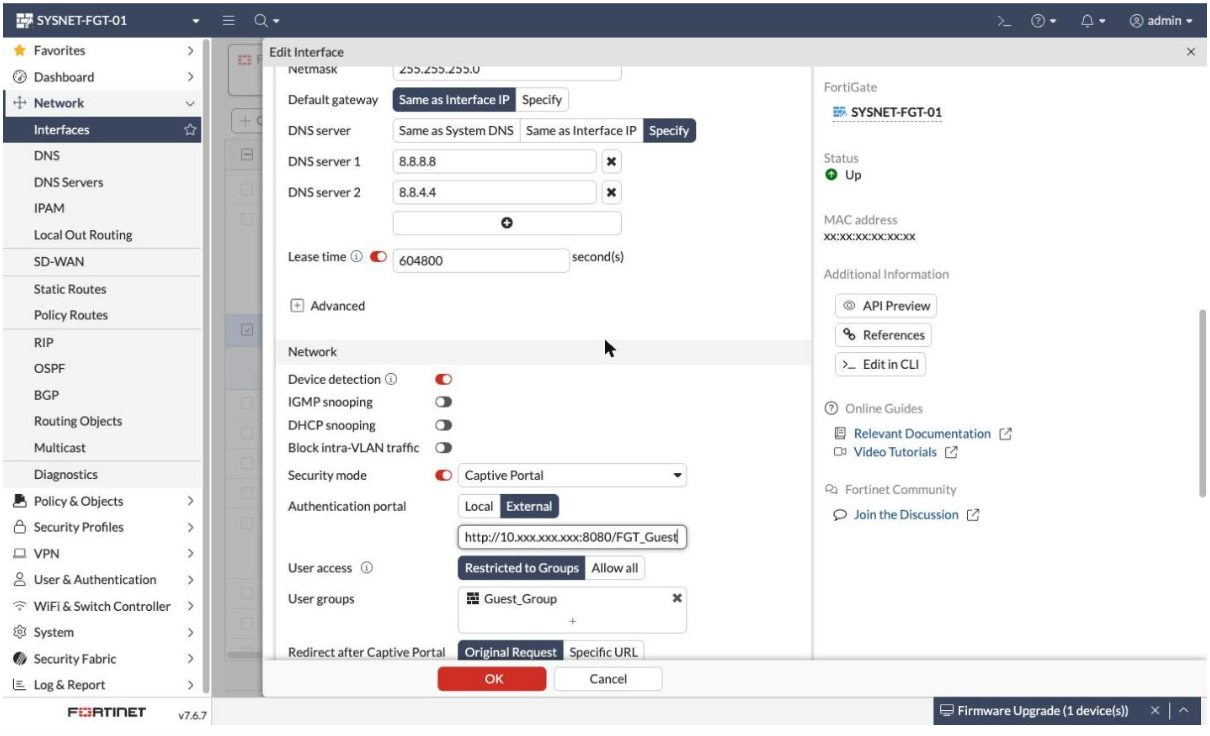
Figure 3 — Captive portal settings on the guest interface (IP masked).
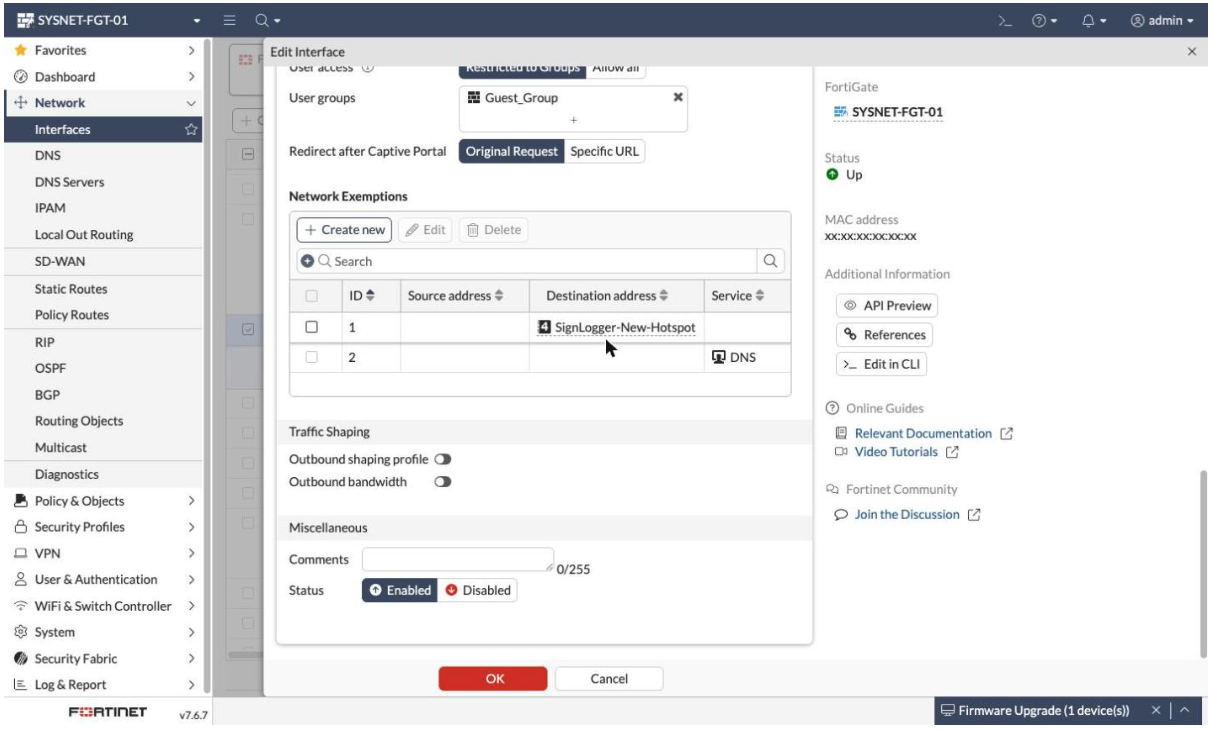
Figure 4 — Network Exemptions and the authentication group.
4. Firewall Policies for Guest Access
Define a firewall policy from the guest interface toward the WAN so guests can reach the internet and are subjected to captive portal authentication. When the policy contains a user group that requires authentication, the FortiGate redirects traffic to the portal. Under Policy & Objects > Firewall Policy, click Create new and fill in:
- Name: a descriptive name (e.g.
Guest-Internet). - Incoming interface: where guest traffic arrives (guest Wi-Fi SSID or guest LAN interface).
- Outgoing interface: usually WAN or SD-WAN/virtual-wan-link.
- Source: typically
allor an address object for the guest subnet. - User/group: the critical field that triggers captive portal authentication — add the RADIUS-backed guest group here; traffic passes only after successful authentication.
- Destination: usually
allfor internet access. - Schedule / Service: e.g. always; ALL or HTTP/HTTPS/DNS.
- Action: ACCEPT.
- NAT: usually enabled (Use Outgoing Interface Address) since the guest network uses private addressing.
In this environment guest access is provided by three policies (Interface Pair View), matching the portal flow exactly — before authentication the user can only reach the portal and DNS; after authentication, the internet via Guest_Group:
- GUEST → LOCAL (Policy 28): source all, destination SignLogger-New-Hotspot, services HTTP/Port-8080/RADIUS, ACCEPT, NAT off. Lets unauthenticated guests reach the SignLogger portal page (HTTP and 8080) and RADIUS; User/group is empty because identity is not verified yet.
- GUEST → virtual-wan-link (Policy 57): source all, destination all, service DNS, ACCEPT, NAT on. Allows DNS resolution before authentication — the user can only reach the portal if DNS works. Serves the same purpose as the DNS network exemption on the interface.
- GUEST → virtual-wan-link (Policy 52): source all, User/group Guest_Group, destination all, service ALL, ACCEPT, NAT on. Provides internet access after authentication; because Guest_Group is in the User/group field, only users successfully authenticated through the portal pass.
- Security Profiles: apply AntiVirus, Web Filter or Application Control as needed to inspect guest traffic.
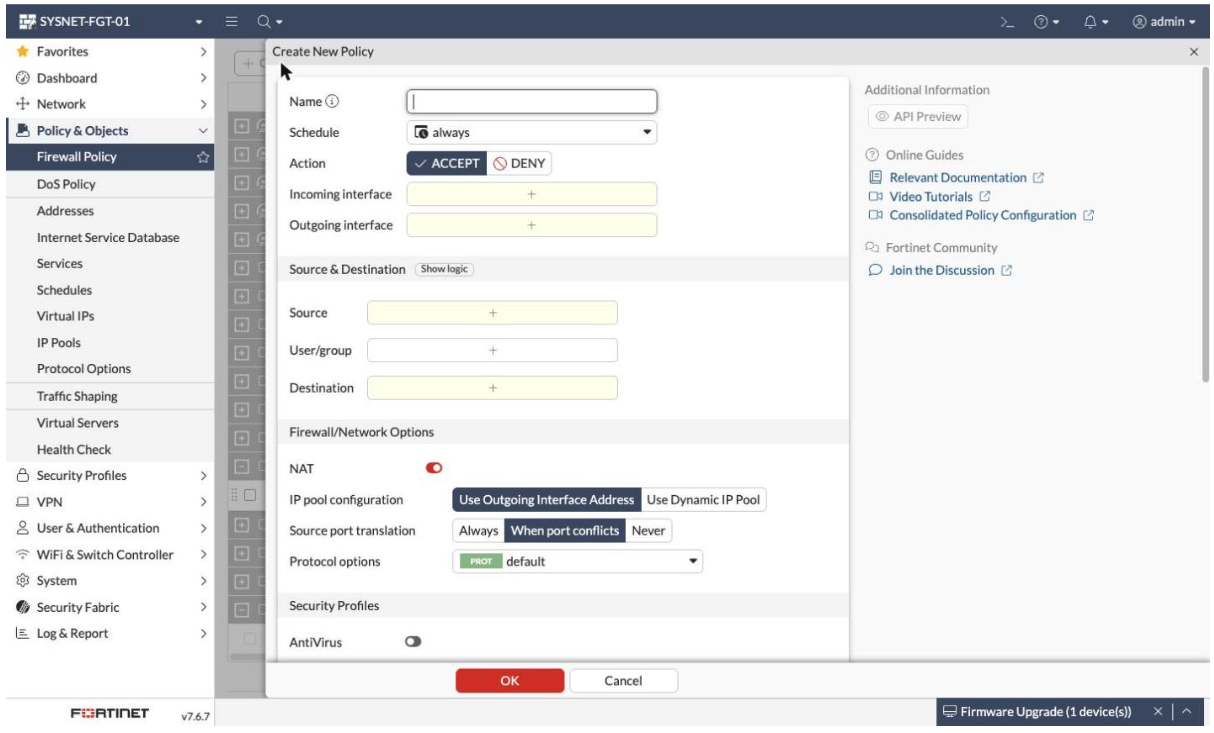
Figure 5 — Firewall policy creation and the User/group field.
Summary and Tips
This guide covered the four building blocks of a guest captive portal on FortiGate: defining the RADIUS server, creating Guest_Group, enabling the portal on the guest interface, and writing the guest access policies. When wrapping up:
- Make sure the RADIUS shared secret matches exactly on both sides and the NAS IP matches the client definition on the server.
- Use Test Connectivity and Test User Credentials to verify RADIUS before writing policies.
- Don't forget the User/group field in the firewall policy — if left empty, captive portal authentication never triggers.
- When using an external portal, keep the SignLogger portal server and DNS in Network Exemptions so the sign-in page stays reachable.