This guide explains, step by step, how to prepare the firewall side of an XML API connection between a Palo Alto Networks firewall and SignLogger. The goal is for SignLogger to report users who authenticate on the guest network to the firewall as IP-to-user mappings (User-ID mapping), to deliver logout information when needed, and to query information from the firewall. Palo Alto's official documentation explicitly states that external systems can send login and logout events to the integrated User-ID agent on PAN-OS via the XML API — and that is exactly the path this guide follows.
All IP addresses, interface names, usernames and profile names in this guide are examples from a lab environment; adapt them to your own network plan. The lab firewall is a PA-445 on PAN-OS 11.1.13, but the menus and logic are largely the same across all PAN-OS 10.x and 11.x releases.
This document is a continuation of our Captive Portal (Authentication Portal) and RADIUS configuration guide. With the captive portal working, the API connection makes portal-authenticated users appear by name on the firewall, enables user-based policies, and puts usernames into the logs. Since you will run the API-side tests from the SignLogger interface, we focus here purely on the Palo Alto side.
What Is the Palo Alto XML API and What Does It Do in the SignLogger Integration?
The PAN-OS XML API lets you do almost everything the web interface does — programmatically over HTTPS. Requests go to the firewall's /api/ path and responses come back as XML. Reading and writing configuration, running operational commands, triggering commits, pulling logs and reports, importing/exporting files and sending User-ID mappings are all available through this interface.
For the SignLogger integration the key category is User-ID. When a guest signs in on SignLogger's authentication page, SignLogger sends the firewall a message pairing that user's IP address with their username. The firewall writes the mapping into its User-ID table — so traffic logs and reports show the username next to the IP, and security policies can be written per user or group. When the user signs out or the session expires, the same interface removes the mapping.
Three conditions must be met on the Palo Alto side: first, an administrator account authorized for API use with an admin role profile assigned; second, an API key generated with that account's username and password; third, network-level reachability from the SignLogger server to the firewall's management interface with the HTTPS service enabled on it. The rest of this guide walks through exactly these settings.
Example Lab Environment and Addressing Plan
The screenshots come from the following lab; change every value to match your own network:
- Firewall model and version: PA-445, PAN-OS 11.1.13
- Firewall address receiving API requests:
10.254.253.244(on the ethernet1/2 data interface, trust zone) - MGT (out-of-band management) interface:
192.168.1.1 - SignLogger server:
10.100.100.253(portal and API client) - Guest network:
172.16.1.0/24, gateway172.16.1.1(ethernet1/2.71, Guest zone) - Corporate network:
172.16.0.0/24, gateway172.16.0.1(ethernet1/2.70, trust zone) - Administrator account created for the API:
apiadmin - Admin role profile created for the API:
apirole
The most critical detail is which interface receives the API requests. The default management path on Palo Alto firewalls is the dedicated MGT interface, which is usually unreachable from data-plane networks. In this lab, the 10.254.253.244 address SignLogger talks to is on the ethernet1/2 data interface, not MGT. For a data interface to accept management and API access, an Interface Management Profile with HTTPS enabled must be attached to it. Skip this detail and API requests time out without any response — a failure that is usually misdiagnosed as an authentication problem.
Prerequisites
- Web interface access with a superuser account — required to create the admin account and role profile, change management settings and commit.
- The SignLogger server's IP address, used in permit lists and security policies.
- Clarity on which IP SignLogger will use to reach the firewall: the MGT interface or a data interface?
- A working Captive Portal (Authentication Portal) configuration — not mandatory, but recommended so the integration produces meaningful results.
- A backup of the running configuration via Device > Setup > Operations before you start — the fastest way back if you need to revert.
Step 1: Create a Dedicated Admin Role Profile for API Access
Palo Alto's documentation gives an explicit best practice: use a separate administrator account for XML API access. This is not just tidiness — a separate account keeps API activity distinct from human administrators in the audit logs, lets you limit permissions to exactly the categories needed, and lets you stop the integration in a security incident by revoking just that account's key. Likewise, a human admin's password change never breaks the integration.
Start with the role profile that defines the account's permissions. Go to Device > Admin Roles and click Add. The lab names this profile apirole. The Role field sets the scope: Device applies to the whole device, Virtual System restricts it to one vsys. For typical single-vsys deployments, Device is sufficient.
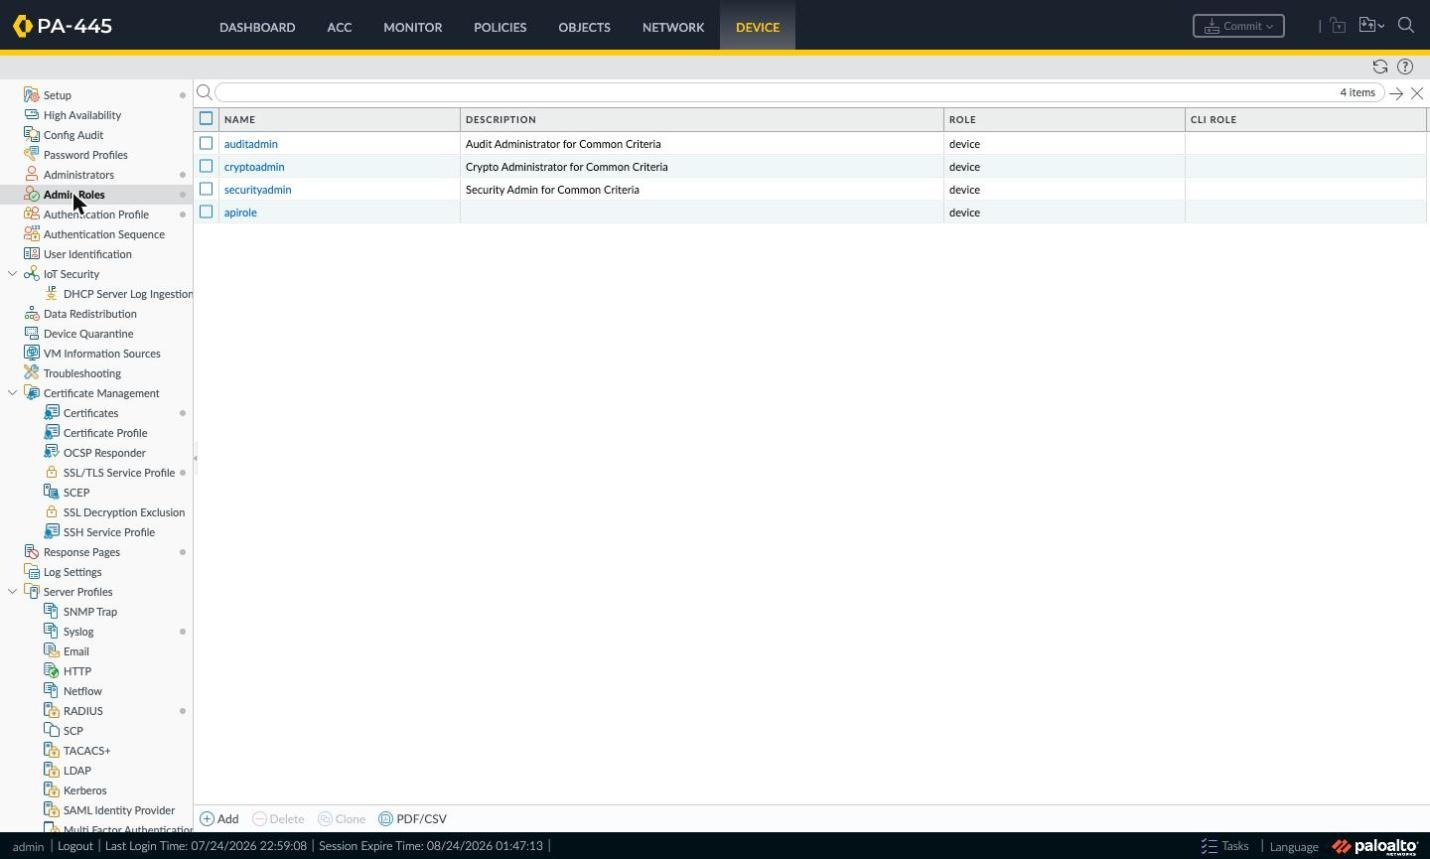
Figure 1: Device > Admin Roles and the apirole profile.
Permissions on the XML API Tab
The role profile window has four tabs: Web UI, XML API, Command Line and REST API. The heart of the integration is the XML API tab. Unlike the Web UI tab it offers only Enable and Disable — there is no read-only middle ground; a category is either fully open or fully closed.
The categories and what they mean for the SignLogger integration:
- User-ID Agent: the mandatory category. SignLogger cannot send IP-user mappings unless this is Enabled; if it is off, the firewall returns an authorization error even with a valid key.
- Operational Requests: permission to run
show/clearoperational commands. Needed for SignLogger to read the current mapping table, query system information or clear a mapping. Strongly recommended for verification and troubleshooting. - Configuration: read/write access to the candidate and running configuration. Needed only if SignLogger is expected to update objects, address groups or policies. For pure User-ID delivery it can stay off.
- Commit: permission to apply configuration changes. Meaningful only alongside Configuration; User-ID mappings are runtime data and need no commit.
- Log and Report: permission to query traffic/threat/authentication logs and produce reports. Open these if you will do reporting or legal record correlation through SignLogger.
- Import and Export: uploading/downloading files such as certificates and response pages — e.g. uploading SignLogger's comfort page file via API.
- IoT Agent: relates to the IoT Security subscription; unused in this integration.
In the lab, every XML API category is Enabled so all test scenarios stay open. In production, apply least privilege and keep only the categories you actually use — for pure User-ID delivery, User-ID Agent plus Operational Requests is usually enough.
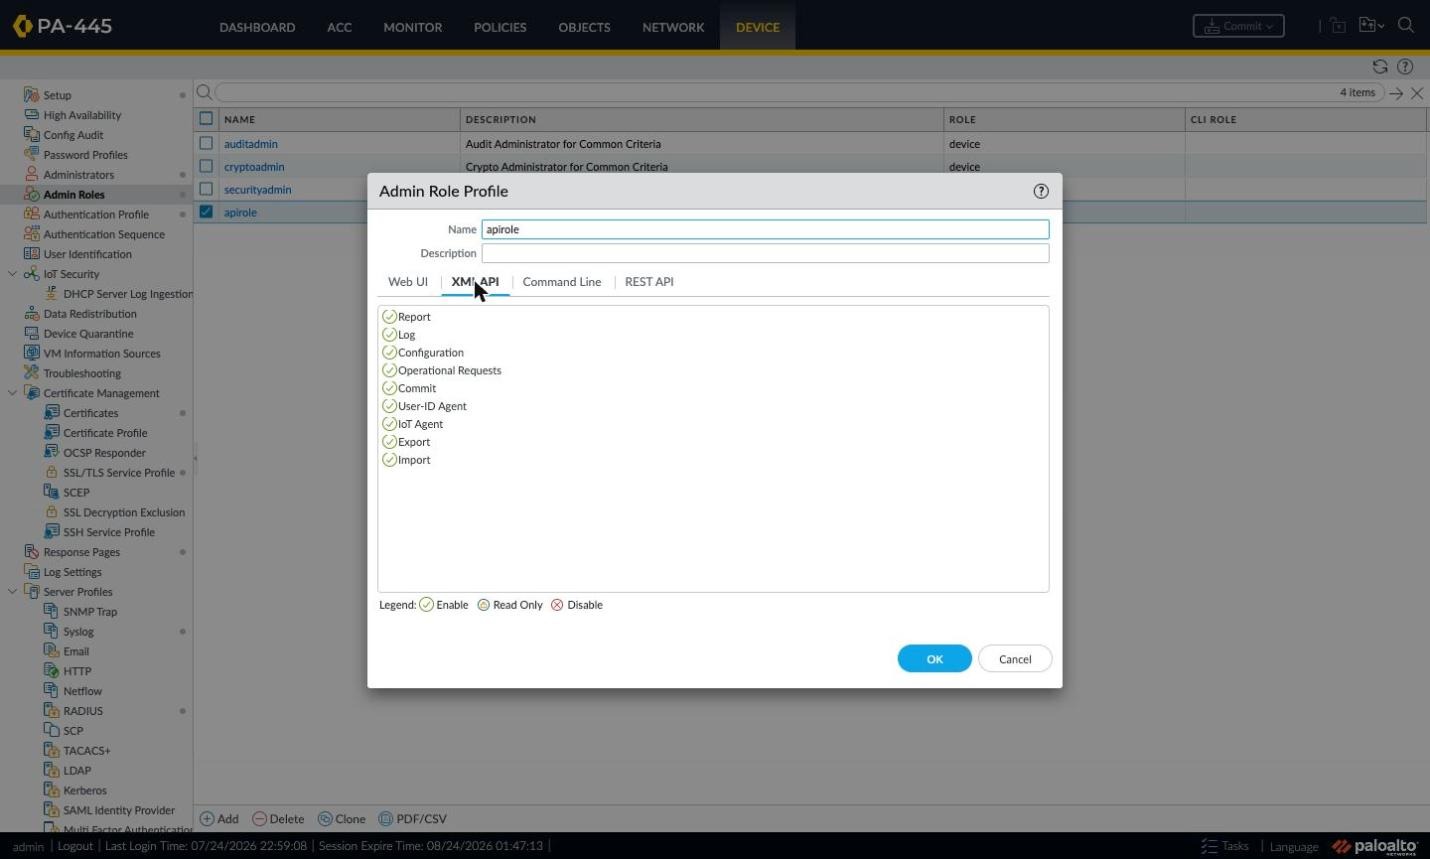
Figure 2: XML API tab and per-category Enable/Disable.
The Web UI, Command Line and REST API Tabs
Command Line sets the account's CLI privilege over SSH/console: None, superuser, superreader, vsysadmin or vsysreader. An API account has no business on the command line, so the safest choice — used in the lab — is None. Even if the key or password leaks, the account cannot operate via CLI.
Web UI controls which menus the account sees in the browser. XML API use does not require any of these; you may open Monitor and parts of Device as read-only for troubleshooting. The lab leaves everything enabled for convenience — tighten this in production.
REST API covers PAN-OS's JSON-based REST interface — a separate permission set. If SignLogger only uses the XML API, leave it closed; open specific resources later if you plan REST-based object/policy management.
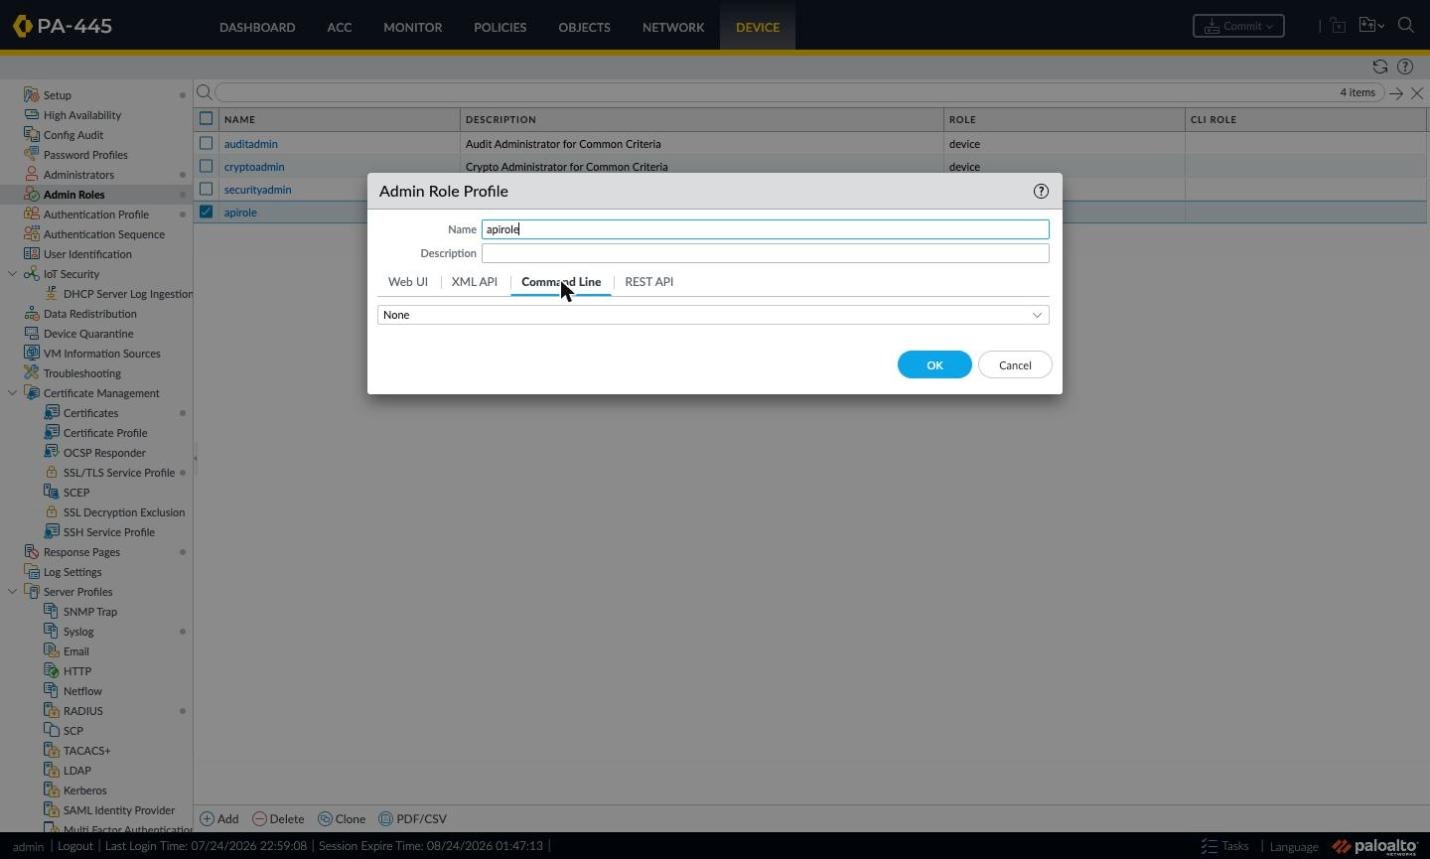
Figure 3: Command Line tab with None selected.
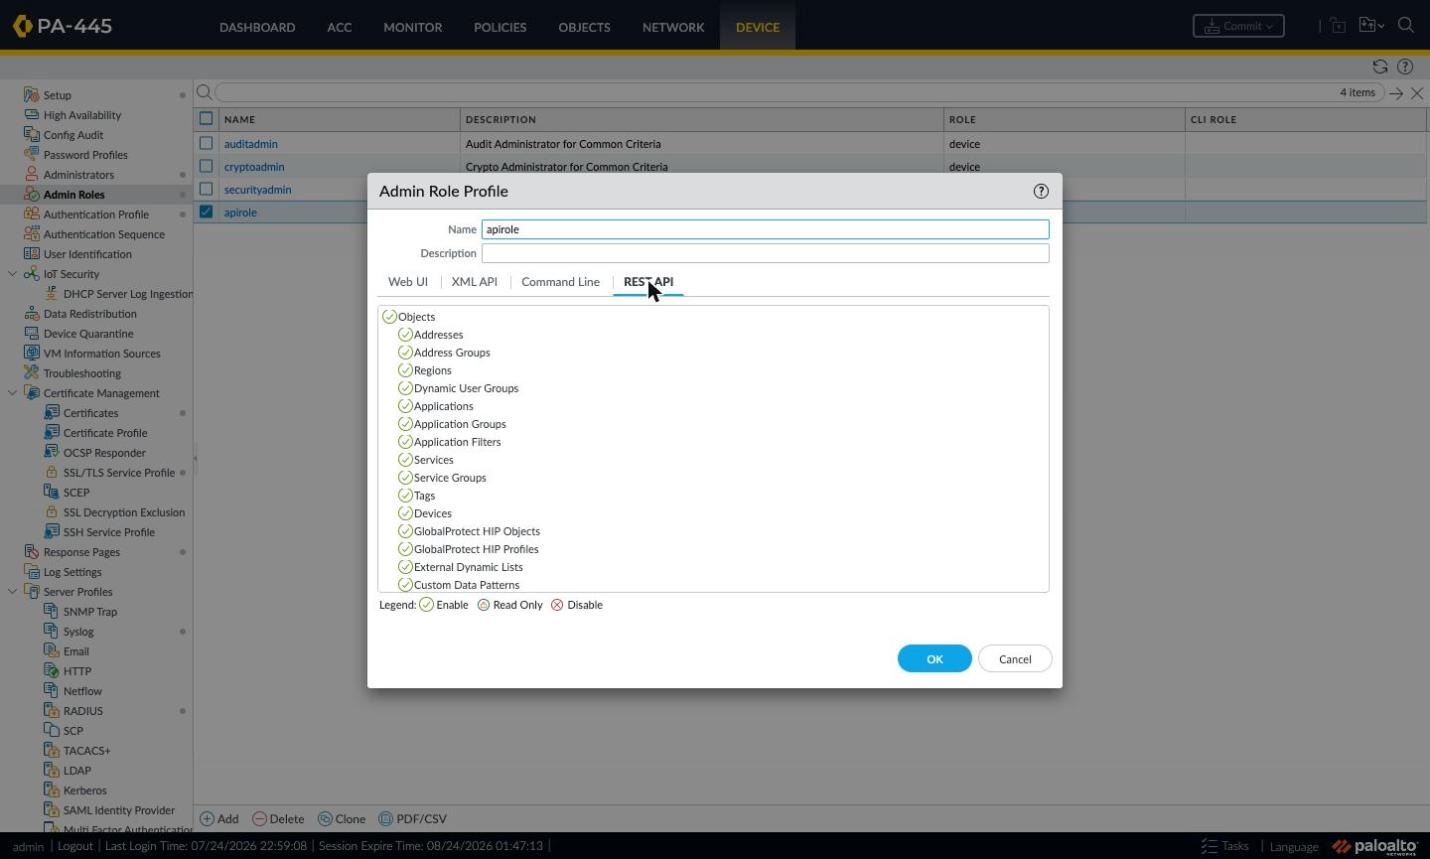
Figure 4: REST API tab and per-resource permissions.
Step 2: Create a Separate Administrator Account for the API
With the role profile ready, create the account that uses it. Go to Device > Administrators, click Add and fill in:
- Name: the username —
apiadminin the lab. You will use it when generating the API key and when defining the integration in SignLogger; renaming later is not easy, so choose a meaningful name up front. - Authentication Profile: choose a profile here only if the account should authenticate against LDAP, RADIUS, TACACS+ or SAML. External authentication is not recommended for API accounts — if the external server is down, the integration stops. The lab uses None with a local password.
- Password / Confirm Password: a strong password unique to this account. It is used only once, to generate the API key — SignLogger stores the key, never the password.
- Administrator Type: select Role Based. Dynamic grants built-in roles like superuser — far too broad for an API account.
- Profile: the role profile from Step 1 (
apirole). - Password Profile: if corporate policy forces periodic password changes, be careful: every password change invalidates existing API keys, requiring a new key to be generated and entered into SignLogger. Plan the process before assigning an expiry profile to an API account.
After clicking OK the change sits in the candidate configuration; the account is not active — and cannot generate a key — until you press Commit. Skipping the commit is the most common mistake at this step.
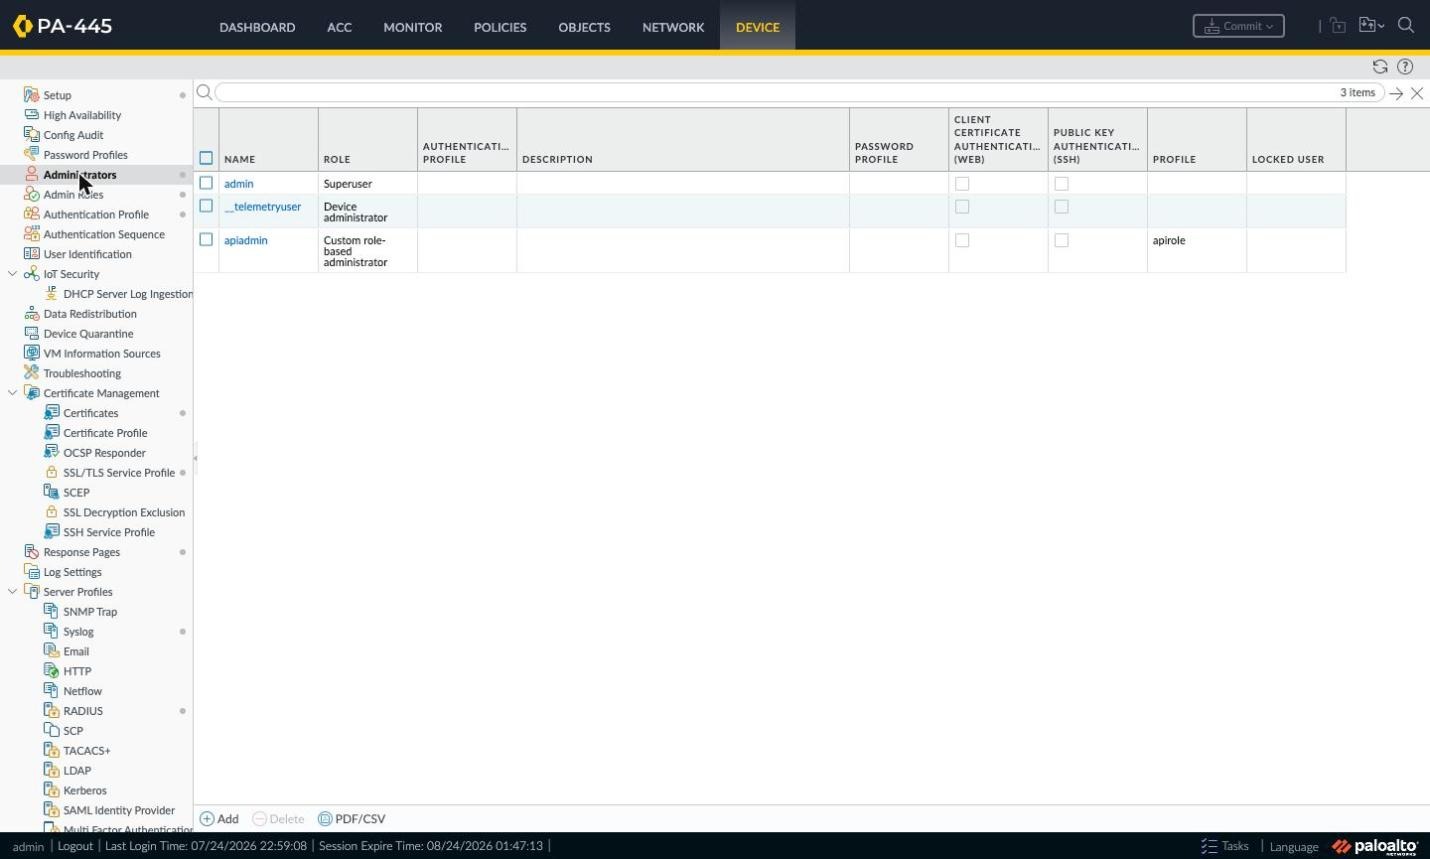
Figure 5: Device > Administrators and the apiadmin account.
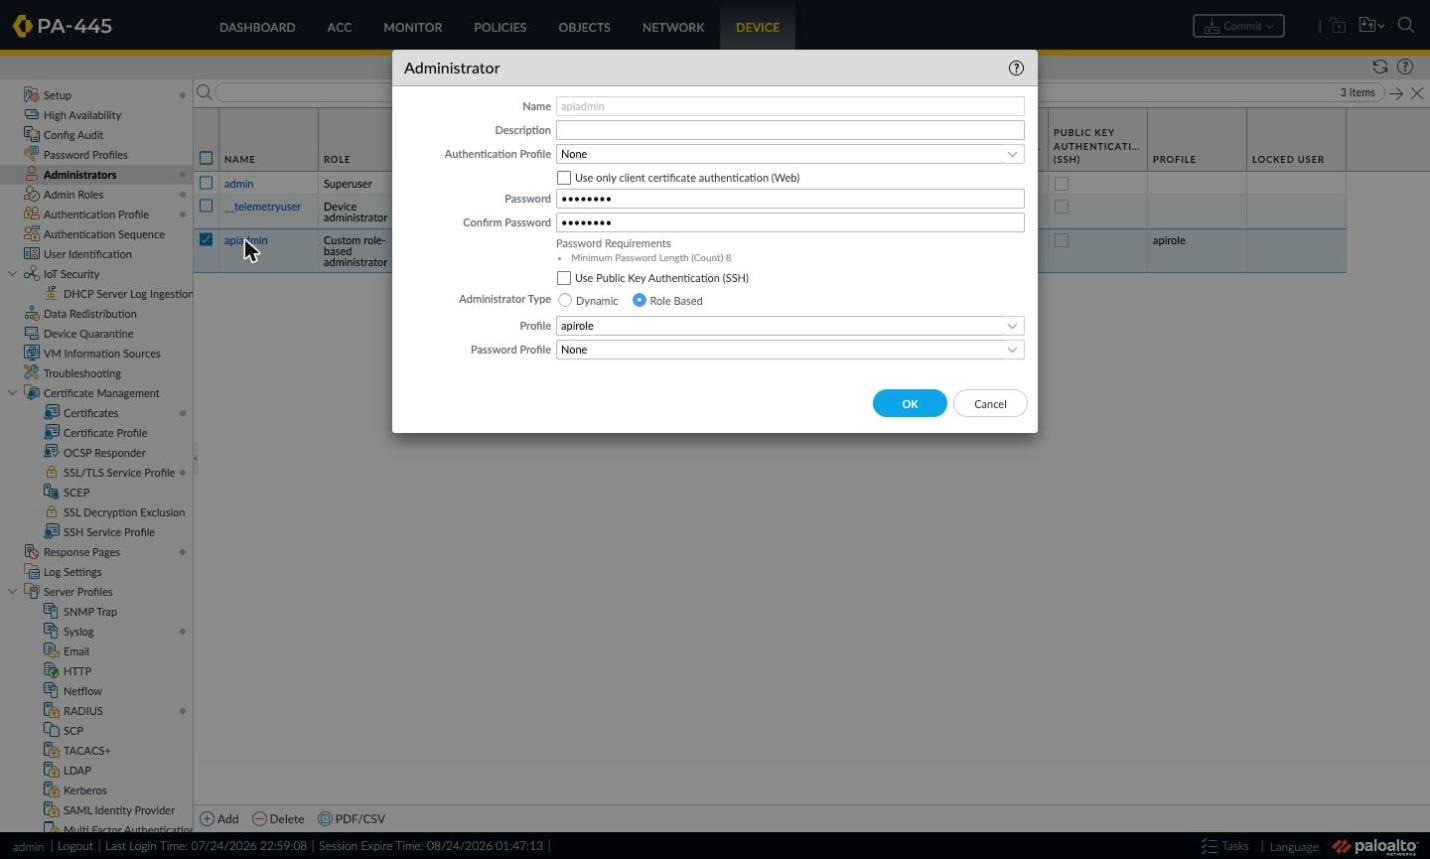
Figure 6: Administrator window — Role Based, profile apirole.
Step 3: Opening Management and API Access at the Network Layer
Even with the account and role in place, no API request gets an answer if the SignLogger server cannot reach the firewall at the network level. PAN-OS controls management-plane access in two different places, and which one applies depends on the address you send requests to.
Option A: Access via the MGT Interface
Go to Device > Setup > Interfaces and click the Management row. The Management Interface Settings window has three groups:
- IP addressing: Static or DHCP Client. The lab MGT uses static
192.168.1.1. - Services: which management services listen on this interface. HTTPS must be ticked for the XML API. Avoid HTTP — the API key would travel in clear text. Ping is handy for reachability tests. Telnet must stay off.
- Permitted IP Addresses: empty means every source may reach management. The moment you add one entry the list becomes a whitelist — so when adding the SignLogger address, also add your own management station or network, or you may lock yourself out after commit. The lab list is empty; in production, fill it.
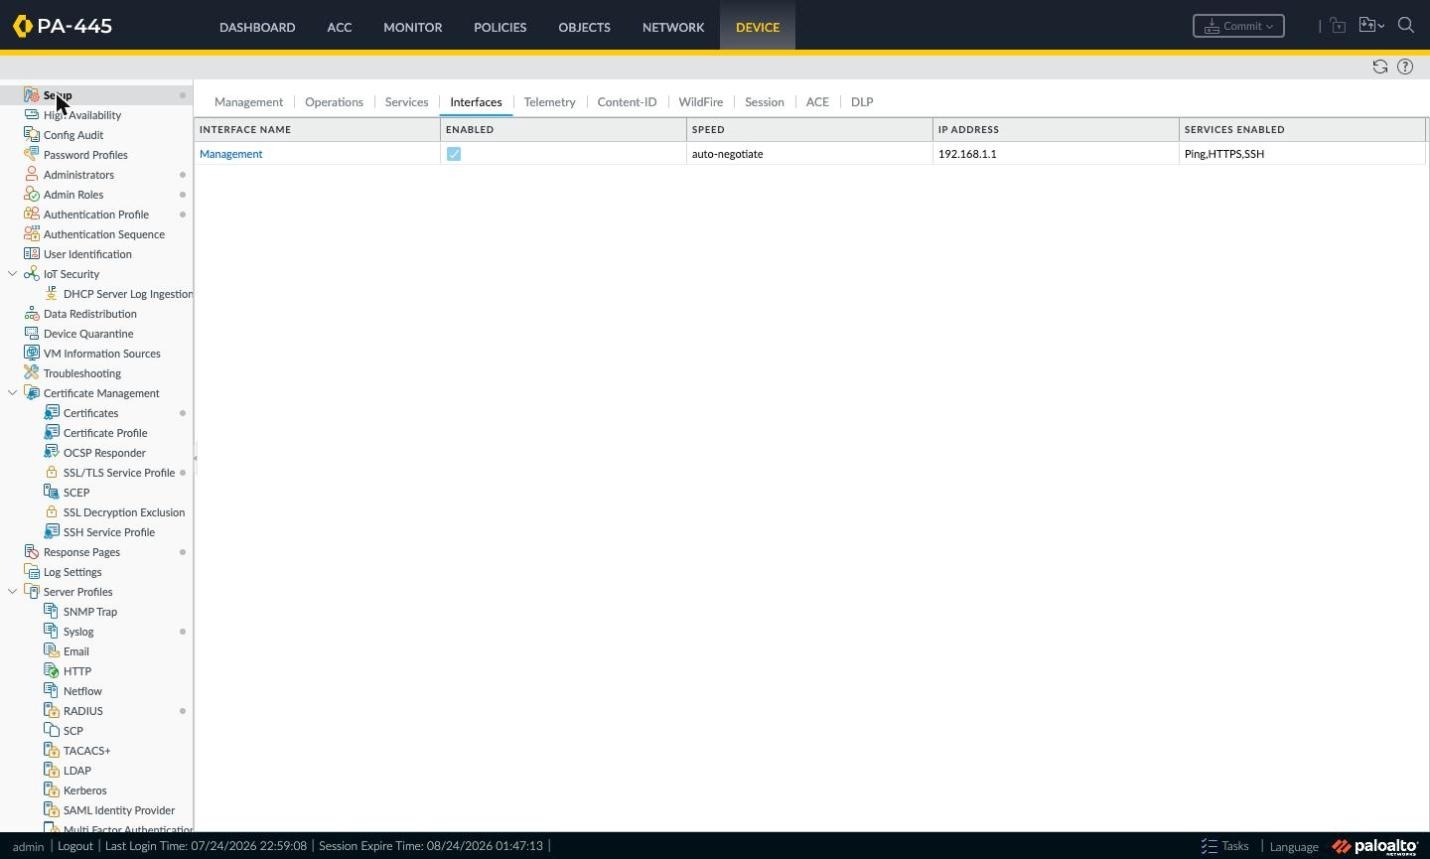
Figure 7: Device > Setup > Interfaces — Management row.
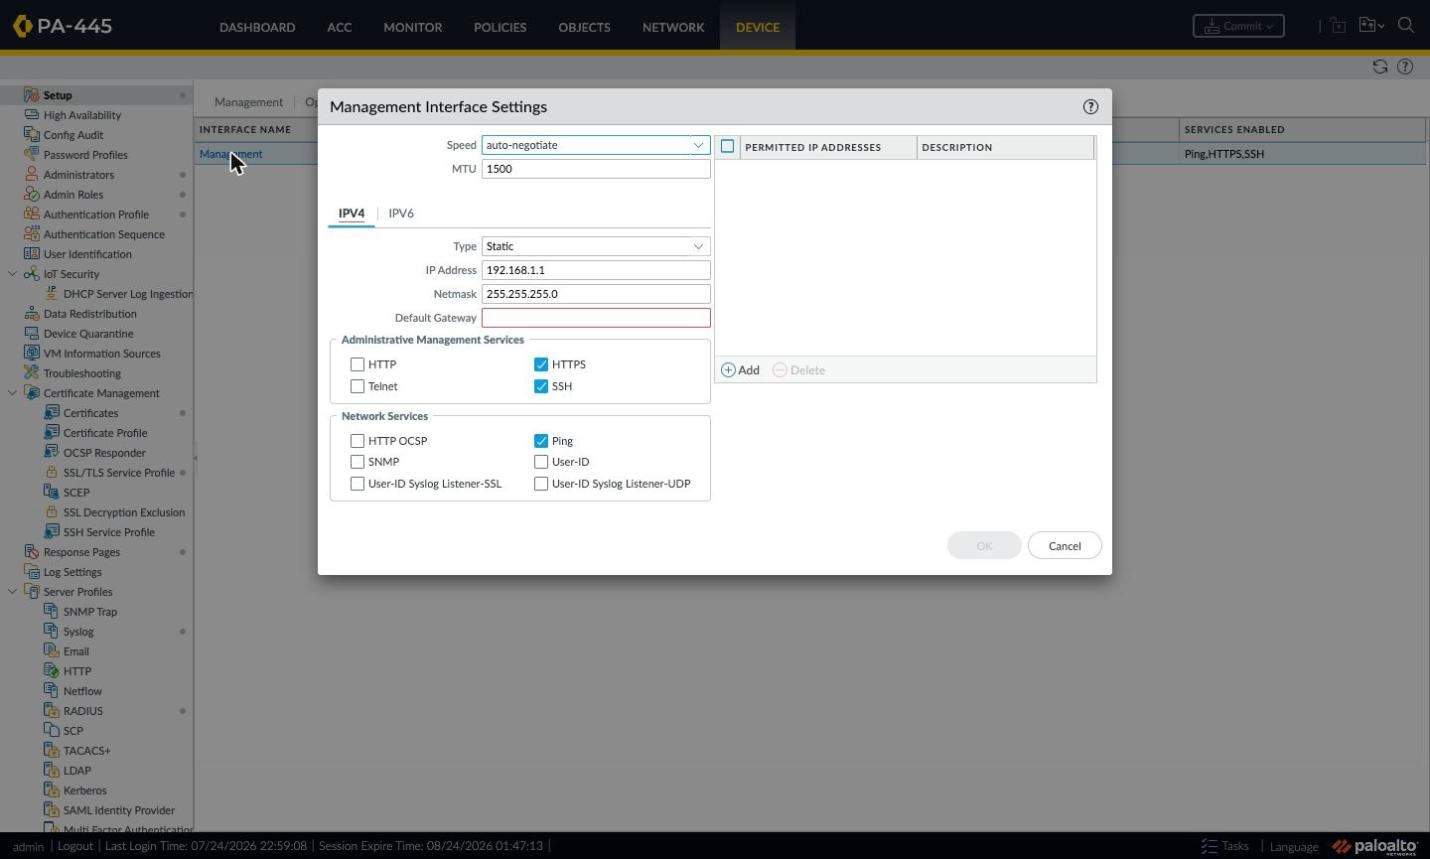
Figure 8: Management Interface Settings — HTTPS on, Permitted IP Addresses empty.
Option B: Access via a Data Interface and the Interface Management Profile
In most real deployments SignLogger is not on the MGT network, so API requests target a data interface IP. In the lab that is 10.254.253.244 on ethernet1/2. A data interface accepts management requests only when an Interface Management Profile is attached — without one it silently drops even requests with a valid API key.
First check Network > Interfaces to see which interface carries which IP and profile. The Management Profile column shows the attached profile. In the lab, ethernet1/2 holds 10.254.253.244/24 in the trust zone with a profile named Allow-Ping; two subinterfaces sit on the same physical port — ethernet1/2.70 (corporate, 172.16.0.1/24) and ethernet1/2.71 (guest, 172.16.1.1/24).
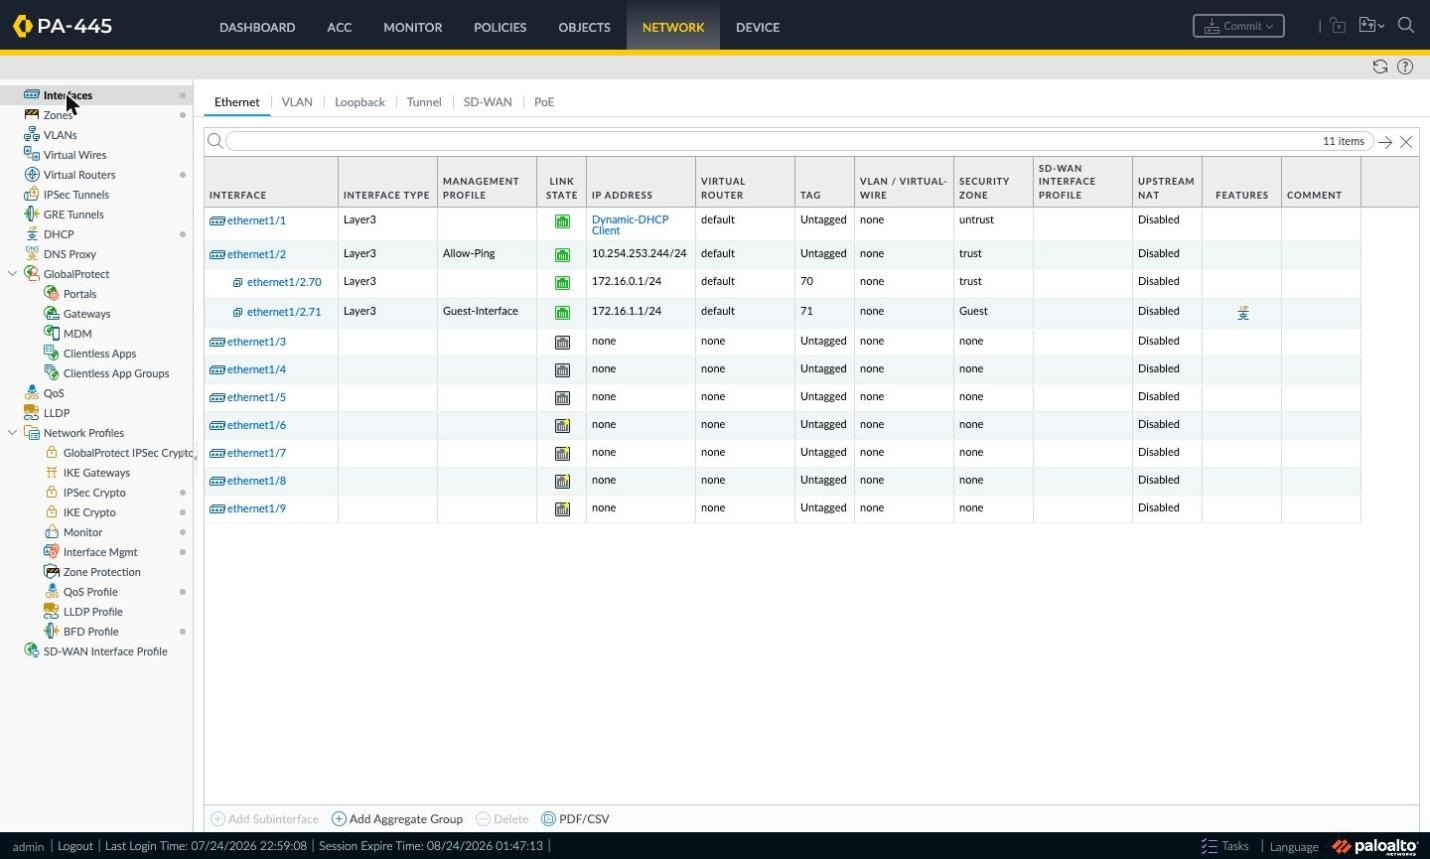
Figure 9: Network > Interfaces — ethernet1/2, its IP, zone and management profile.
The profiles themselves live under Network > Network Profiles > Interface Mgmt, with open services shown per column. The lab has two: Allow-Ping (Ping, SSH, HTTPS) and Guest-Interface (Response Pages and User-ID — needed for captive portal response pages on the guest network, unrelated to the API).
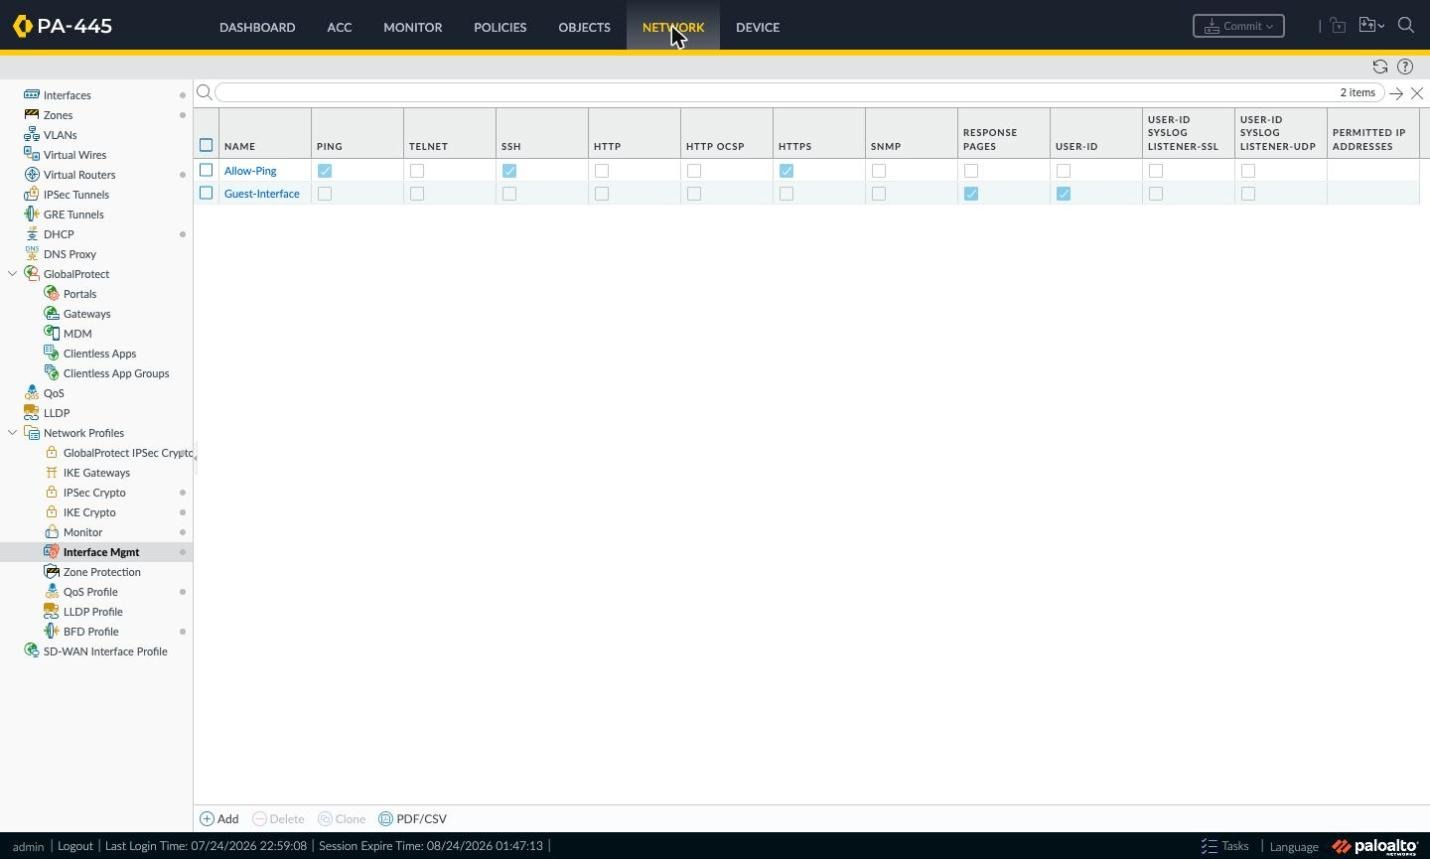
Figure 10: Interface Mgmt profiles and their service columns.
Open a profile to see two groups. Under Administrative Management Services: HTTP, HTTPS, Telnet, SSH — HTTPS is mandatory for the XML API. Under Network Services: Ping, HTTP OCSP, SNMP, Response Pages, User-ID and User-ID Syslog listeners. Do not confuse the User-ID box here with the XML API: that box lets another Palo Alto device or a Windows User-ID agent connect to this interface. SignLogger sends mappings via the XML API over HTTPS, so that box is not needed.
The Permitted IP Addresses list works like the MGT one: empty accepts all sources. The safest approach is to narrow it to the SignLogger server and your management stations — a guest device should never even see the management interface.
An important warning: do not attach management profiles to interfaces that don't need API access. Opening HTTPS management on the internet-facing interface exposes your firewall's management plane to the world. In the lab, ethernet1/1 (internet-facing) has no management profile — which is the correct state.
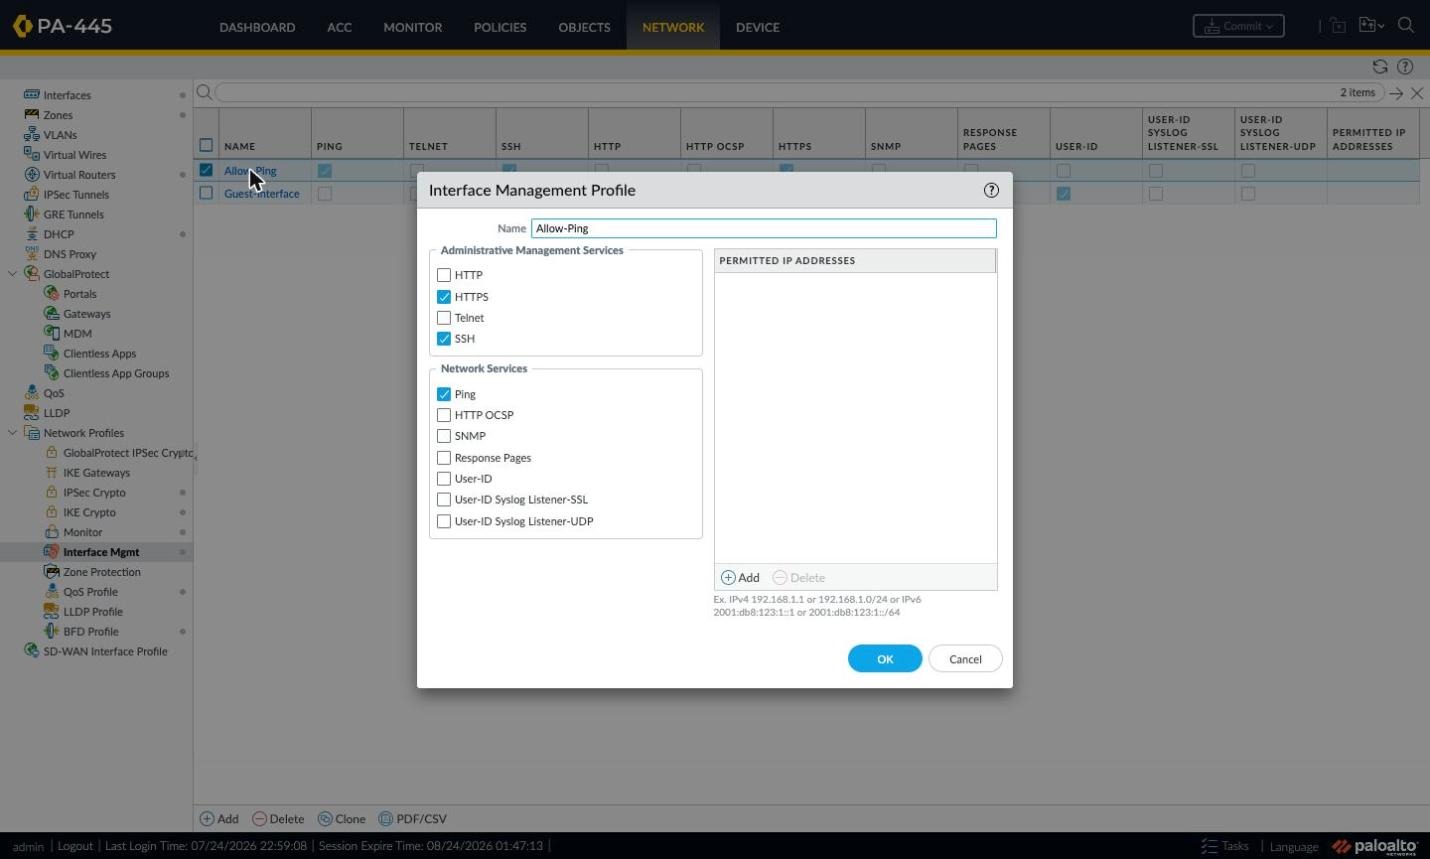
Figure 11: Interface Management Profile — HTTPS on, permitted IP list empty (lab).
Step 4: API Key Settings and Key Lifetime
Central API key settings live in Device > Setup > Management > Authentication Settings (gear icon). Three fields matter for the integration:
- API Key Lifetime (min): how many minutes generated keys stay valid. The default 0 means keys never expire. Palo Alto's security advice is to set a lifetime — but when it expires, the key dies and the integration stops. If SignLogger has no automatic key-renewal mechanism, keeping 0 and enforcing security through Permitted IP lists is the more manageable approach. The lab uses 0.
- Expire All API Keys: invalidates every issued key in one action — the emergency button when you suspect a leak. All integrations need new keys afterwards.
- API Key Certificate: the certificate used to sign keys — must be RSA, at least 3072 bits, self-signed root. Enabling or changing it invalidates all existing keys; leave it empty for initial setup and adopt it later in a planned maintenance window. Empty in the lab.
Idle Timeout, Failed Attempts and Lockout Time on the same page concern web UI sessions and don't directly affect API-key requests — still, set them to match corporate policy.
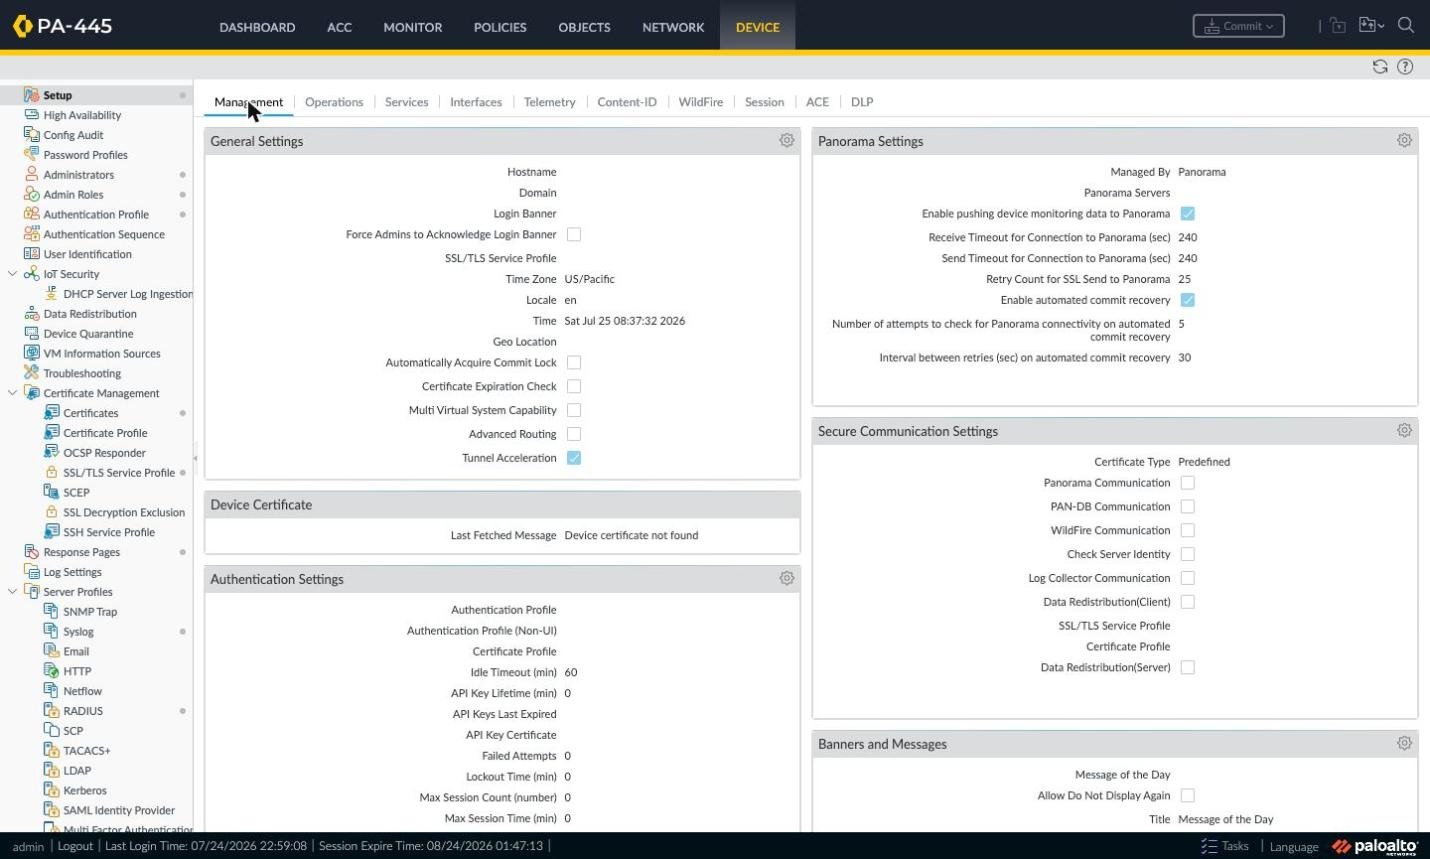
Figure 12: Authentication Settings section.
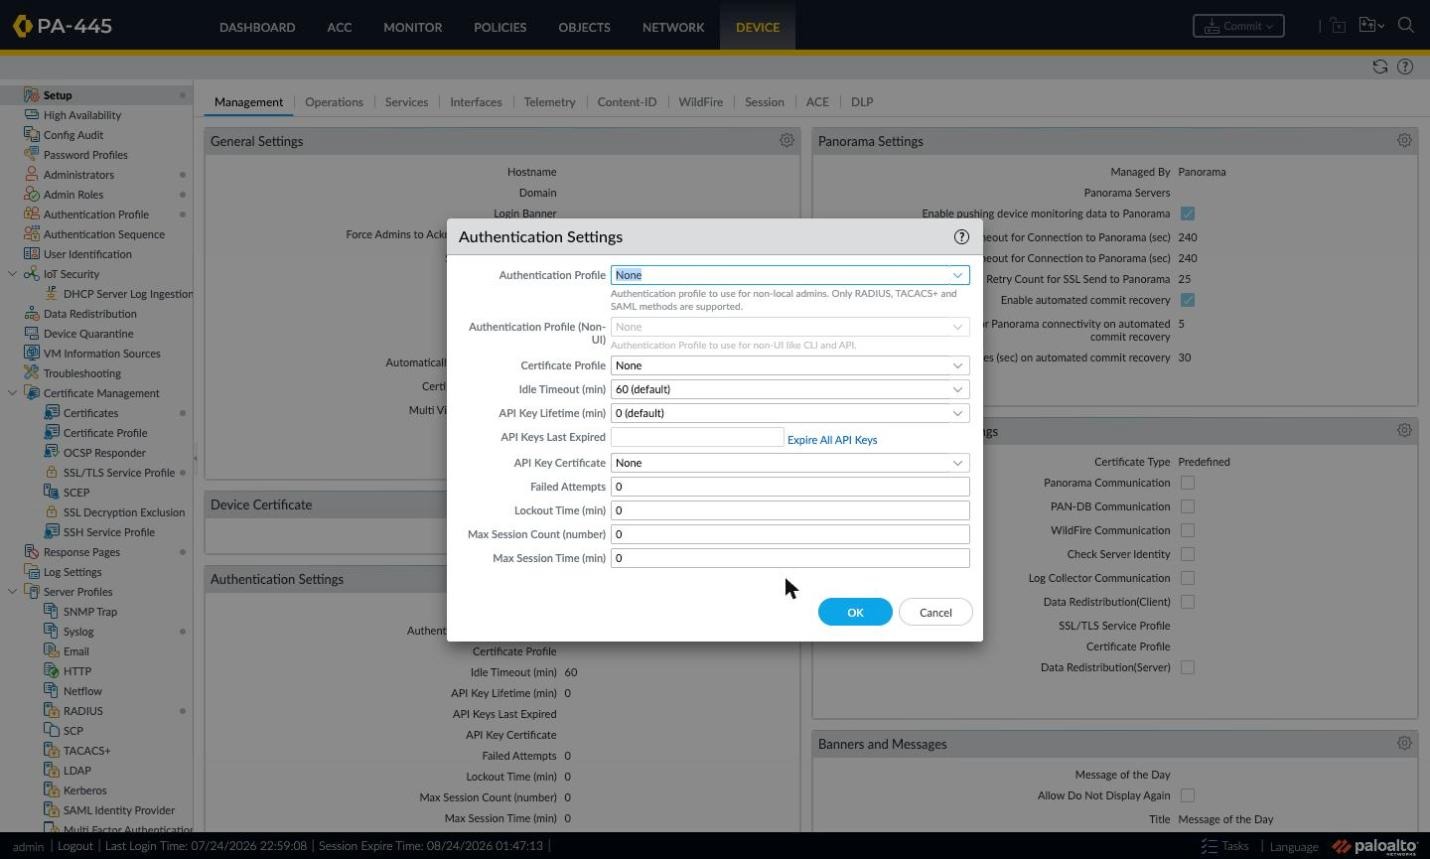
Figure 13: Authentication Settings window — API Key Lifetime.
Generating the API Key
The key is produced by a request to the firewall's keygen endpoint with the account's username and password. Because it requires the password, the system administrator should do this personally — and the resulting key must be treated as secret as a password. Palo Alto's documentation recommends a POST request:
curl -k -X POST "https://10.254.253.244/api/?type=keygen" -H "Content-Type: application/x-www-form-urlencoded" -d "user=apiadmin&password=YOURPASSWORD"A successful response returns XML with status="success" and the API key inside the key element. From then on the key stands in for credentials on every request. It can be delivered three ways: in the X-PAN-KEY header, as a key parameter in the request body, or in the URL query string. The header is the most secure — keys in URLs end up in server and proxy logs. Prefer the header method in SignLogger if the field is available.
Knowing when a key becomes invalid will save you during a mysterious outage months later. Per Palo Alto's docs, a key dies when: the account's password changes, the account is deleted, the configured key lifetime expires, the API key certificate is reconfigured or expires, or all keys are manually expired. If the integration ever stops "for no reason", check this list first.
Step 5: Preparing the User-ID Side
For SignLogger's mappings to matter, the firewall's User-ID machinery must be ready. Skip this and API requests return success while logs still show no usernames and user-based policies never match — the most common "everything is right but nothing works" scenario.
Enabling User Identification on Zones
PAN-OS only uses an IP-user mapping in policy and log evaluation when User Identification is enabled on the source zone. Go to Network > Zones, open the guests' zone and tick Enable User Identification. In the lab this is on for the Guest zone, off for trust and untrust.
The same window's User Identification ACL holds Include and Exclude lists controlling which subnets participate in user mapping. Exclude subnets full of identity-less devices (server networks, printers). Behavioral detail: adding any entry to the Include List automatically excludes every subnet not on it.
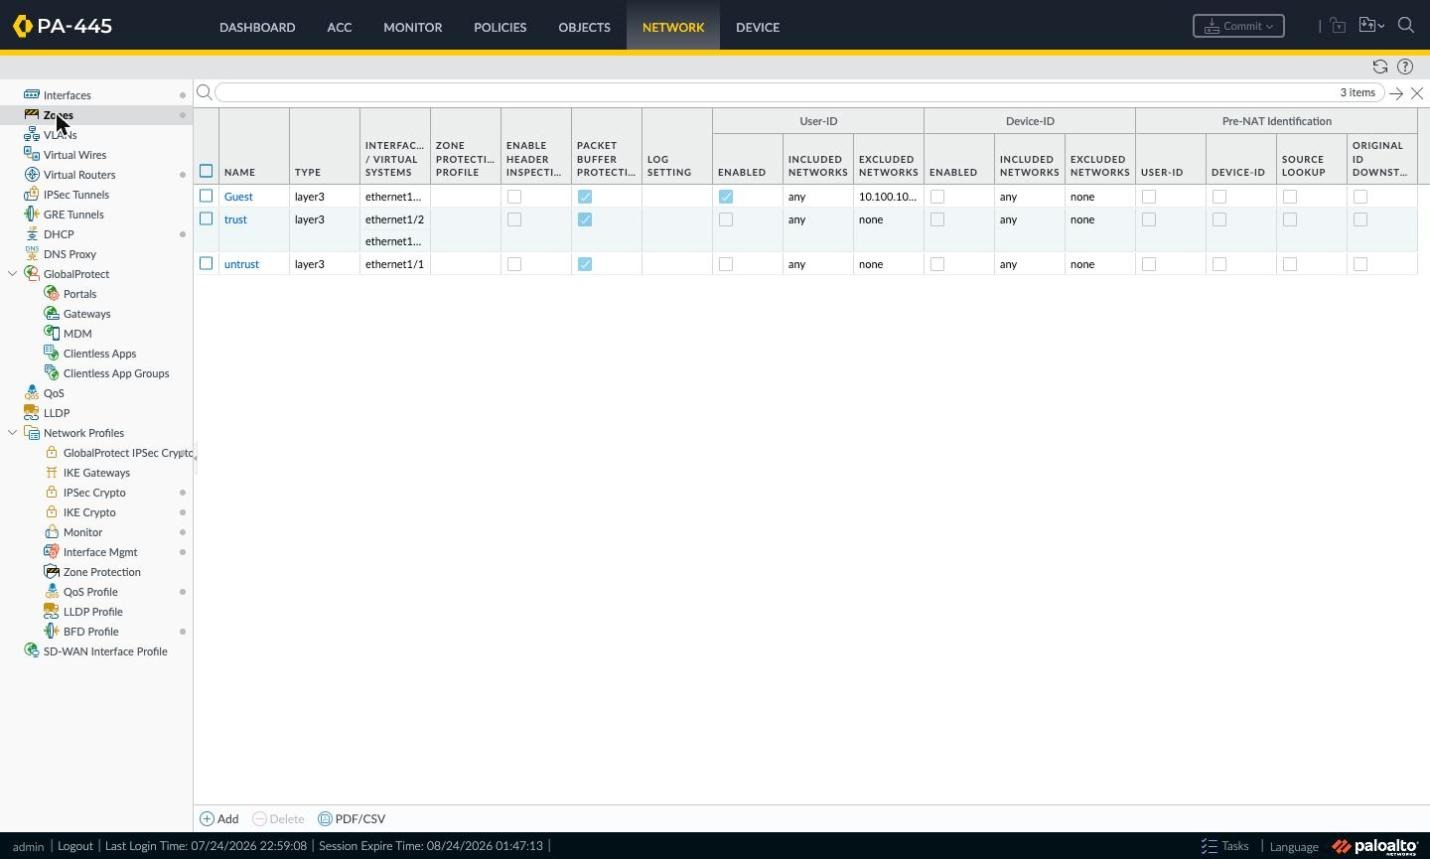
Figure 14: Network > Zones — User Identification enabled on the guest zone.
User Mapping Timeout and Server Monitoring
Device > User Identification > User Mapping holds the integrated User-ID agent settings. For the API integration the two key fields are Enable User Identification Timeout and User Identification Timeout (min) — how long an API-written mapping lives before it is dropped automatically. The lab uses 45 minutes.
Align this with the guest session duration in SignLogger. If the firewall timeout is shorter than the portal session, the mapping drops while the user is still online and usernames vanish from logs. If it is much longer, a new guest receiving the same IP appears under the previous user's identity — the more serious risk on guest networks with short DHCP leases. The healthiest model: SignLogger actively sends logout messages via the API, and the timeout remains only a safety net.
The Server Monitoring list on the same page collects mappings from sources like Active Directory. Since SignLogger delivers mappings via API, it can stay empty (as in the lab); AD monitoring for the corporate network can coexist with it.
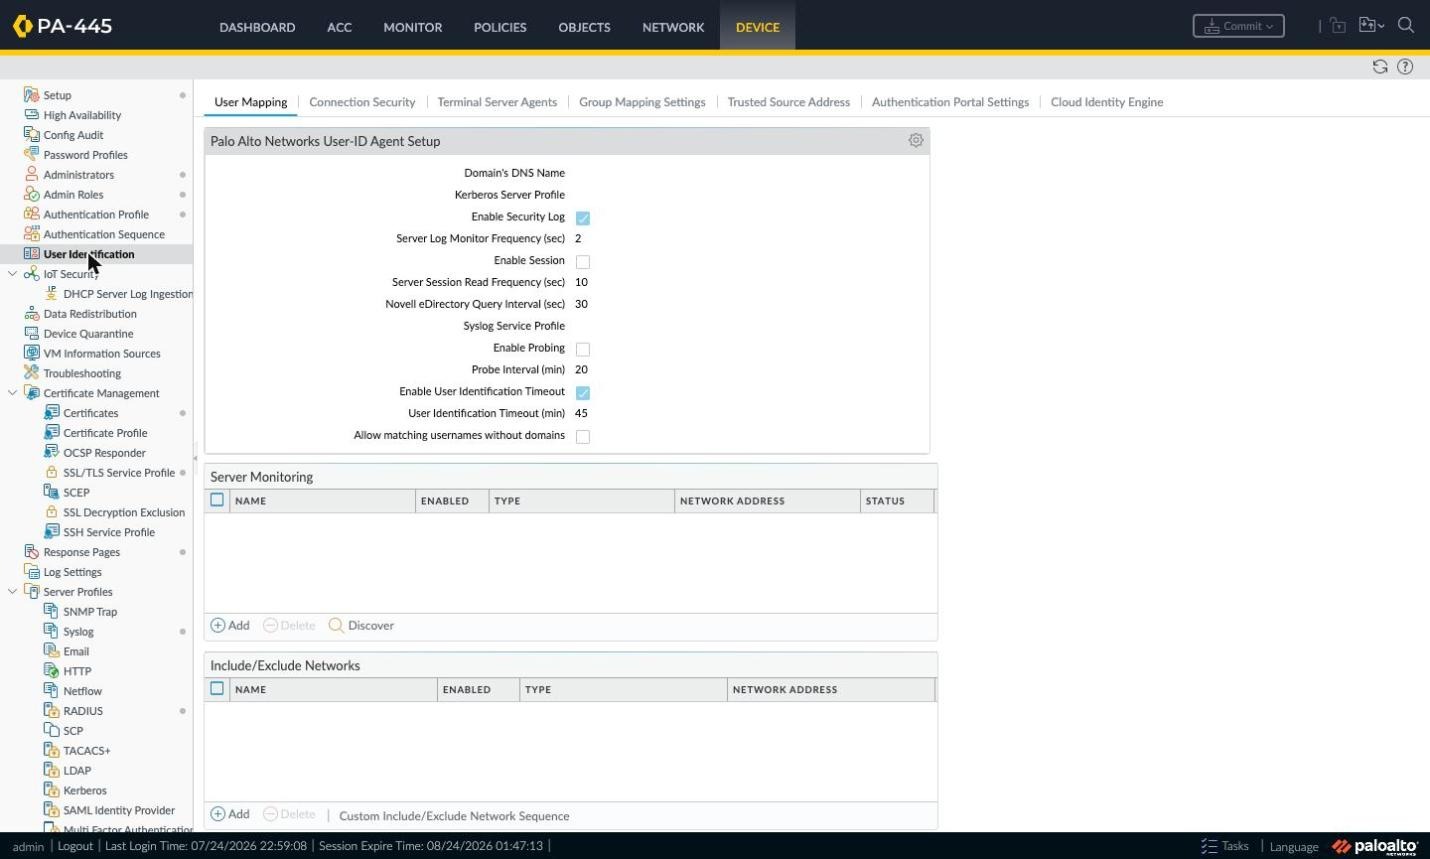
Figure 15: User Mapping tab — User Identification Timeout.
Step 6: XML API Request Structure and User-ID Messages
This section is not a UI setting, but knowing what the firewall expects makes SignLogger-side definitions and troubleshooting far easier. The firewall ships a built-in API browser: open the firewall address with /api/ appended and you get the category list — Commit, Configuration Commands, Export, Import, Logs, Operational Commands, Reports, User ID and IoT. Each category shows the URL pattern to use. The page is visible only to a signed-in administrator and is the fastest tool for testing.
For the User ID category the path pattern is:
/api/?type=user-id&cmd=<uid-message>...</uid-message>The uid-message body describes which user maps to which IP. Login events use a login block, logouts a logout block. A typical login message:
<uid-message>
  <version>1.0</version>
  <type>update</type>
  <payload>
    <login>
      <entry name="guest01" ip="172.16.1.55" timeout="45"/>
    </login>
  </payload>
</uid-message>
name is the username, ip the client's address. timeout is optional and sets a per-mapping lifetime in minutes; without it, the global User Identification Timeout applies. On sign-out, the same structure is sent with a logout block and the mapping is removed.
Mind the username format: in domain environments PAN-OS typically expects the domain-qualified form; on domainless guest networks a plain username is fine — the Allow matching usernames without domains option on the User Mapping page can help. What matters is that the name SignLogger sends matches the name used in your security policies exactly.
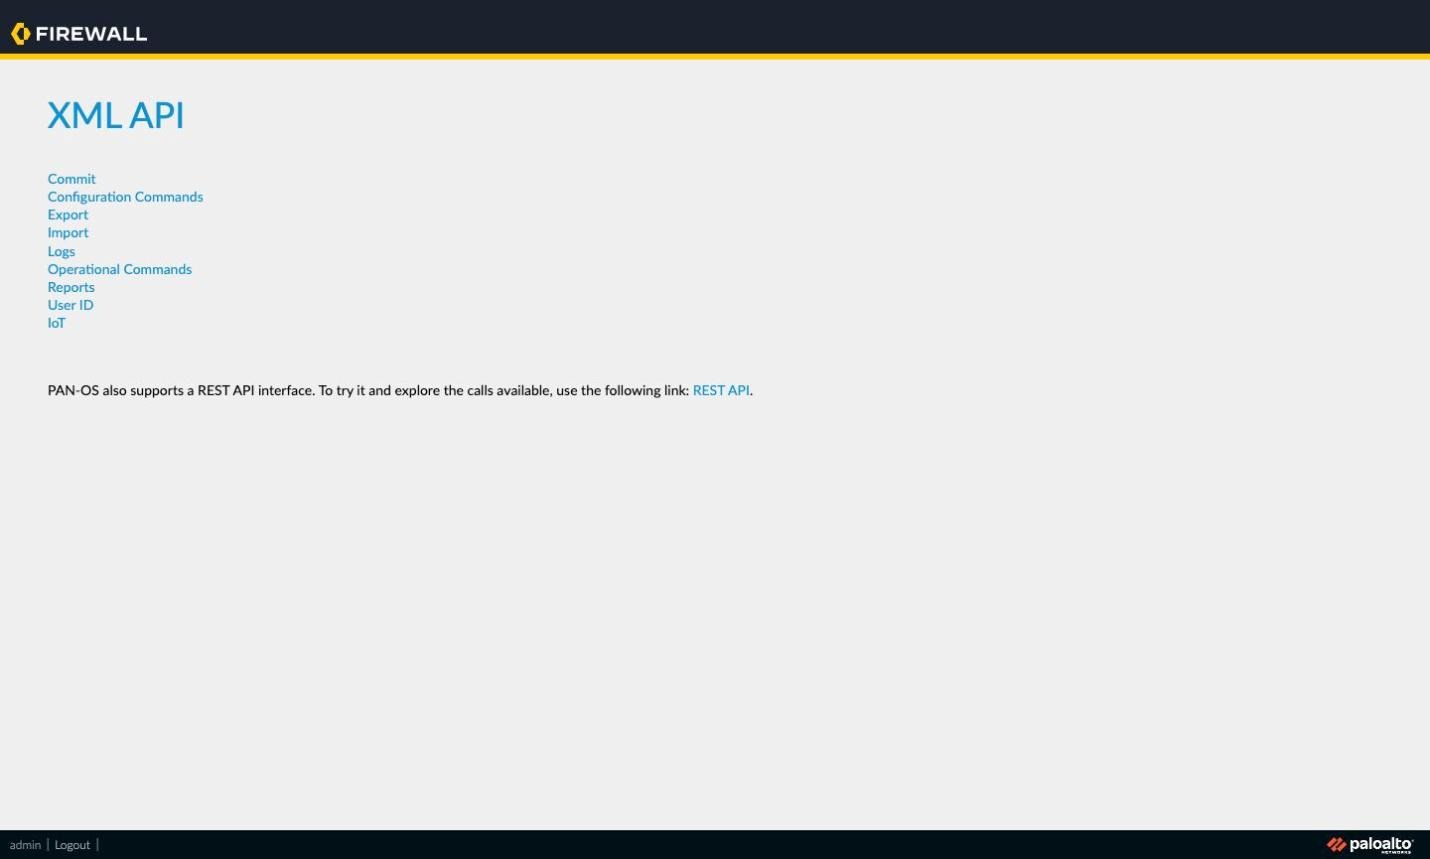
Figure 16: The built-in XML API browser.
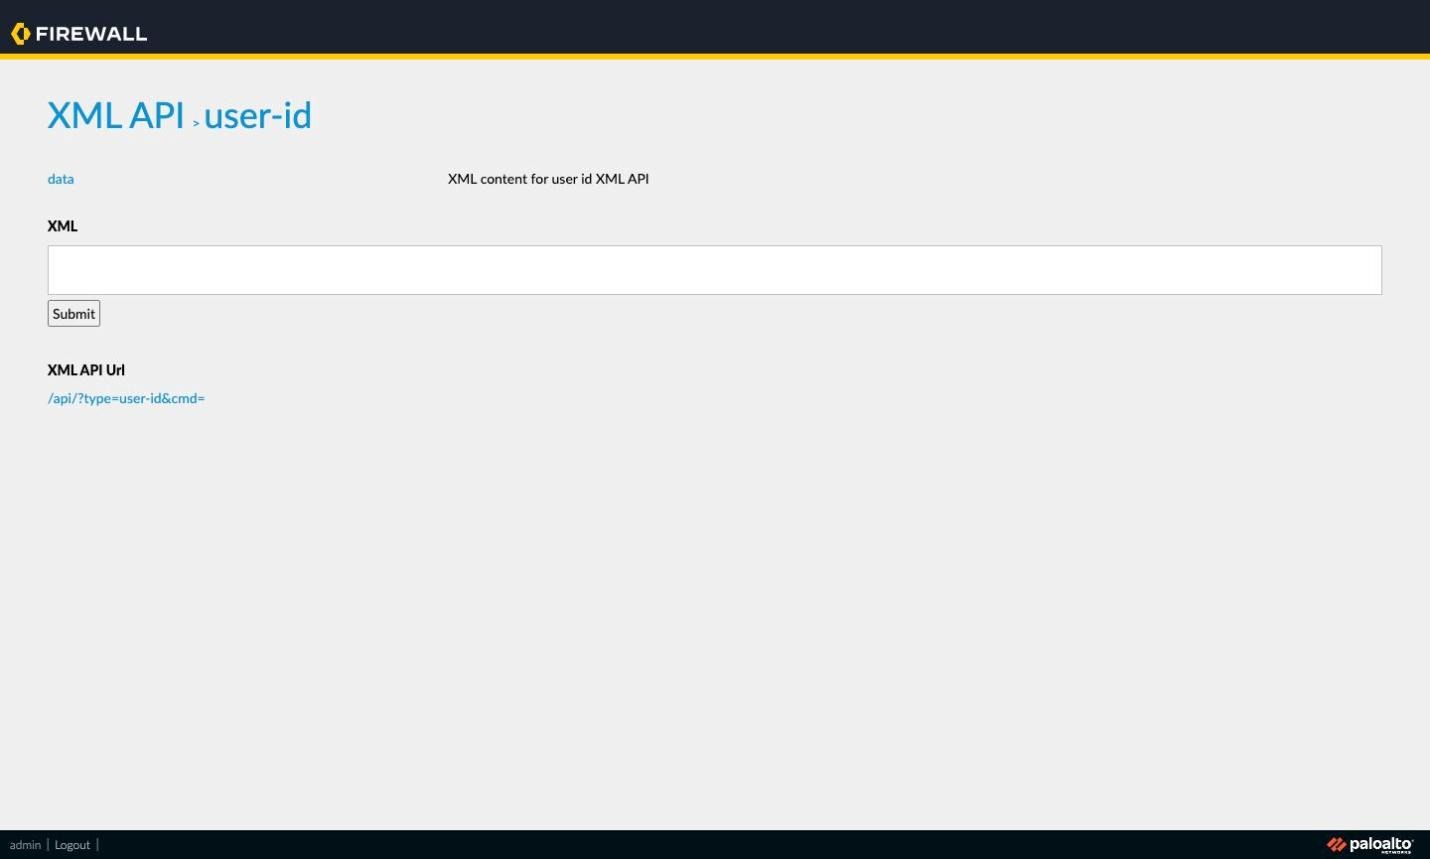
Figure 17: The User ID section and its URL pattern.
Step 7: Security Policy and Network Path Checks
Even with the right management profile, traffic sometimes cannot reach the firewall. If the SignLogger server sits in a different zone than the interface receiving API requests, the traffic may also need to pass a security policy: write an allow rule with source SignLogger, destination the firewall's interface IP and service HTTPS — keeping the destination tight.
The fastest path check is three steps: ping the target address from the SignLogger server (answers if Ping is enabled in the profile); try a TCP connection to port 443; open the firewall UI from a browser. If all three pass, the problem is in authentication or authorization, not the network.
Another frequent case is the firewall's self-signed certificate: if SignLogger's HTTP client verifies certificates, requests fail before connecting. Disabling verification is fine in the lab; in production, install a certificate signed by your corporate CA on the management interface and keep verification on.
Verification and Testing
Test in stages so failures localize themselves:
- Validate the key with a simple system-info query (
type=op,show system info) — success proves both the network path and authentication. - Send a single mapping using the sample uid-message with a test user and IP; the response status must be success.
- Confirm the mapping is in the table —
show user ip-user-mapping allon the CLI or via API; the source should read XML API. - Try a real guest: sign in through the SignLogger portal from a guest device and confirm the username appears next to that IP in the traffic logs.
- Test logout: after the user signs out, the mapping should disappear; if not, SignLogger isn't sending logout messages and the timeout has to do the work.
- Write a user-based rule — the final proof the integration is worth it.
Troubleshooting: Common Errors
- Requests time out with no response: network path or management profile issue. Check which interface owns the target address, whether it has an Interface Management Profile, and whether HTTPS is enabled there. If Permitted IP Addresses is populated, confirm SignLogger's address is on it.
- Invalid credentials: the key may be dead. Did the password change, was the account deleted, did the key lifetime expire, was the API key certificate changed? Any yes means generating a new key.
- Authorization error with a valid key: the relevant category is closed on the role profile's XML API tab — verify User-ID Agent is Enabled, and commit after role changes.
- Success responses but no usernames in logs: User Identification is almost certainly disabled on the source zone. Check Network > Zones; if an Include List exists, confirm the guest subnet is on it.
- Mappings vanish quickly: the User Identification Timeout is shorter than the portal session, or the message's timeout value is tiny.
- User signed out but the mapping stays: SignLogger isn't sending logout; shorten the timeout as a stopgap and enable logout notifications as the real fix.
- Wrong user shown: the IP was reassigned to another guest. Align DHCP lease time with mapping lifetime and enable logout notifications.
- SSL/certificate errors: self-signed interface certificate with client verification on — install a CA-signed certificate.
- UI changes have no effect: the candidate configuration was never committed — press Commit.
Security Recommendations
An API key opens the firewall's door and deserves the care of an admin password. Use a dedicated API-only account and never share it with human administrators. Apply least privilege in the role profile and close unused XML API categories. Keep Command Line at None. Populate Permitted IP Addresses on the management interface and on data-interface profiles, allowing only SignLogger and management stations. Never enable HTTP or Telnet. Send the key in the X-PAN-KEY header rather than the URL. If you suspect a leak, use Expire All API Keys and issue a new one. And review Monitor > Logs > Configuration and System regularly to answer who did what via the API and when.
Quick Checklist
- A role profile for the API exists under Device > Admin Roles.
- User-ID Agent is Enabled on its XML API tab.
- Command Line is None.
- A separate Role Based API account exists with the role profile attached.
- The target address is decided; if not MGT, an Interface Management Profile is attached to that interface.
- HTTPS is on in the profile; HTTP and Telnet are off.
- Permitted IP Addresses is populated per policy — including your own management address.
- API Key Lifetime under Device > Setup > Management is a deliberate choice.
- Enable User Identification is ticked on the guest zone.
- User Identification Timeout aligns with the portal session duration.
- All changes are committed.
- The API key was generated by the administrator and stored securely in SignLogger.
- A test mapping was sent and observed on the firewall.
- A real guest sign-in showed a username in the traffic logs.
- The mapping disappeared after sign-out.
Frequently Asked Questions
Is Captive Portal required for the API integration?
No. Sending mappings via the XML API is independent of Captive Portal — but the portal is what answers where guest identities come from, so the two make a meaningful whole together.
What's the difference between the XML API and the REST API?
The XML API is older and broader: User-ID mappings, log retrieval, commits — all live there. The REST API is a JSON-based interface focused on object and policy management. User-ID delivery uses the XML API; permissions for the two are managed on separate tabs of the role profile.
Should the API key be non-expiring?
Palo Alto recommends setting a lifetime for security. In practice, unless something renews the key automatically, expiry causes a silent outage. Ask: when the key expires, can SignLogger regenerate it by itself? If not, an unlimited key with tight Permitted IP lists is the safer whole.
Do I need to store the account password in SignLogger?
No. The password is used once, to generate the key; SignLogger stores the key. This distinction matters: a password change halts the integration until the key is renewed, but the password itself is never held by a third system.
Is using a data interface instead of MGT a security risk?
Yes, if left uncontrolled. The cleanest design keeps management on a separate MGT network. If you must use a data interface: enable only HTTPS in the profile, restrict Permitted IP Addresses to SignLogger and management stations, and never attach the profile to an internet-facing interface.
Do mappings require a commit?
No. User-ID mappings are runtime data and take effect immediately. Commit is needed only for configuration changes such as role profiles, accounts and interface settings.
Conclusion
The XML API link between Palo Alto and SignLogger doesn't require many settings on the firewall — but every one of them must be right. In summary: create a dedicated admin role profile with User-ID Agent enabled on the XML API tab, create a separate role-based account using it, enable HTTPS management on the interface receiving requests, enable User Identification on the guest zone, align the timeouts with the portal, and commit everything. Generating the API key requires the password, so it is the system administrator's step.
Once in place, guest traffic appears as named users instead of anonymous IPs — moving your security policies to a per-user basis and giving your legal record-keeping meaningful data. Take a backup before starting, test in stages before production, and keep the access lists tight.
Resources
The technical content of this guide is based on Palo Alto Networks' official documentation, in particular: API Authentication and Security; PAN-OS API Authentication and Enable API Access (the source of the separate-account recommendation); Get Your API Key and Generate an API Key Certificate (keygen request format, certificate requirements and key invalidation conditions); Configure an Admin Role Profile and Configure a Firewall Administrator Account; Send User Mappings to User-ID Using the XML API; and Enable User-ID / Map IP Addresses to Users (zone-based User Identification, Include/Exclude lists and mapping timeout behavior).
Related: Sending Palo Alto Logs to SignLogger in CEF Format.