Updated: July 2026 | Tested on: PAN-OS 11.1.13 (PA-445)
What's in This Guide?
This guide has two major parts. Part 1 shows how RADIUS authentication is configured on a Palo Alto firewall; Part 2 walks through the complete Captive Portal setup (officially renamed Authentication Portal as of PAN-OS 9.1) with screenshots. A detailed troubleshooting section at the end collects problems actually encountered and solved in a real lab environment.
All screenshots come from a PA-445 lab device running PAN-OS 11.1.13. The IP addresses, interface names, certificate names and usernames in this guide are examples only — adapt them to your own environment.
What Is Captive Portal (Authentication Portal) and How Does It Work?
Captive Portal is the mechanism by which the firewall redirects not-yet-identified users to a web form for authentication. In the Palo Alto architecture this feature is part of the User-ID infrastructure: when a user signs in, the firewall creates an IP-to-user mapping and uses it in security policies.
The flow: a guest tries to open a website, the traffic matches an Authentication Policy rule, the firewall redirects the client to the portal address on its own interface, the user enters credentials, and after successful verification the firewall records the IP-user mapping — traffic is then evaluated by Security Policy. A crucial detail: Authentication Policy is evaluated BEFORE Security Policy, so the redirect happens even for users who have not yet authenticated.
PAN-OS offers two modes. In Redirect mode the firewall sends the client an HTTP 302 to its own Layer 3 interface; session cookies, per-rule timeouts and Kerberos SSO are available only in this mode. In Transparent mode the firewall impersonates the destination server and prompts directly, but browser certificate warnings are unavoidable. This guide uses and recommends Redirect.
Lab Topology and Prerequisites
The example topology: the outside leg is ethernet1/1 in the untrust zone; the inside management leg is ethernet1/2 with 10.254.253.244/24 in the trust zone. The guest network is the ethernet1/2.71 subinterface (VLAN 71) with 172.16.1.1/24 in the Guest zone. Guest clients get addresses from the firewall's DHCP server and reach the internet via source NAT.
Before starting you need: a Layer 3 interface, its own security zone, a working default route, DNS access for the guest network and Web UI administrator access. For RADIUS you also need a reachable RADIUS server with a client (NAS) entry defined for the firewall.
PART 1: Configuring RADIUS on the Palo Alto
RADIUS integration on Palo Alto has two layers: first a RADIUS Server Profile holding the server's address, port, shared secret and protocol; then an Authentication Profile that uses the server profile and is assigned to consumers such as Captive Portal, GlobalProtect or administrator logins.
Step 1.1 — Creating the RADIUS Server Profile
Open the Device tab and choose Server Profiles > RADIUS. The screen summarizes all defined RADIUS profiles, their servers and the selected protocol. Click Add to create a new profile.
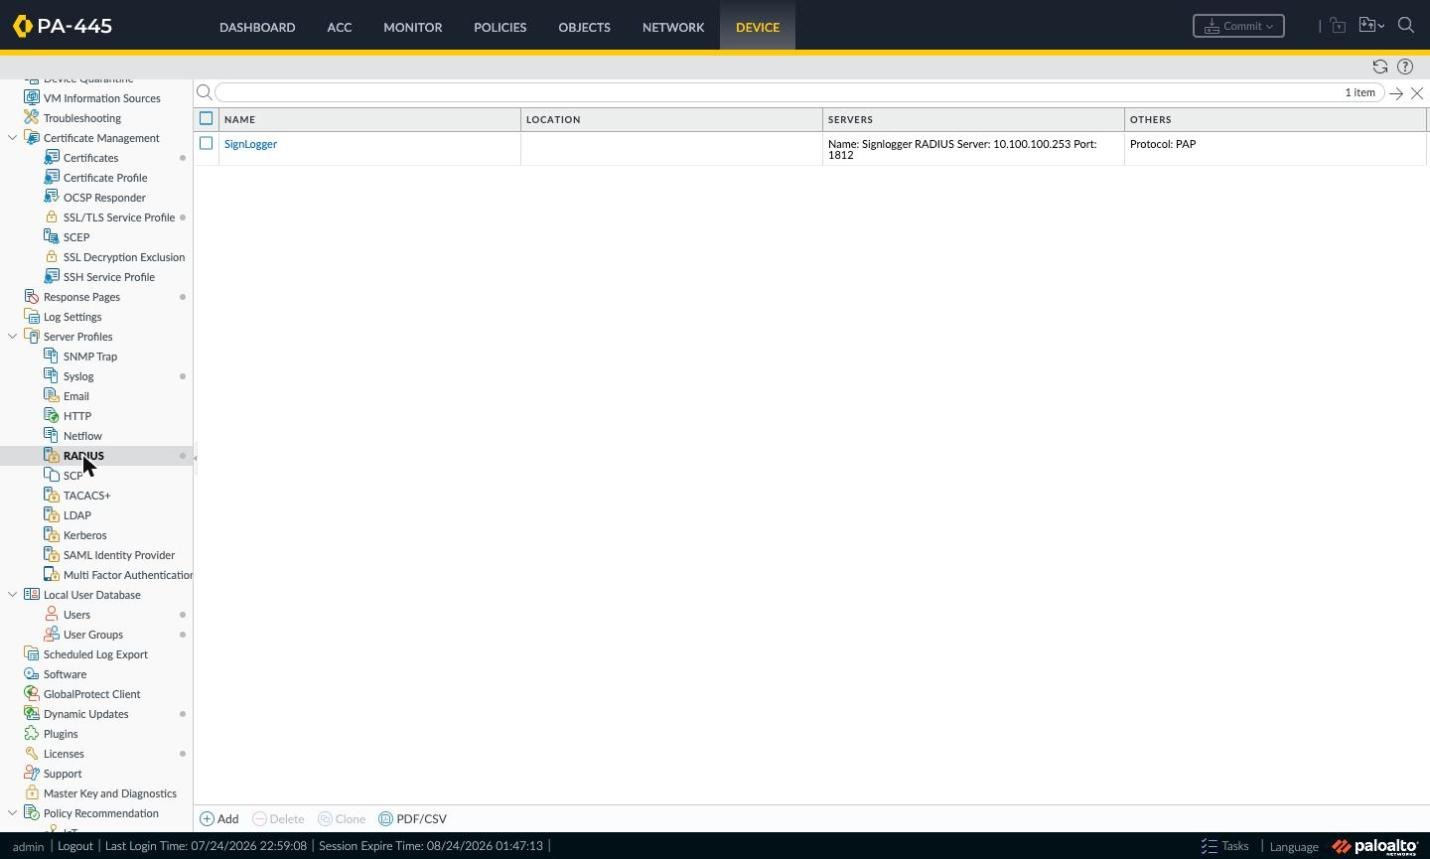
Figure 1: Device > Server Profiles > RADIUS list.
In the RADIUS Server Profile window, give the profile a meaningful Profile Name. Tick Administrator Use Only only if the profile will serve firewall admin logins exclusively — for Captive Portal it must stay unticked. Timeout is the seconds to wait for a response and Retries the number of attempts; 3 and 3 are fine in the lab.
In the Servers table click Add and enter a Name label, the server's IP or FQDN in RADIUS Server, the shared secret defined on the RADIUS server in Secret, and the authentication port in Port. The standard RADIUS authentication port is 1812 (legacy devices may use 1645). The shared secret is never displayed in clear text.
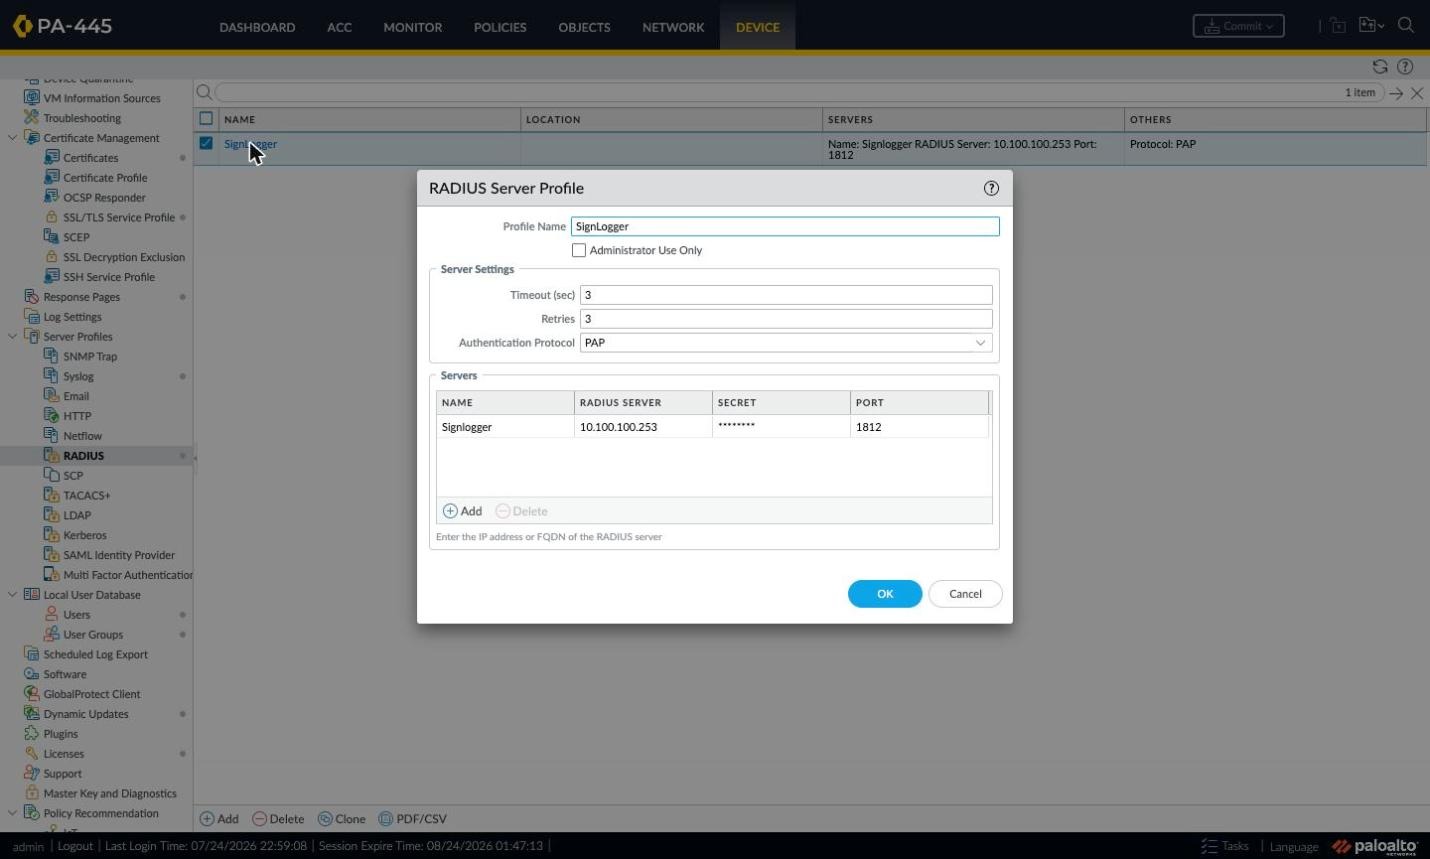
Figure 2: RADIUS Server Profile window and the server entry.
The Authentication Protocol drop-down offers PAP, CHAP, PEAP-MSCHAPv2, PEAP with GTC and EAP-TTLS with PAP. For the SignLogger integration you must select PAP: SignLogger's RADIUS server performs captive portal authentication with PAP, and any other choice leaves authentication requests unanswered and portal logins failing. In PAP the credentials are protected inside the RADIUS packet by the shared secret, so enter a long, unpredictable value in the Secret field and carry the RADIUS traffic between the firewall and SignLogger over an isolated (management) network.
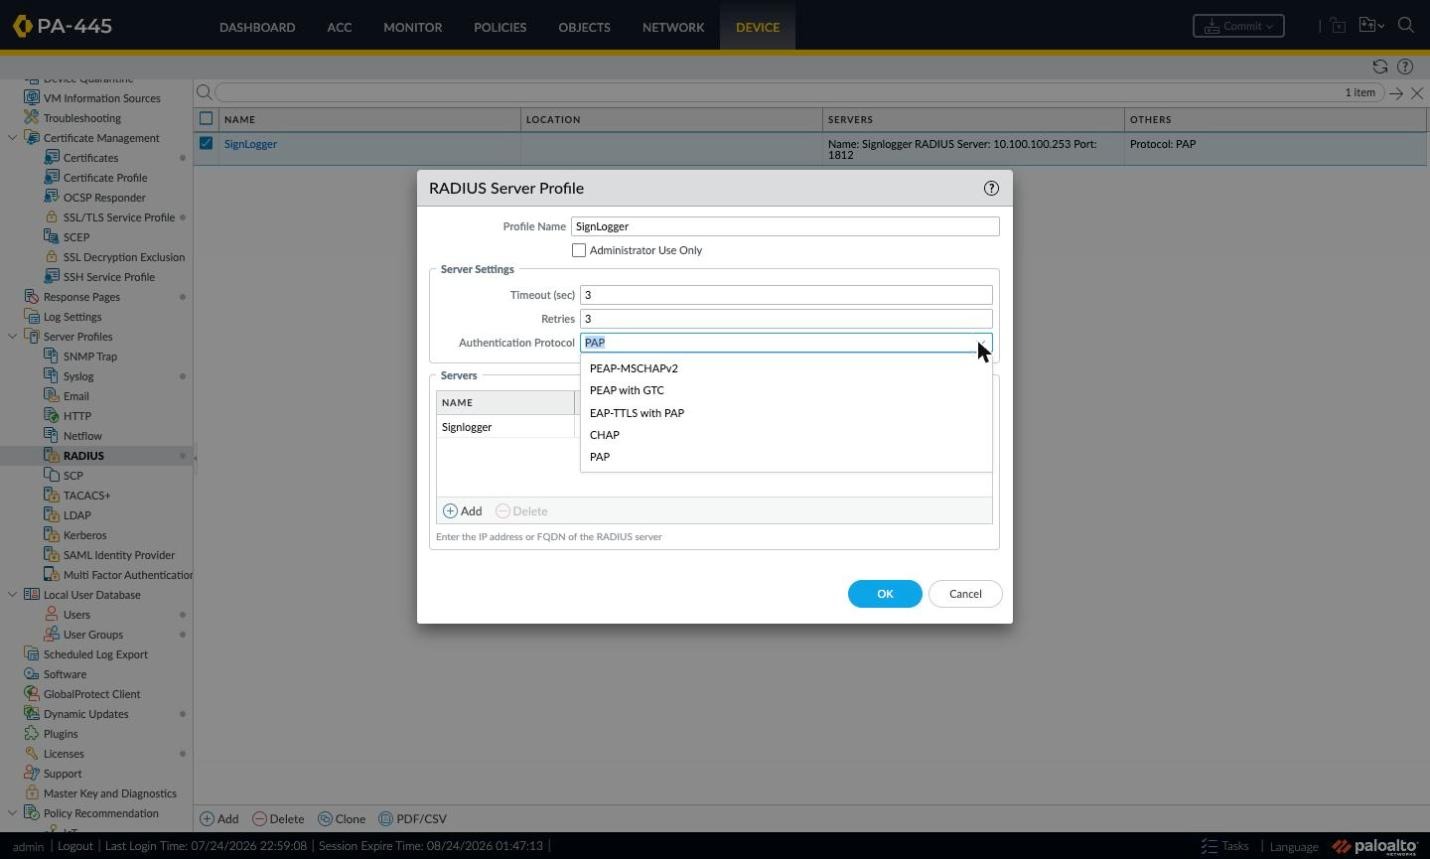
Figure 3: Authentication Protocol options.
Step 1.2 — Creating the RADIUS-Based Authentication Profile
A server profile is not usable on its own — it must be wrapped in an Authentication Profile. Under Device > Authentication Profile you see the existing profiles, their types, bound server profiles, allow lists and lockout values.
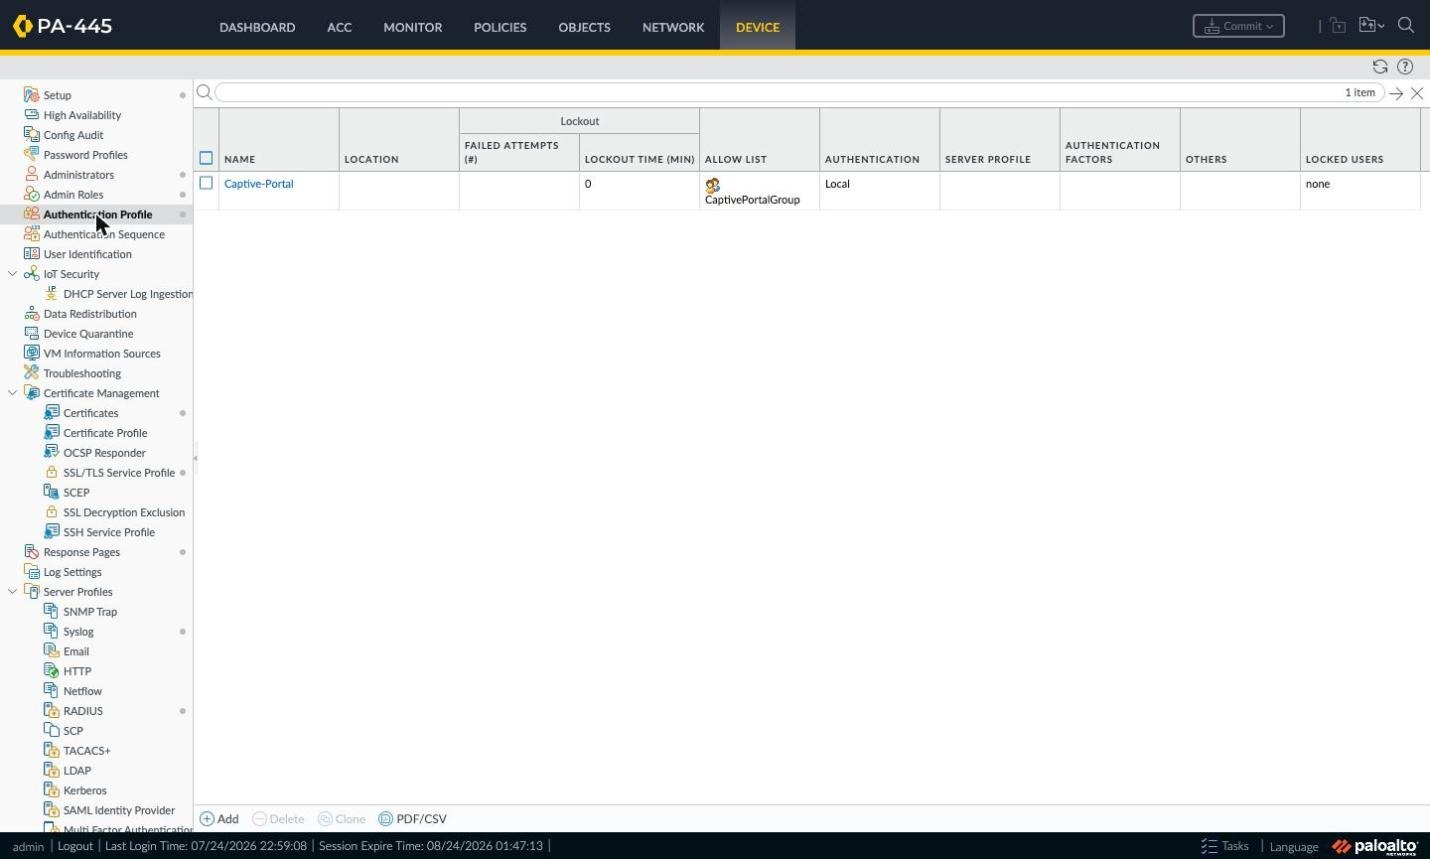
Figure 4: Device > Authentication Profile list.
Add opens an empty Authentication Profile window with a Name field and three tabs: Authentication, Factors and Advanced. Initially Type is None and the profile does nothing.
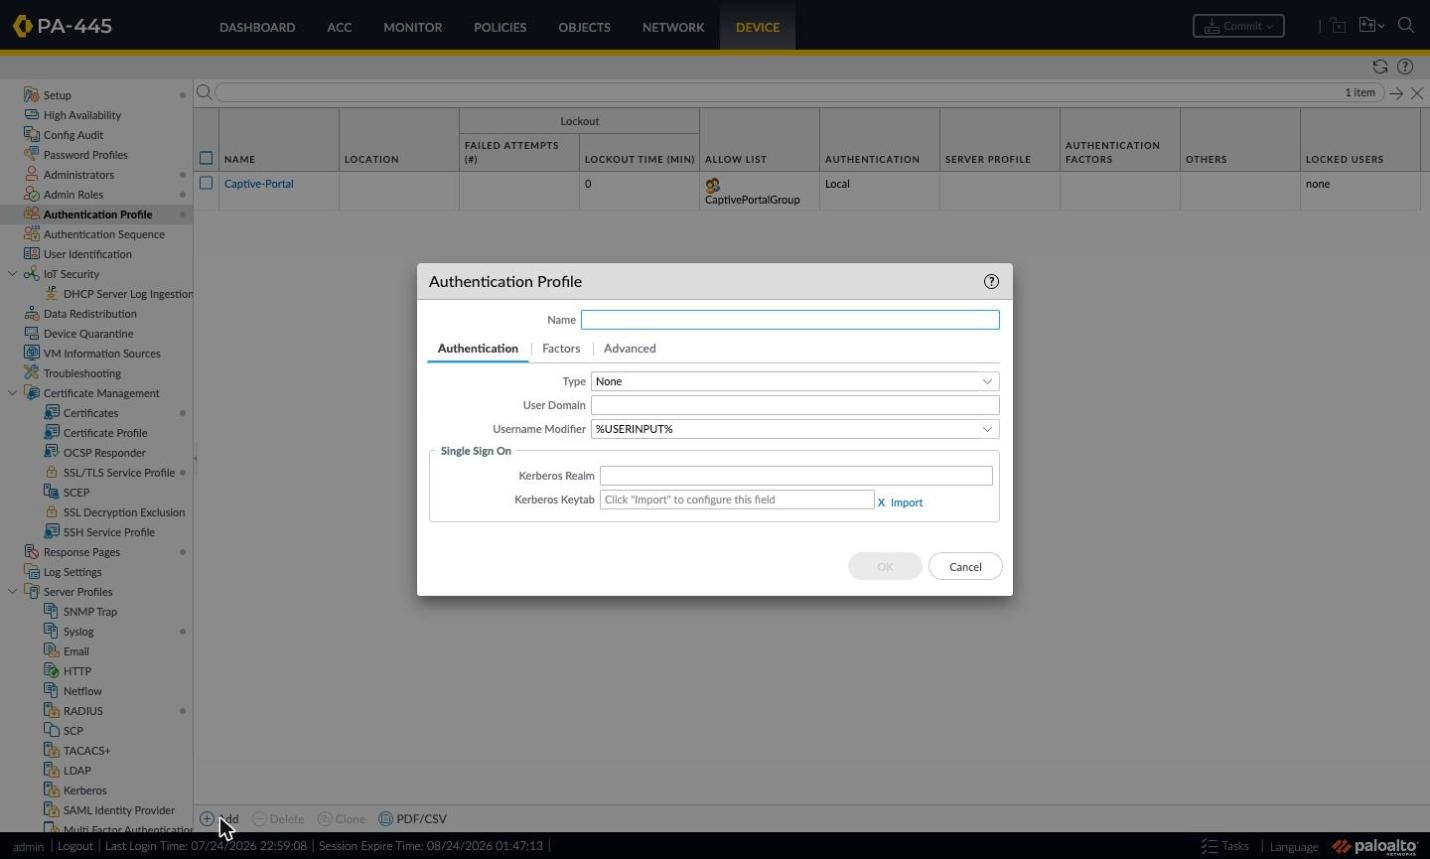
Figure 5: Empty Authentication Profile window.
The Type list shows every backend PAN-OS supports: None, Cloud Authentication Service, Local Database, RADIUS, LDAP, TACACS+, SAML and Kerberos. Choose RADIUS. (For a quick portal test without an external server, Local Database also works.)
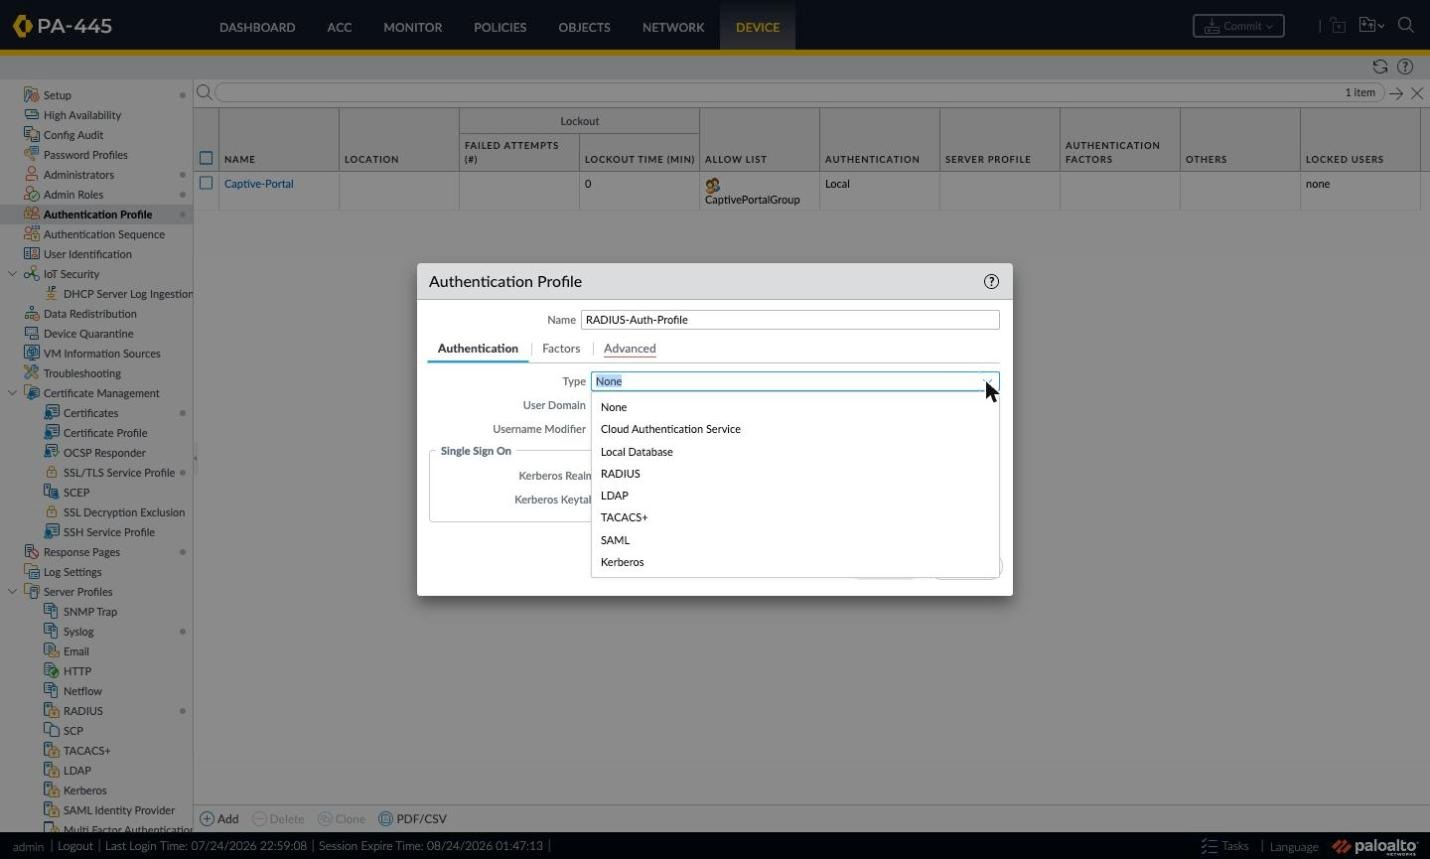
Figure 6: Authentication Profile Type options.
Selecting RADIUS reveals two new fields. Server Profile is mandatory (outlined in red). The Retrieve user group from RADIUS checkbox makes the firewall read group information from the RADIUS response (e.g. Filter-Id or vendor-specific attributes) enabling group-based policy. User Domain and Username Modifier control how the username is sent to RADIUS; %USERINPUT% forwards exactly what the user typed.
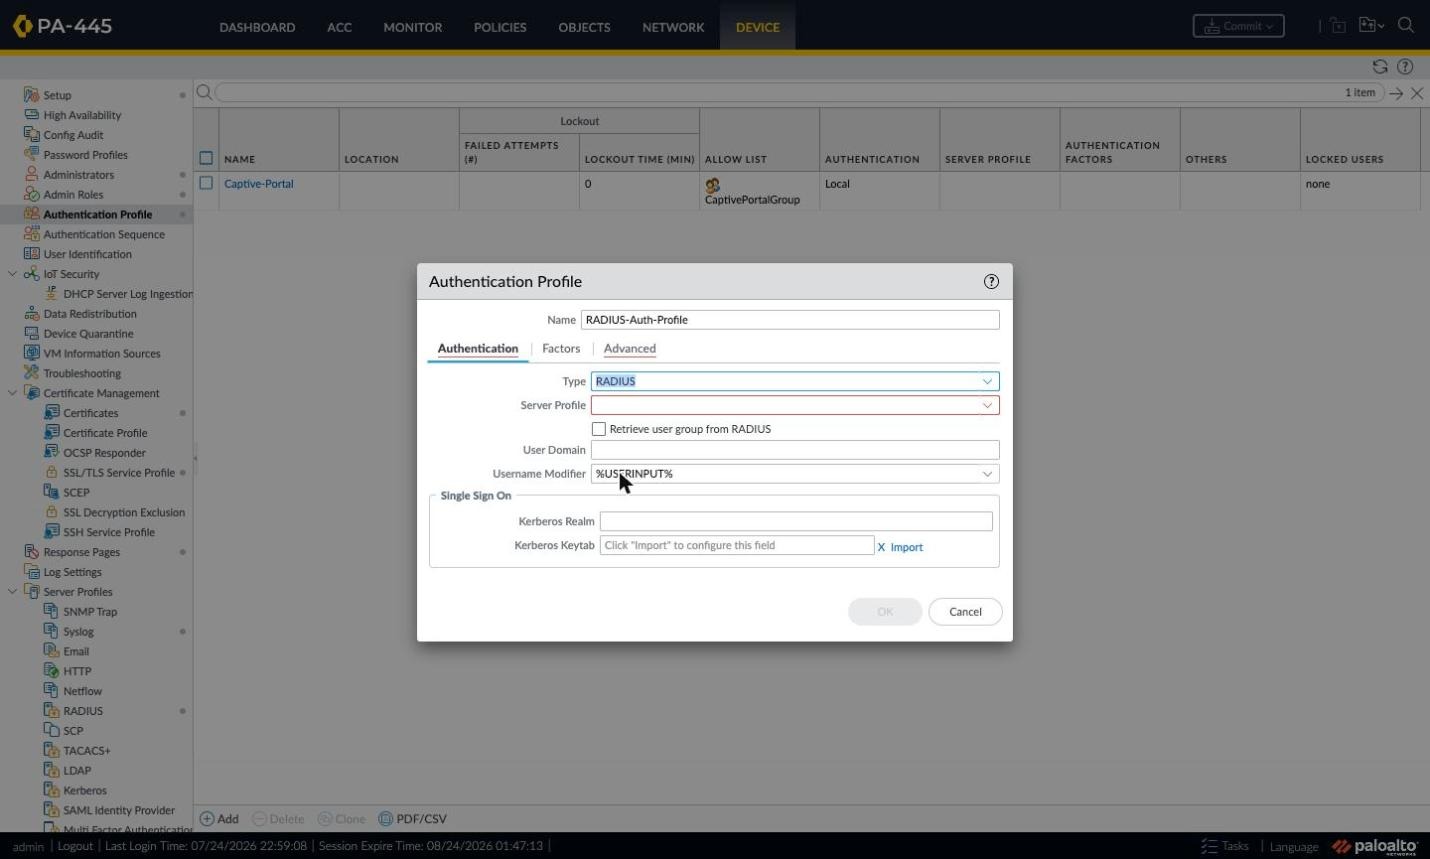
Figure 7: Fields shown after selecting RADIUS.
The Server Profile drop-down lists the RADIUS profiles created earlier; the New RADIUS Profile shortcut lets you create one without leaving the window.
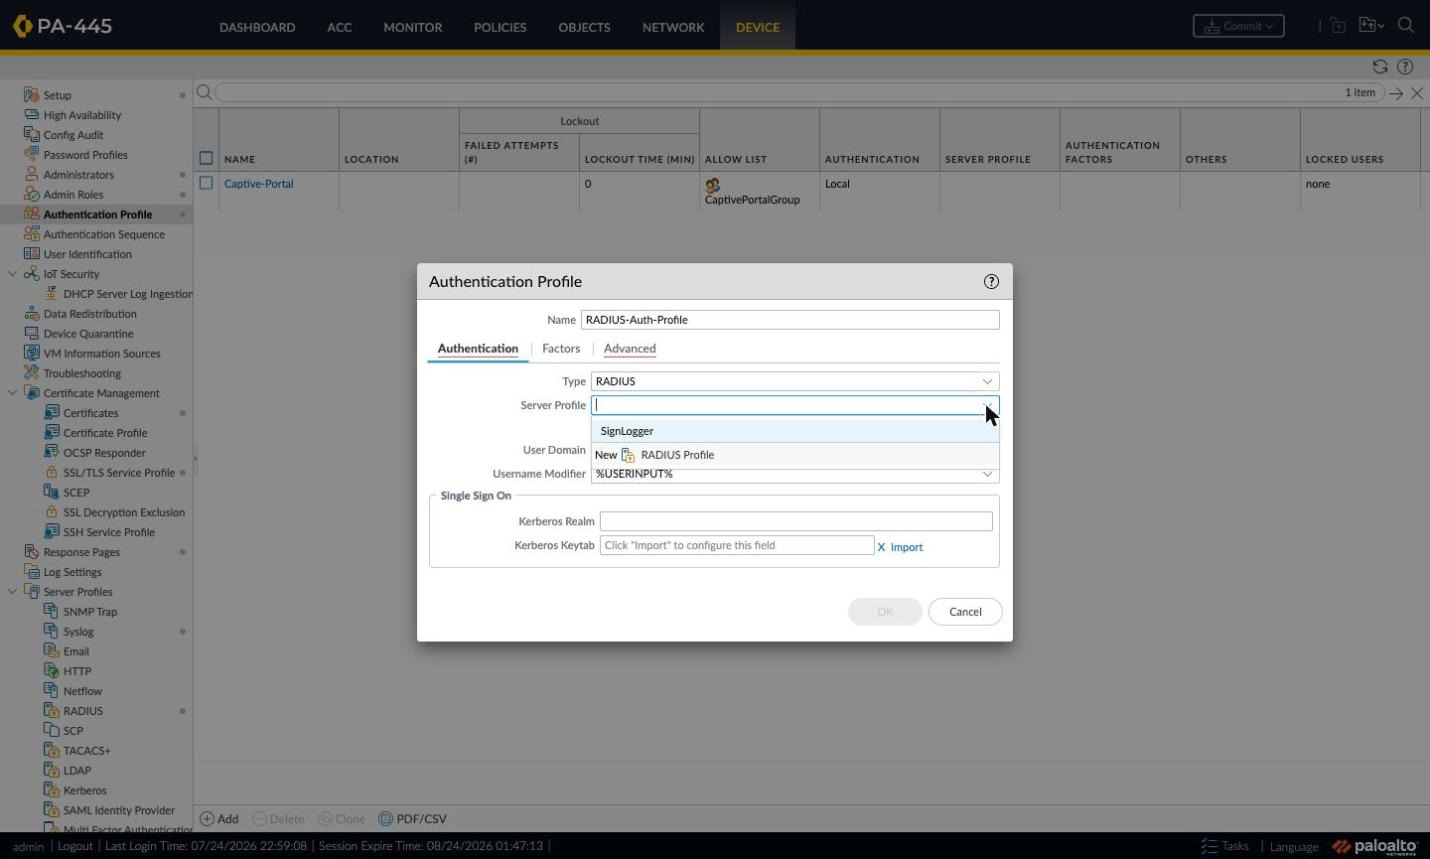
Figure 8: Server Profile selection.
With the server profile selected and group retrieval ticked, the Authentication tab is complete: the profile will ask the RADIUS server for username/password and use the returned group in policy evaluation.
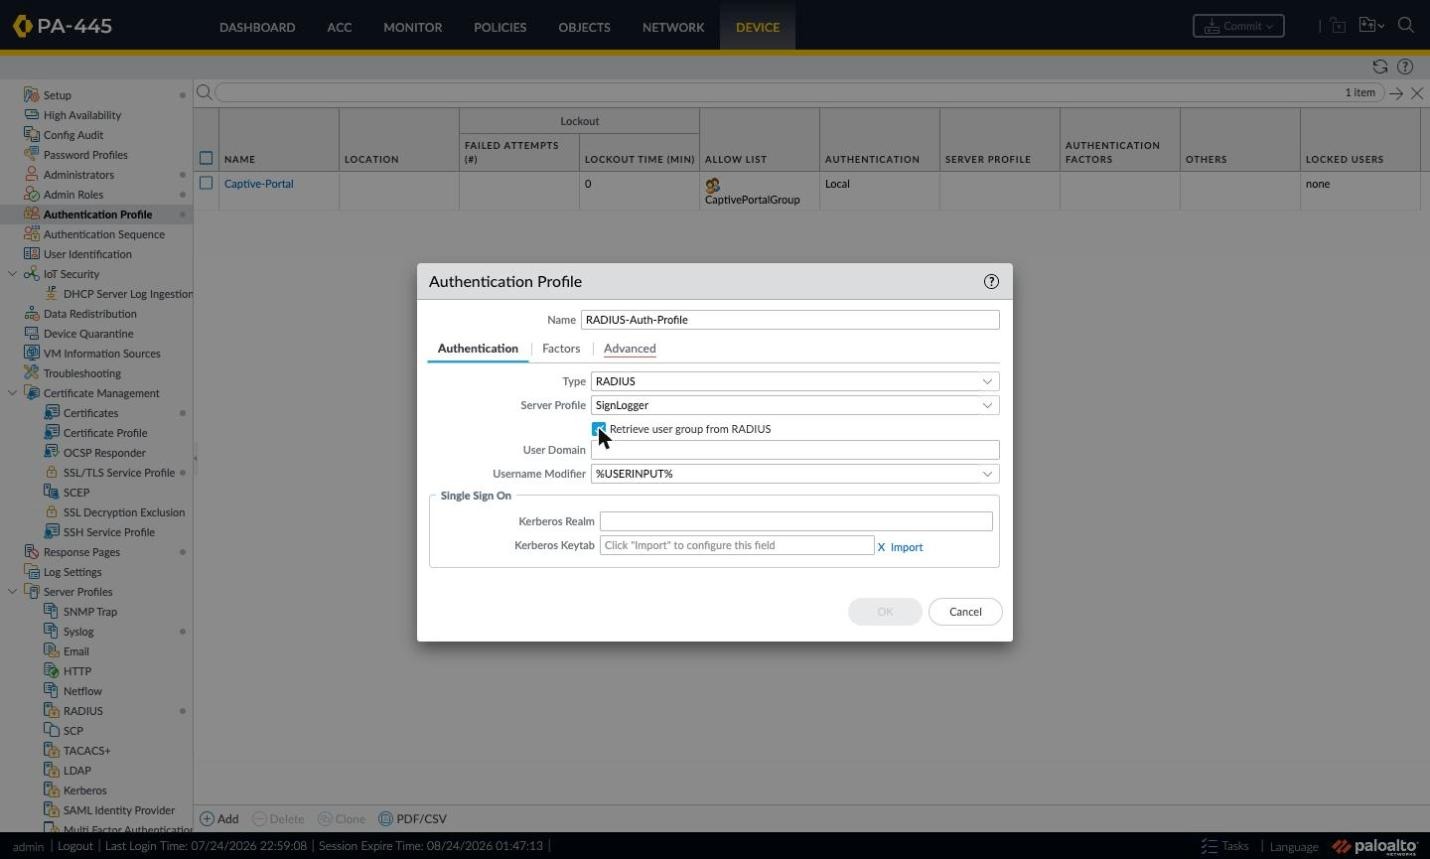
Figure 9: Completed RADIUS Authentication Profile.
Step 1.3 — Allow List and Account Lockout (Advanced Tab)
The Advanced tab is often skipped yet critical. If the Allow List is left empty, nobody can authenticate with this profile — add at least one entry. Under Account Lockout, Failed Attempts sets how many failures lock the account and Lockout Time how many minutes the lock lasts; 0 means locked until an administrator intervenes. On guest networks set a sensible value against brute force.
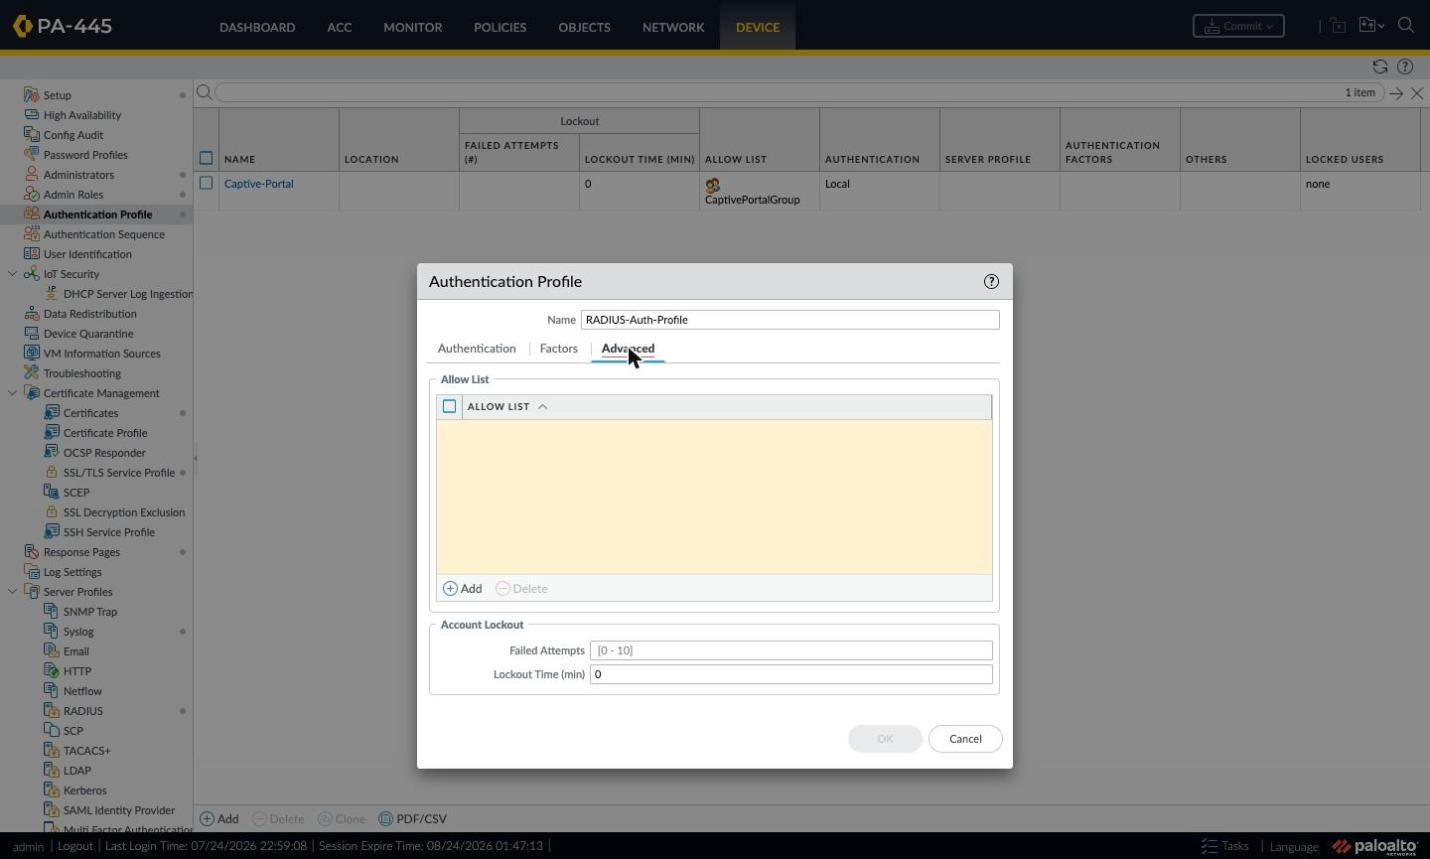
Figure 10: Authentication Profile Advanced tab.
Clicking Add on the Allow List shows all plus the locally known groups and users. all admits everyone who authenticates successfully; least privilege favors a specific group in production. With RADIUS group retrieval enabled you can list the group names returned by RADIUS here.
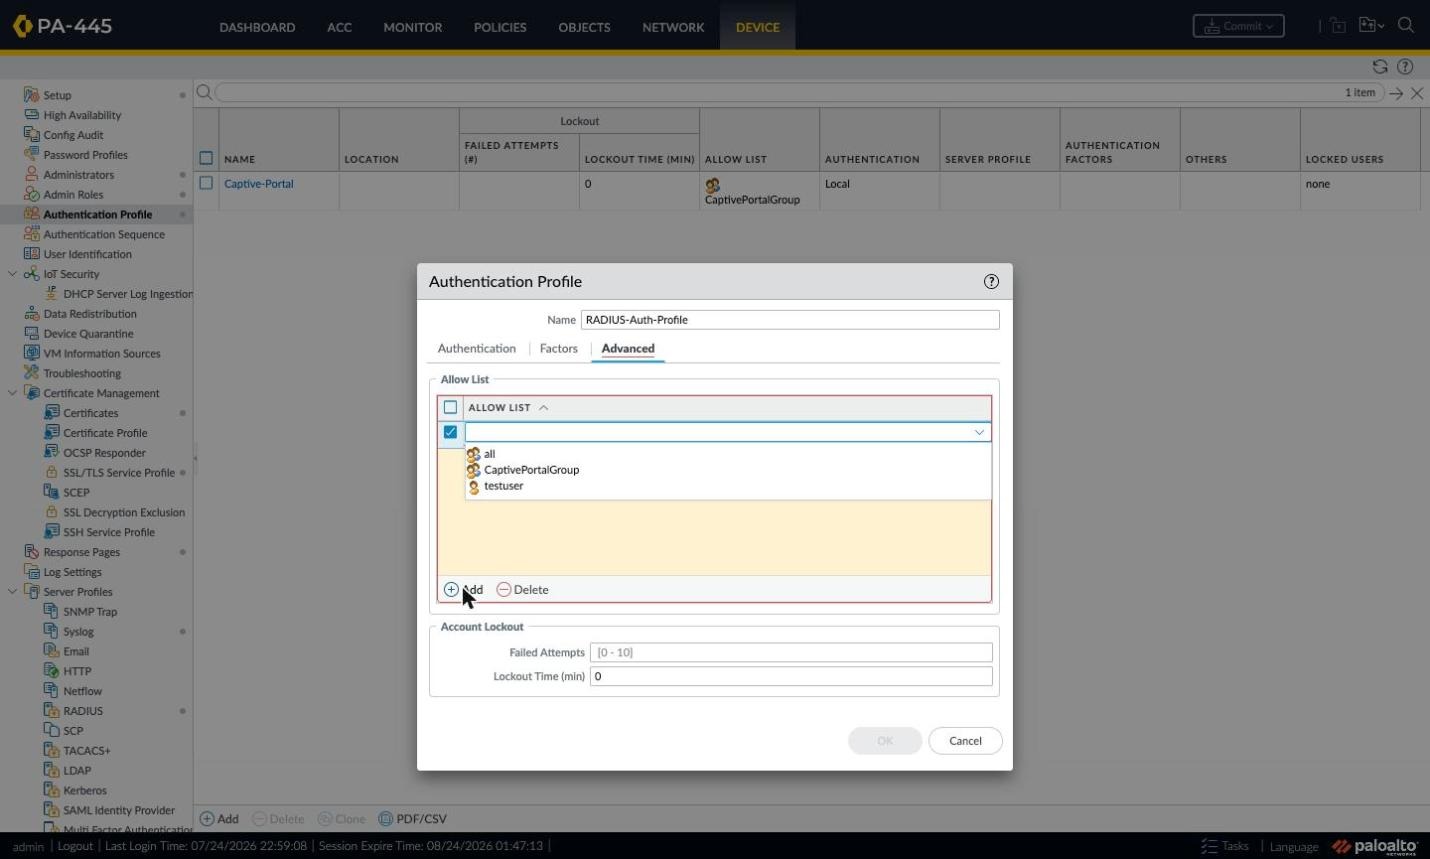
Figure 11: Allow List options.
PART 2: Setting Up the Palo Alto Captive Portal
Captive Portal setup is a chain of interdependent steps — break the order and some fields cannot be selected. For example an SSL/TLS Service Profile needs a certificate, and the certificate needs a root CA first. The sequence below follows those dependencies.
Step 2.1 — Layer 3 Interface and Subinterface for the Guest Network
Network > Interfaces shows all physical interfaces, subinterfaces, management profiles, IPs, VLAN tags and zones in one table. In the example, ethernet1/1 runs as a DHCP client in untrust, ethernet1/2 is the management leg in trust, and the guest network hangs off ethernet1/2.71 in the Guest zone.
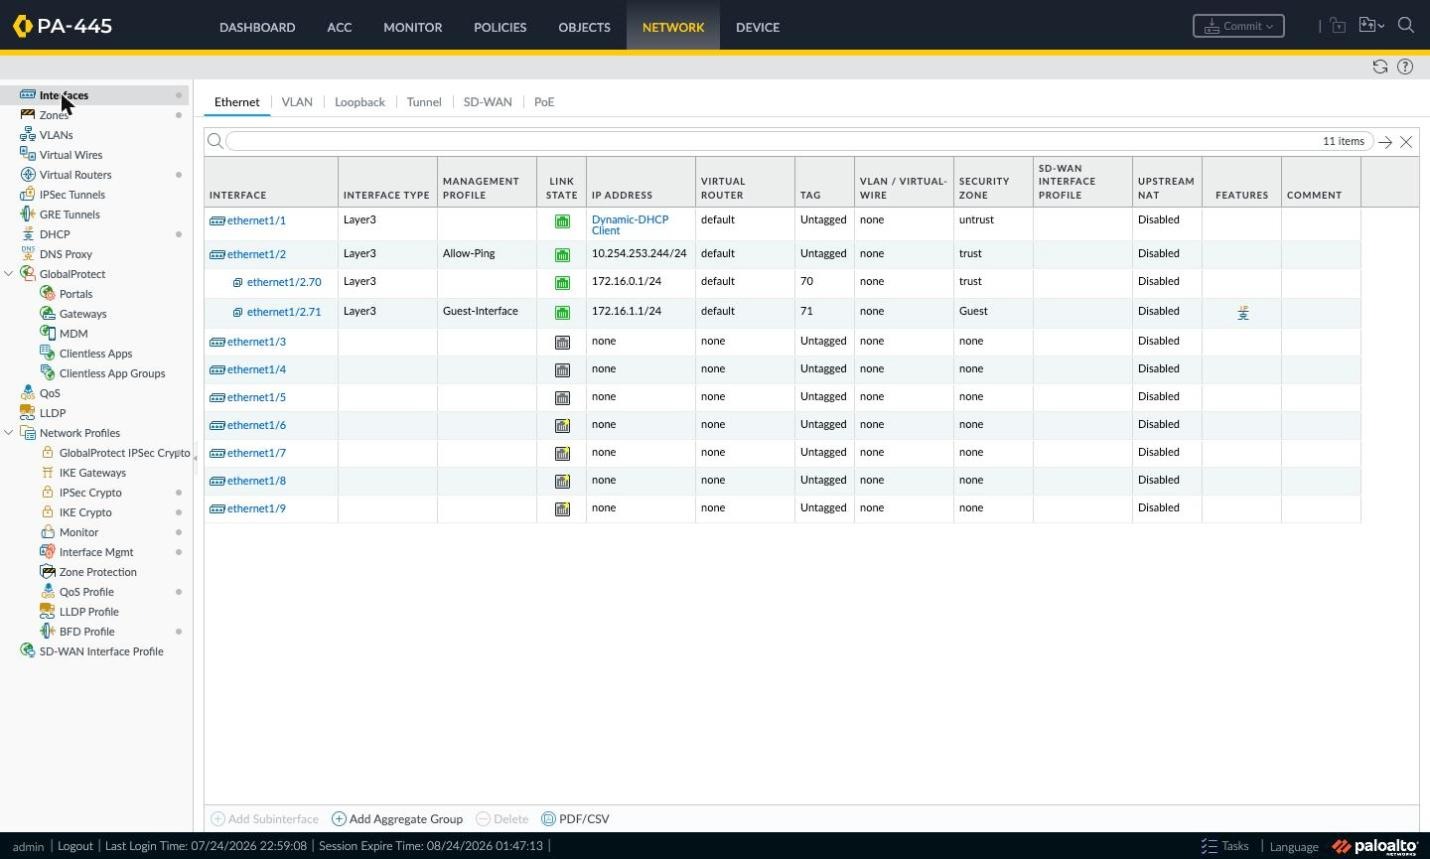
Figure 12: Network > Interfaces overview.
Clicking the subinterface opens the Layer3 Subinterface window. On Config you set the VLAN Tag, Virtual Router and Security Zone. Put the guest network in its own zone without exception — Authentication Policy rules are written per zone, so the separation is functionally required.
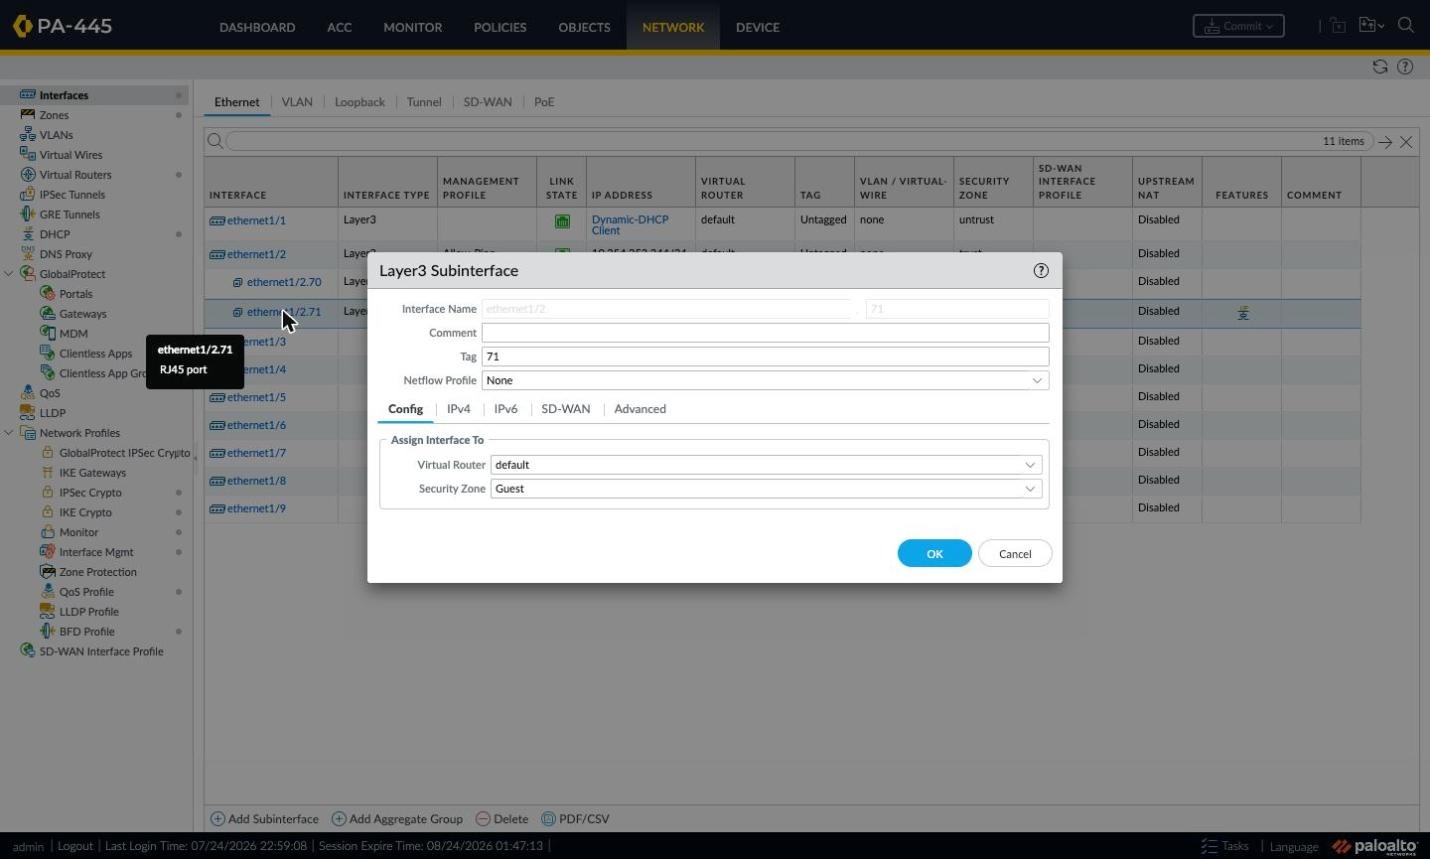
Figure 13: Layer3 Subinterface — Config tab.
On IPv4, give the interface a static IP — it doubles as the guests' default gateway and the captive portal redirect target. The example uses 172.16.1.1/24.
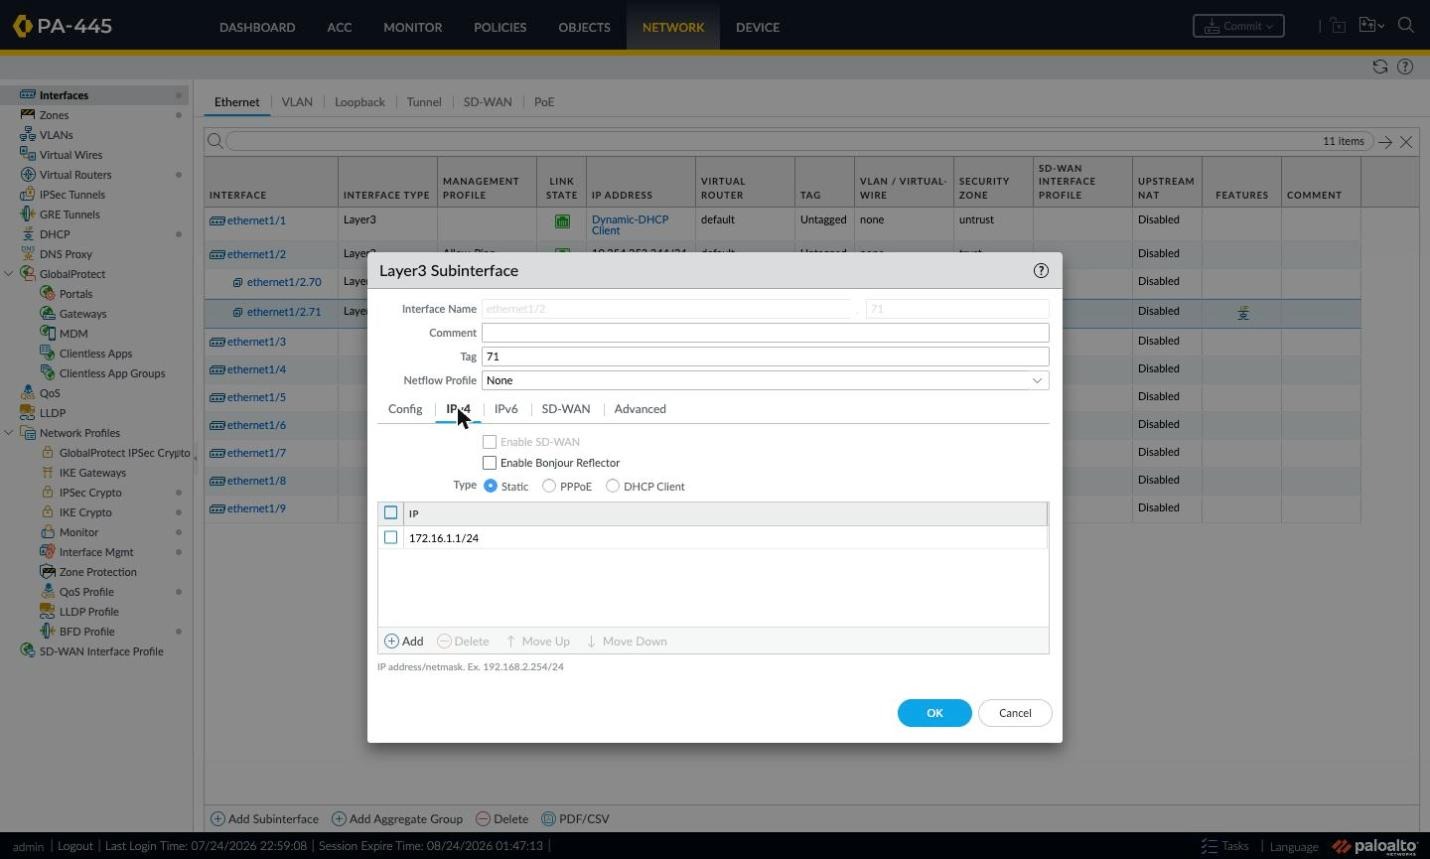
Figure 14: Layer3 Subinterface — IPv4 tab.
On Advanced > Other Info sits the Management Profile field. For Captive Portal to work you must attach a profile that enables the Response Pages and User-ID services here. Palo Alto's documentation states this explicitly: when using an interface other than MGT, Response Pages and User-ID must be enabled in the Interface Management Profile.
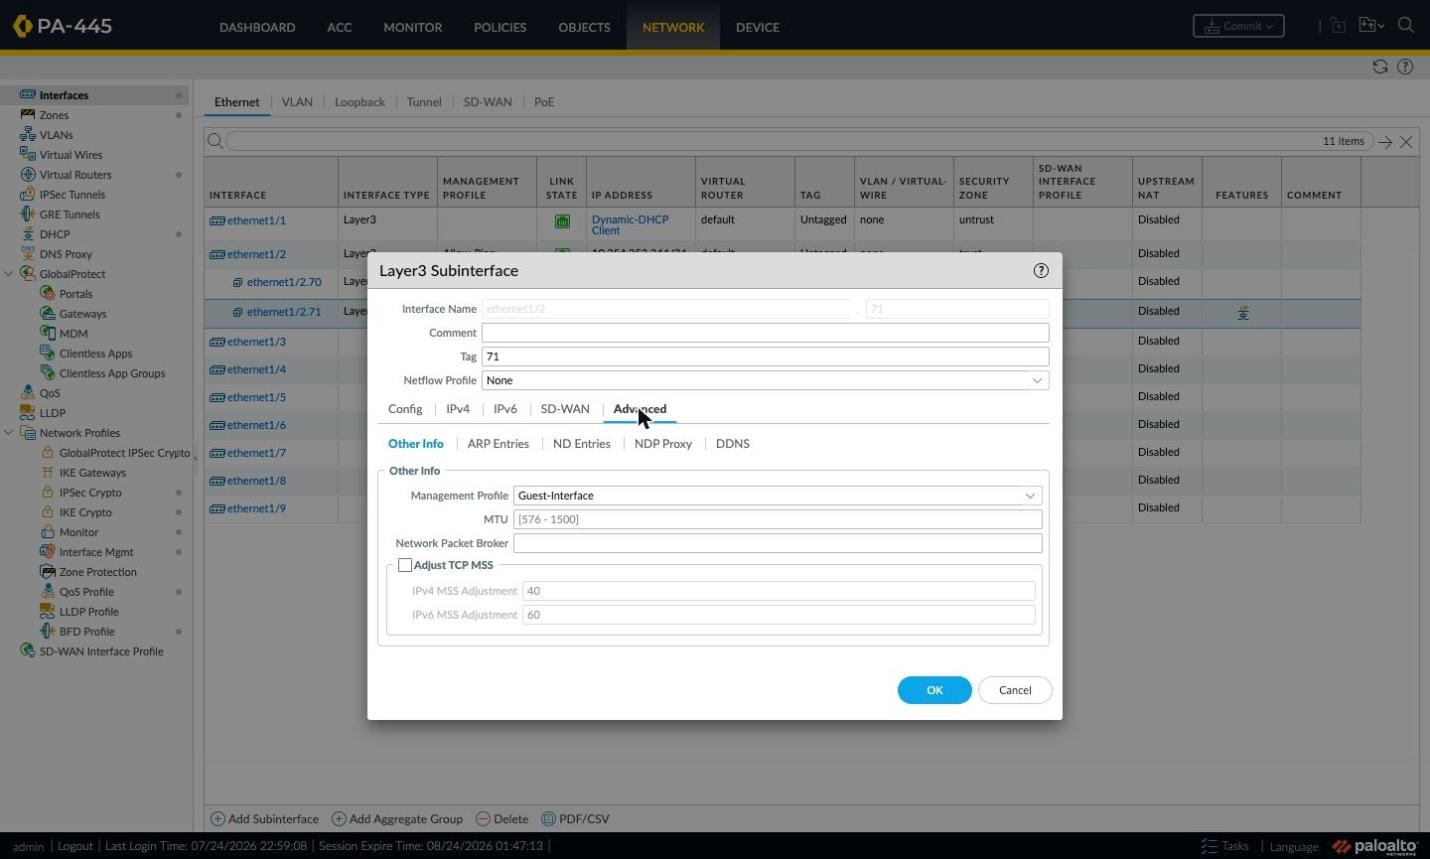
Figure 15: Advanced tab and the Management Profile field.
Step 2.2 — Interface Management Profile: Response Pages and User-ID
Go to Network > Network Profiles > Interface Mgmt. The table shows per-profile service columns; the profile attached to the guest interface must have RESPONSE PAGES and USER-ID ticked. Without them the redirect may fire but the portal page never renders.
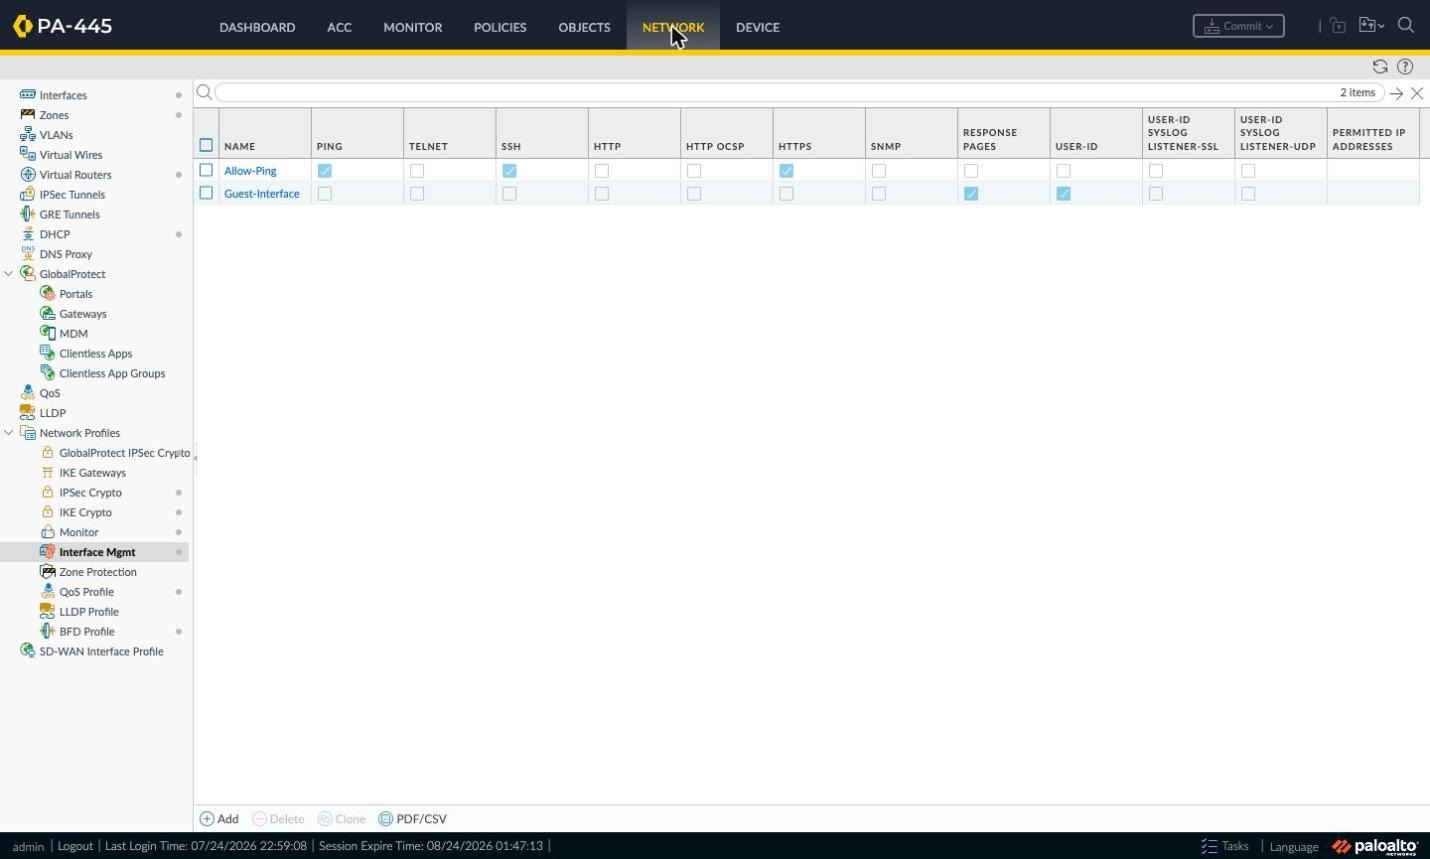
Figure 16: Network Profiles > Interface Mgmt list.
Inside the profile, the HTTP/HTTPS/Telnet/SSH boxes under Administrative Management Services control firewall management access — all must stay off for a guest network. Under Network Services tick only Response Pages and User-ID. Leaving Permitted IP Addresses empty allows all sources; narrow it to the guest subnet if you wish.
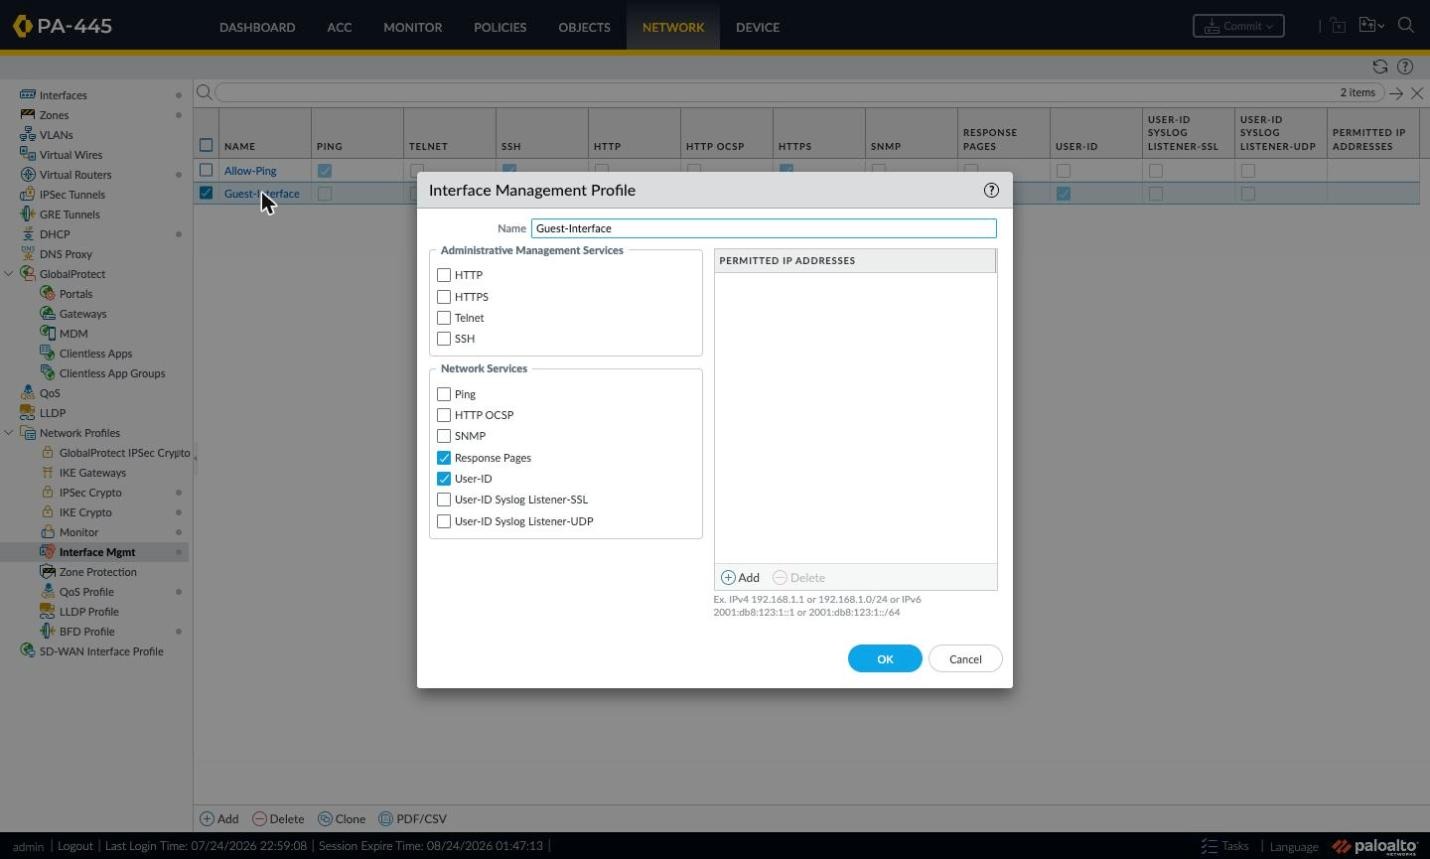
Figure 17: Interface Management Profile window.
Step 2.3 — Enabling User Identification on the Zone
Network > Zones shows the User-ID state per zone. The guest zone's ENABLED box must be ticked; otherwise the firewall never creates IP-user mappings for that zone and users remain unknown even after successful authentication.
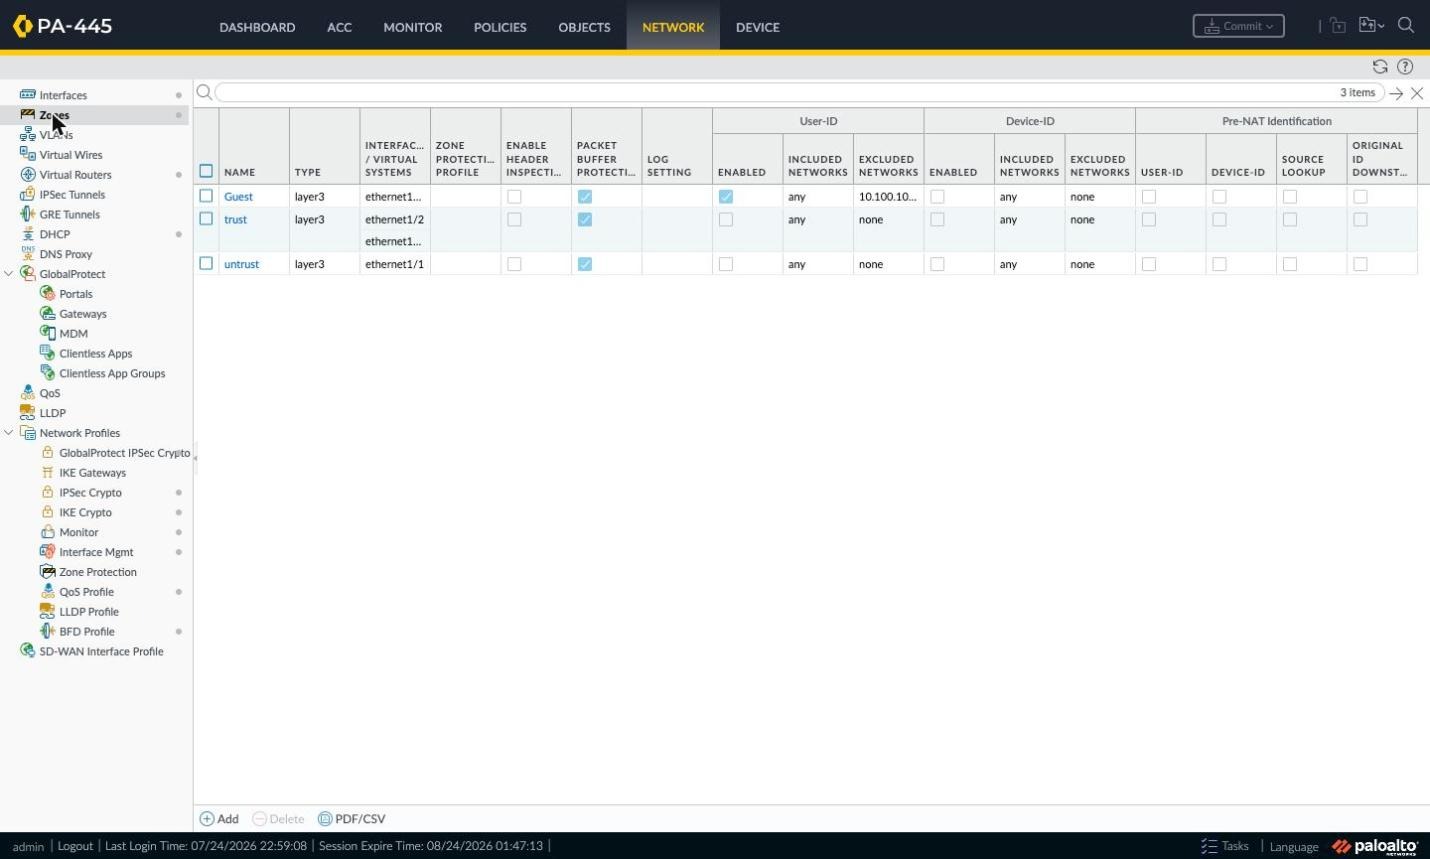
Figure 18: Network > Zones and User-ID state.
Open the zone and tick Enable User Identification. The User Identification ACL has two lists: Include List subnets are mapped, Exclude List subnets are not. Excluding servers, printers or the RADIUS server itself is common practice.
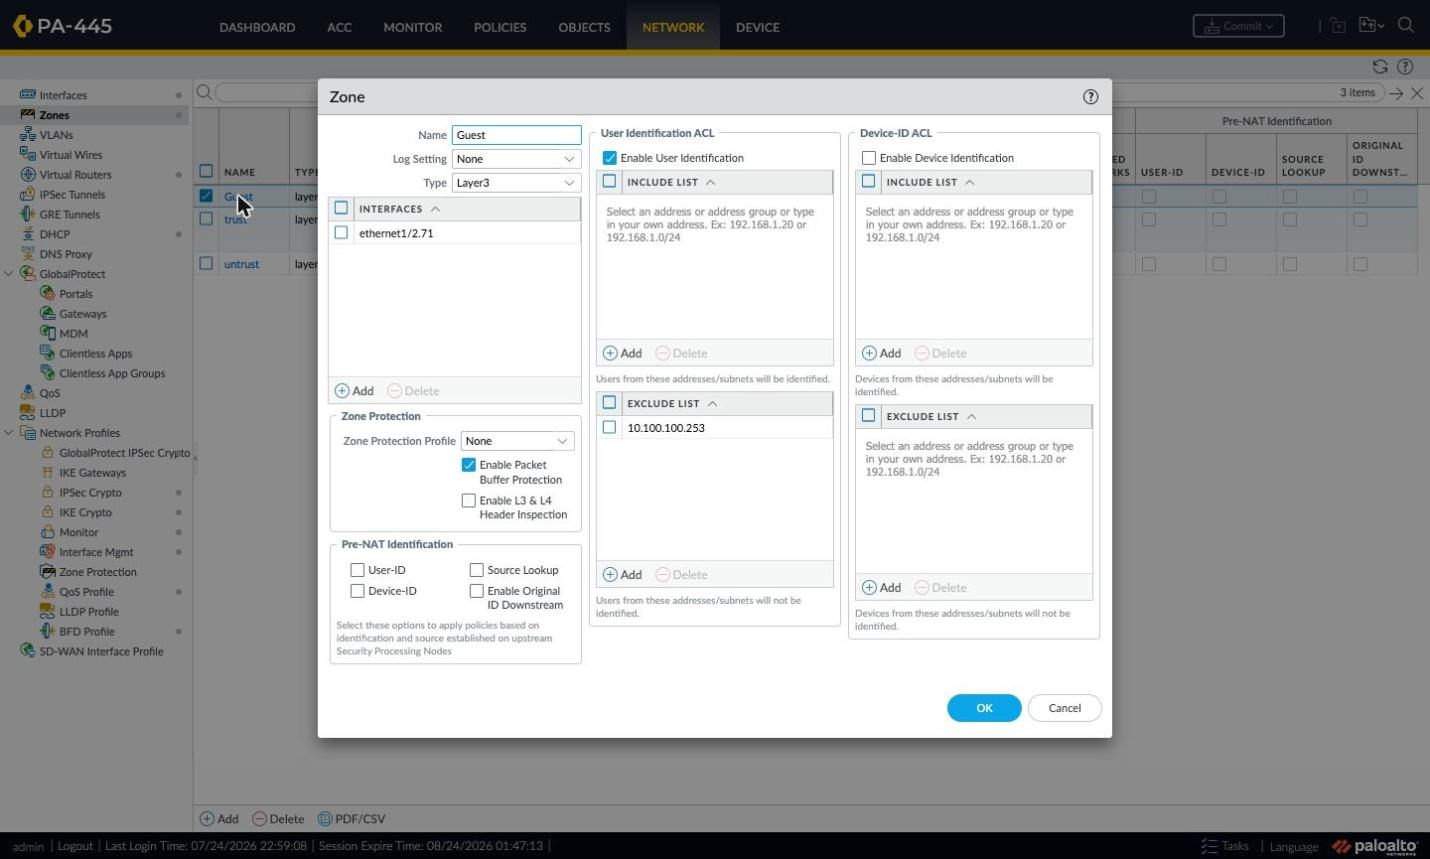
Figure 19: Zone window and User Identification ACL.
Step 2.4 — DHCP Server for the Guest Network
Define a DHCP server for the guest interface under Network > DHCP so clients receive address, gateway and DNS. The list view summarizes interface, mode, lease, DNS servers, pool and gateway.
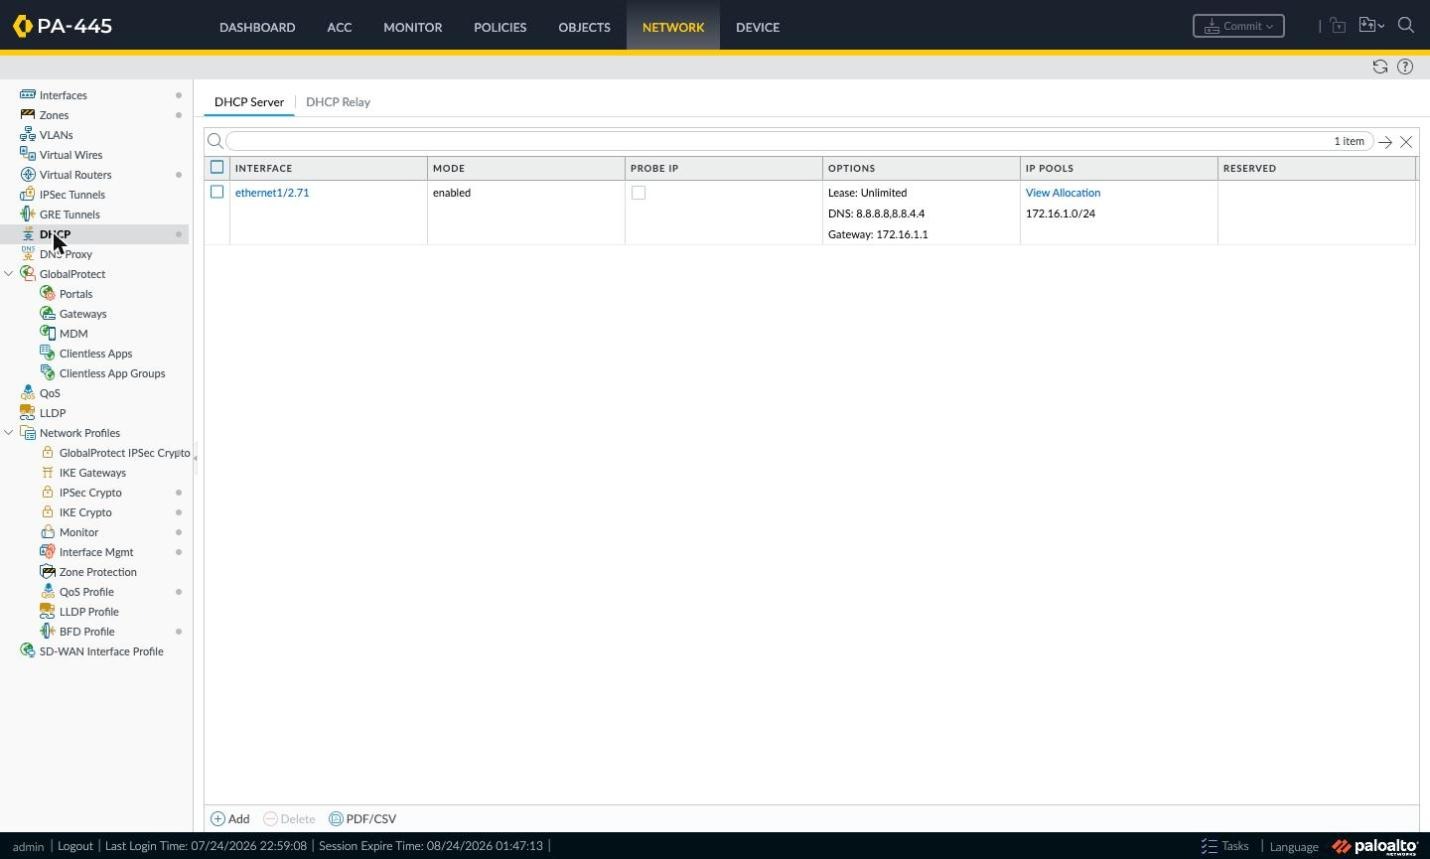
Figure 20: Network > DHCP server list.
On the Lease tab set the lease time and IP pool. Unlimited is convenient in a lab but can exhaust addresses on guest networks — prefer a Timeout of a few hours. Defining a range like 172.16.1.10 – 172.16.1.200 instead of the whole subnet leaves room for the gateway and static devices.
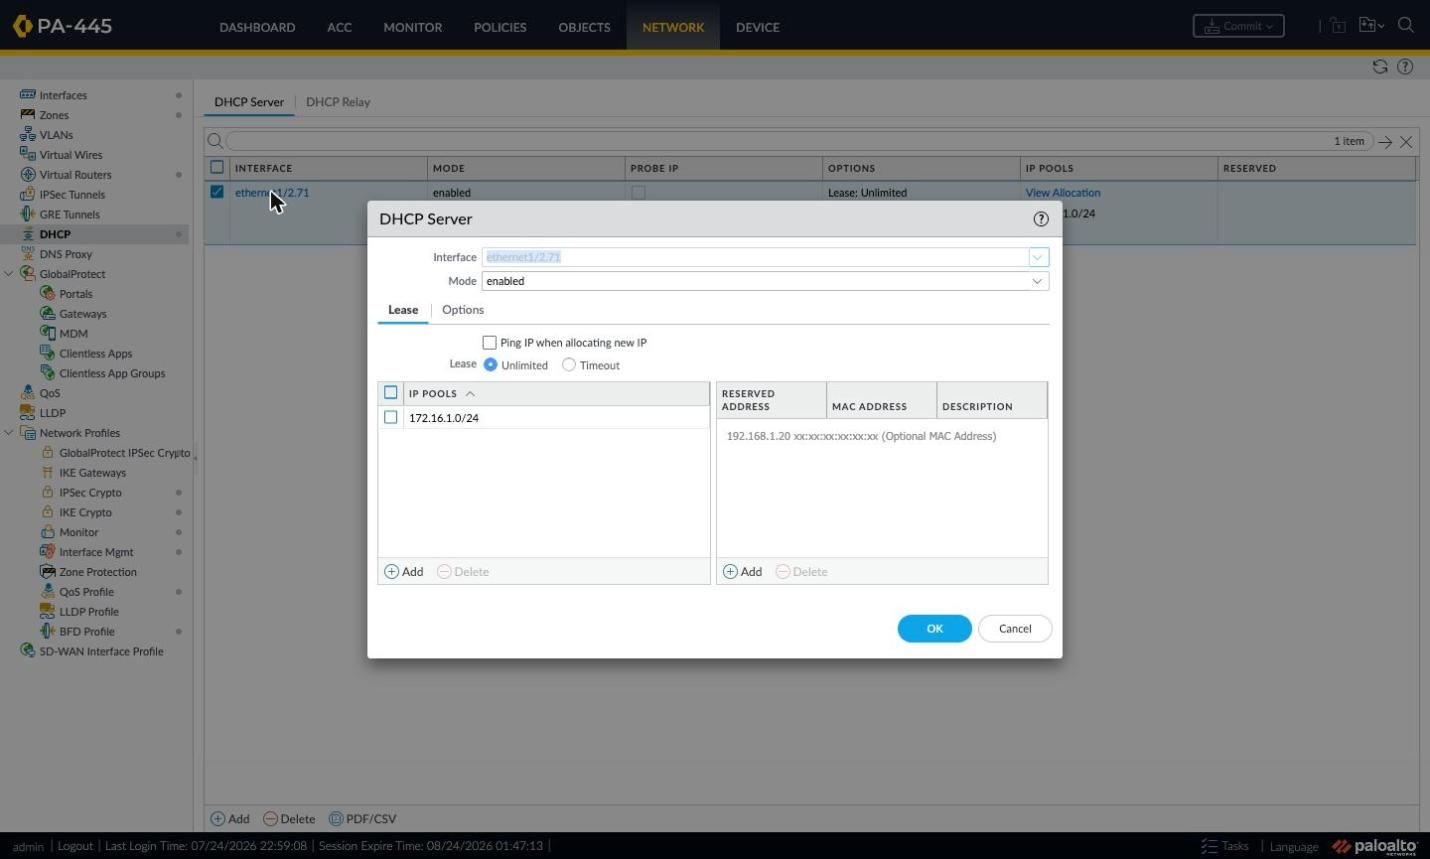
Figure 21: DHCP Server — Lease tab.
On Options, set Gateway to the guest interface IP, the Subnet Mask, and Primary/Secondary DNS. Important: if the portal will be addressed by an intranet hostname (redirect host) instead of an IP, the DNS you hand to clients must resolve that name to the guest interface IP — the official docs require a DNS A record for the redirect host.
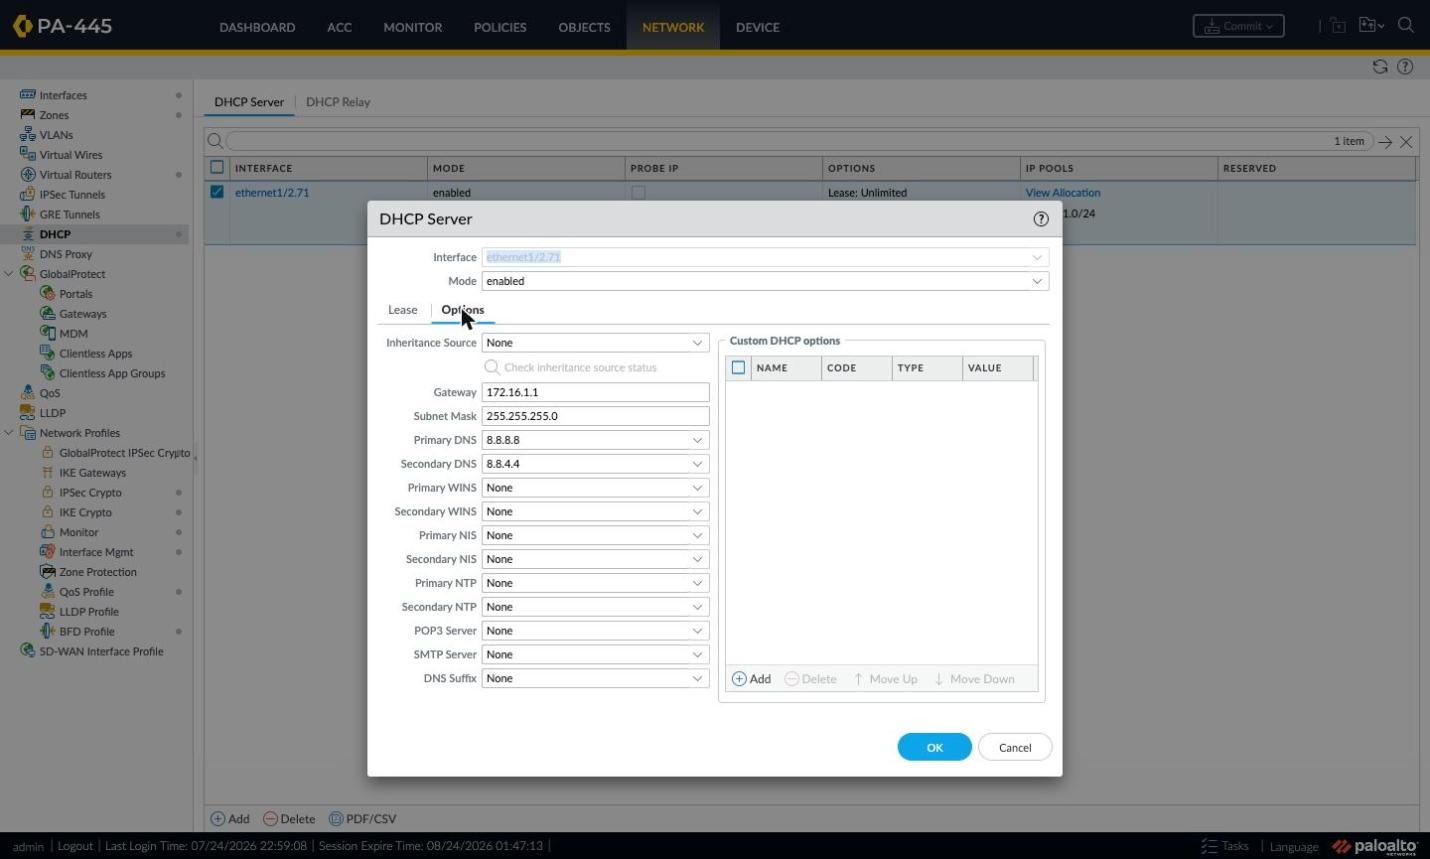
Figure 22: DHCP Server — Options tab.
Step 2.5 — Certificates: Root CA and Portal Server Certificate
⚠️ Decide first — a self-signed certificate does NOT work on a guest network: The self-signed root-CA method described below inevitably produces a certificate error on a guest/hotspot network. Redirect mode always serves the portal over HTTPS; if the guest’s phone cannot validate the presented certificate it shows a warning. For the certificate to be accepted without a warning it MUST be issued by a public (publicly trusted) CA, and these three conditions must all hold:
- A real domain name: the Redirect Host must be an FQDN under a real domain you own — e.g.
hotspot.sysnet.com.tr. A public CA only issues a certificate for a real domain you control, via domain control validation (DCV); it CANNOT issue for a made-up internal name (hotspot.local, a single-word name) or a private IP (CA/B Forum, since 2015).- A DNS A record: add an A record for this FQDN on your DNS server that points to the guest interface’s IP address — e.g.
hotspot.sysnet.com.tr → 172.16.1.1. Otherwise the client gets a DNS error instead of a certificate error.- SAN + intermediate chain: the FQDN must appear as a dNSName in the certificate’s SAN (modern browsers ignore the CN), and the full intermediate chain must be served (a pre-auth guest has no internet to fetch AIA).
A self-signed root CA only makes sense on managed corporate devices (where you can distribute the root via GPO); it categorically fails on a guest network because you cannot install a root certificate on a guest phone. The steps below show the certificate-generation screen — in production, set Signed By to “External Authority (CSR)” and have a public CA sign it.
In Redirect mode the portal is served over HTTPS, so a server certificate is needed. The documented path: first generate a self-signed root CA, then a server certificate signed by it. Device > Certificate Management > Certificates lists certificates hierarchically — an indented row is signed by the CA above it.
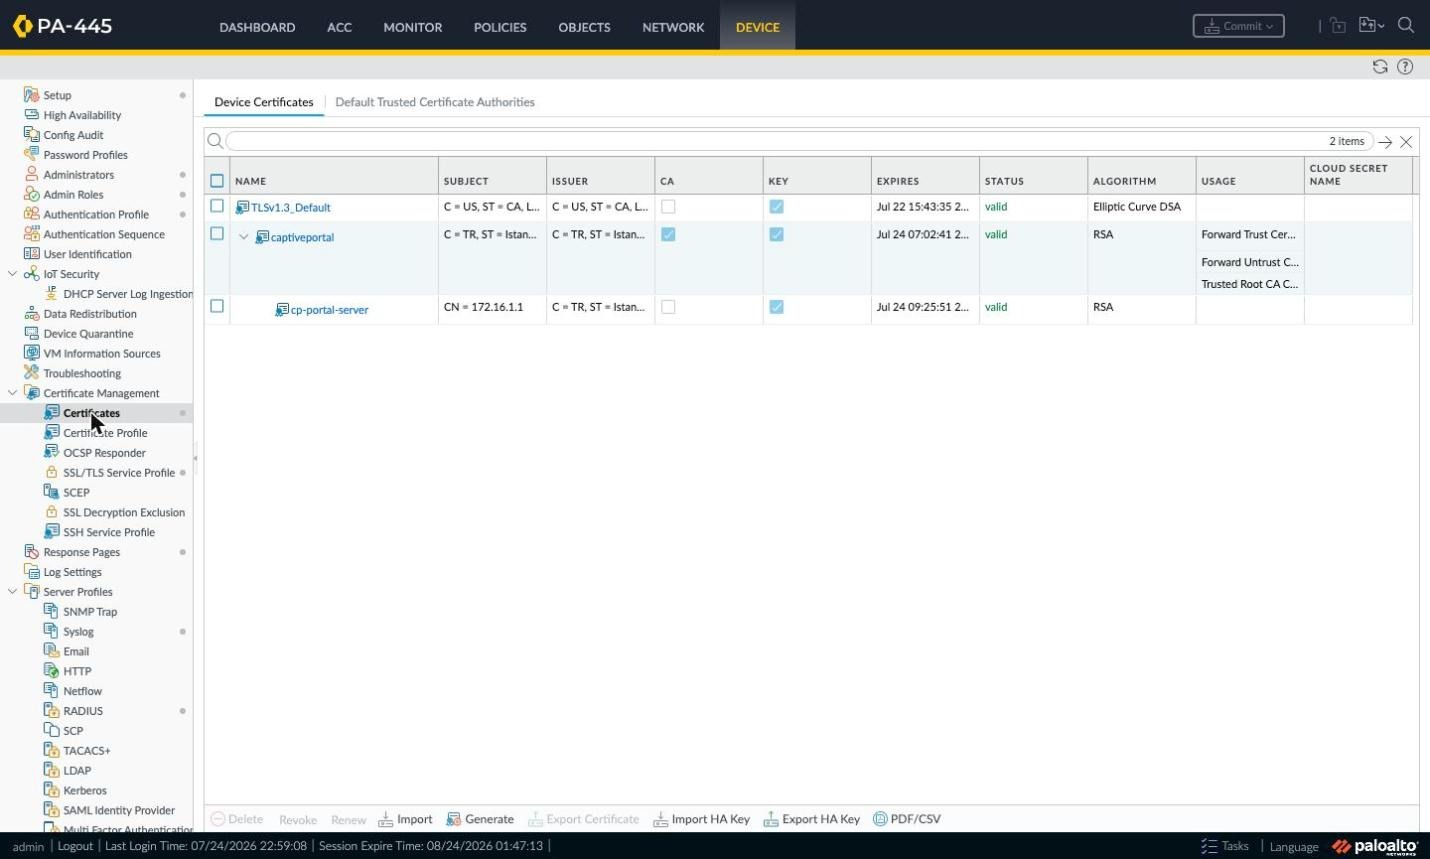
Figure 23: Device > Certificate Management > Certificates.
Generate opens the Generate Certificate window with Certificate Type (Local/SCEP), Certificate Name, Common Name, Signed By, the Certificate Authority and Block Private Key Export checkboxes, cryptographic settings and the Certificate Attributes table.
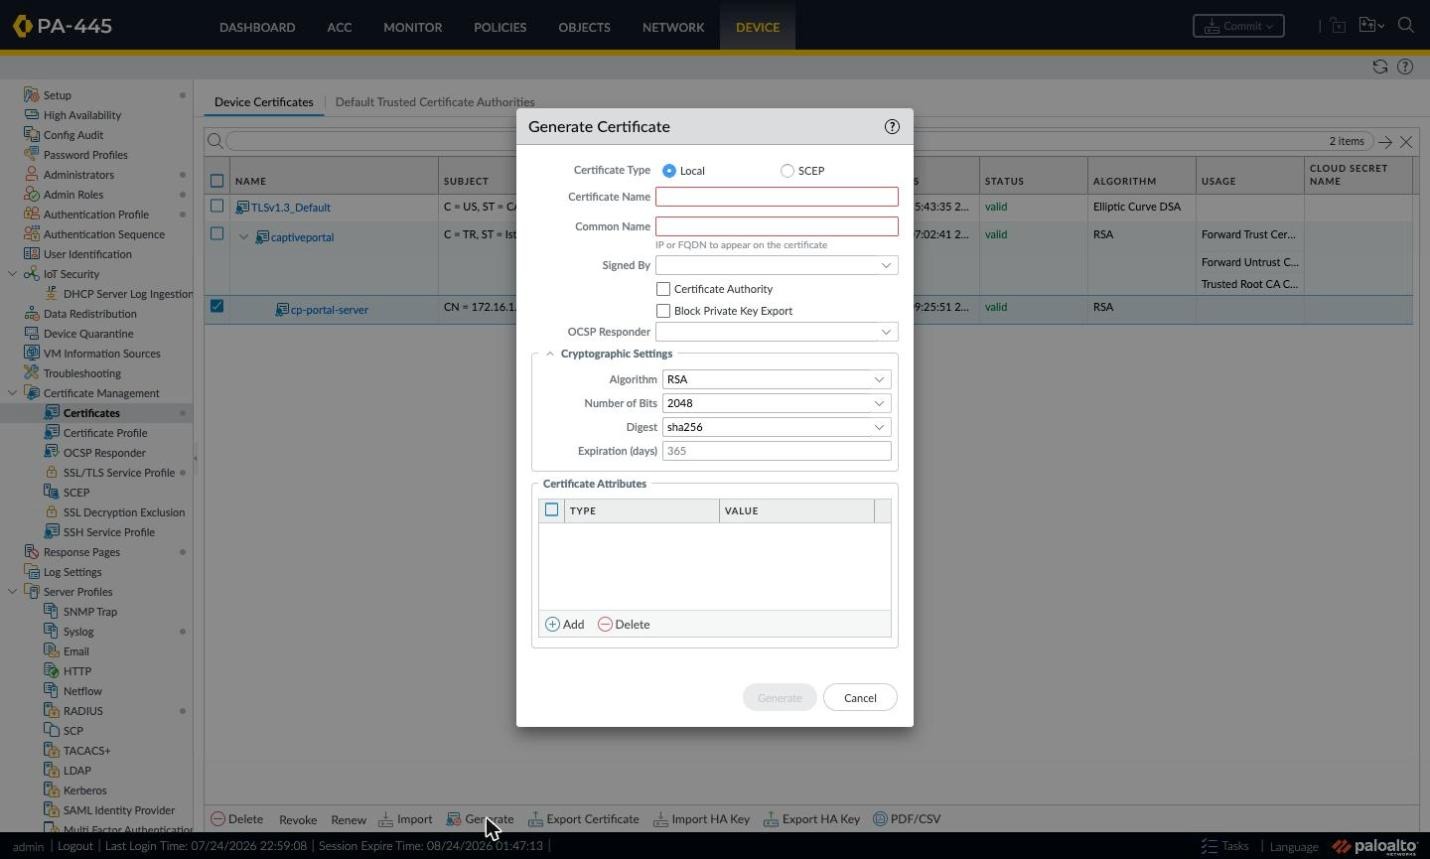
Figure 24: Empty Generate Certificate window.
Create the root CA first: enter a Certificate Name and a corporate Common Name, leave Signed By empty (empty = self-signed) and tick Certificate Authority. Use a long Expiration for a CA — the example uses 3650 days. RSA 2048 with sha256 is compatible with current clients.
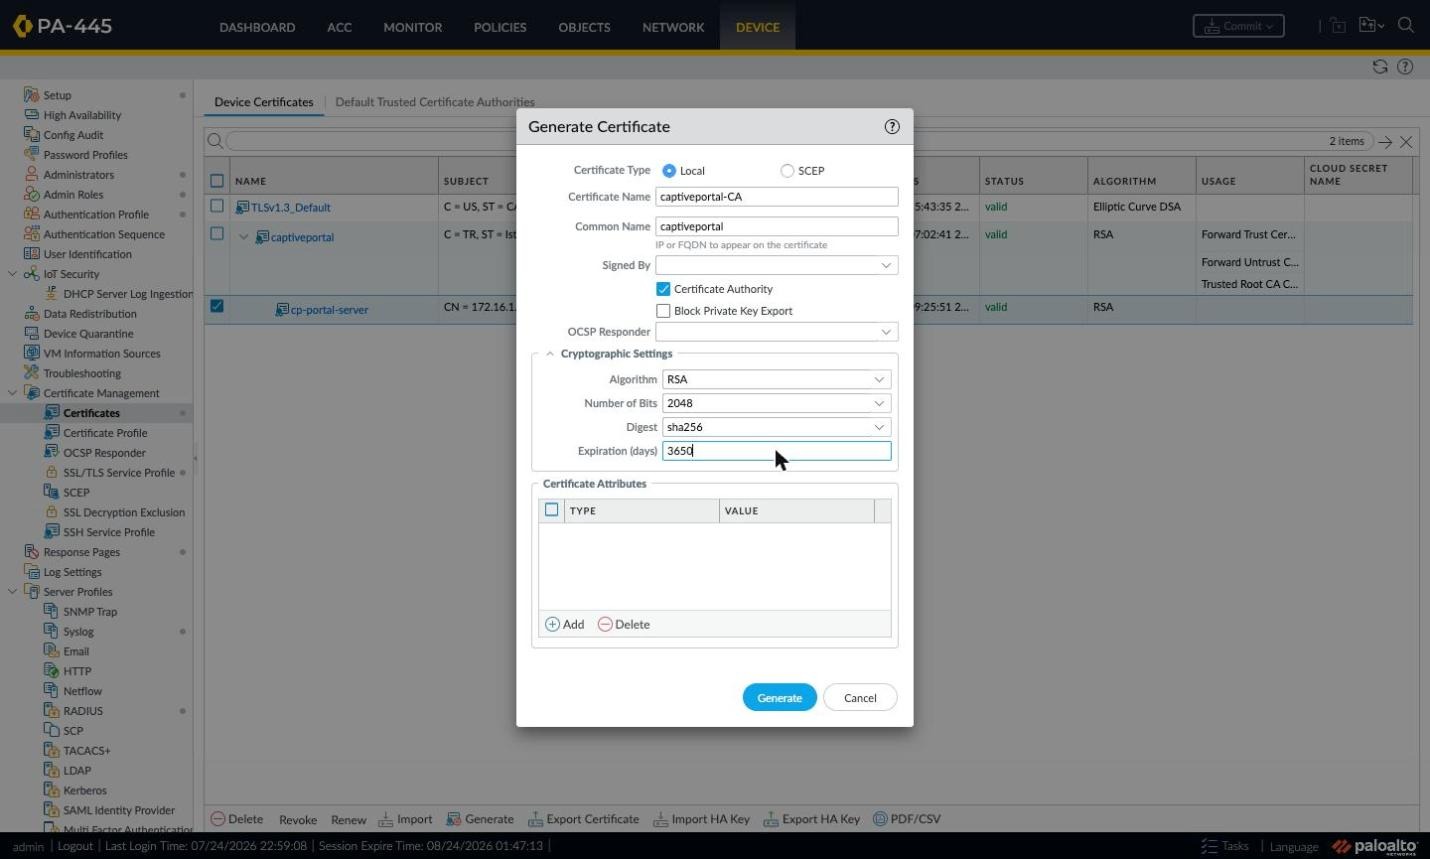
Figure 25: Generating the root CA.
Then the portal server certificate: this time do not tick Certificate Authority, and pick the root CA you just created under Signed By. The list also offers External Authority (CSR) if you want a public CA to sign it.
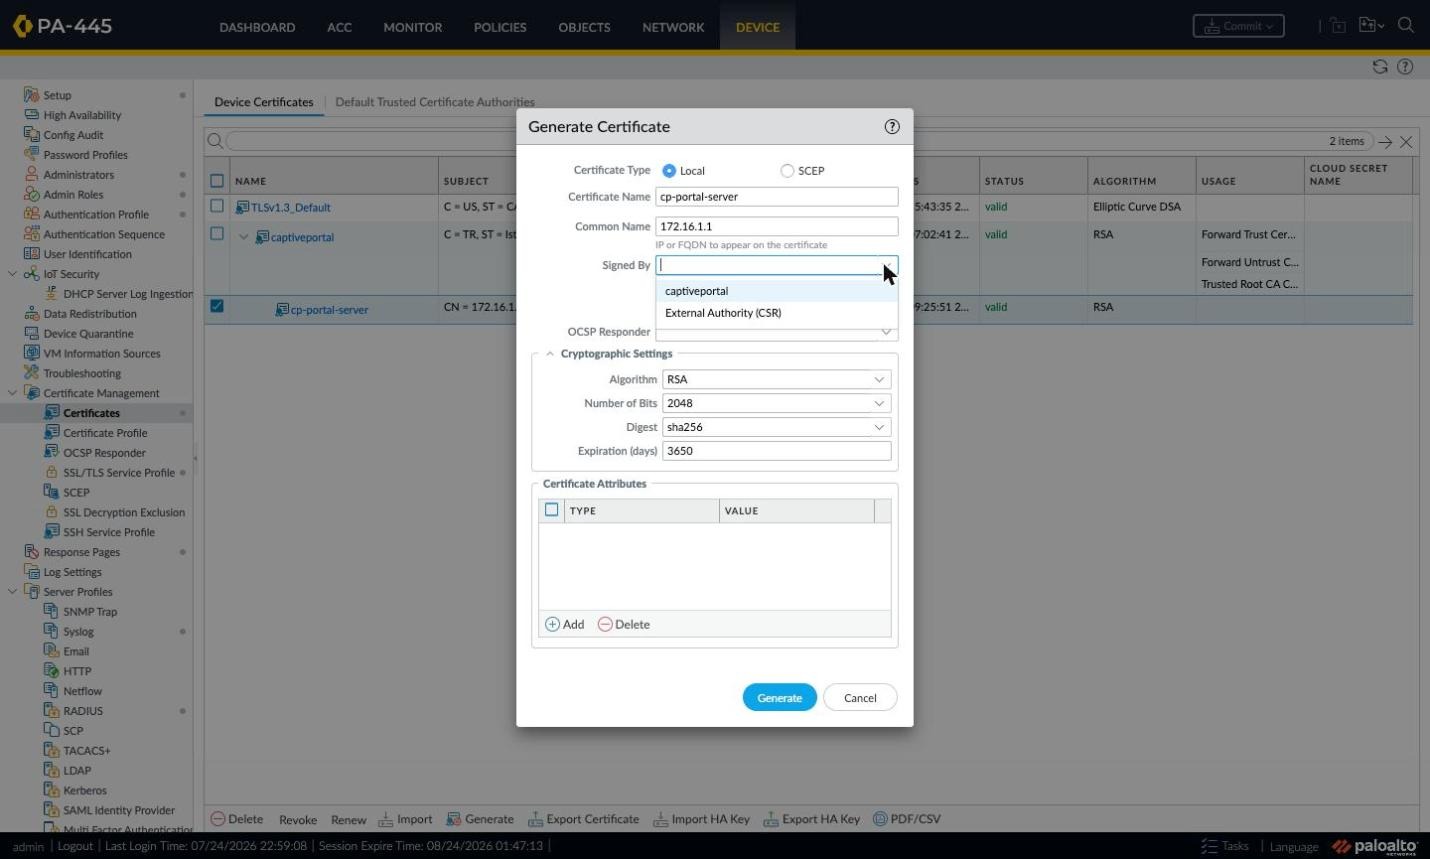
Figure 26: Signed By selection.
The critical detail is the Certificate Attributes table. The Type list offers Country, State, Locality, Organization, Department, Email, Host Name (DNS SAN), IP (IP Address SAN) and Alt Email. The official documentation suggests adding the redirect interface's IP as a SAN. HOWEVER, on the public-CA path do NOT put a private IP in the SAN: public CAs cannot issue for RFC1918 private IPs and may reject the CSR. Put only the FQDN (as a dNSName / Host Name) in the SAN; the guest arrives via the FQDN anyway. Because modern browsers ignore the Common Name, a certificate without the dNSName SAN is treated as invalid. (Adding an IP SAN only makes sense when you sign with your own internal CA.)
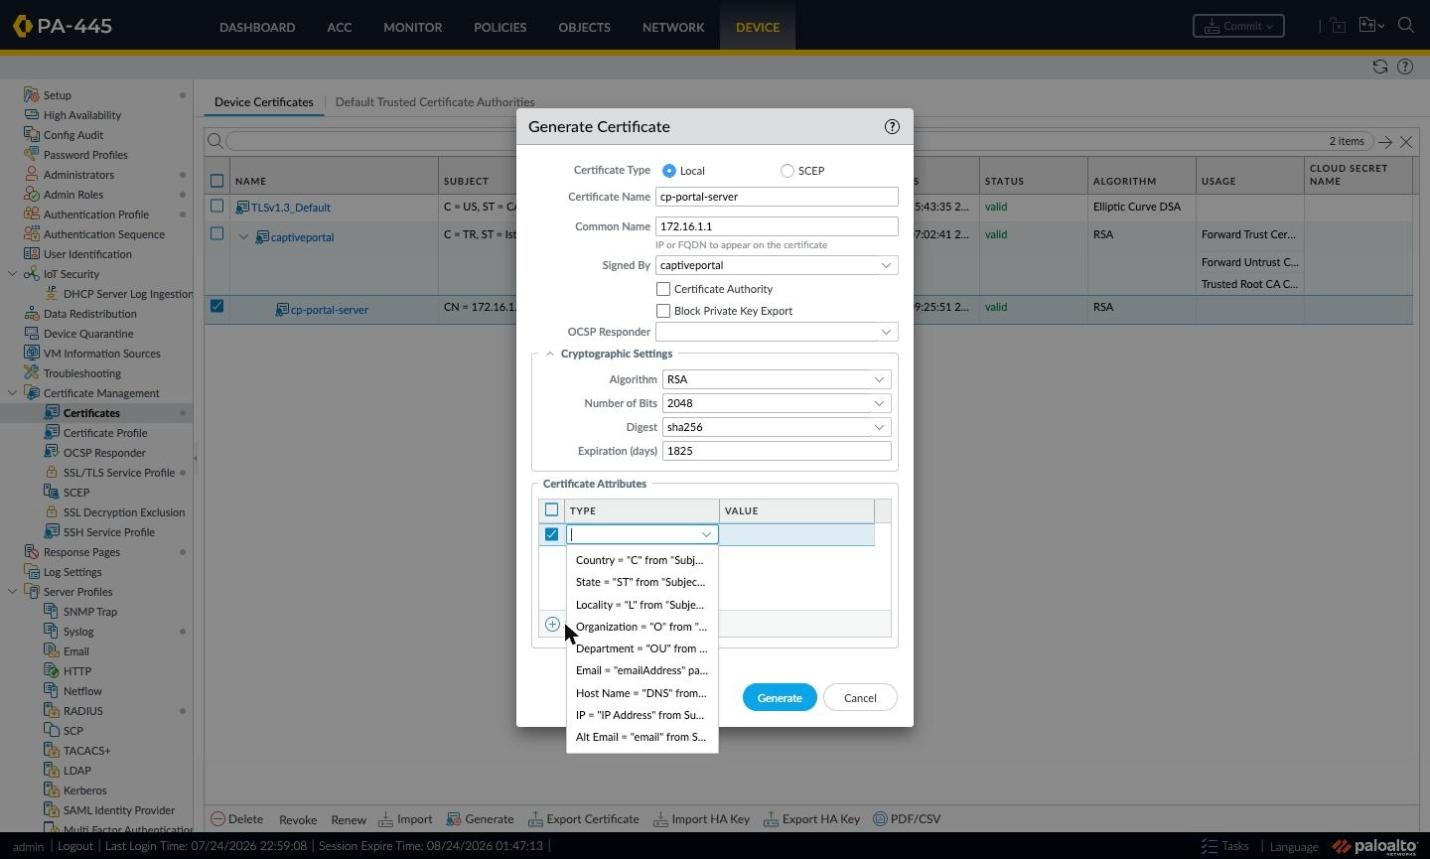
Figure 27: Certificate Attributes type options.
After picking the type, double-click the VALUE cell to edit it — a single click does not enter edit mode and this trips many people. The completed form shows the certificate name, the redirect target as Common Name, the root CA under Signed By and the SAN IP in the attributes row. Generate produces the key pair.
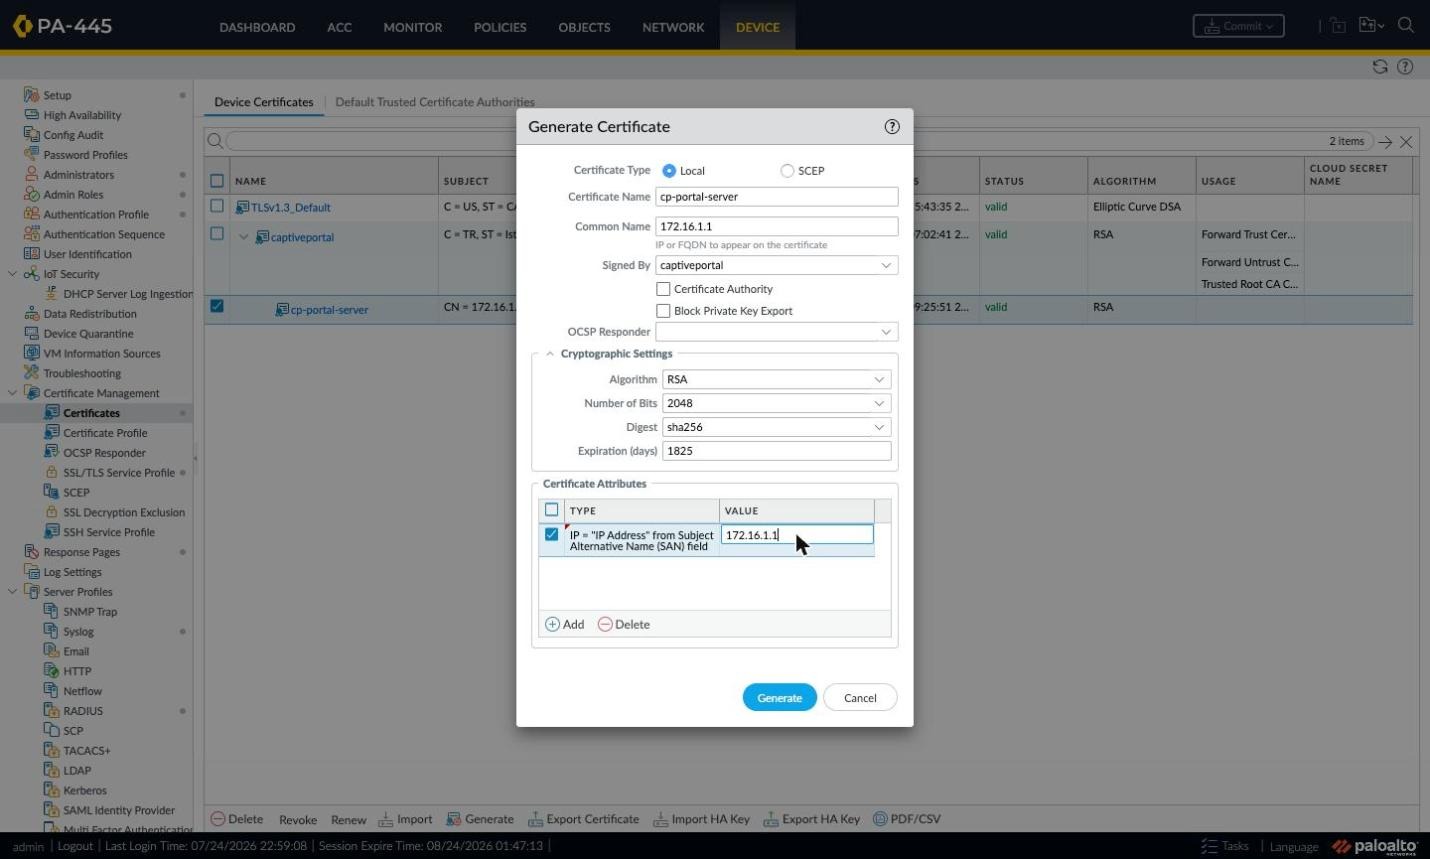
Figure 28: Completed portal server certificate form.
Clicking the root CA shows its information window: Certificate Authority ticked and greyed. The Forward Trust / Forward Untrust / Trusted Root CA boxes below relate to SSL Forward Proxy decryption. If you will run decryption together with Captive Portal, remember the official warning: Authentication Portal redirect does not work with SSL Inbound Inspection — use SSL Forward Proxy.
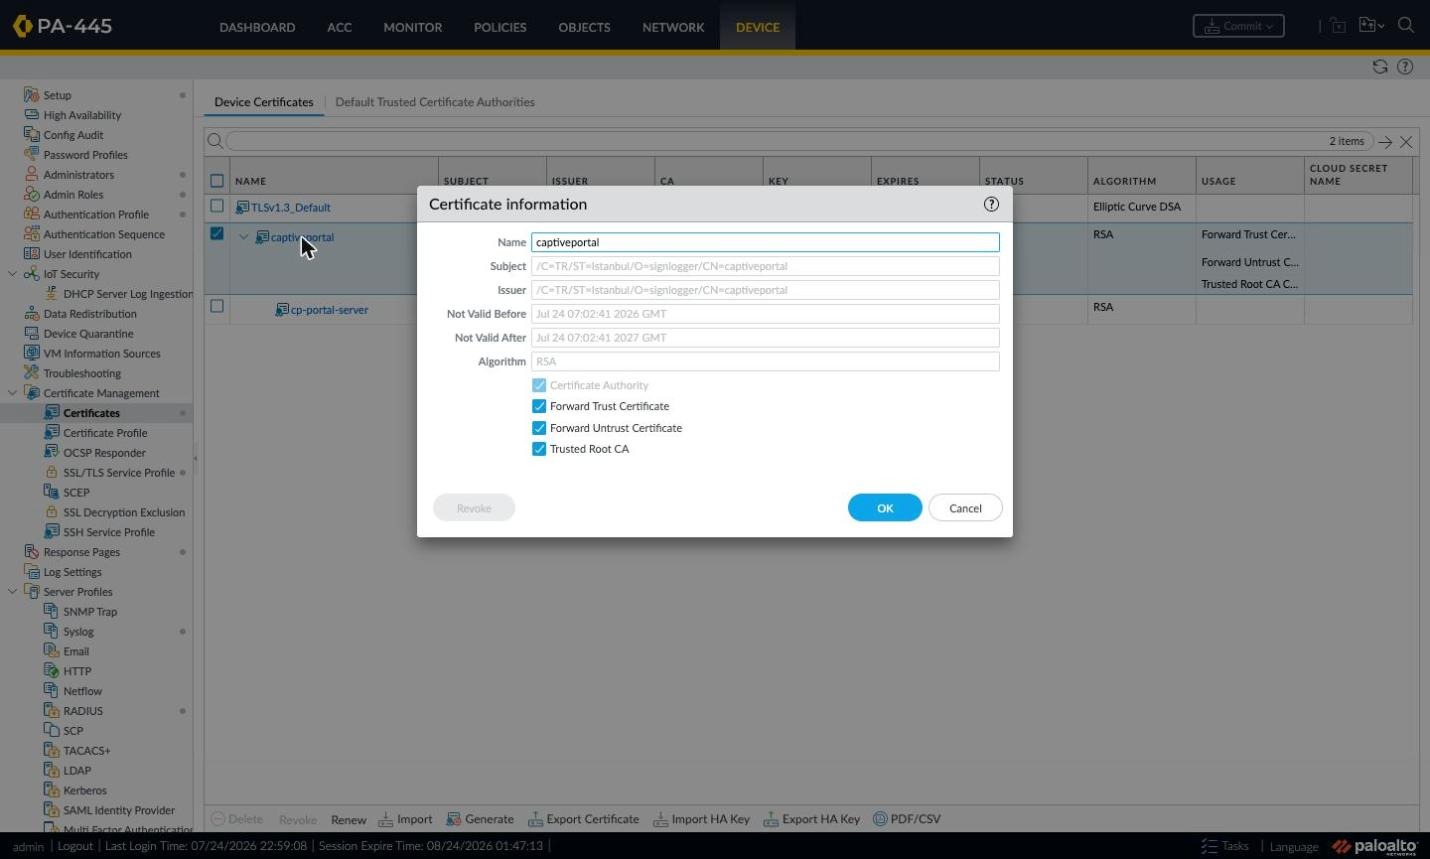
Figure 29: Root CA certificate information.
The portal certificate's window shows the redirect target as Subject and the root CA as Issuer; the CA boxes are empty and inactive because it is an end-entity certificate. Note its validity period — when it expires the portal stops abruptly.
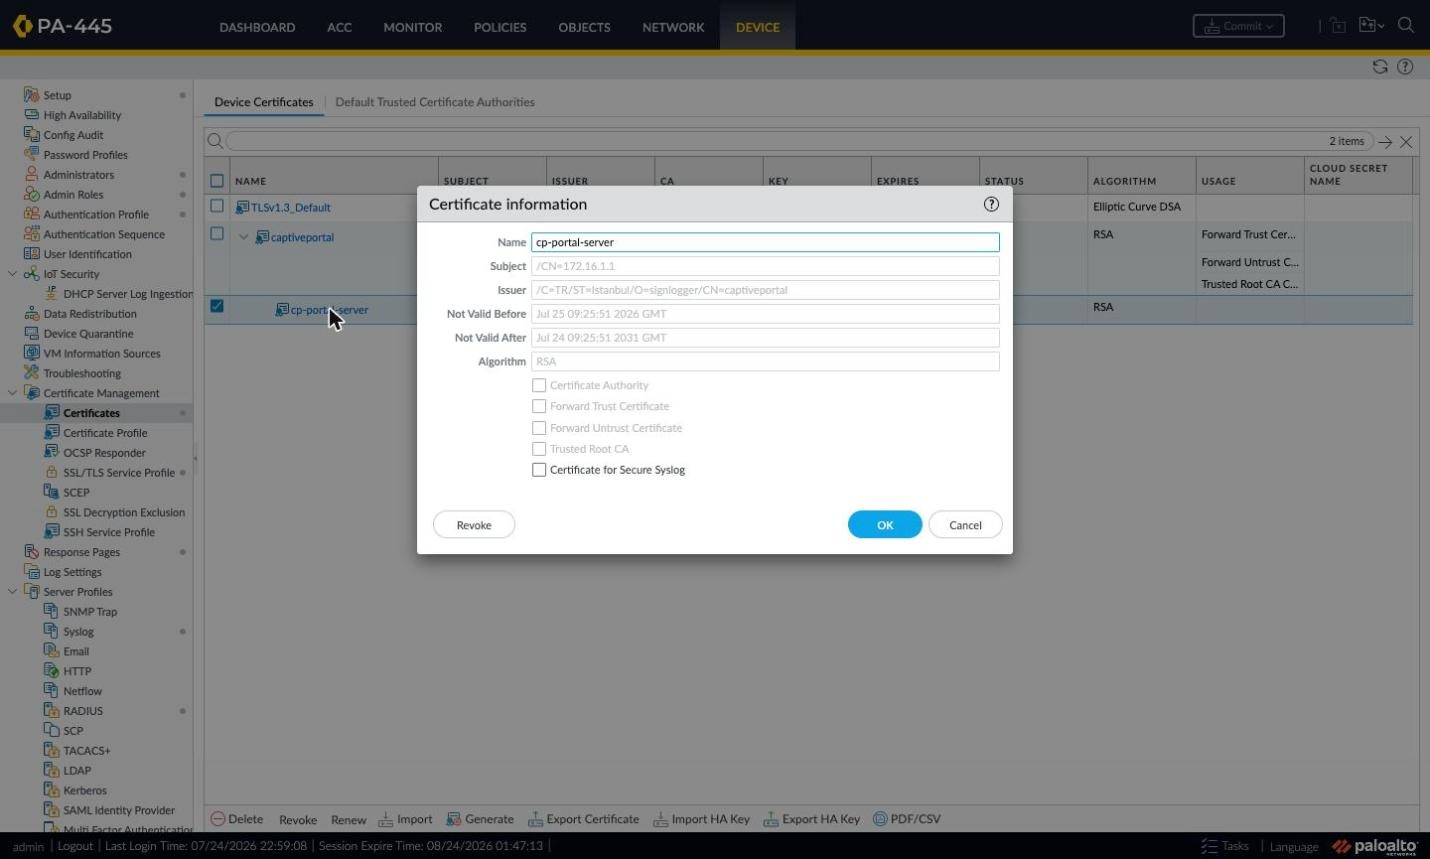
Figure 30: Portal server certificate information.
Step 2.6 — Creating the SSL/TLS Service Profile
The certificate becomes usable by Captive Portal through an SSL/TLS Service Profile. Device > Certificate Management > SSL/TLS Service Profile lists profiles, their certificates and protocol ranges. The predefined TLSv1.3_Default exists, but create your own profile for the portal.
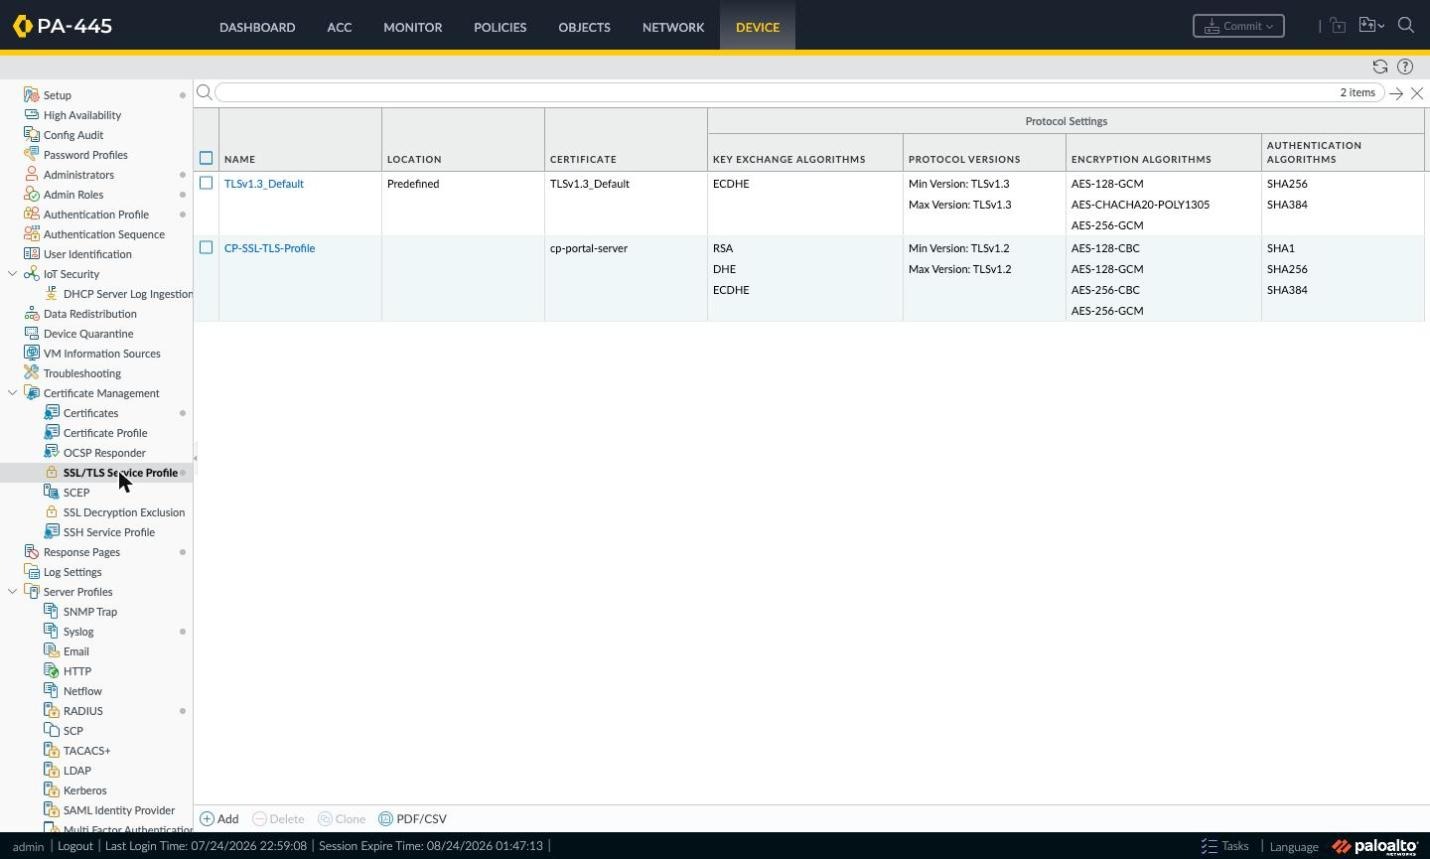
Figure 31: SSL/TLS Service Profile list.
In the Add window pick a Name and select the portal server certificate. Under Protocol Settings choose Min/Max versions. Officially, without a profile the firewall defaults to TLS 1.2. Setting both Min and Max to TLSv1.2 gives the widest client compatibility in the lab; TLSv1.3 as Max is fine unless you have very old clients.
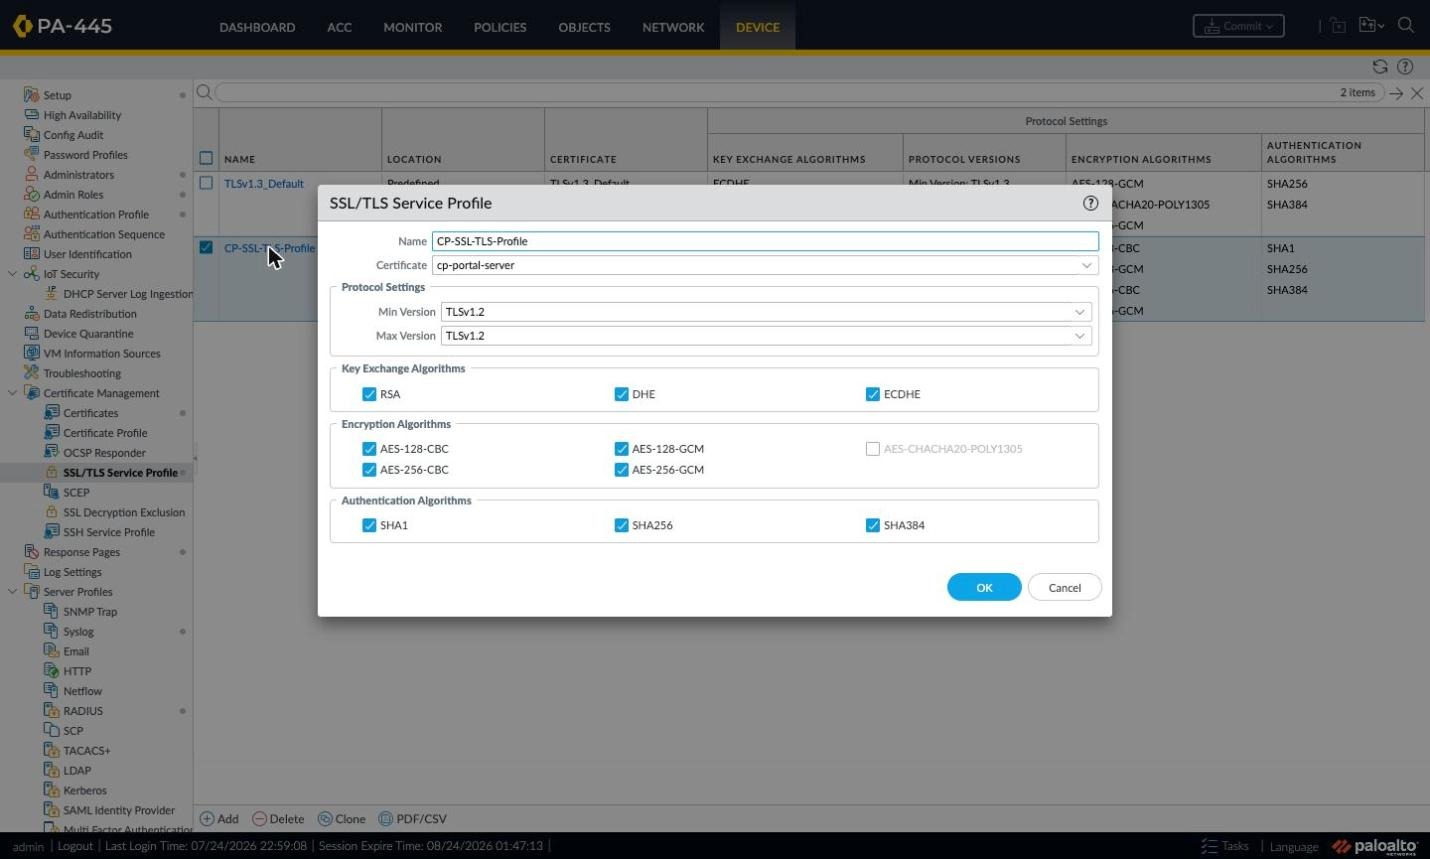
Figure 32: SSL/TLS Service Profile window.
Step 2.7 — Local User Database (Optional RADIUS Alternative)
For a quick test without RADIUS or LDAP you can use the firewall's local user database under Device > Local User Database > Users. Not scalable for production, but ideal for proof of concept.
Note: this step is optional. In the architecture built in this guide authentication runs over RADIUS, so you don't need the local database in production. Still, we recommend keeping one local user defined: it lets you isolate faults quickly when the portal misbehaves — if the local user can sign in, the problem is on the RADIUS side; if not, it is in the portal page, certificate or policy. Treat this section as a troubleshooting aid, not a required step.
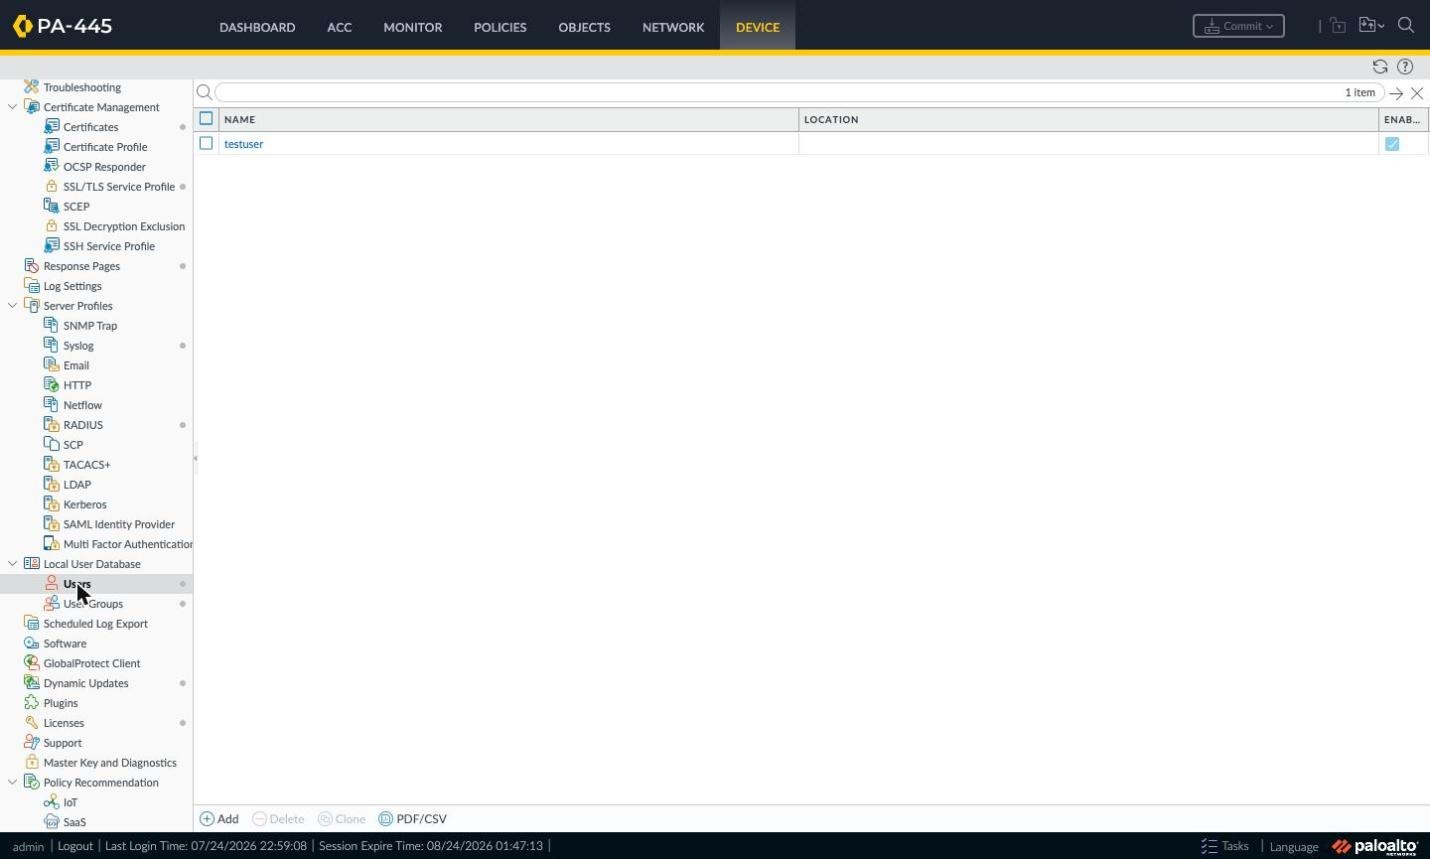
Figure 33: Device > Local User Database > Users.
The Local User window takes a username, mode and password; Mode selects between a clear-text password or a pre-computed hash.
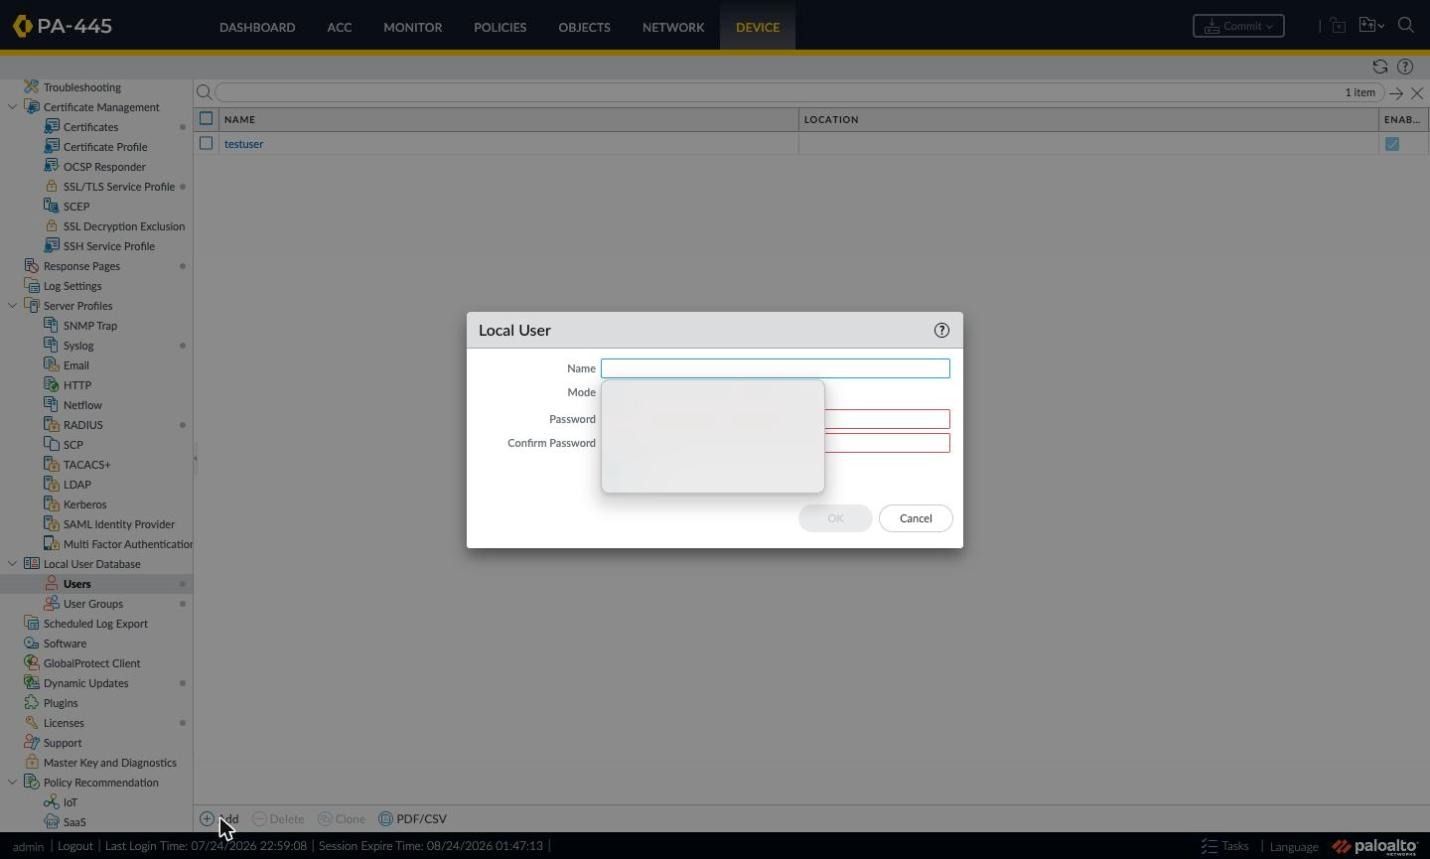
Figure 34: Local User window.
Grouping users beats using them one by one in policy. User Groups lists local groups and their members.
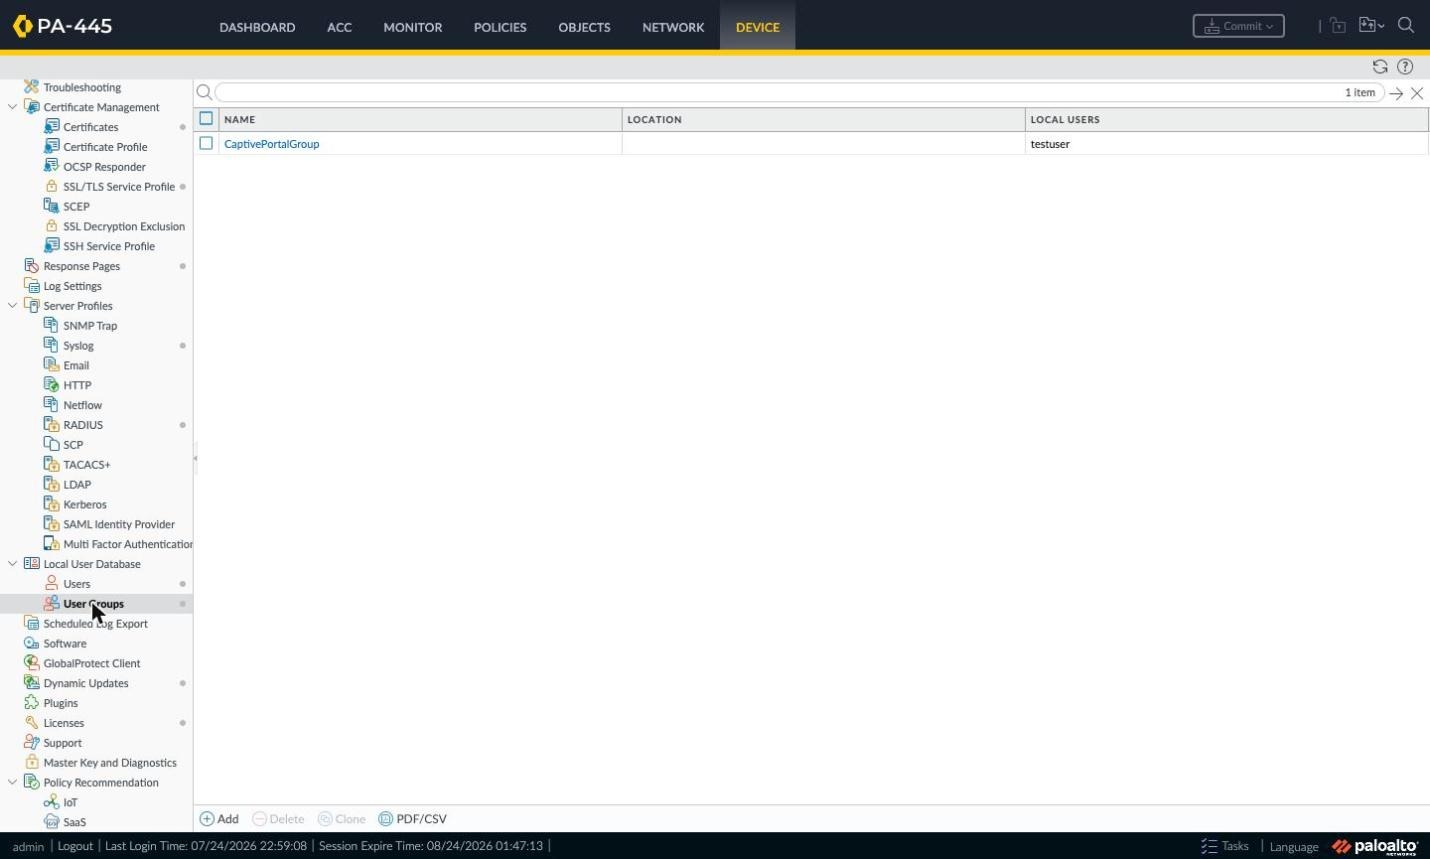
Figure 35: Device > Local User Database > User Groups.
In the Local User Group window name the group and add members from All Local Users; the group can then be used in the Authentication Profile Allow List and in Security Policy.
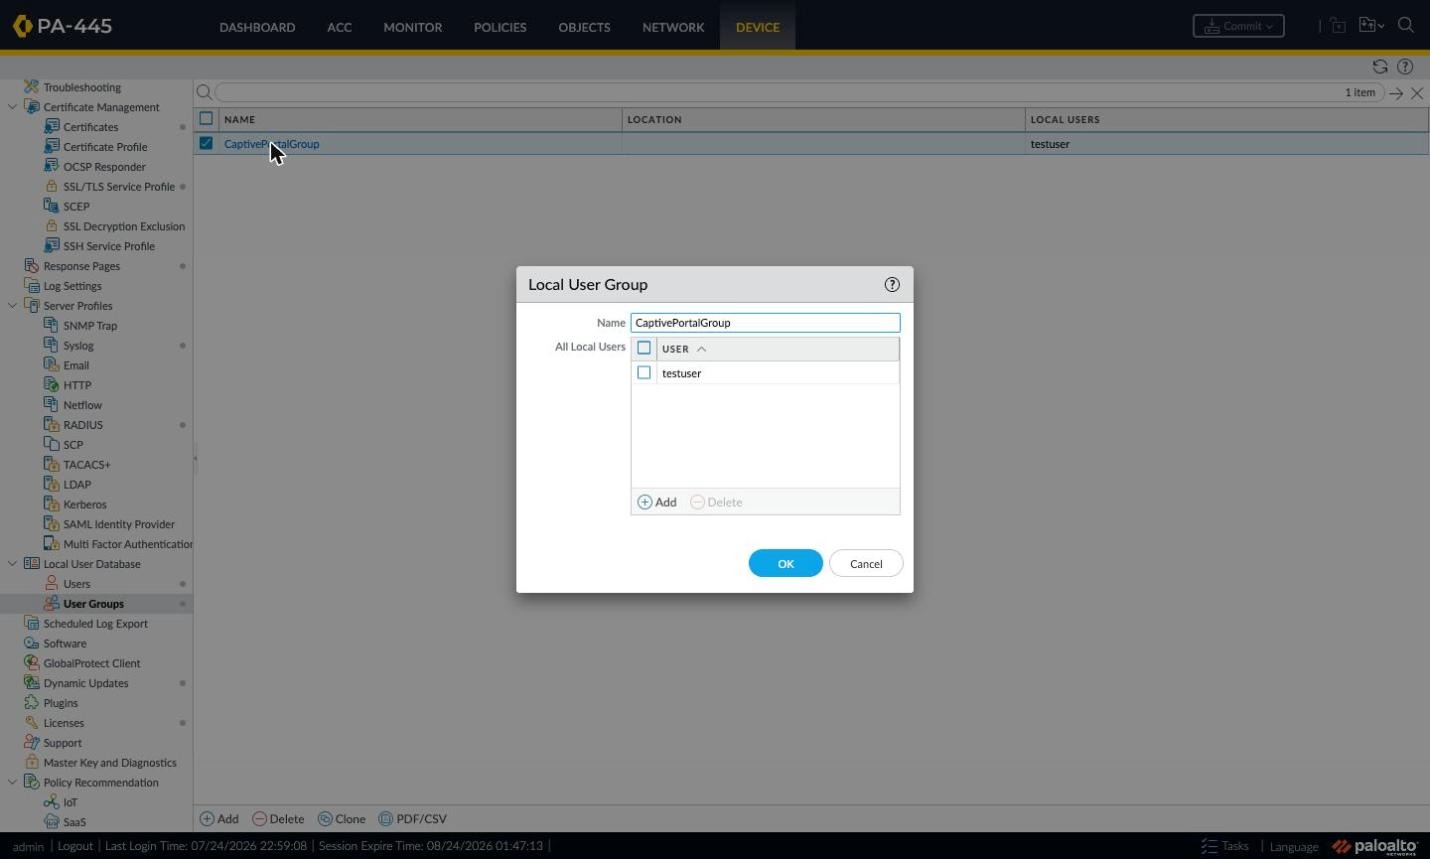
Figure 36: Local User Group window.
Step 2.8 — Authentication Profile for Captive Portal
Create the Authentication Profile the portal will use. For RADIUS use the profile from Part 1; for local-database testing set Type to Local Database. Leaving Username Modifier at %USERINPUT% passes the typed username through unchanged.
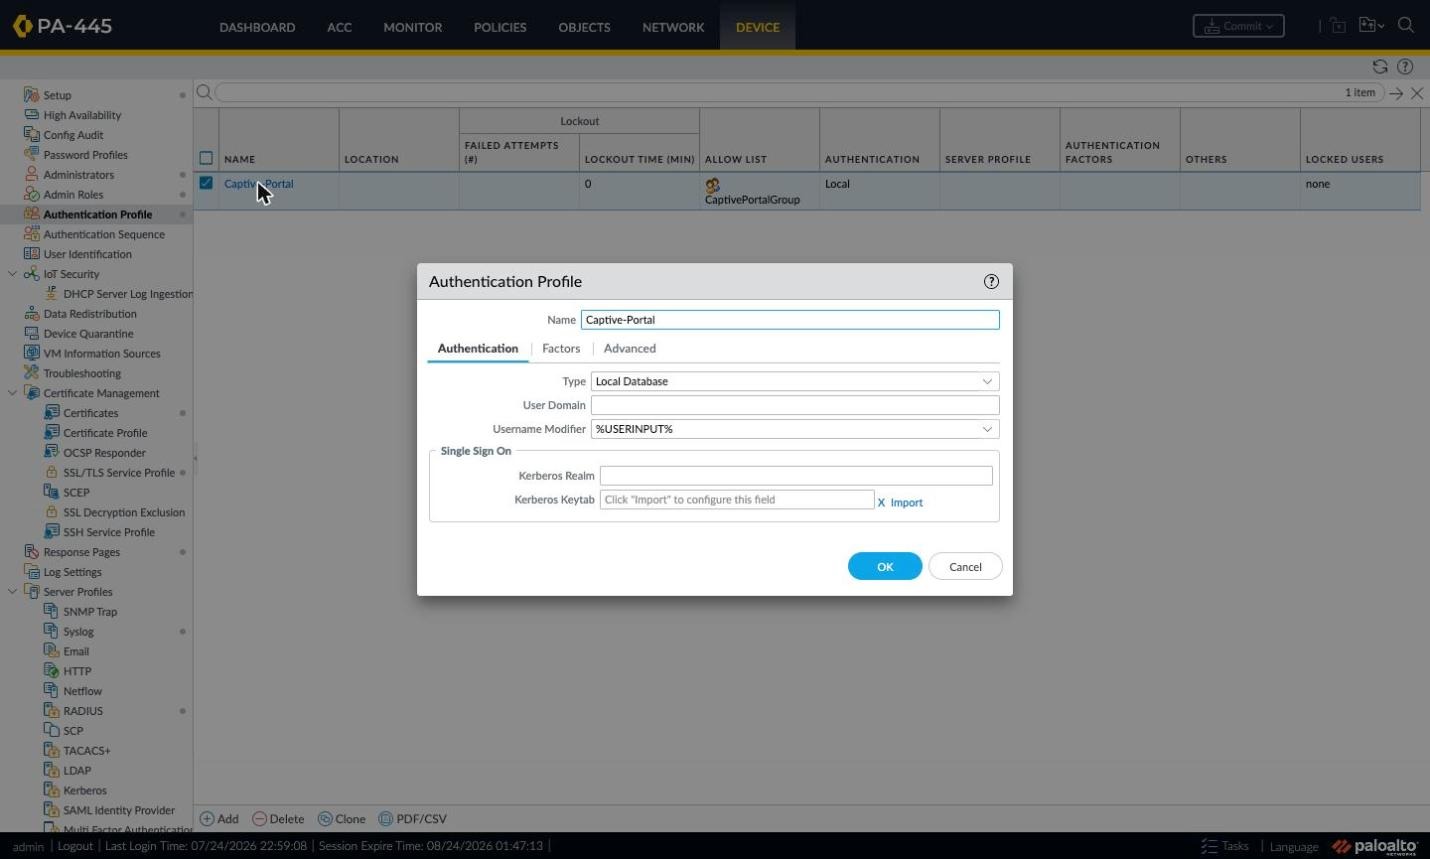
Figure 37: Authentication Profile for Captive Portal (Local Database).
On Advanced, add the user group to the Allow List. Skipping this is one of the most common captive portal mistakes: everything looks right, the user types the correct password, and access is still denied.
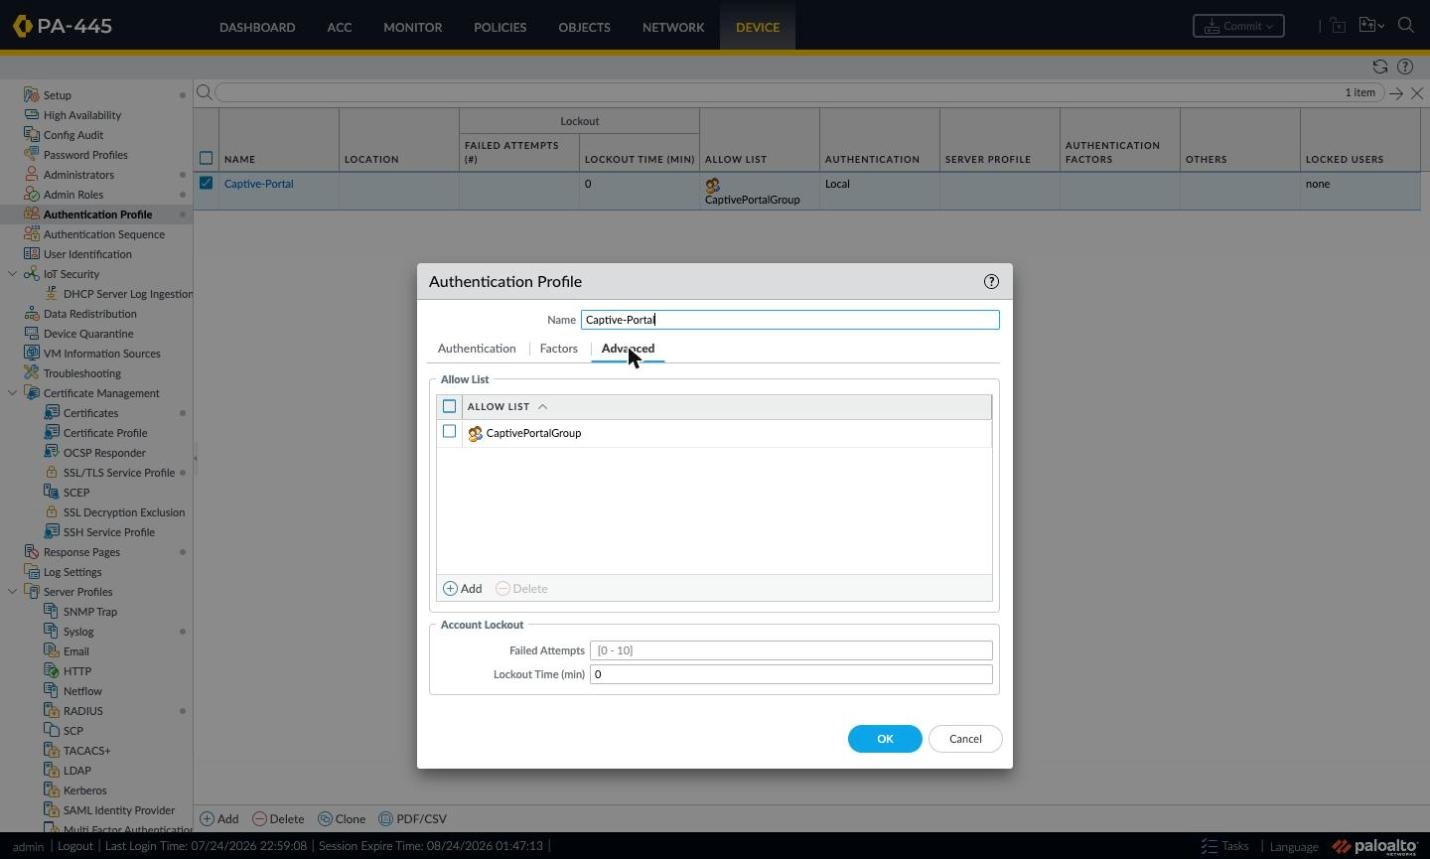
Figure 38: Advanced tab and the Allow List.
Step 2.9 — Authentication Portal Settings
The heart of the setup: Device > User Identification > Authentication Portal Settings. The summary shows whether the portal is enabled, the mapping timer, idle timer, chosen SSL/TLS profile, authentication profile, mode and redirect host at a glance.
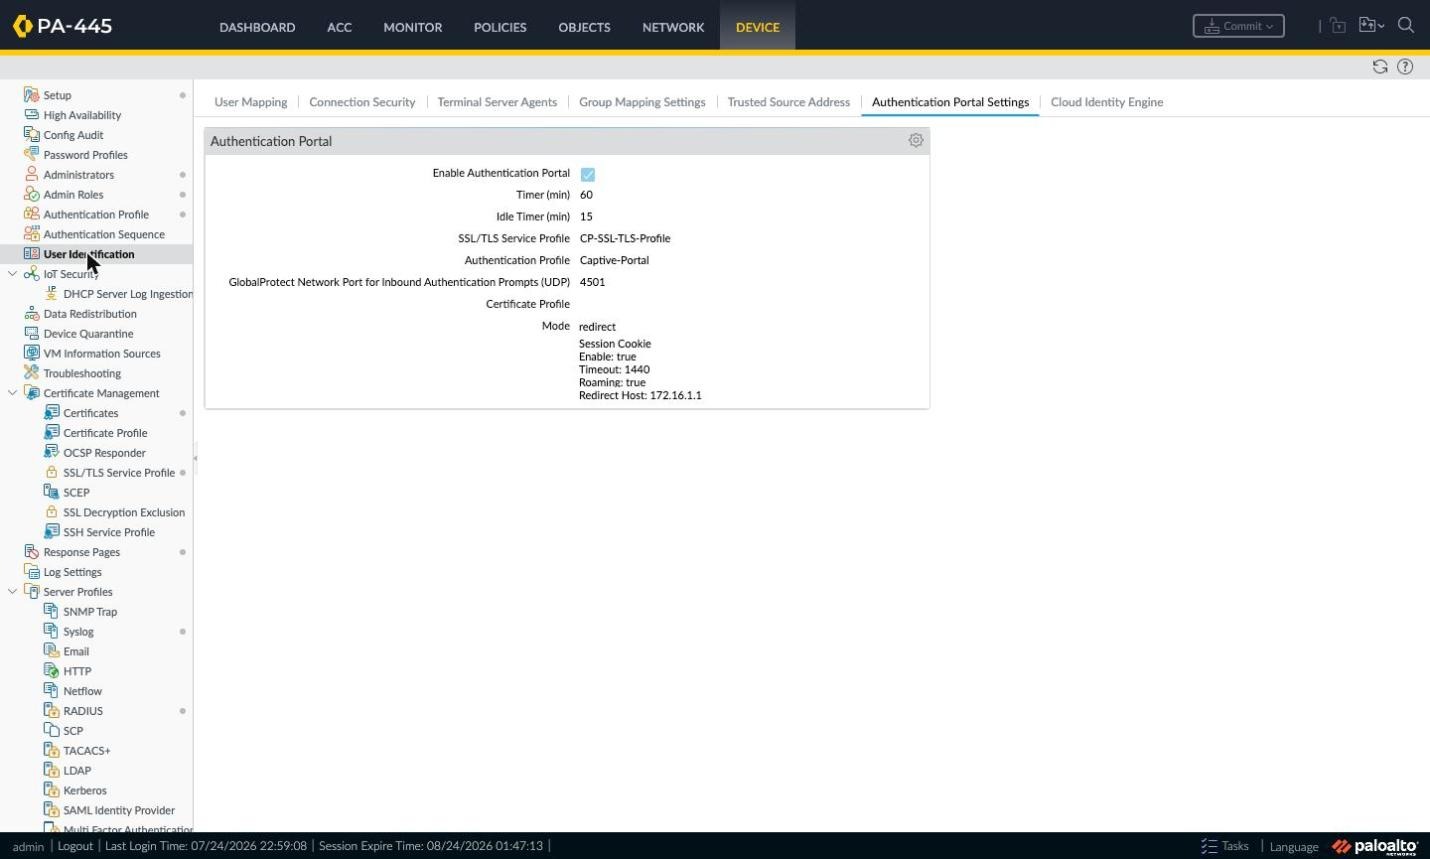
Figure 39: Authentication Portal Settings summary.
Click the gear to edit. Tick Enable Authentication Portal. Timer is how many minutes the IP-user mapping is kept after sign-in (default 60, range 1–1440); Idle Timer drops idle sessions. Select your SSL/TLS Service Profile — leaving it empty is the most common redirect-mode gap. Assign the Authentication Profile. Choose Redirect as Mode and enter the Layer 3 interface IP (or a hostname resolving to it) as Redirect Host. Session Cookie / Enable spares users from re-entering credentials on every request; Roaming keeps the cookie valid across IP changes.
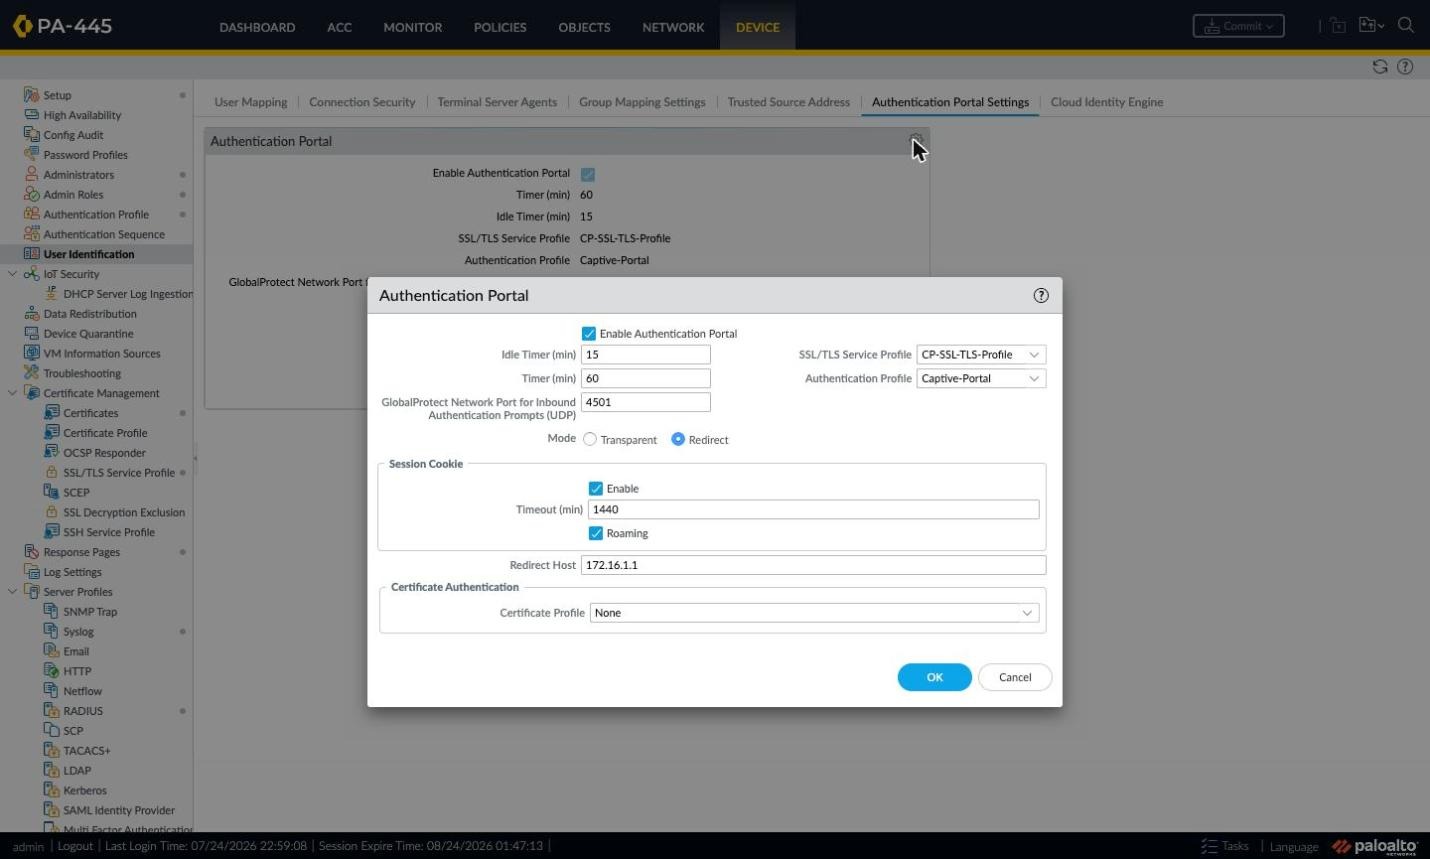
Figure 40: Authentication Portal edit window.
Step 2.10 — Authentication Enforcement Object
The Authentication Enforcement object decides which method and profile an Authentication Policy rule uses. Objects > Authentication ships three predefined objects: default-web-form, default-browser-challenge and default-no-captive-portal. Per the documentation they use the global portal profile and carry restrictions: per-rule Timeout values are not applied with default objects, and they cannot be used in MFA rules. Creating your own object is best practice.
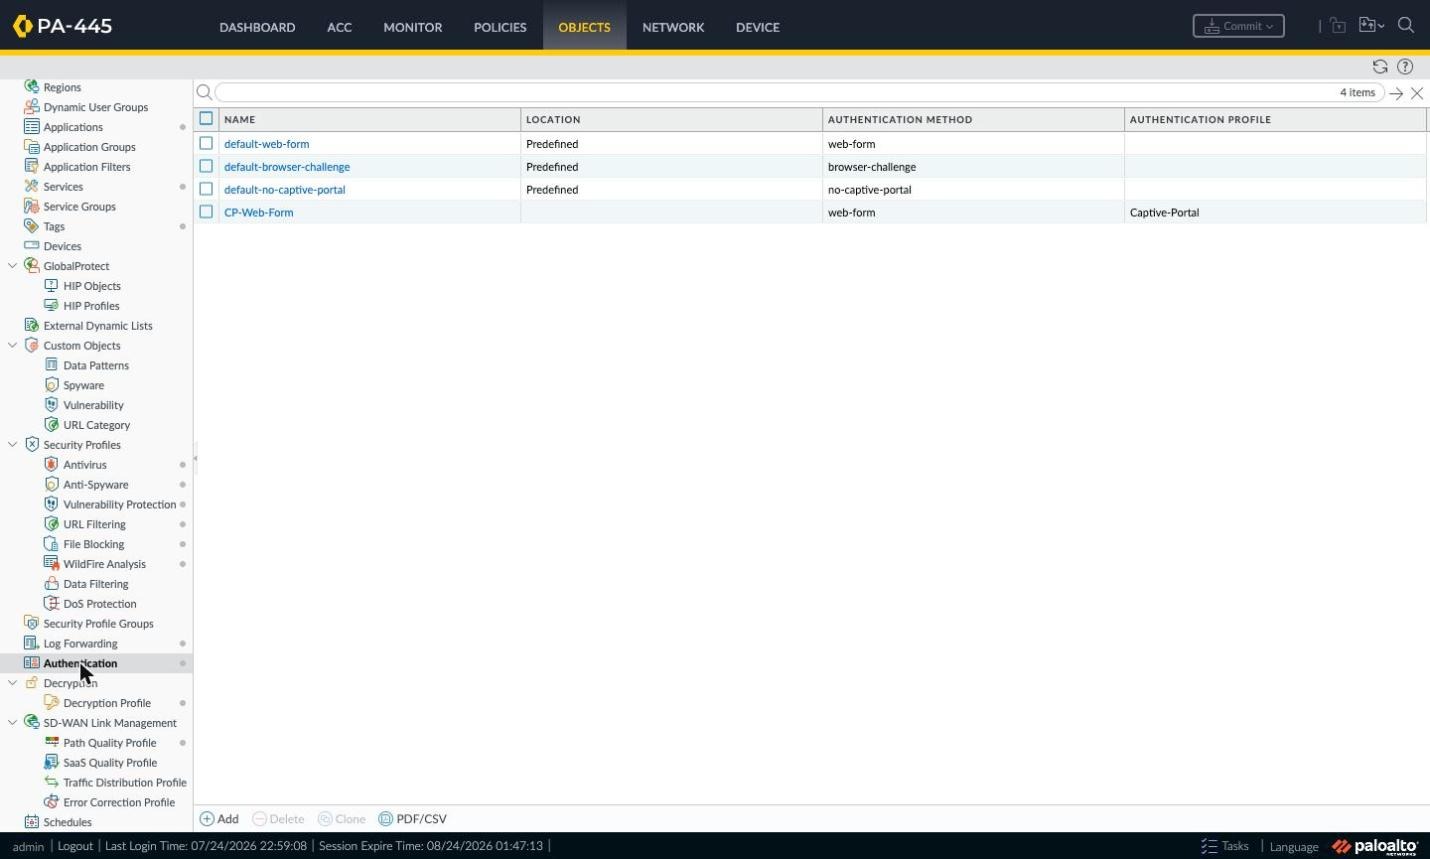
Figure 41: Objects > Authentication list.
In the Add window set a Name, choose web-form as Authentication Method and select the profile. The Message text is shown to users on the portal page — one clear sentence noticeably improves the experience.
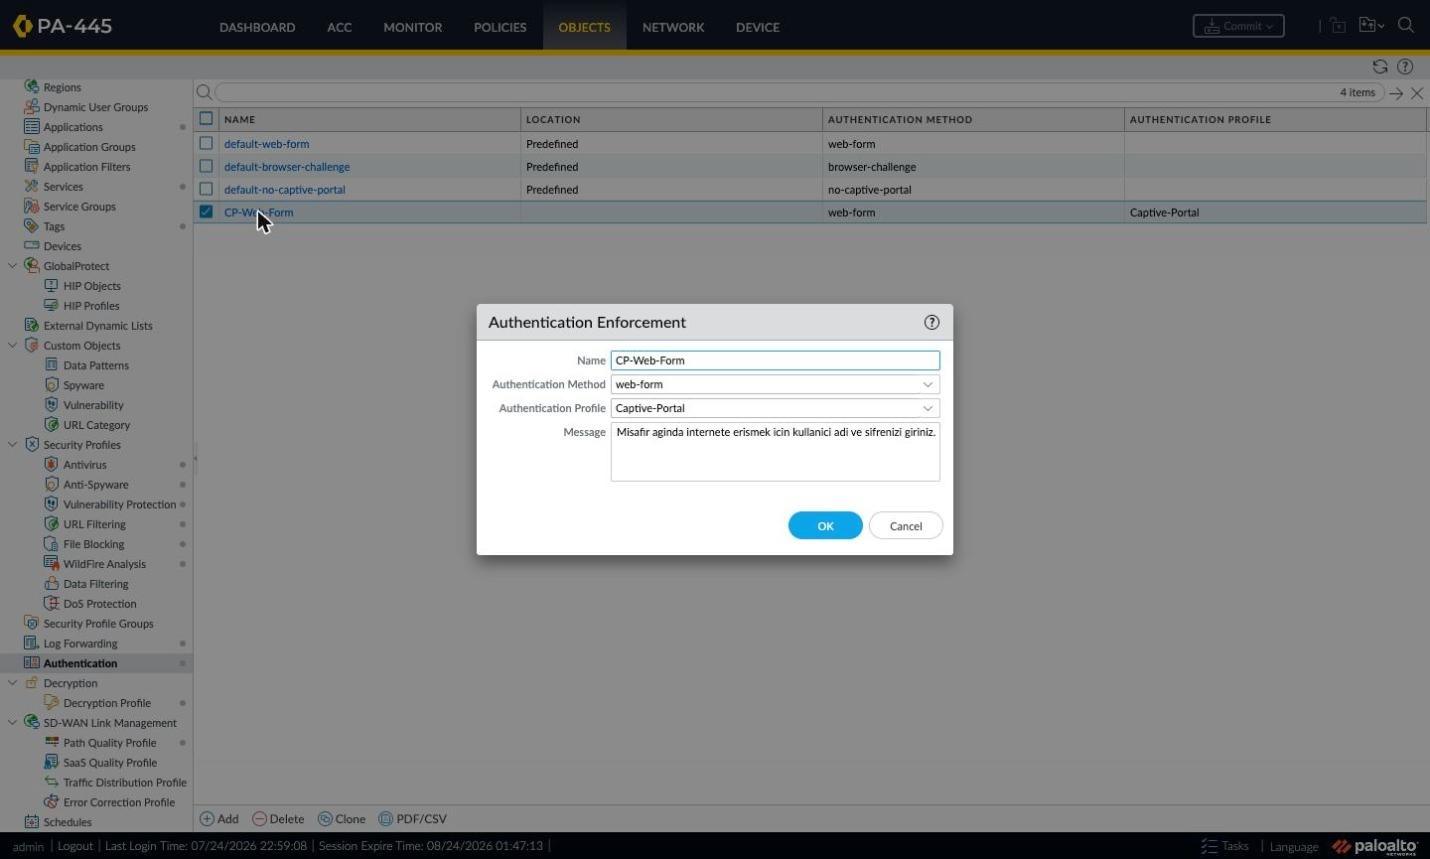
Figure 42: Creating the Authentication Enforcement object.
Step 2.11 — The Authentication Policy Rule
Portal settings alone never show anyone a page — the redirect is triggered by an Authentication Policy rule. Policies > Authentication lists rules with source, destination, service and enforcement columns.
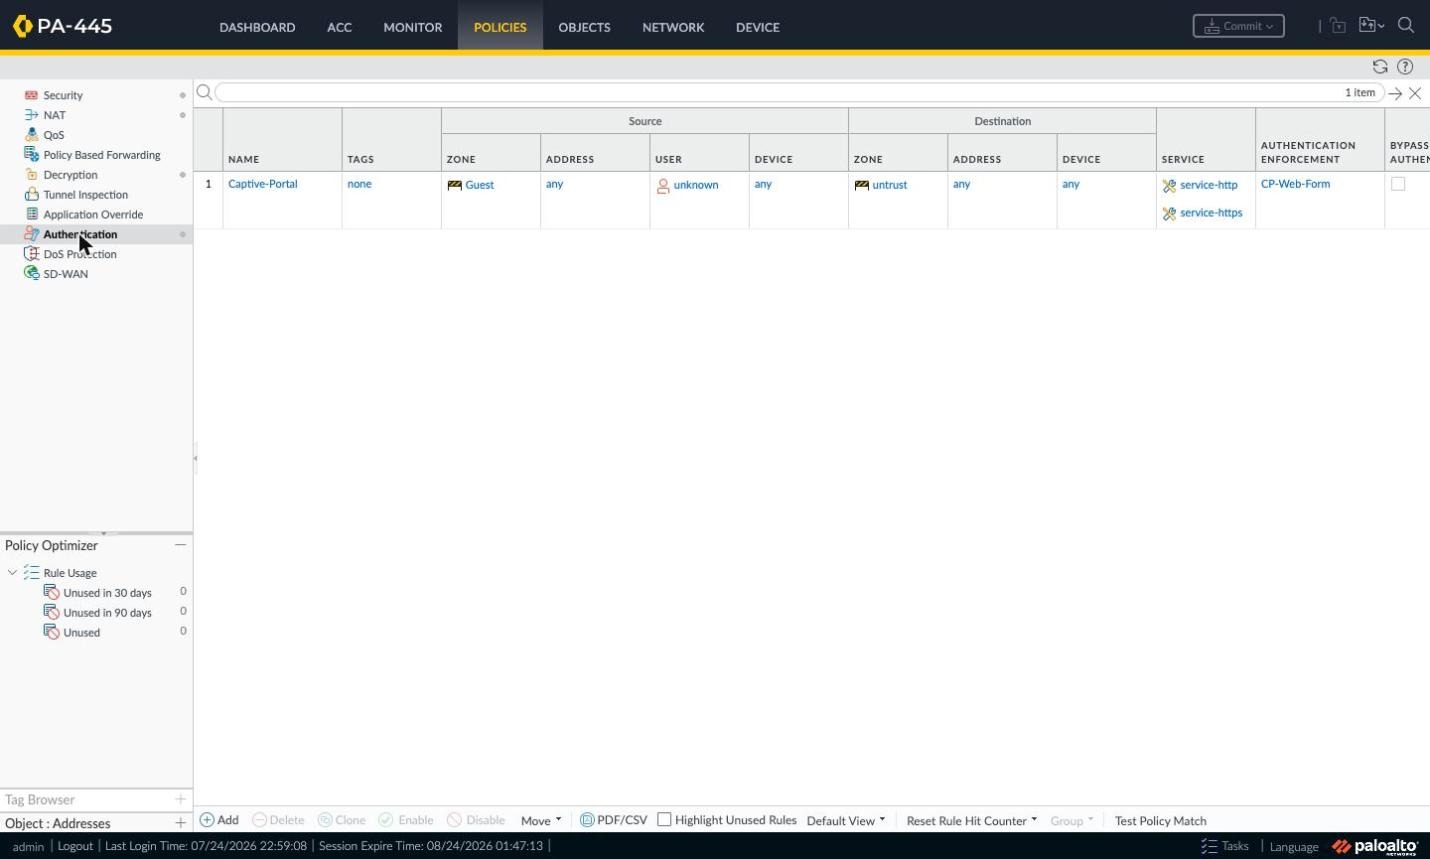
Figure 43: Policies > Authentication rule list.
The rule window has five tabs. On General set the name, description and tags — meaningful names pay off in troubleshooting.
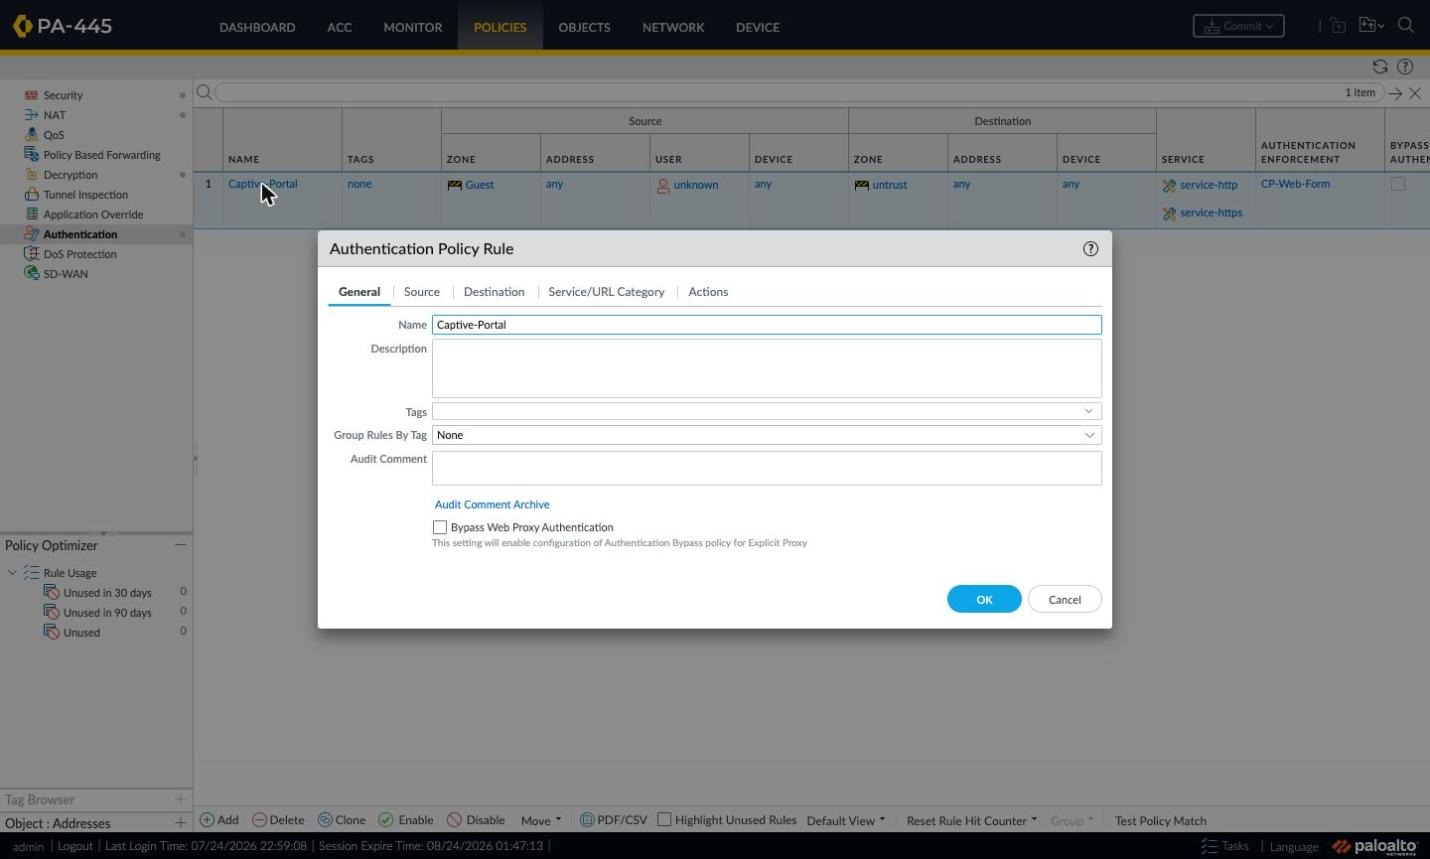
Figure 44: Authentication Policy Rule — General tab.
On Source select the guest zone and set Source User to unknown — the rule then applies only to users not yet identified, so signed-in users don't keep landing on the portal.
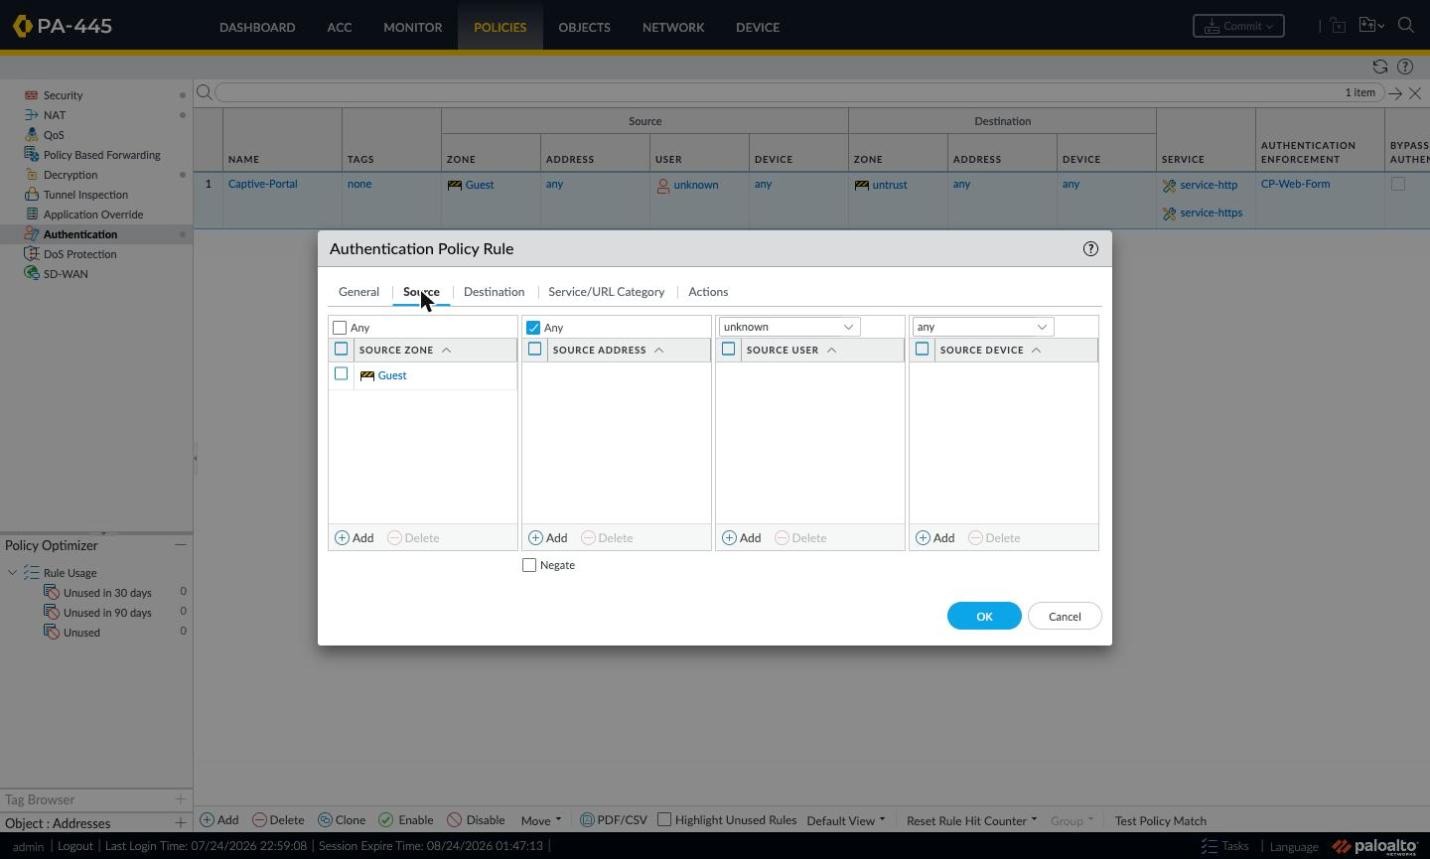
Figure 45: Source tab.
On Destination pick the internet egress zone; leaving the address as any triggers the redirect for every site the user visits.
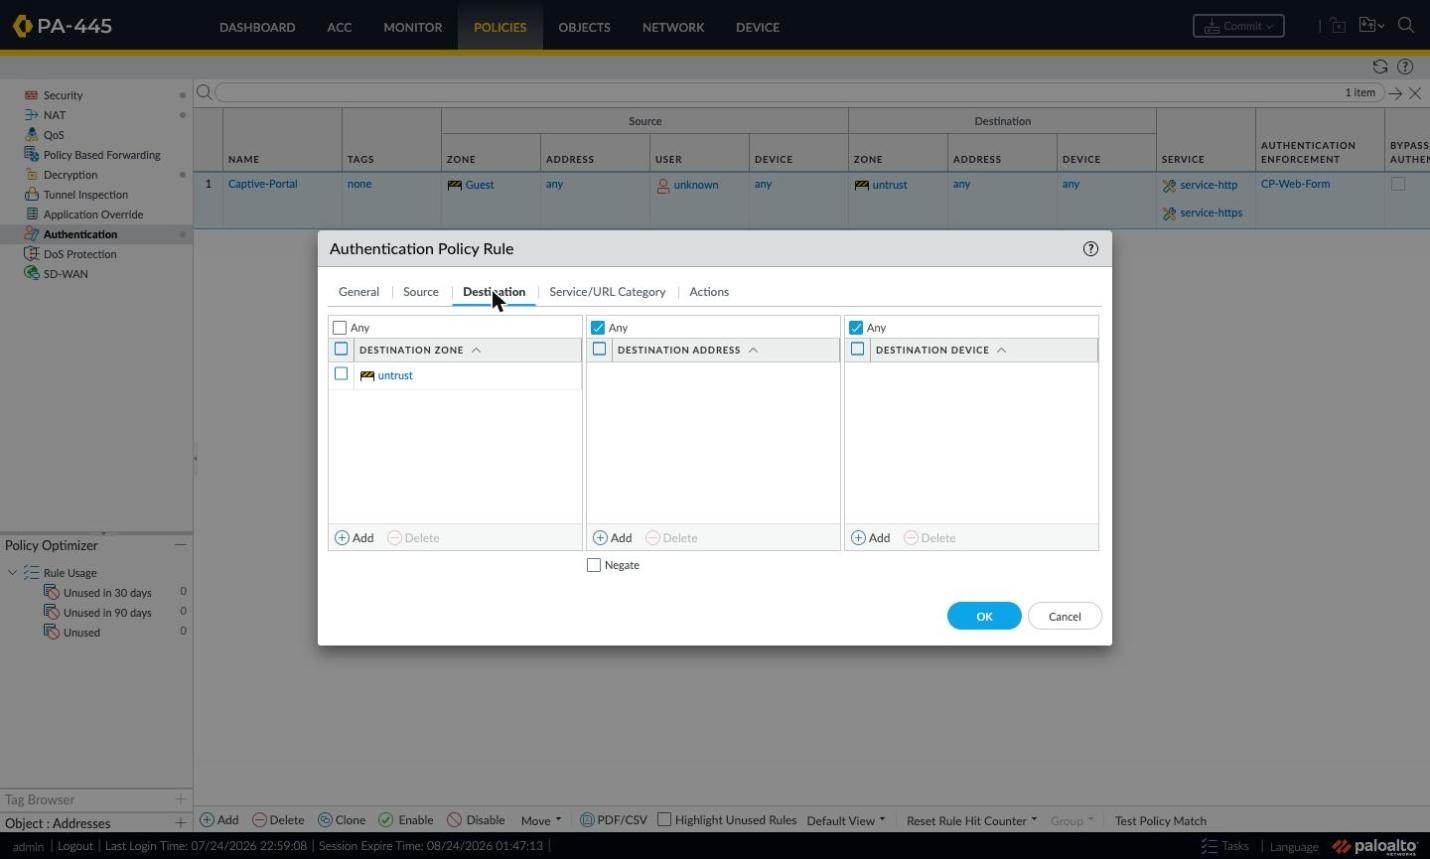
Figure 46: Destination tab.
On Service/URL Category add service-http and service-https. Captive Portal can only redirect web traffic — DNS, NTP and other protocols can't be redirected. The URL Category field can optionally limit authentication to certain categories.
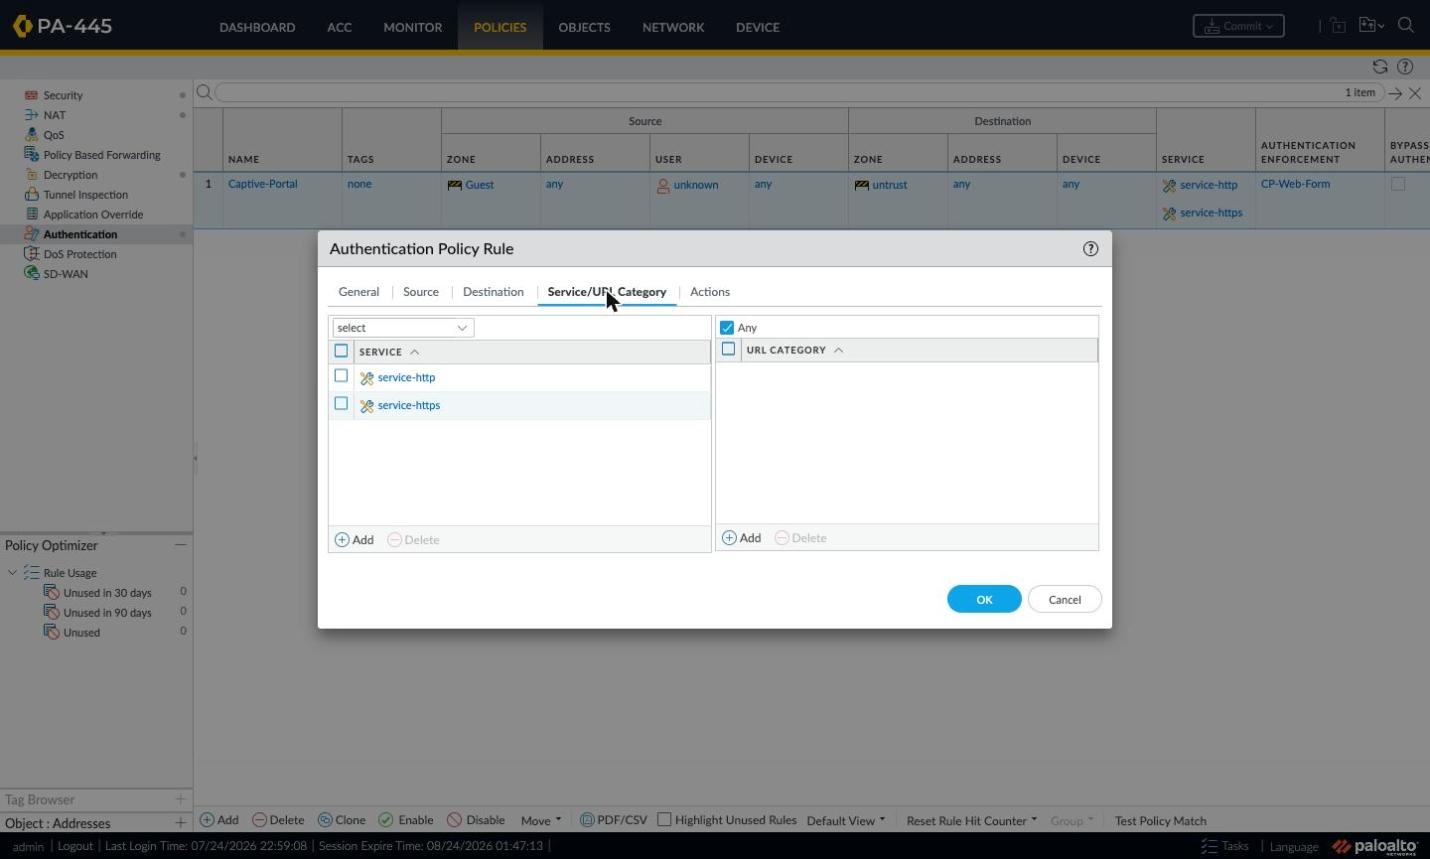
Figure 47: Service/URL Category tab.
Actions defines the behavior: pick your custom Authentication Enforcement object, set the Timeout (minutes before re-authentication), and under Log Settings enable Log Authentication Timeouts plus a Log Forwarding profile — a lifesaver when troubleshooting.
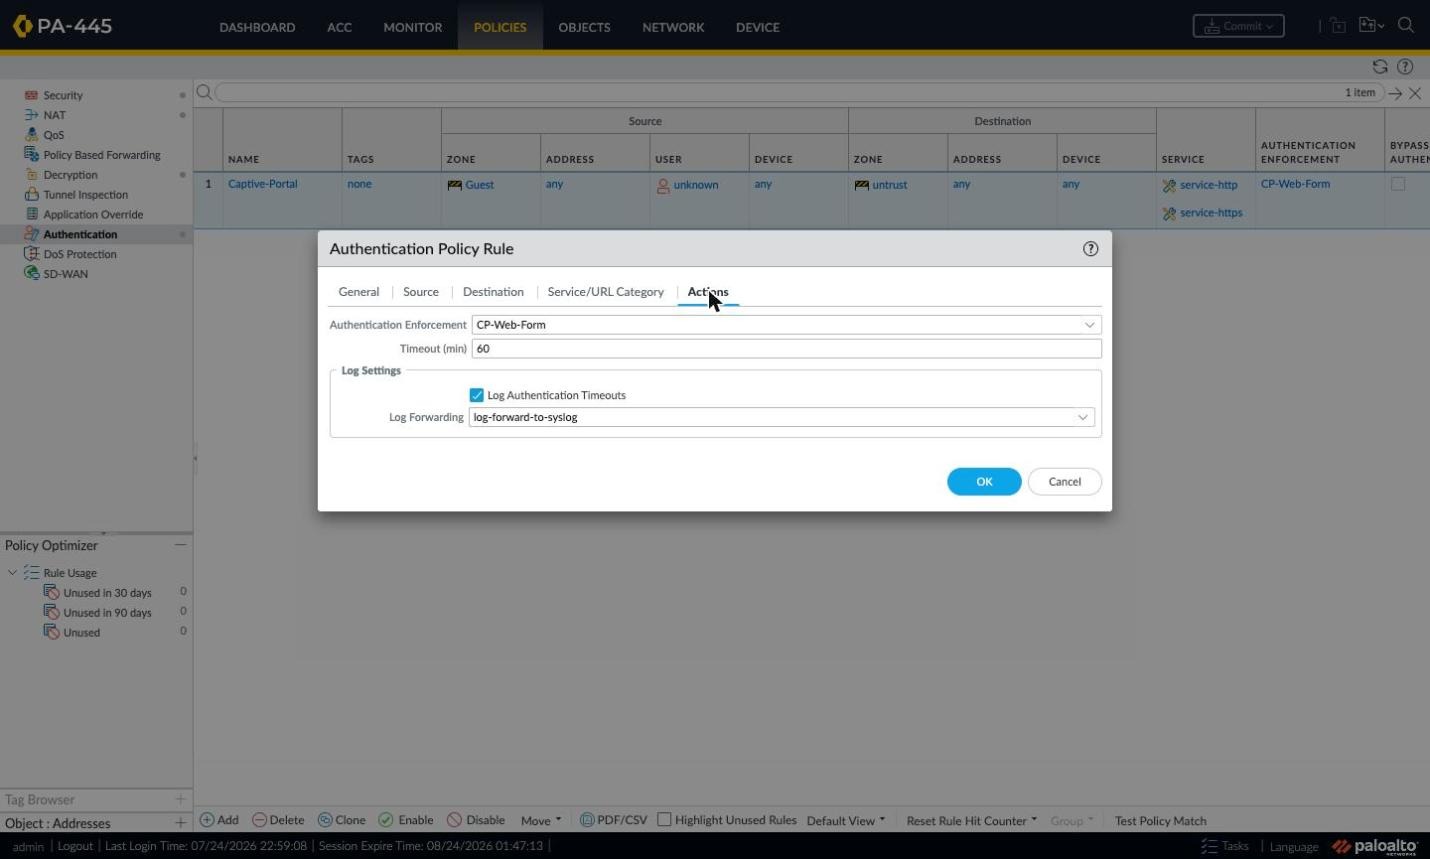
Figure 48: Actions tab.
Step 2.12 — Security Policy and NAT Rules
The official docs are blunt: before starting, make sure your security policy allows access to the services and URL categories that require authentication. In practice this means three rules: a DNS allow rule for unidentified guests (without DNS the browser never attempts a site and the redirect never fires); a rule letting authenticated (known-user) guests out to the internet; and the default deny at the bottom.
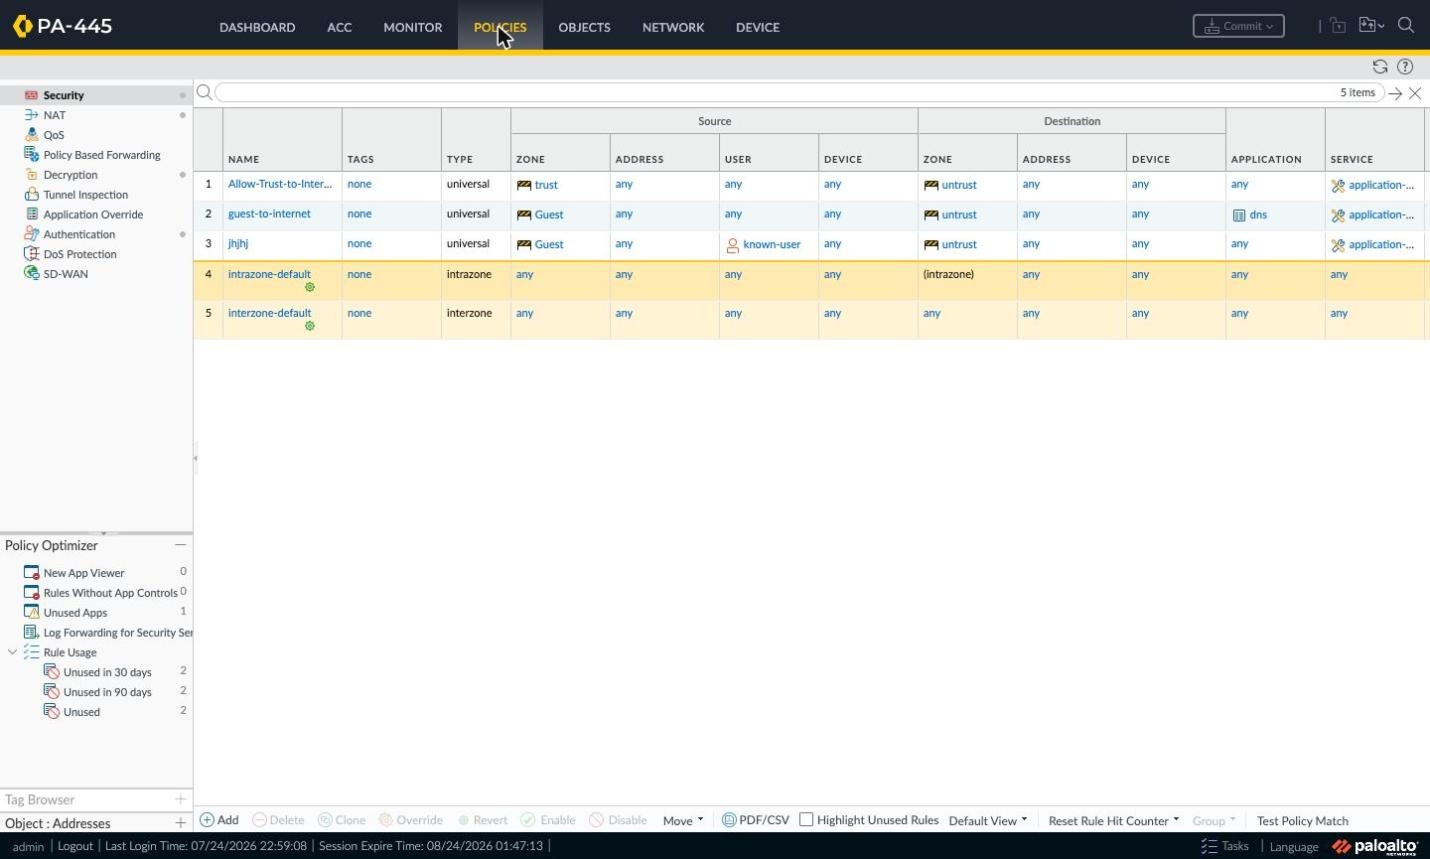
Figure 49: Policies > Security rule list.
Guests also need a source NAT rule to reach the internet: under Policies > NAT select the guest and internal zones as source, untrust as destination, and dynamic-ip-and-port translation on the outside interface.
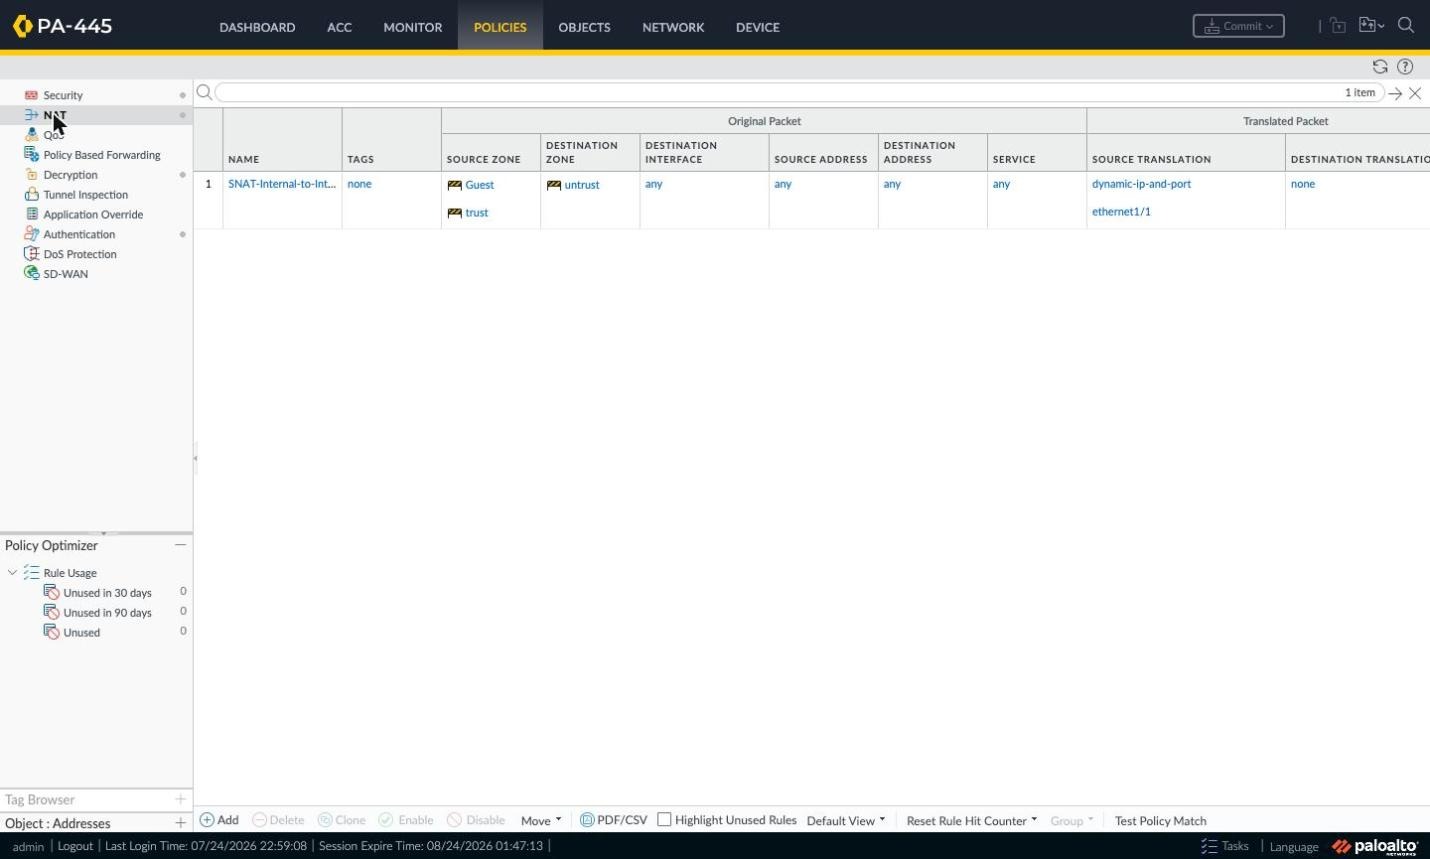
Figure 50: Policies > NAT rule.
Step 2.13 — Response Pages and Commit
Device > Response Pages lists every page the firewall can serve. The Captive Portal Comfort Page row matters most here — it is exactly the sign-in page presented in web-form authentication. Its Action column must not read Disabled.
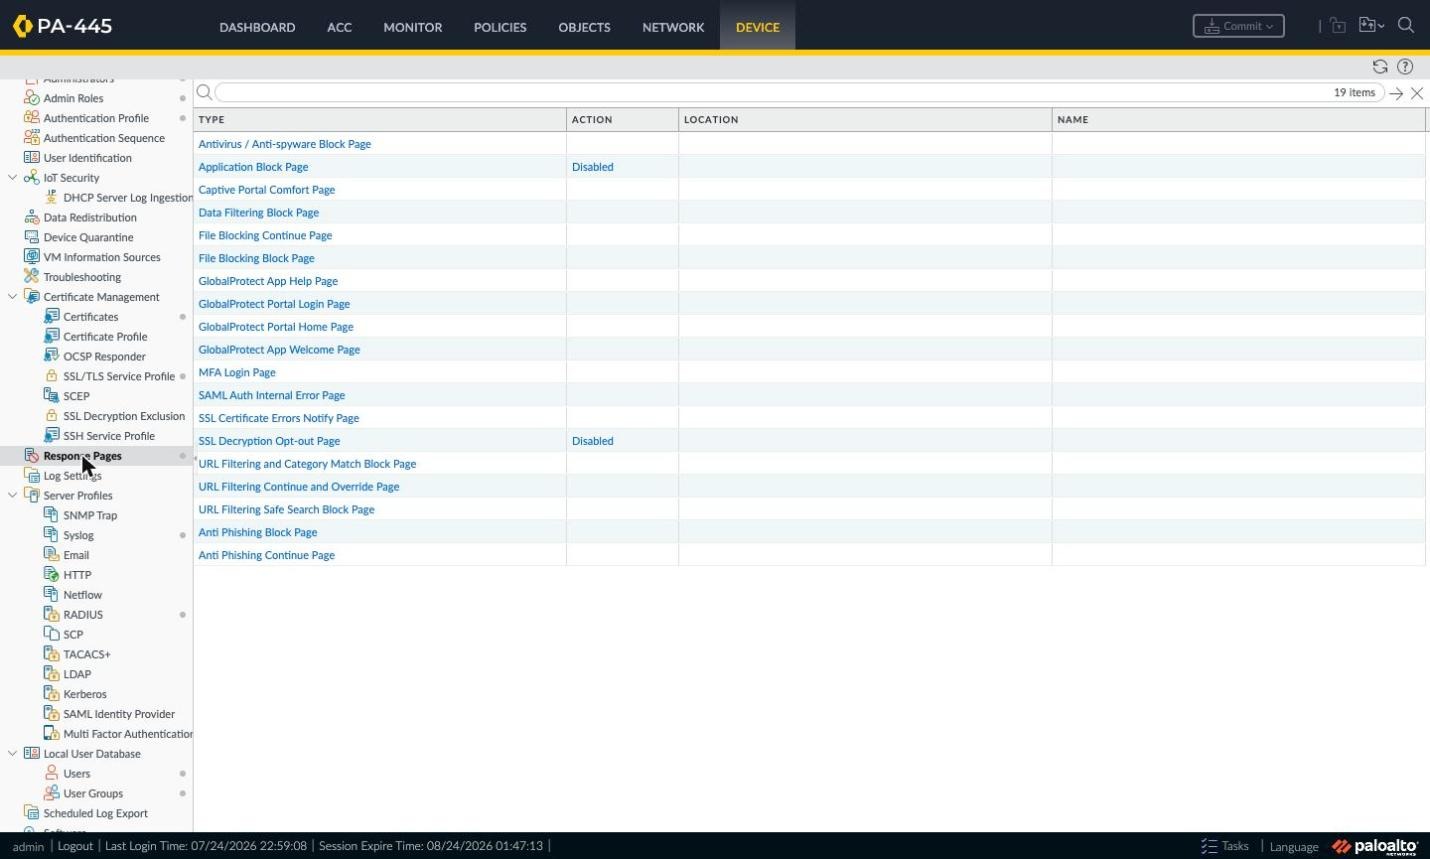
Figure 51: Device > Response Pages list.
Downloading and Uploading the SignLogger Comfort Page
In the architecture built here, users never see the firewall's stock sign-in form. SignLogger provides the welcome and authentication experience; the firewall's Captive Portal Comfort Page acts purely as a bridge that carries the user to SignLogger. You don't write this bridge page by hand: SignLogger's captive portal management screen generates a comfort page per device and offers it as a downloadable .txt file. With multiple firewalls, each needs its own file — a file generated for one device does not work on another. Likewise, if the portal address, port or device definition changes on the SignLogger side, regenerate the file and upload it again. So the Response Pages task is: download the file generated for this device from SignLogger, and import it into this firewall's Captive Portal Comfort Page.
After downloading, open the file in a text editor and verify two values: the portal address must point at your own SignLogger (example: http://10.100.100.253:8080/paguest) and the fw parameter at your firewall's management address (example: 10.254.253.244). Keep the file a single flat HTML document with no external CSS, fonts or images — custom response pages are size-limited and an unauthenticated user cannot fetch external resources anyway. The exact file used in our lab:
<!DOCTYPE html>
<html lang="tr">
<head>
<meta charset="utf-8">
<meta name="viewport" content="width=device-width, initial-scale=1">
<title>Misafir Girisi</title>
<script type="text/javascript">
(function(){
var portal = "http://10.100.100.253:8080/paguest";
var mgmt = "10.254.253.244";
try {
var sep = portal.indexOf("?") === -1 ? "?" : "&";
portal += sep + "panos=1&fw=" + encodeURIComponent(mgmt) + "&orig=" + encodeURIComponent(window.location.href);
} catch(e){}
window.location.replace(portal);
})();
</script>
<meta http-equiv="refresh" content="0;url=http://10.100.100.253:8080/paguest?panos=1&fw=10.254.253.244">
</head>
<body style="font-family:sans-serif;text-align:center;padding-top:40px">
Misafir giris sayfasina yonlendiriliyorsunuz... / Redirecting...<br>
<a href="http://10.100.100.253:8080/paguest?panos=1&fw=10.254.253.244">Devam et / Continue</a>
</body>
</html>The page deliberately has three redirect layers. If JavaScript runs, window.location.replace redirects instantly and the orig parameter carries the portal address the user was on, so they can return after sign-in. If JavaScript is off, the meta refresh fires. If both fail, the user can tap the Continue link. Preserve all three layers when customizing — on some clients (notably iOS's captive portal mini-browser) single-layer redirects fail silently.
Upload steps: in SignLogger open the captive portal management screen, select this firewall, download its comfort page .txt. Then on the firewall open Device > Response Pages, click the Captive Portal Comfort Page row, use Import, select the .txt file and confirm with destination Shared (or the relevant vsys). Afterwards the window shows a Shared row next to Predefined — Shared is your uploaded page and takes precedence. Do not delete the Predefined row: if anything goes wrong, removing only the Shared row instantly restores the firewall's stock form — the fastest rollback.
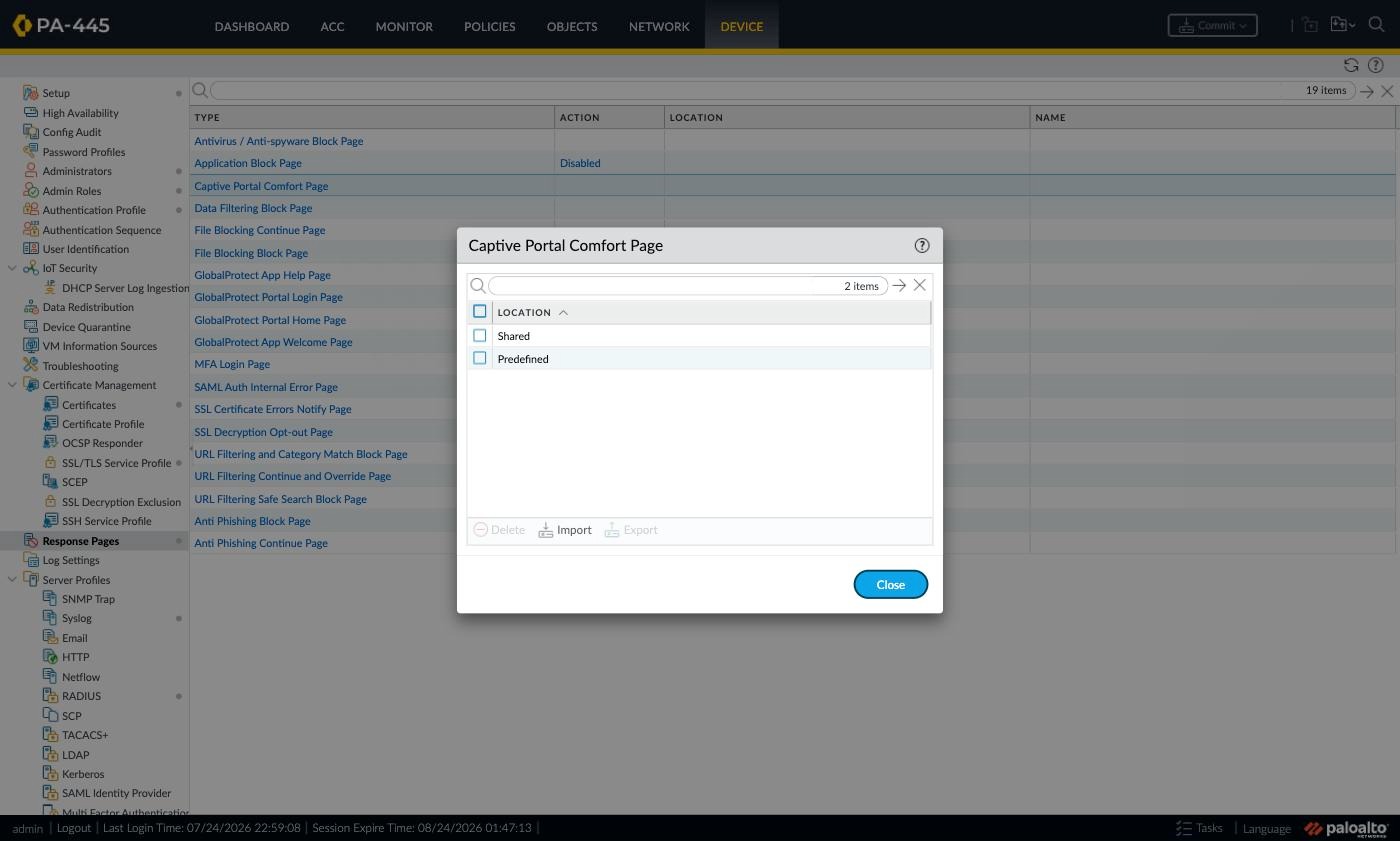
Figure 51a: Captive Portal Comfort Page window (Shared = uploaded custom page, Predefined = stock page).
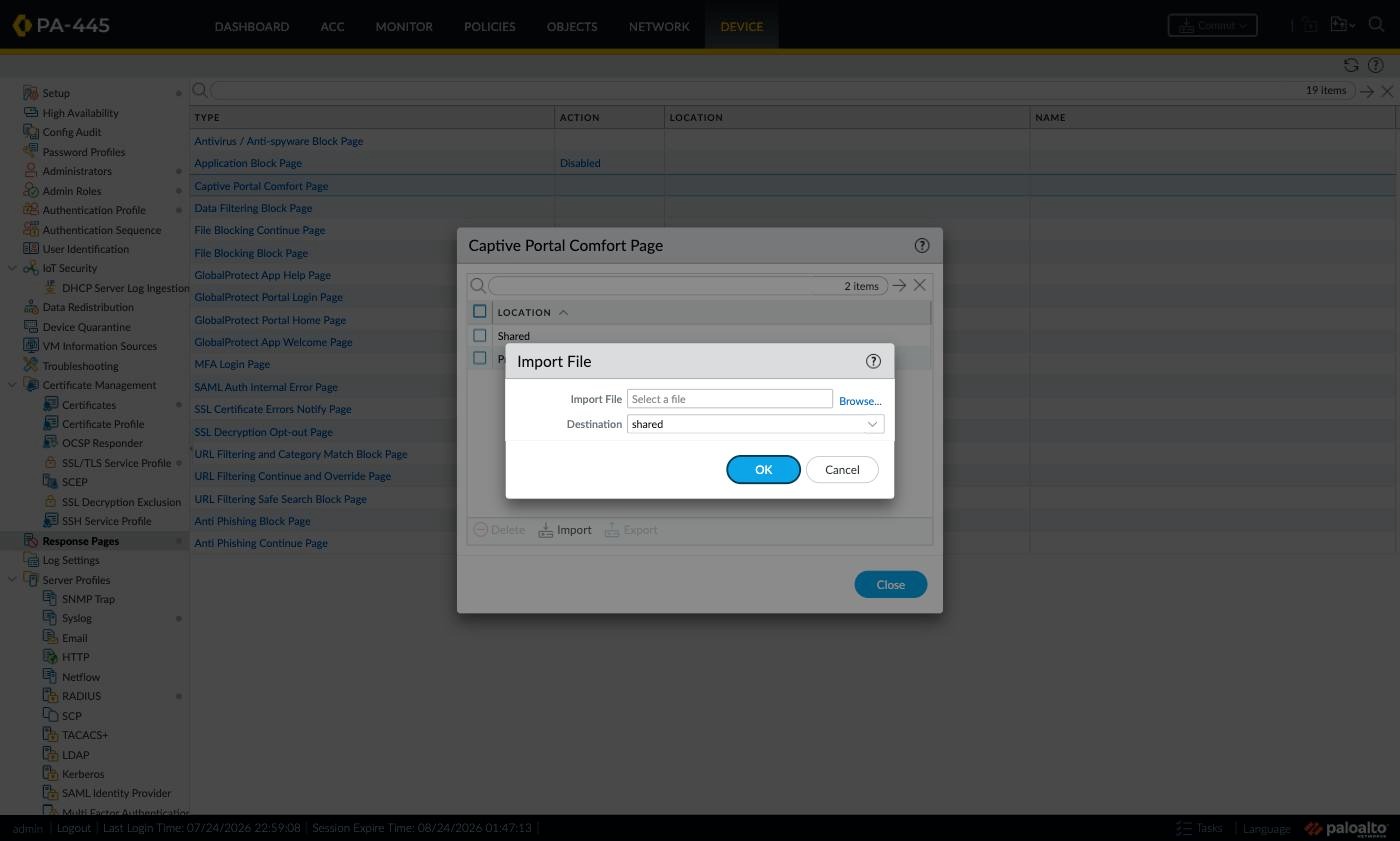
Figure 51b: Import File window — the SignLogger .txt is selected and Destination stays shared.
Import alone is not enough: the upload only lands in the candidate configuration (the commit window shows it as shared-object). Test before committing and the old page keeps appearing — the most common misdiagnosis. Also re-verify the Comfort Page row's Action column does not read Disabled after the upload.
Settings That Must Accompany the Comfort Page
The bridge page cannot work alone: an unauthenticated user has no right to reach the SignLogger server yet, so the redirect would time out before the page opens. You need a pre-authentication rule in Security policy that matches before the authentication-enforcing rules. In the lab it is called guest-to-signlogger-portal: source zone Guest, destination zone trust, destination the SignLogger address object (10.100.100.253), services service-http and service-https, action Allow. The comfort page targets port 8080, and the predefined service-http object already covers 80 and 8080. The rule must sit above the authentication-enforcing rules.
Don't guess whether the rule matches — prove it. Use the Security Policy Match test under Device > Troubleshooting: From Guest, To trust, source the client's IP, destination the SignLogger address, destination port 8080, Execute. The result must name guest-to-signlogger-portal; if another rule returns, fix the ordering.
In Authentication Portal Settings the mode must be Redirect and the Redirect Host must be the guest network's firewall-side address (172.16.1.1 in the lab) — the comfort page is only meaningful in redirect mode, since the browser must store a cookie and follow the redirect. The same screen must show your RADIUS profile (RADIUS-Auth in the lab) as Authentication Profile and the profile carrying your portal certificate as SSL/TLS Service Profile. Choose Timer, Idle Timer and the session cookie lifetime deliberately: the lab uses a 60-minute portal timer and a 1440-minute cookie — with a long cookie, forcing a user to sign in again also requires clearing the client-side cookie.
Two network details are easy to miss. First, User-ID must be enabled on the guest zone but the portal server's address (10.100.100.253) should be on the zone's Exclude list, or the portal's own traffic gets dragged into user mapping. Second, a rule permitting DNS before authentication must exist — in the lab a separate rule allows only the dns application.
Do not NAT the traffic from the guest network to the portal server, so SignLogger sees the client's real address. In return, the router on SignLogger's network needs a return route to the guest subnet (172.16.1.0/24) — without it the page won't open and the failure masquerades as a comfort-page problem. Since the portal address uses HTTP on 8080, some browsers may flag an HTTPS→HTTP redirect as insecure; the clean production fix is serving the SignLogger interface over HTTPS and updating the comfort page address accordingly.
Finally, verify on three levels. After signing in through SignLogger you should see an Authentication Success entry in Monitor > Logs > Authentication with the enforcement object used and the protocol your RADIUS client used (PAP in the lab). Monitor > Logs > User-ID must show a mapping for the same IP, and new sessions in Monitor > Logs > Traffic must carry the Source User. If the redirect works but no Authentication entry ever appears, SignLogger is not posting the credentials back to the firewall's portal form — check the device definition (fw parameter) and that the comfort page file was generated for this device.
When everything is in place, apply the changes with Commit; running Validate Commit first is a good habit. Skipping commit is the most classic Palo Alto mistake — candidate-only changes never affect traffic, so the screen looks right while the portal stays broken.
Verification and Testing
Logs are the fastest truth. Filter the guest client's IP in Monitor > Traffic and read the Session End Reason column: auth-policy-redirect means the redirect fired; policy-deny means security policy blocked the traffic.
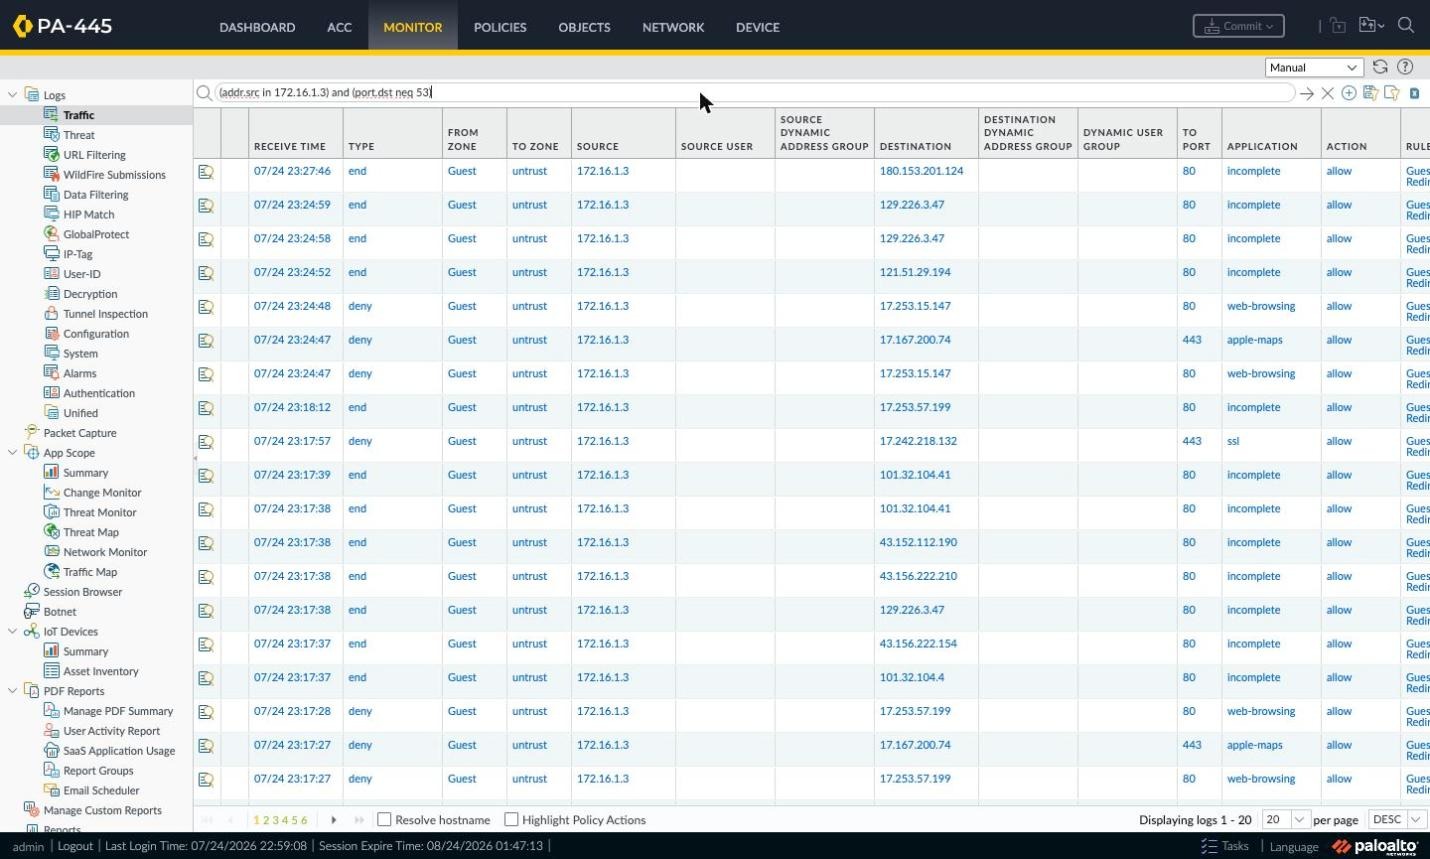
Figure 52: Monitor > Traffic — auth-policy-redirect.
The second stop is Monitor > Authentication: entries appear when the user sees the portal and signs in. An Authentication Timeout event with a no-credentials description proves the page rendered but nobody signed in. A completely empty log means the redirect isn't firing or the page never reaches the client.
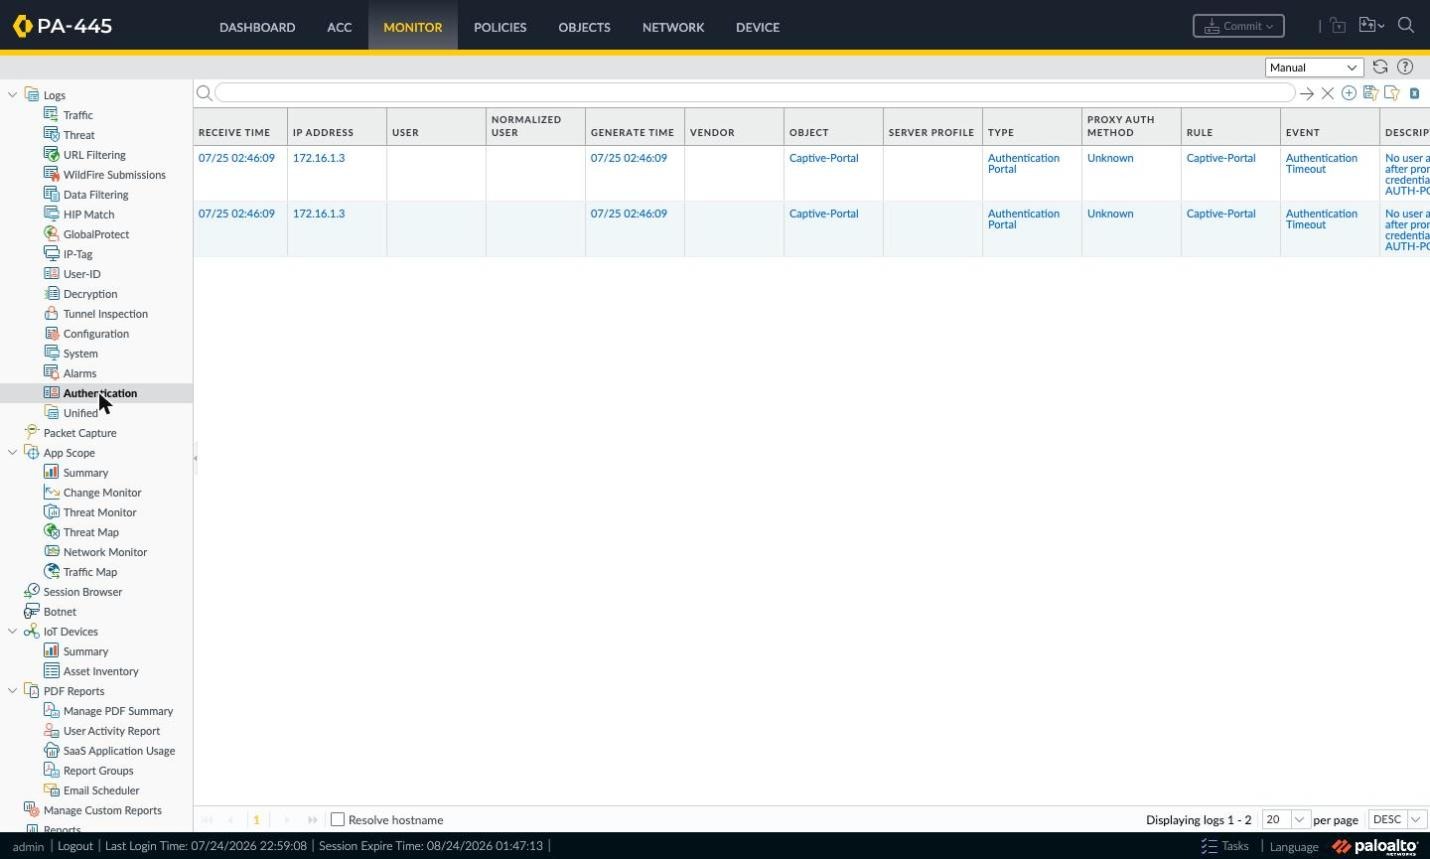
Figure 53: Monitor > Authentication log.
Troubleshooting: When the Captive Portal Doesn't Work
The scenarios below were encountered — and solved — one by one in a real lab deployment.
Problem 1: The portal opens but shows a blank white page
The sneakiest one. Redirect works, the browser reaches the portal, the certificate warning is passed — then nothing but white. The cause is usually a broken or incomplete custom HTML page imported over the Captive Portal Comfort Page. Diagnose it in Device > Response Pages: click the Comfort Page row. If only a Predefined row exists, the problem is elsewhere. If a second Shared (or vsys) row exists, a custom page has replaced the built-in form. Compare with an untouched page such as Data Filtering Block Page — one row there makes the difference obvious.
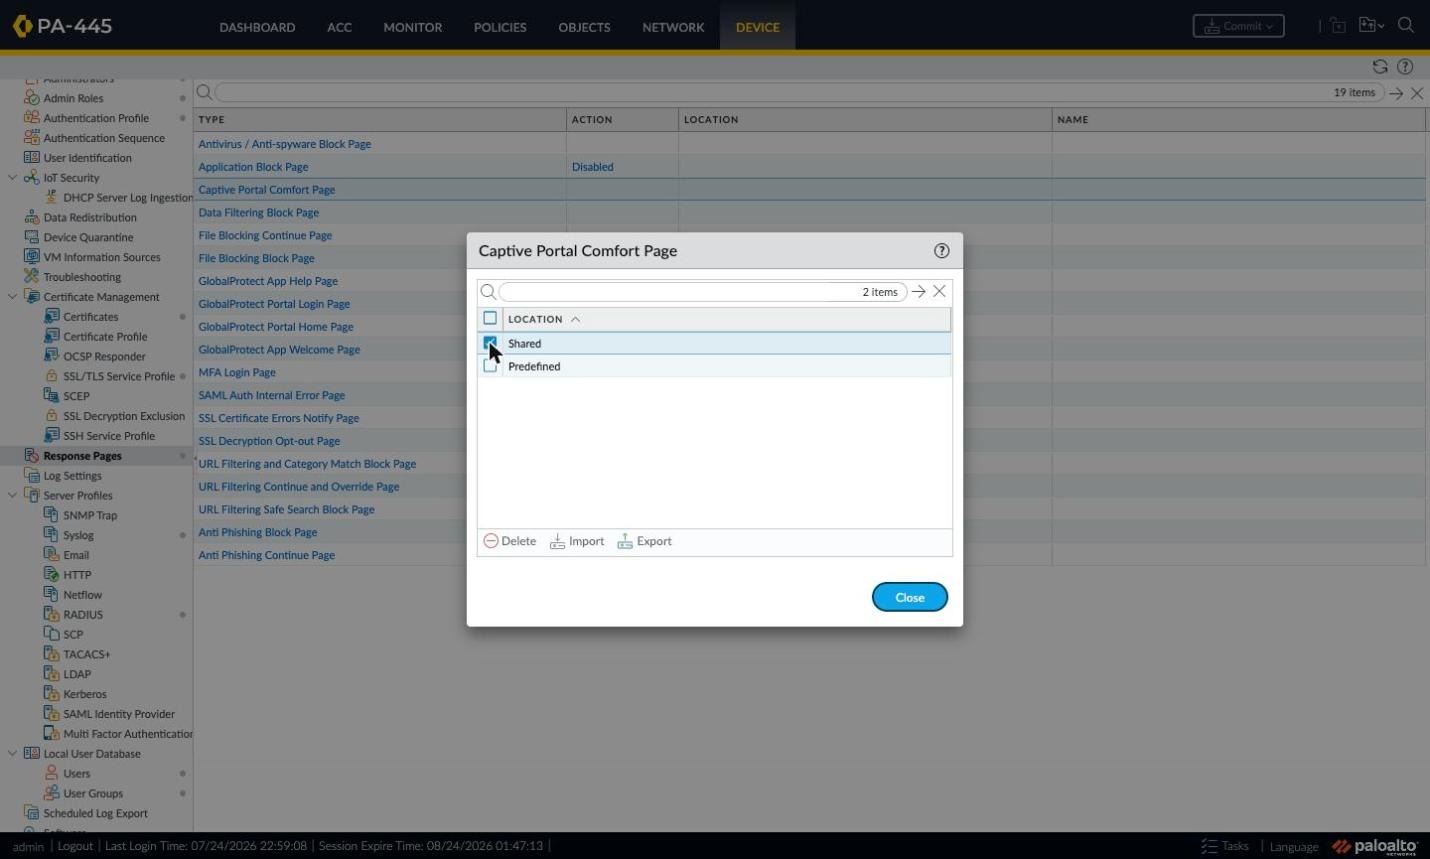
Figure 54: Faulty state — a custom comfort page exists in Shared.
The fix is simple: select the Shared row, take a backup with Export, then Delete and Commit. The firewall reverts to the built-in form and the portal starts working instantly; the healthy state shows a single row again.
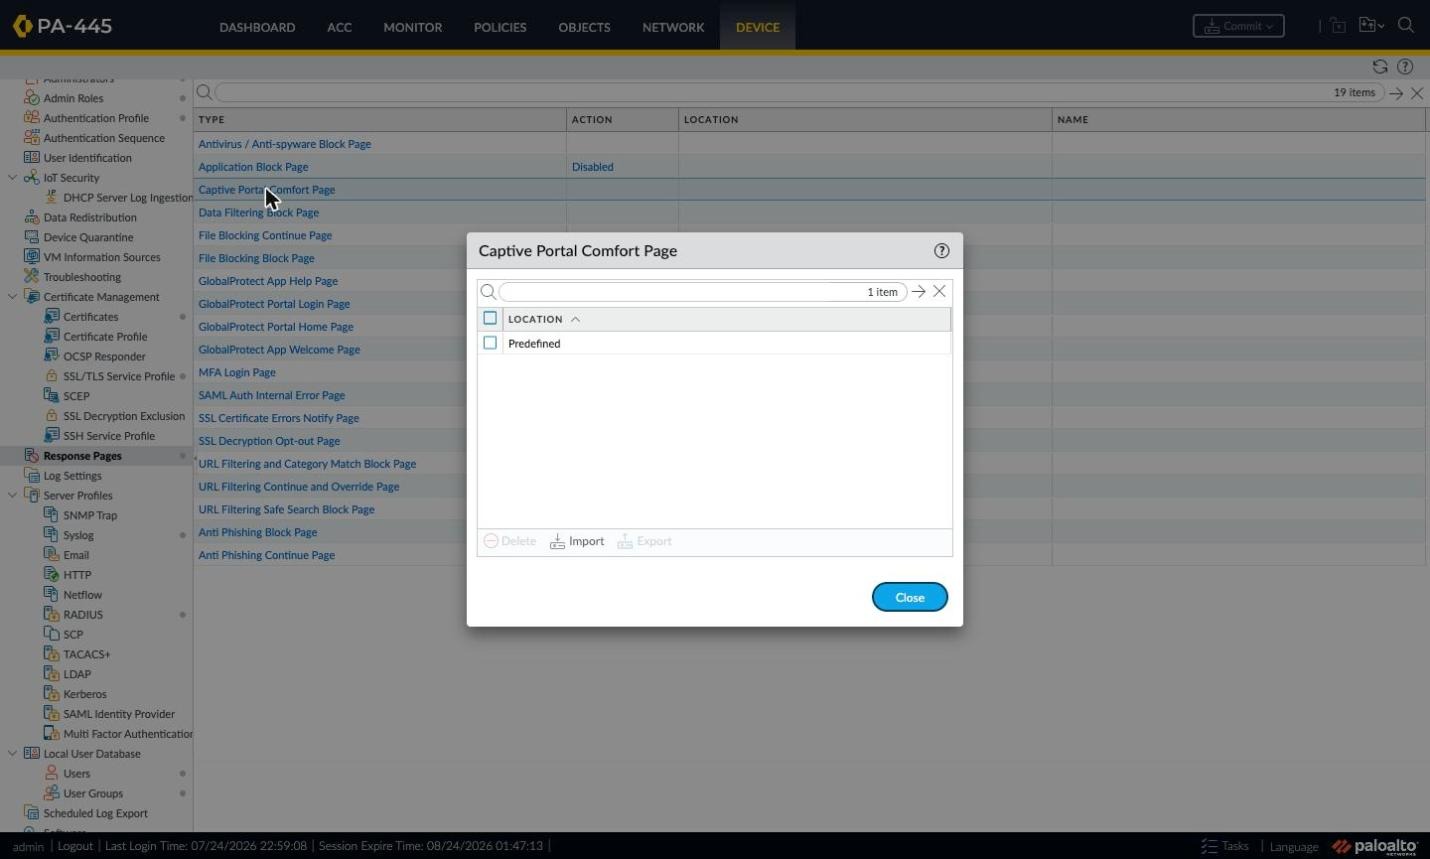
Figure 55: After the fix — only the Predefined page remains.
Problem 2: Changes were made but nothing changes
Every change lands in the candidate configuration first and does nothing until committed. A non-greyed Commit button means changes are pending. To see what's waiting, compare Local Candidate to the running config under Device > Config Audit and check the Change Summary tab.
Problem 3: Browser certificate warnings
On a guest network the only durable fix is to use a real domain name (e.g. hotspot.sysnet.com.tr) for the portal, obtain a certificate for it from a public CA, and add a DNS A record that resolves the FQDN to the guest interface’s IP (see Step 2.5). As long as your self-signed root CA is not trusted by clients the warning is unavoidable, and installing a root CA on a guest phone is impractical. The documented fix is exporting the root CA and importing it as a trusted root on all client browsers — in Active Directory, distribute it via GPO. On iOS, installing the profile is not enough: full trust must also be enabled under Settings > Certificate Trust Settings. Since installing certificates on guests is impractical, the cleanest fix is a real domain name for the portal with a certificate from a public CA.
Problem 4: The portal doesn't open on iPhone/iPad (Apple CNA)
Apple devices open a mini browser called the Captive Network Assistant when joining a network. The official documentation has a dedicated CNA section with three requirements: an FQDN (not just an IP) as redirect host; an SSL/TLS service profile using a certificate for that FQDN signed by a public CA; and this CLI command:
set deviceconfig setting ctd cap-portal-ask-requests 5The reason is documented: the firewall's default portal rate limit is one request every two seconds. The CNA exceeds it, causing TCP resets and errors — the recommended value is 5. Many tcp-rst-from-client entries in the traffic log are the signature of this problem.
Problem 5: The redirect never fires
Check in order: are Response Pages and User-ID ticked in the interface management profile? Is Enable User Identification on for the zone? Are the Authentication Policy rule's source zone, user field (unknown) and services (service-http, service-https) correct? Can guests resolve DNS? If any of the four is missing, the portal never engages.
Problem 6: Sign-in succeeds but there's no internet
Even after successful authentication, traffic needs a Security Policy rule written for known-user. If that rule's hit count stays zero, either the user mapping isn't being created or rule ordering is wrong. Also, leaving the application field as any with service application-default can cause unexpected blocks — either name applications explicitly or set the service to any. And confirm the NAT rule covers the guest zone.
Quick Checklist
Before starting or when troubleshooting, run down this list: Layer 3 interface and security zone ready; Response Pages and User-ID enabled in the interface management profile; User Identification enabled on the zone; DHCP and DNS working; root CA and SAN-bearing portal certificate generated; SSL/TLS Service Profile created and selected in Authentication Portal Settings; authentication profile and Allow List defined; a custom Authentication Enforcement object created; the Authentication Policy rule written with the right zone and services; Security Policy rules for DNS and known-user in place; the NAT rule covering the guest zone; no broken custom page sitting over the Captive Portal Comfort Page; and — above all — everything committed. With an external portal like SignLogger, add two items: the device-specific comfort page .txt generated in SignLogger has been imported into the Comfort Page and committed, and the pre-authentication rule granting portal access before sign-in exists in the policies.
Frequently Asked Questions
What's the difference between Captive Portal and Authentication Portal?
Two names for the same feature. Palo Alto renamed Captive Portal to Authentication Portal as of PAN-OS 9.1; traces of the old naming, like Captive Portal Comfort Page, remain in the UI.
Redirect or Transparent?
Redirect, in nearly every scenario. Session cookies, Kerberos SSO and a cleaner certificate experience exist only there. Transparent mode impersonates the destination server and therefore produces certificate warnings every time.
Should the Redirect Host be an IP or a name?
For a warning-free portal, use a dotted FQDN under a real domain you own — e.g. hotspot.sysnet.com.tr — and add a DNS A record for it pointing to the guest interface’s IP. The official “intranet hostname without dots” advice is an older recommendation tied to NTLM/Kerberos SSO browser-zone classification; it does not apply to web-form guest authentication, and a public CA cannot issue a certificate for a single-word name. A bare IP is not enough either: public CAs cannot certify a private IP and Apple CNA requires an FQDN.
Can I combine Captive Portal with SSL decryption?
Yes, with a firm restriction: Authentication Portal redirect does not support SSL Inbound Inspection — use SSL Forward Proxy alongside the redirect.
Why create a custom enforcement object instead of the defaults?
The default objects use the global authentication profile; per the docs they ignore rule-based Timeout values and cannot be used in MFA rules. Custom objects are required to assign different profiles to different rules.
Conclusion
A Palo Alto Captive Portal is not a single screen — it is a chain from the interface management profile through certificates and authentication profiles to policy rules. When a link is missing, the result is usually a silent failure: a blank page or a portal that never appears instead of an error message. Work through the steps in order, commit after each one, and read the traffic and authentication logs first when anything misbehaves.
On the RADIUS side, keeping the server profile and authentication profile separate and never leaving the Advanced tab's Allow List empty prevents the two most common mistakes. Before production, plan a real domain name with a public CA certificate for the portal, apply the Apple CNA settings, and tighten the DHCP pool.
Resources
All technical requirements in this guide were verified against the official sources below; screenshots were taken on a lab device running PAN-OS 11.1.13.
- Configure Authentication Portal (Palo Alto Networks)
- Configure Authentication Policy (Palo Alto Networks)
- Authentication Policy and Authentication Portal (Palo Alto Networks)
- Configure RADIUS Authentication (Palo Alto Networks)
- SignLogger License Activation and Firewall Device Setup Guide
- Palo Alto XML API Configuration for SignLogger