This document was written to explain the Hotspot Management module in SignLogger screen by screen, field by field. The aim is for an administrator building or operating a guest Wi-Fi (captive portal) infrastructure to see in one place what each screen does, what to enter in each field, and what happens when a setting changes. All screenshots come from a live deployment; every field showing device serial numbers has been masked for privacy.
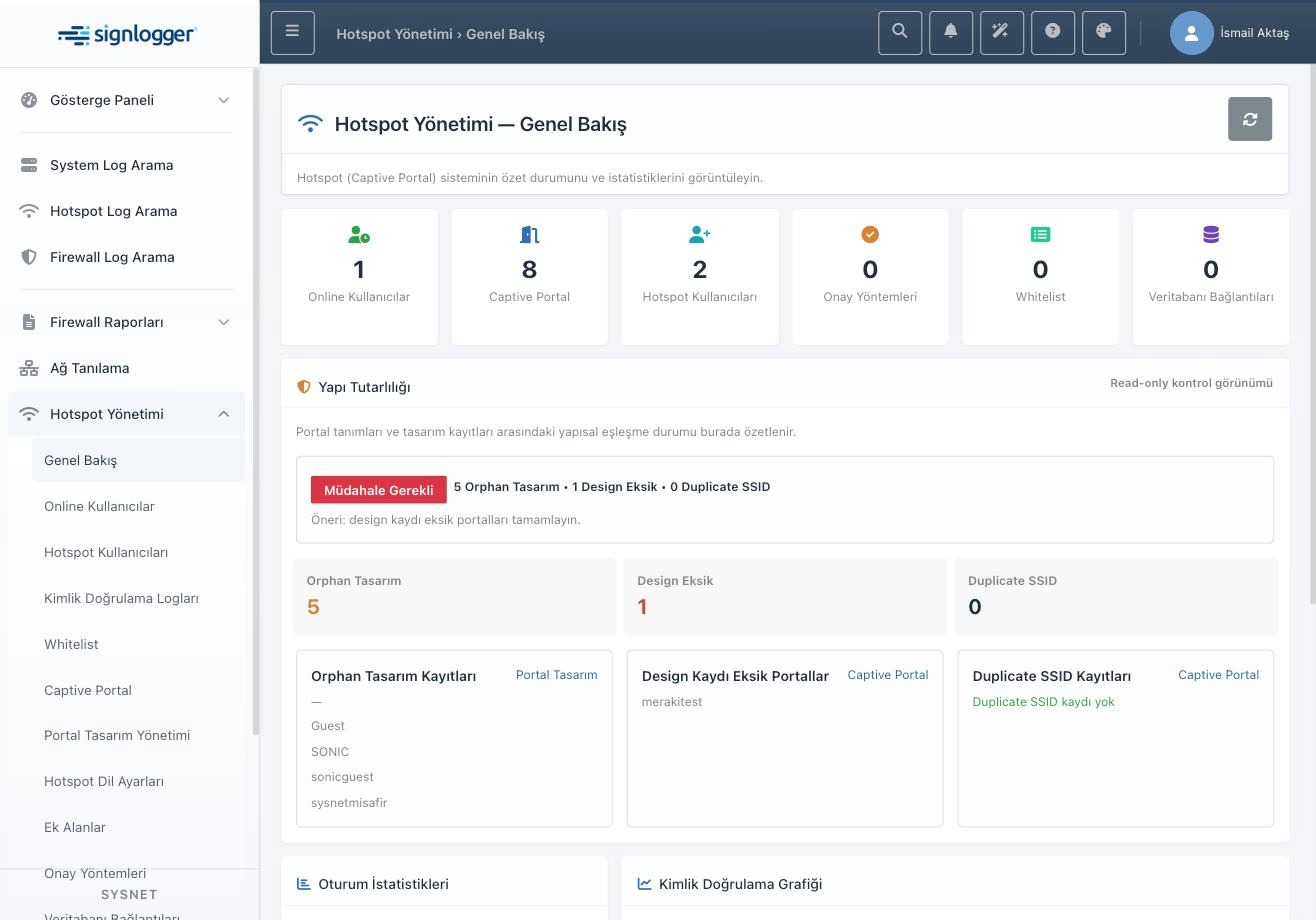
Figure 1 — Hotspot Management Overview: a one-page summary of every sub-component of the module.
1. Purpose and Logic of the Module
Hotspot Management is the part of SignLogger that runs the guest network (captive portal) side. The SSID concept sits at the center: almost every record in the system — portal definition, design, language texts, additional fields, approval method, whitelist and database connection — is bound to a specific SSID.
The user-side flow: a client joins the wireless network, is redirected to SignLogger's portal address by the firewall or access point, authenticates with one of the enabled methods (SMS, form, local user sign-in, LDAP), passes an approval step if required, and is finally released to the configured redirect address. Each link of this flow is managed from a different screen in the module.
2. Menu Structure and How the Pages Relate
The Hotspot Management menu has eleven pages. Overview provides a summary and health check. Online Users and Authentication Logs are the monitoring side; Hotspot Users and Whitelist the identity/access side; Captive Portal, Portal Design Management, Hotspot Language Settings and Additional Fields configure the portal itself; Approval Methods and Database Connections configure the verification and approval chain.
These pages depend on each other. For example, no SSID appears in the Portal Design screen without a Captive Portal record; admin approval users cannot be defined before admin approval is selected for the SSID in Approval Methods. Respecting this order during setup prevents most "the list comes up empty" issues later.
3. Overview
Overview is designed for a quick read of the state on every visit. The six cards on top show the number of active sessions, defined portals/SSIDs, created guest users, defined approval methods, whitelist entries and external database connections. A zero on a card is not an error by itself — it just means the feature has not been configured yet.
The page's most valuable part is the Structure Consistency panel, which compares portal definitions with design records and reports three kinds of inconsistency. Orphan Design lists design records whose portal record was deleted or never existed. Missing Design lists SSIDs that have a portal but no design record; those portals open with the default look, so completing them first is recommended. Duplicate SSID catches the same SSID name used in more than one portal record — critical, because it makes redirect and authentication behavior ambiguous. The panel is read-only: when a "Needs Attention" label appears, you make the fix on the relevant page yourself.
The lower part shows Session Statistics (total online, total offline, today's authentications), a daily authentication chart and Quick Access buttons into the sub-modules.
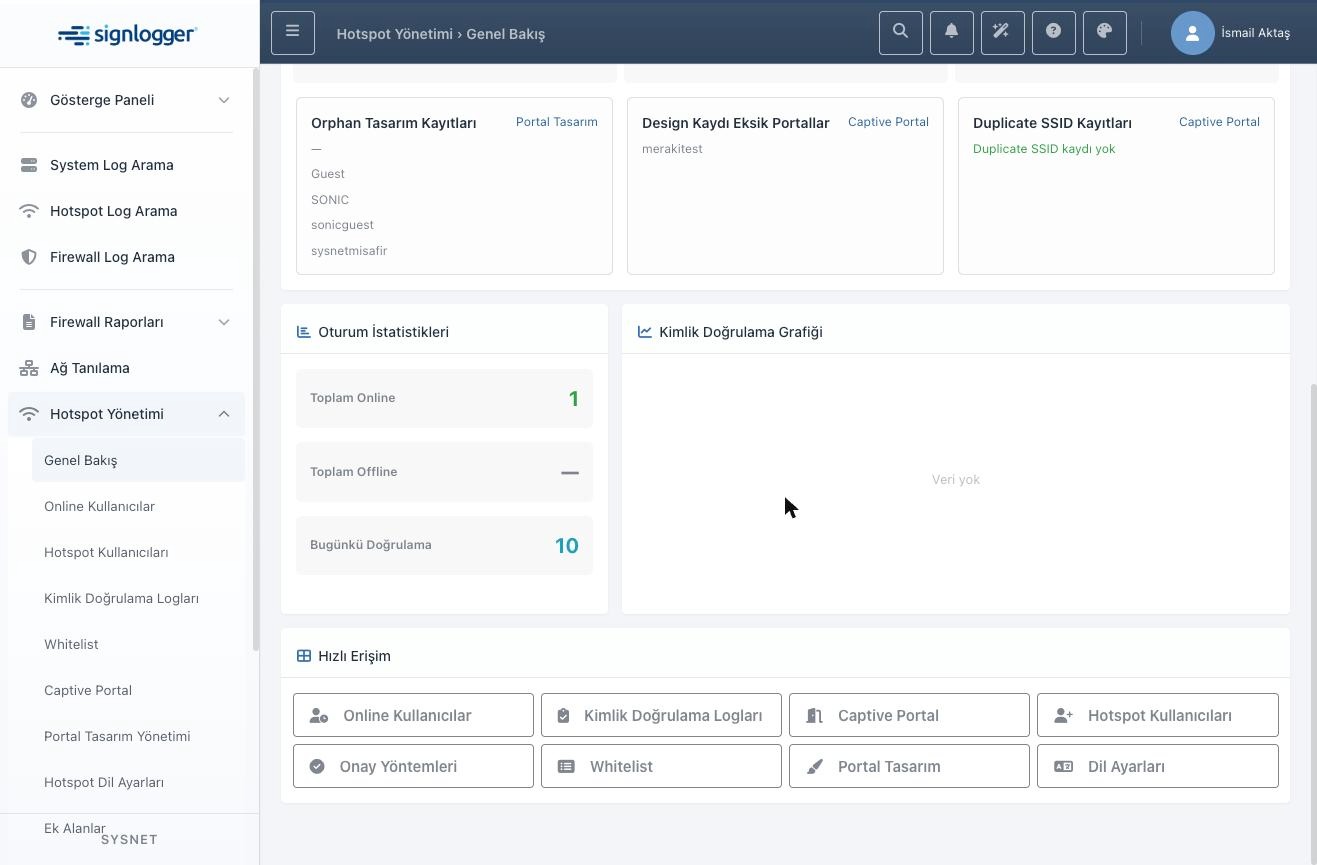
Figure 2 — Structure Consistency detail cards, session statistics and Quick Access shortcuts.
4. Online Users
This screen shows the live session state of users who signed in through the portal, and lets you terminate sessions when needed. The three cards on top show current open sessions, users who signed in within the last 24 hours, and the group distribution. Group information reflects the RADIUS/NAC group assignment; in the example all sessions are in Guest_Group.
There are two tabs. Online lists sessions still in progress; Offline lists ended or expired ones — the right place for retrospective checks. Table columns cover username, full name, authentication method, device type, client IP, NAS IP and device name. The method column tells how the session was opened: form_auth for form-based sign-up, sms_auth for SMS verification, user_login for local user sign-in. With multiple devices collecting sessions, a device filter appears at the top.
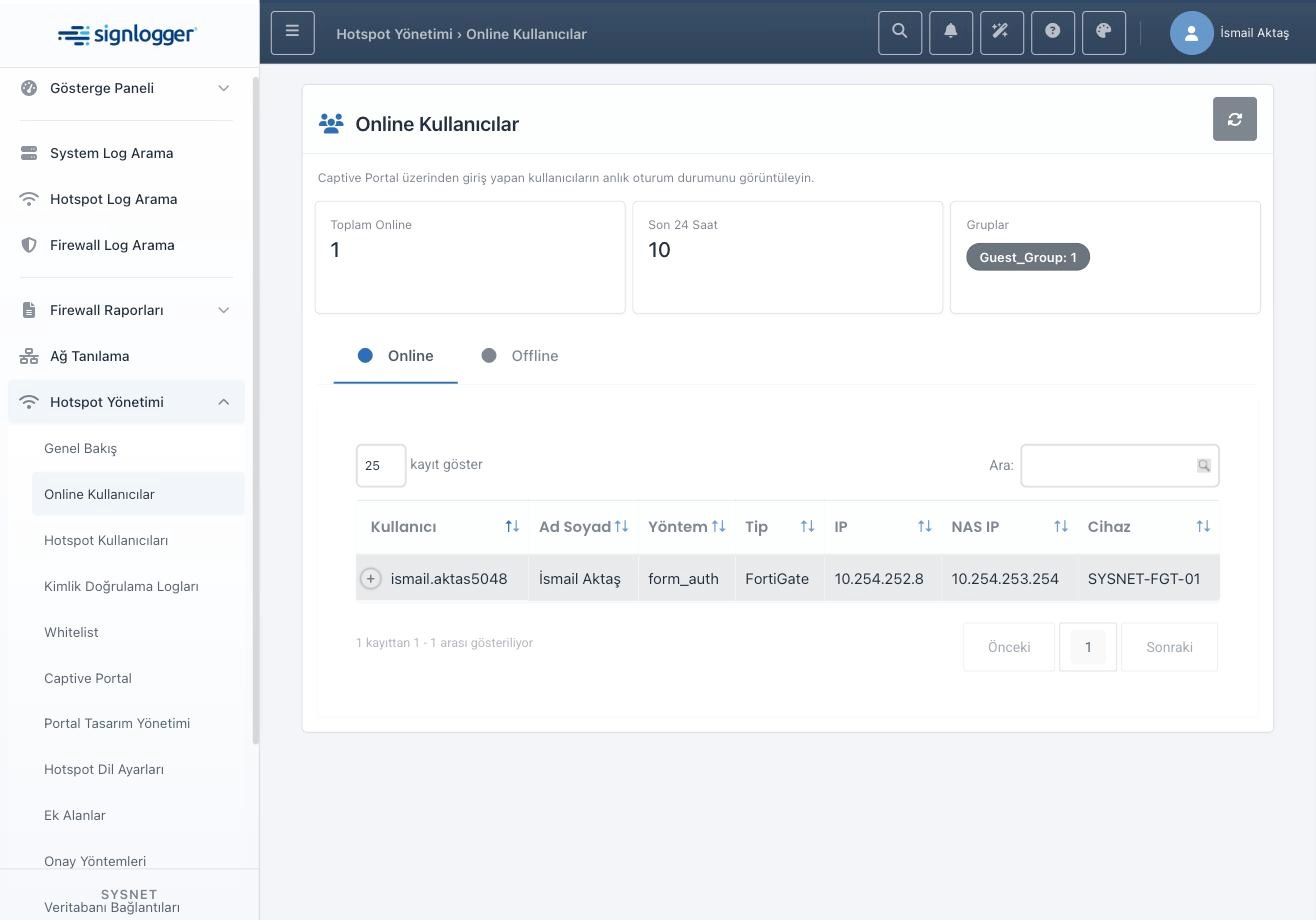
Figure 3 — Online Users: top cards show the live load, the table shows session details.
The plus button at the start of a row expands it to show the session's group, start time and elapsed time. Two action buttons live there: the green one terminates the session on the device side (e.g. FortiGate deauth), the red one forces logout on the RADIUS/NAC side. Which applies depends on how the session was opened: deauth for FortiGate sessions, force logout for RADIUS-based sign-ins. Both actions are permission-gated; without permission the UI returns a warning.
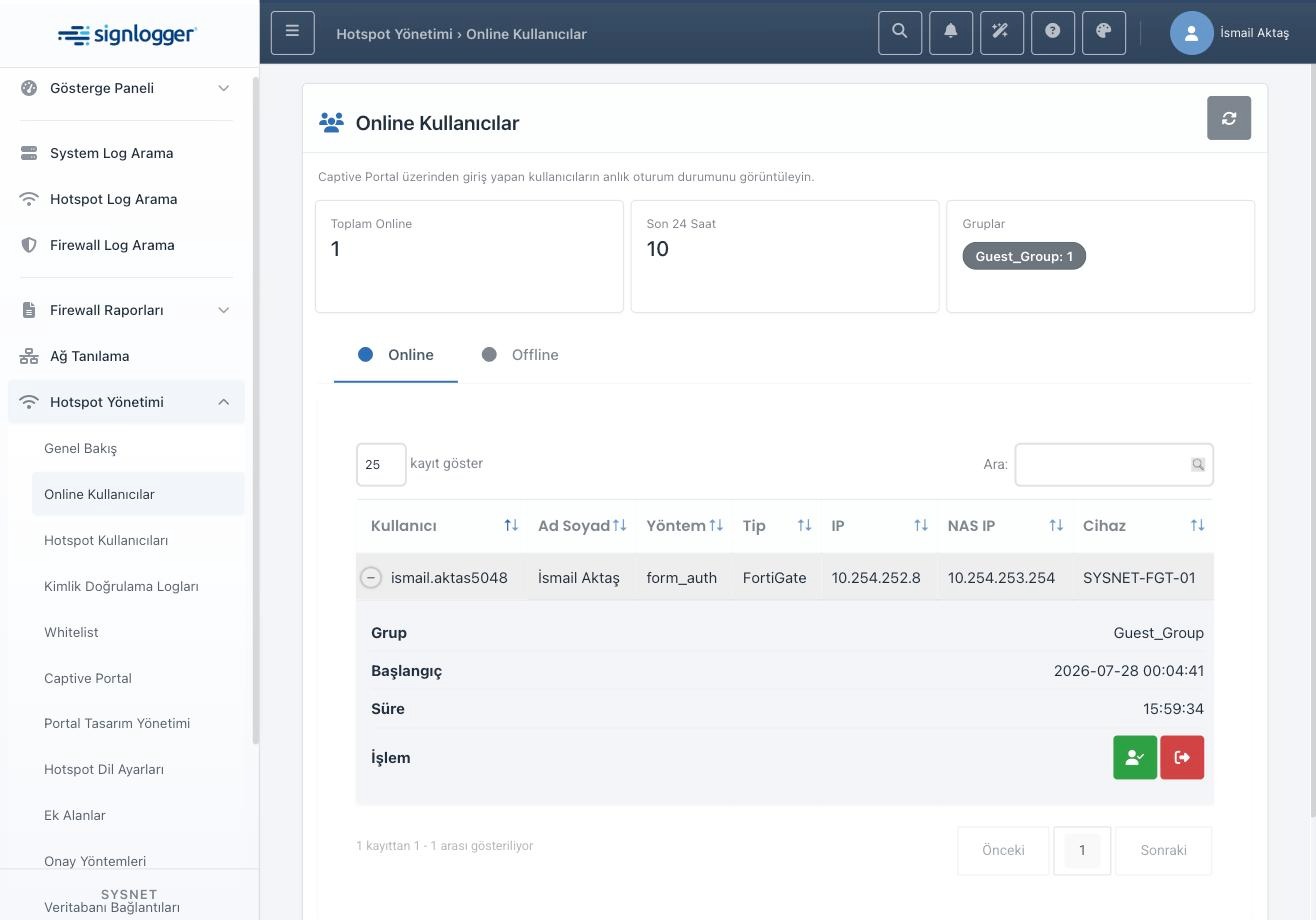
Figure 4 — Expanded session row: group, start, duration and session termination buttons.
Error responses are meaningful too: 401 means your own session expired and you will be redirected to sign-in; 403 means the action needs a permission you don't have. Other errors show the HTTP code and part of the response — useful verbatim in a support ticket.
5. Hotspot Users
This page manages local portal users created manually or by the system. It is the place for cases where SMS or form verification doesn't fit — a long-term contractor, or a fixed identity for a meeting-room device.
The table shows record ID, username, full name, bound device, device serial, SSID, creation time and active/passive state. The serial column disambiguates records when the same SSID name exists on different devices.
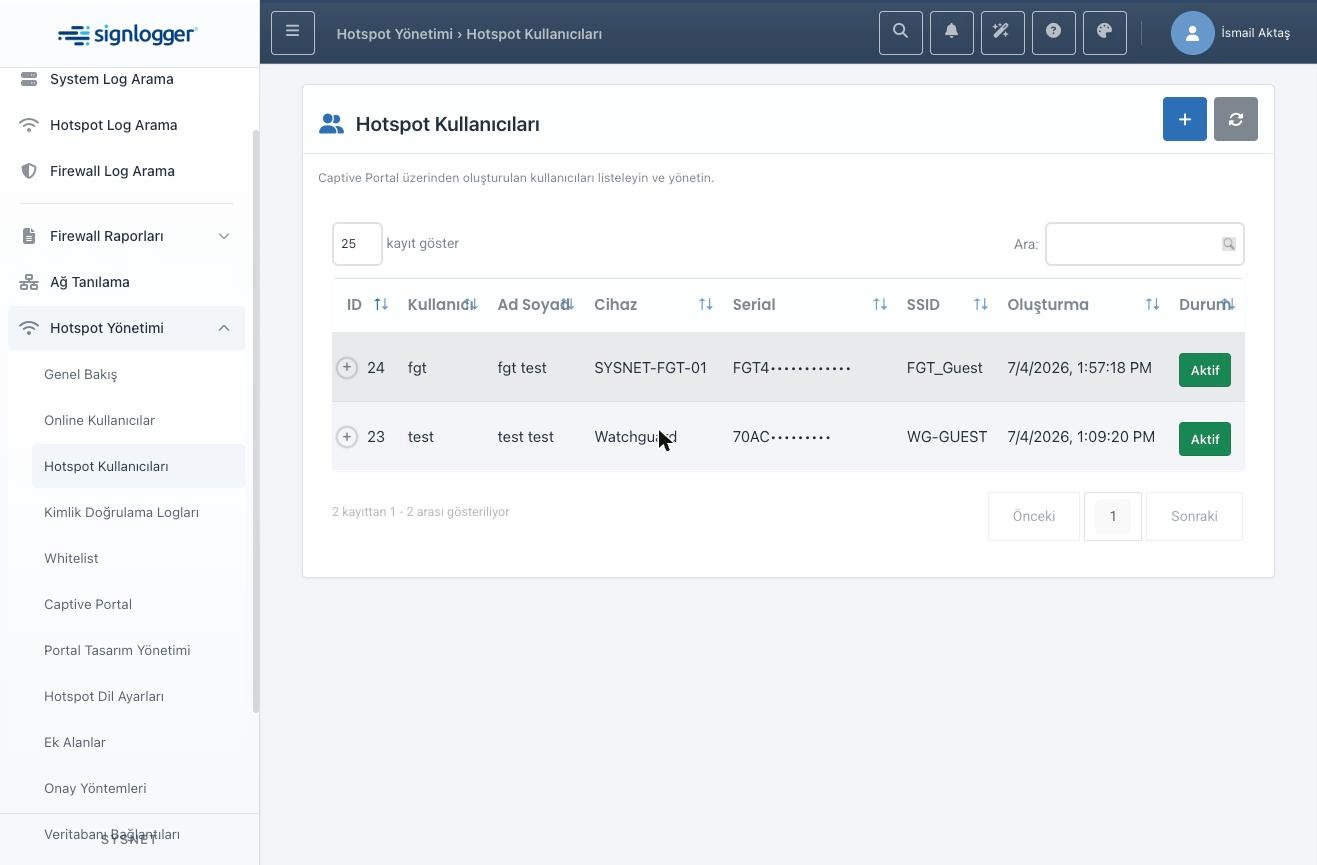
Figure 5 — Hotspot Users list.
The plus button opens the Add User window. The first and most critical field is SSID: users are defined per SSID, and a wrong choice means the user cannot sign in on the expected portal. Status toggles the record active/passive — choose Passive to disable a user temporarily without deleting. First and last name are required and keep the list readable. The username must be unique; it is used together with the password at portal sign-in. The password is required for new records; leaving it empty while editing keeps the current one. The rule is stated in the UI: at least eight characters with at least one uppercase letter, one digit and one special character.
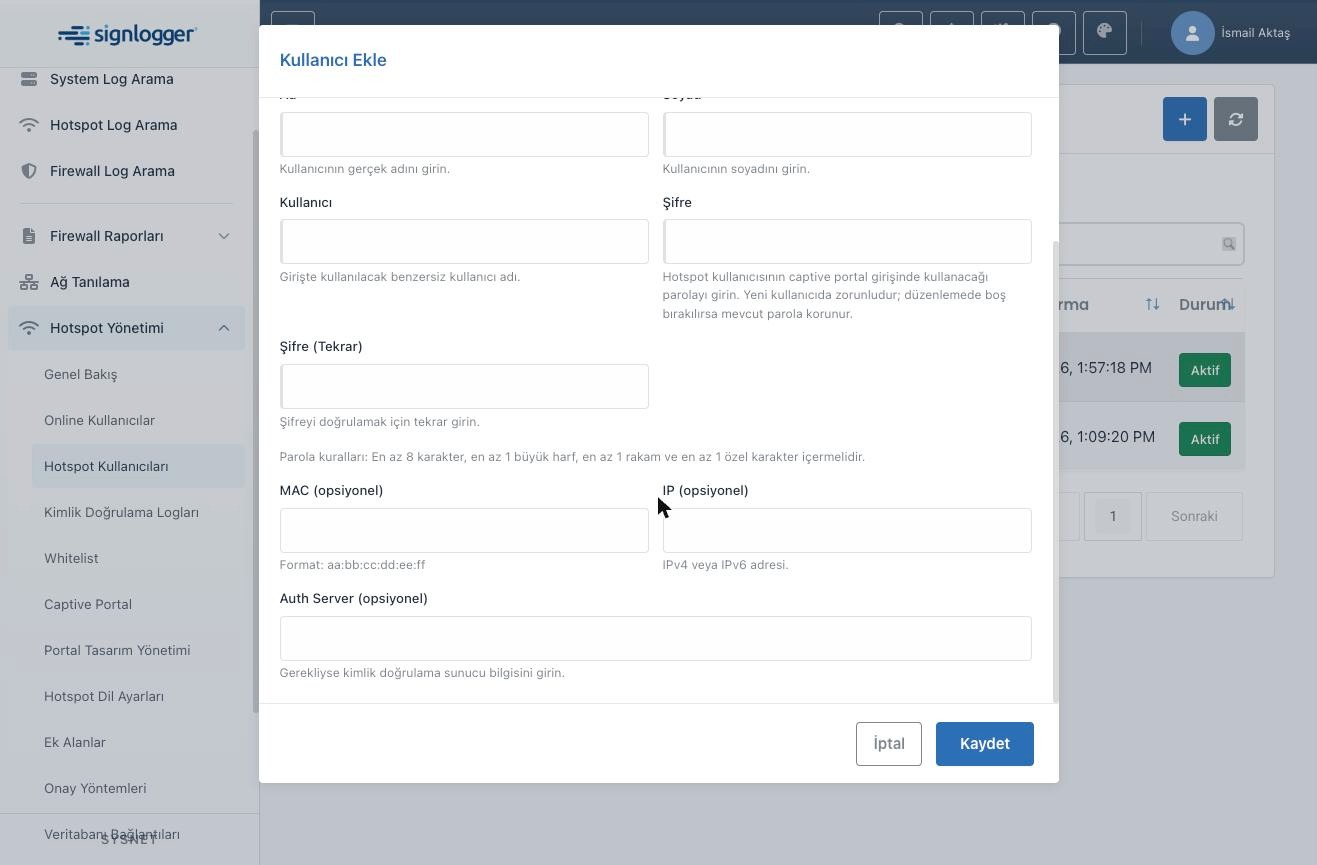
Figure 6 — Add User window: SSID, status, identity fields and the optional MAC/IP/Auth Server fields.
The three fields at the bottom are optional but clear: MAC carries the device's hardware address (aa:bb:cc:dd:ee:ff) when MAC matching is used; IP assigns a fixed address; Auth Server applies in deployments with an external authentication server. Each row has an eye icon opening a read-only Detail window showing every field as name-value pairs plus raw JSON — the fastest way to see what is actually stored when a record misbehaves.
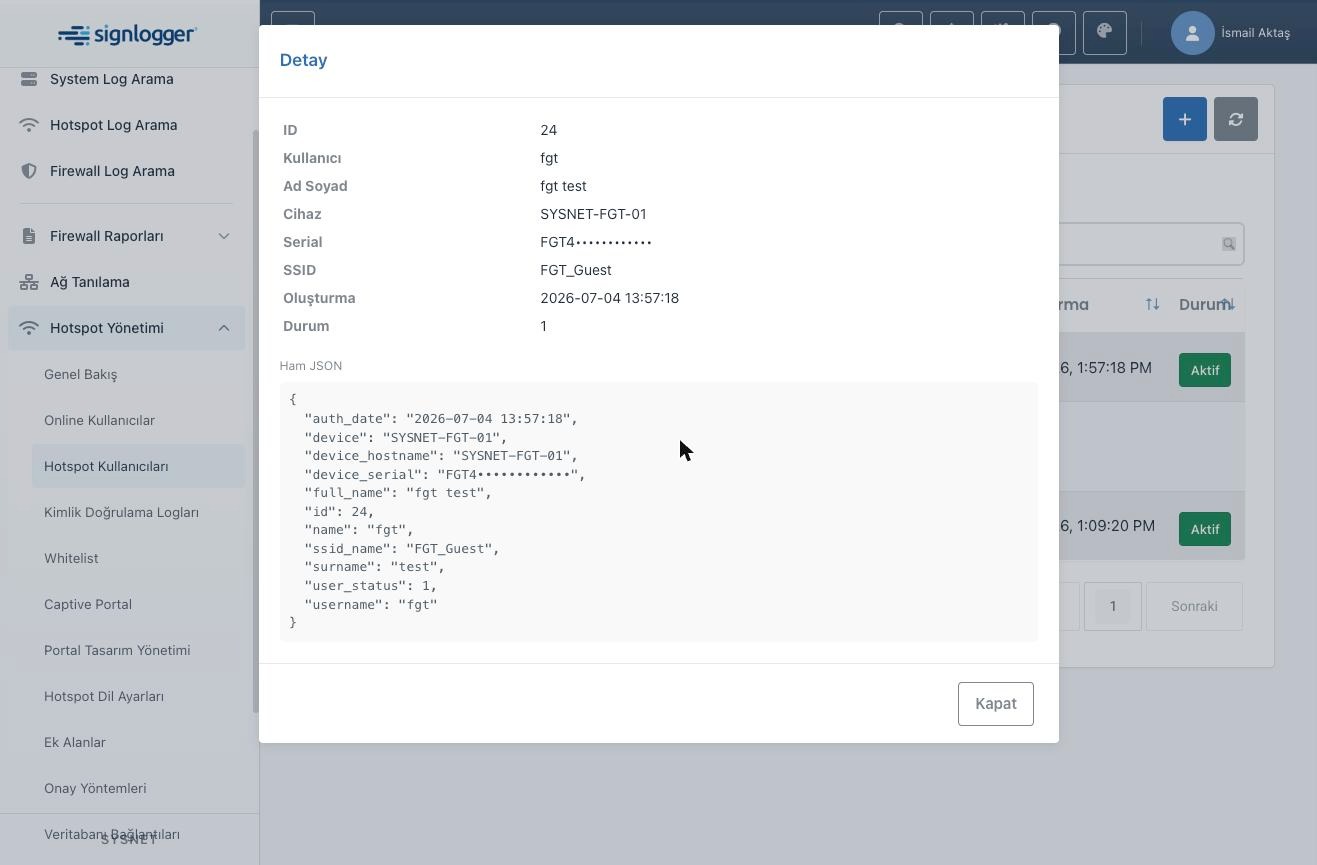
Figure 7 — Detail window: field/value summary and raw JSON view.
6. Authentication Logs
This screen lists every authentication attempt made through the portal, chronologically, with its outcome. Online Users answers "who is connected right now"; this screen answers "who tried to sign in, when, with which method, and what happened". It is the page you will use most while troubleshooting.
Columns cover time, user, full name, SSID, device, method, status, IP and MAC. For SMS sign-ins the user column shows the phone number; for form or local sign-ins, the username. The device column shows the source hardware by serial. The method values — sms_auth, form_auth, user_login — reveal which path users prefer when several are enabled on one SSID. The status column shows success/failure, and expanding a row reveals extra detail and JSON.
Practical use: when a user says they cannot sign in, narrow the time range and search by username or MAC; if the status is failed, read the reason field. An empty list usually points to permissions or backend log support — not to the user never trying.
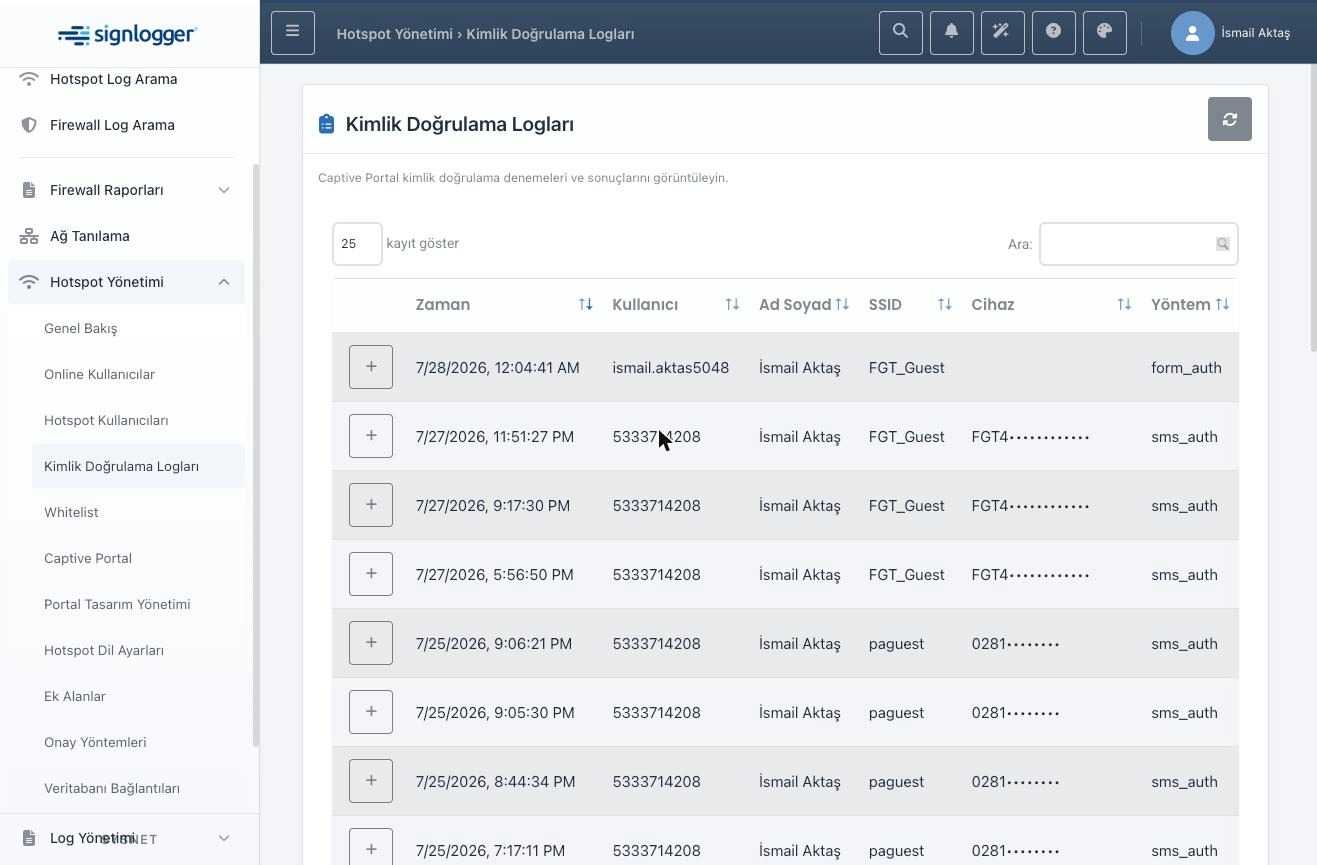
Figure 8 — Authentication Logs.
7. Whitelist
The Whitelist screen grants specific MAC addresses automatic portal access and works via NAC. Management is per SSID: with the SSID selector on "All" you see every network's entries, but adding requires a single SSID selected — the Add button stays inactive on "All" (the hint below the selector says so, too).
The MAC Address field accepts colon-separated, dash-separated or separator-free formats and normalizes the value. First/last name are optional labels. The table has SSID, name, MAC and action columns.
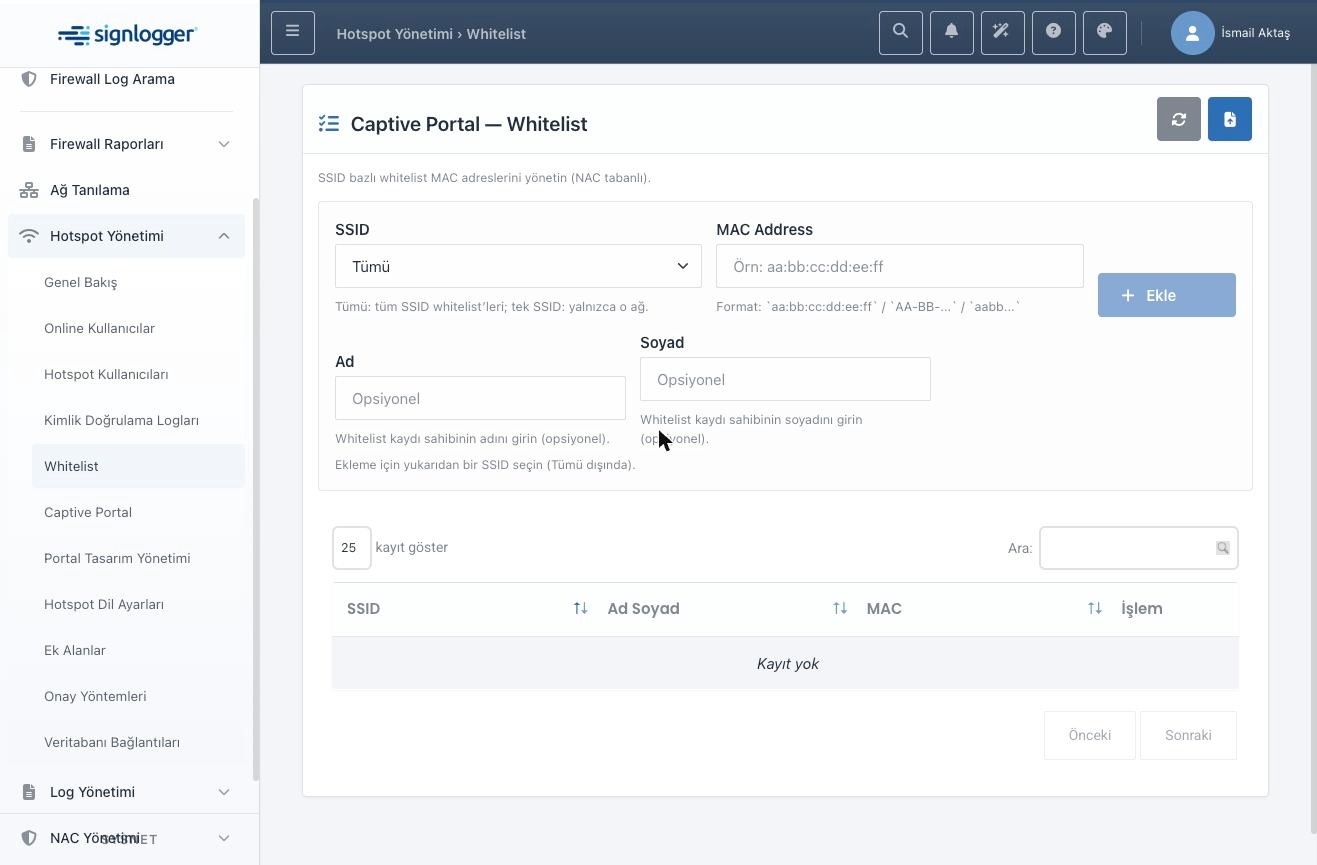
Figure 9 — Whitelist: SSID selection, MAC entry and the optional name fields.
The second button on the top right opens Bulk Upload. Its most important setting is Dry run: when on, the file is only validated and nothing is written to the database. Testing the format this way before large uploads prevents half-finished imports. The file may be CSV or XLSX; the mandatory column is mac or mac_address, optional ones are description and enabled.
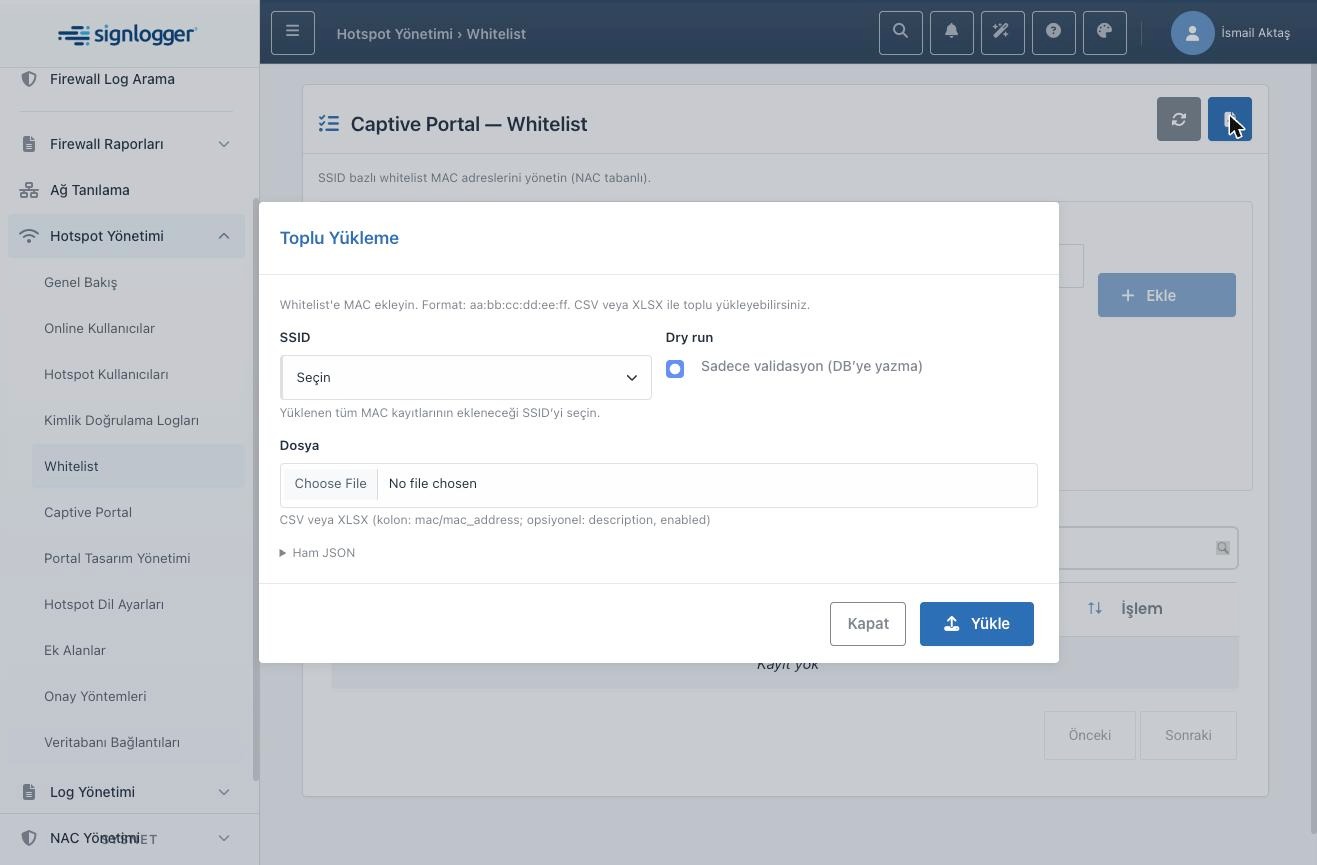
Figure 10 — Bulk Upload window; with Dry run enabled the file is only validated.
A security note matters here. MAC addresses are chosen by the client and are easily spoofed, so a whitelist is a low-security mechanism. Modern phones also use randomized MAC addresses that change periodically — whitelisting such a device permanently gives unreliable results. Treat the whitelist as a small, audited exception list, not a permanent access policy. The right solution for managed corporate devices is 802.1x; for guests, phone-based methods such as SMS. Use the MAC Anomaly Monitoring screen under NAC to watch for abuse; critical findings are also written to the NAC Audit Log.
8. Captive Portal (SSID) Management
This page is the heart of the module. Each row is a portal/SSID definition, and everything from design to authentication method binds to it. Columns: a small logo preview, the record's domain (root only), the bound device with serial, the location name, the SSID, and the copyable portal address. What the UI calls Location corresponds to the backend field company_name.
The portal address is derived automatically from host + SSID. Renaming an SSID therefore changes the portal address — remember to update the redirect on the firewall or access point. The Redirect URL is not shown in the list; it is managed in the edit window's Network and Redirect section.
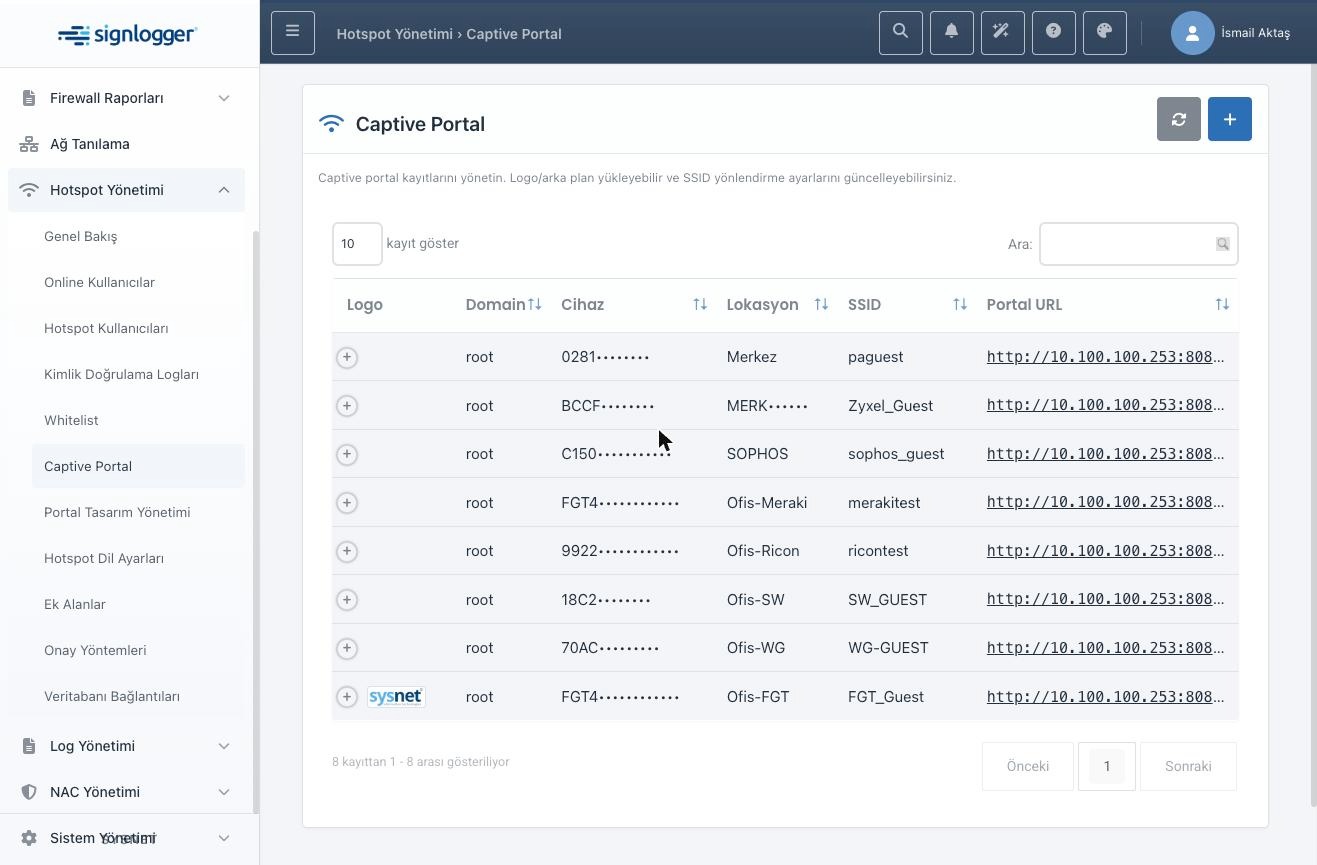
Figure 11 — Captive Portal record list.
The plus button at a row's start reveals three values not shown in the list — the permitted firewall IP, the portal's default language and the guest network CIDR — along with the edit and delete buttons.
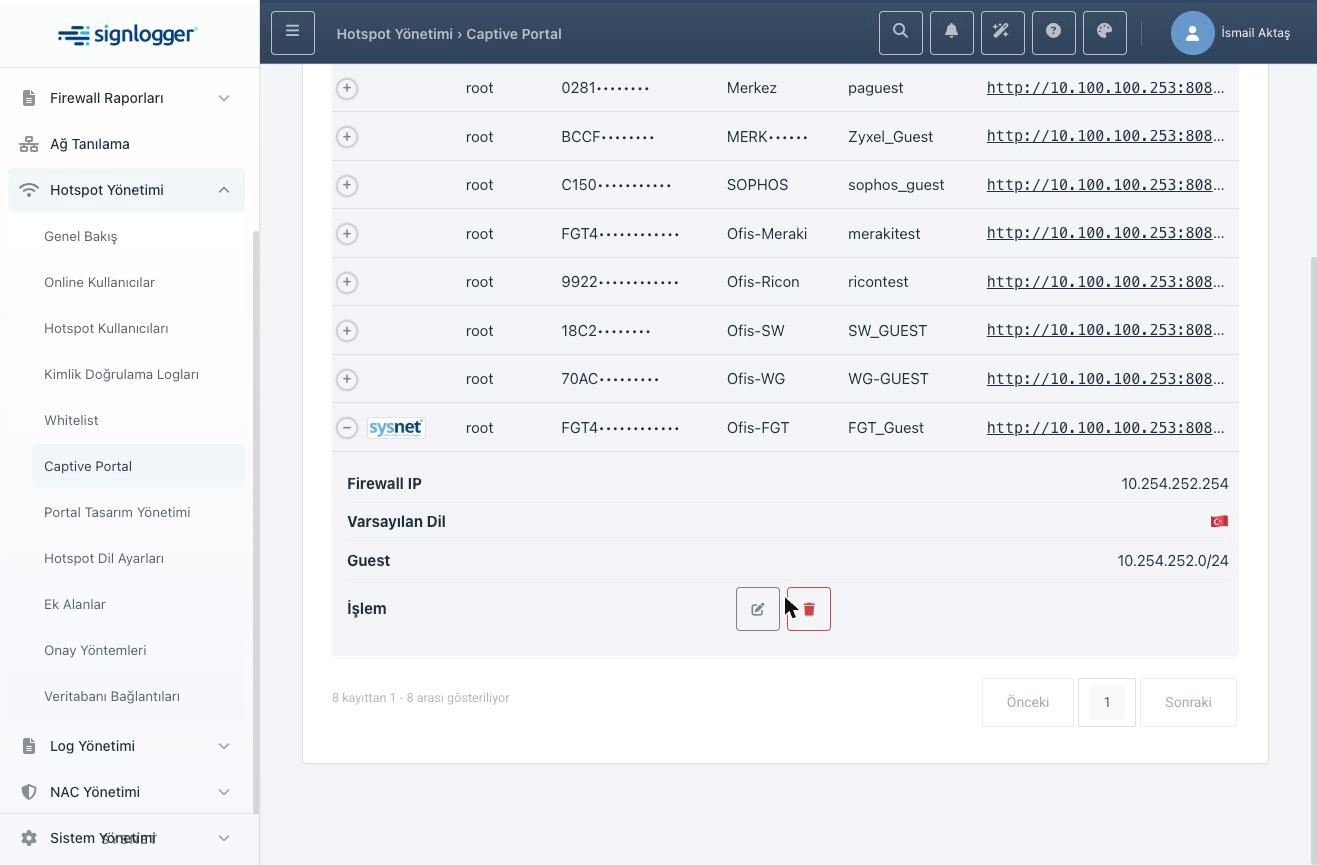
Figure 12 — Expanded portal row: firewall IP, default language and guest network.
8.1 The Edit Window — Basic
The edit window has six sections designed to be filled top to bottom. In Basic, Device (required) binds the record to hardware — the drop-down shows device name plus serial. Location (required) groups records. SSID is the wireless network redirected to the portal. Default Language sets the language the portal opens with.
Four optional fields follow: FQDN for domain-based portal access; a second SSID for aliases or legacy setups; RADIUS Group, which sets the group assigned to authenticated users and becomes critical in LDAP scenarios (covered in its own section); and Mail Server, selecting which defined server sends notification and approval mail.
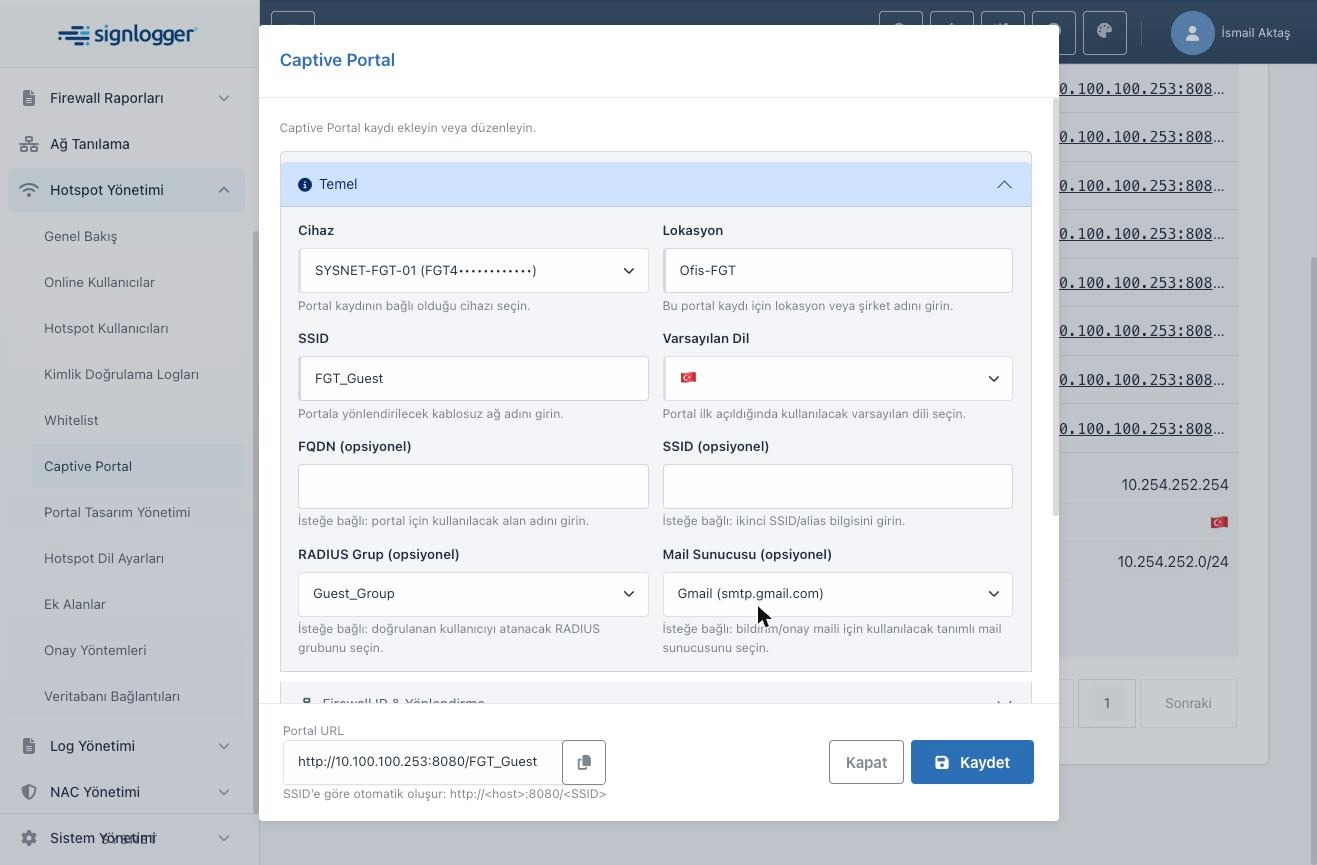
Figure 13 — The Basic section.
8.2 Firewall IP and Redirect
All three fields here are required and directly decide whether the portal works. Firewall IP takes one IP/CIDR or a comma-separated list — the firewall addresses allowed to talk to the portal. Guest Network takes the guest subnet(s) as CIDR. Redirect URL is the exact address users land on after successful sign-in.
When this trio is wrong the picture is always the same: the user sees the portal, signs in, gets a success message — and has no internet. Verify Firewall IP and Guest Network against the real topology first.
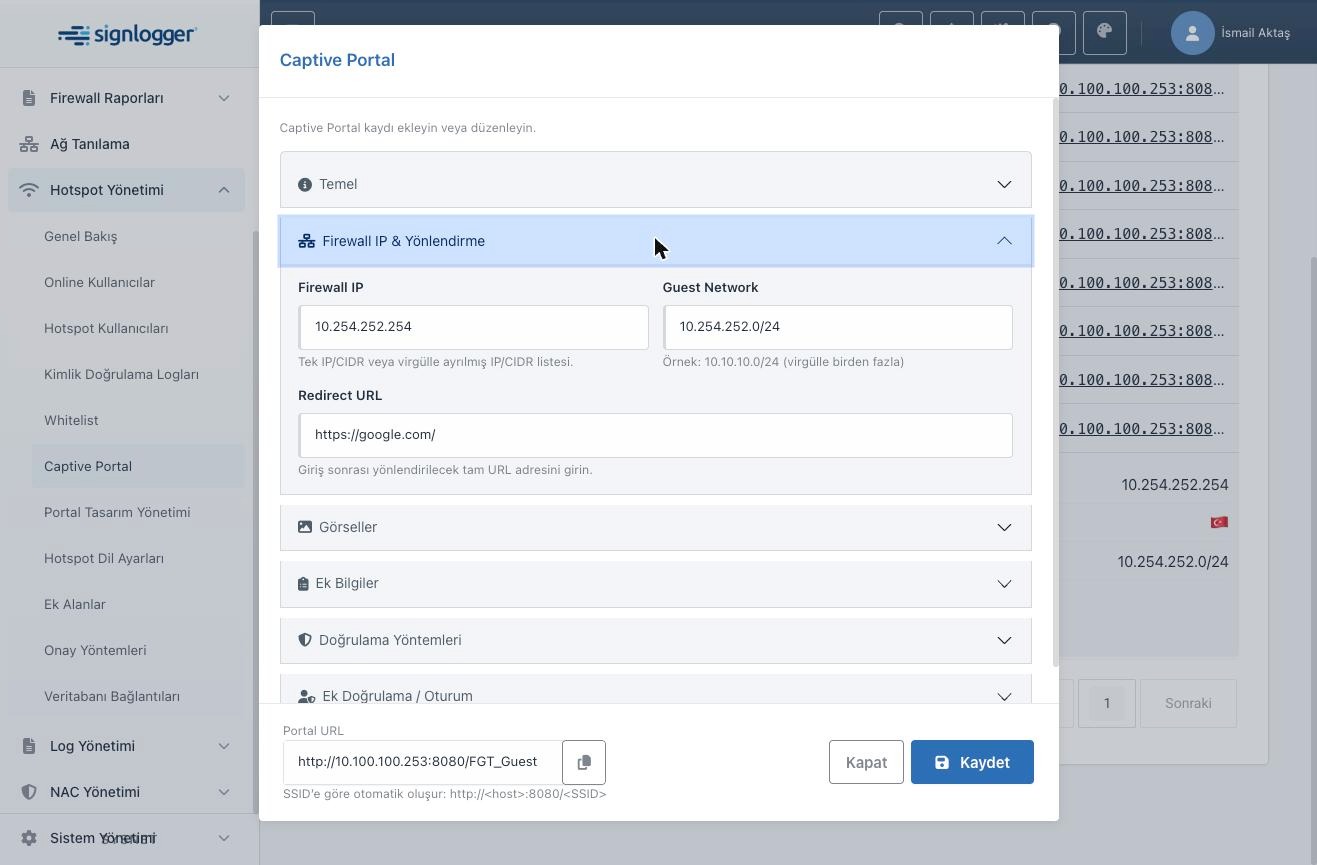
Figure 14 — Firewall IP and Redirect section.
8.3 Images
The Images section uploads the portal logo and background. Each field has a delete button (permission required); an uploaded logo previews below. Both are optional — the portal opens with the default look otherwise. For corporate branding, upload the logo here and tune the colors in Portal Design Management.
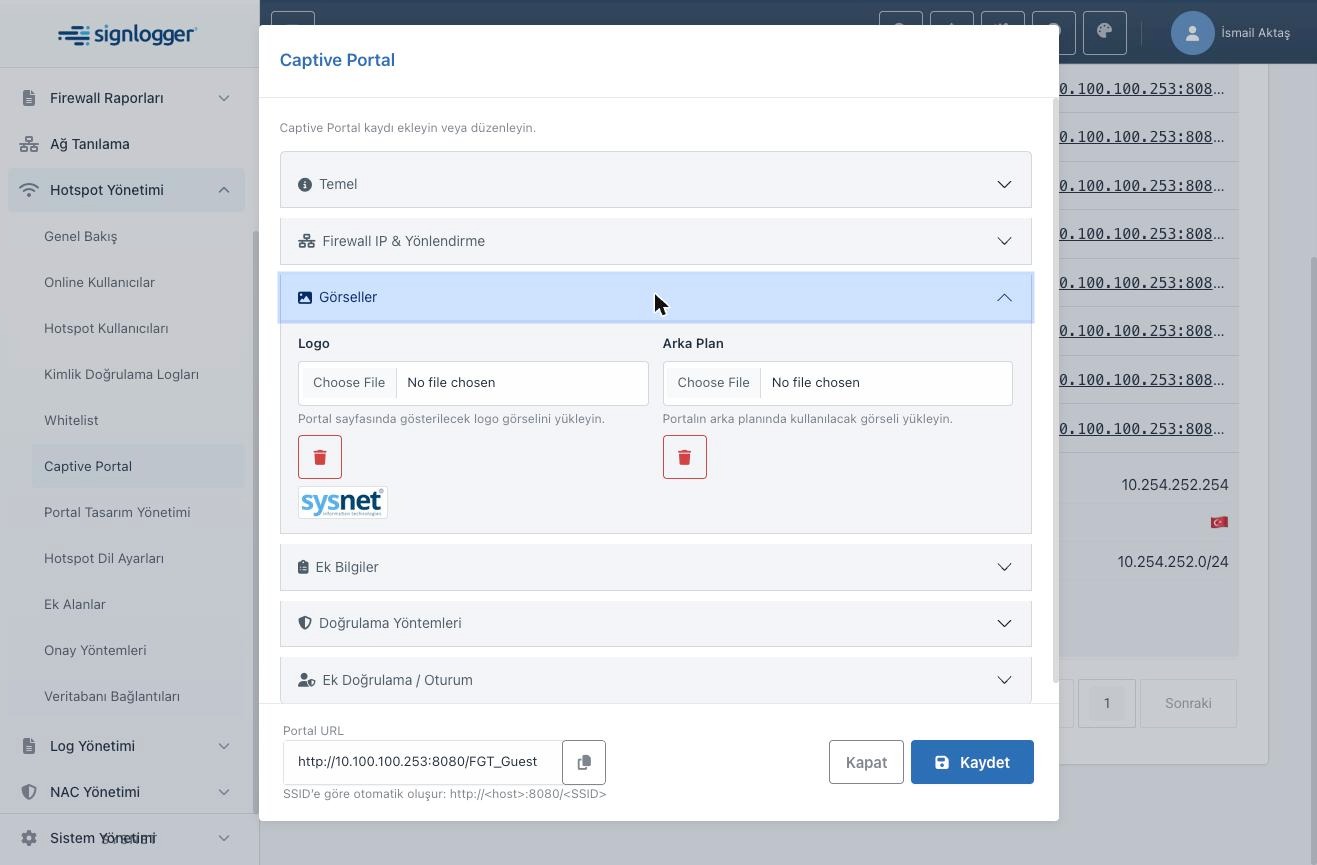
Figure 15 — Images section: logo and background upload fields.
8.4 Additional Information
This section has a single switch: Additional Fields. When on, the portal collects extra information from users. The UI warns right above the switch: additional fields only gather information and never affect the authentication methods — enabling them does not harden sign-in, it only adds form fields. The labels and values are defined on the Additional Fields page.
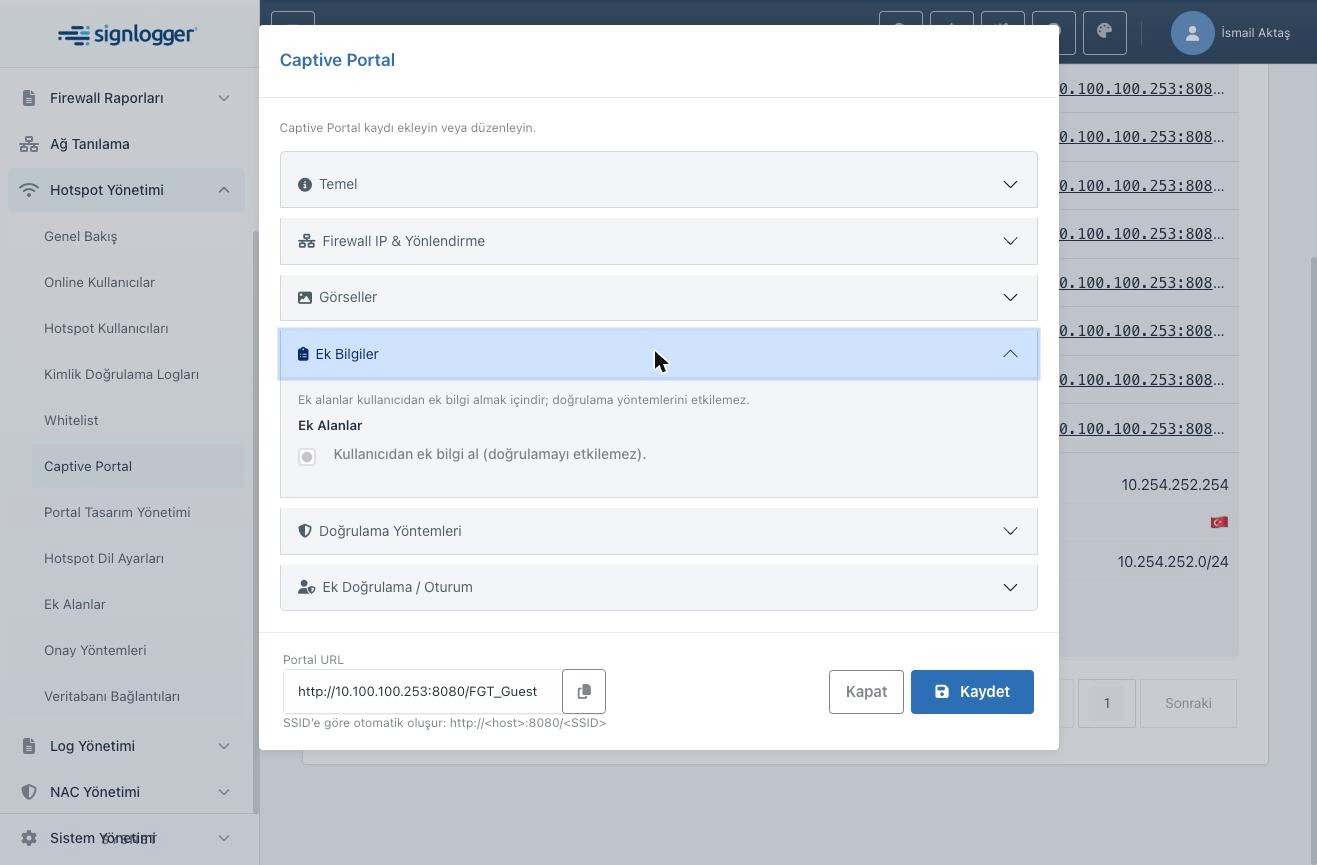
Figure 16 — Additional Information section and the "does not affect authentication" note.
8.5 Authentication Methods
This section is the portal's gate. The UI makes an important distinction at the top: SMS and LDAP are authentication methods, while 2FA is an extra verification layer. There are four switches: Login (local username/password), Form auth (sponsor-approved form sign-up), SMS (code sent to a phone number) and LDAP (Active Directory account sign-in). The LDAP switch carries an explicit "Not recommended" label.
The Trusted Domains field plays a critical role for form sign-ups: the approval mail is sent ONLY to sponsor addresses within the listed domains — leave it empty and no approval mail ever goes out. The same data is shared with Trusted Domains on the Approval Methods page, so it can be edited in either place. The National ID/Passport and Phone options control whether extra identity fields appear on the form and are optional.
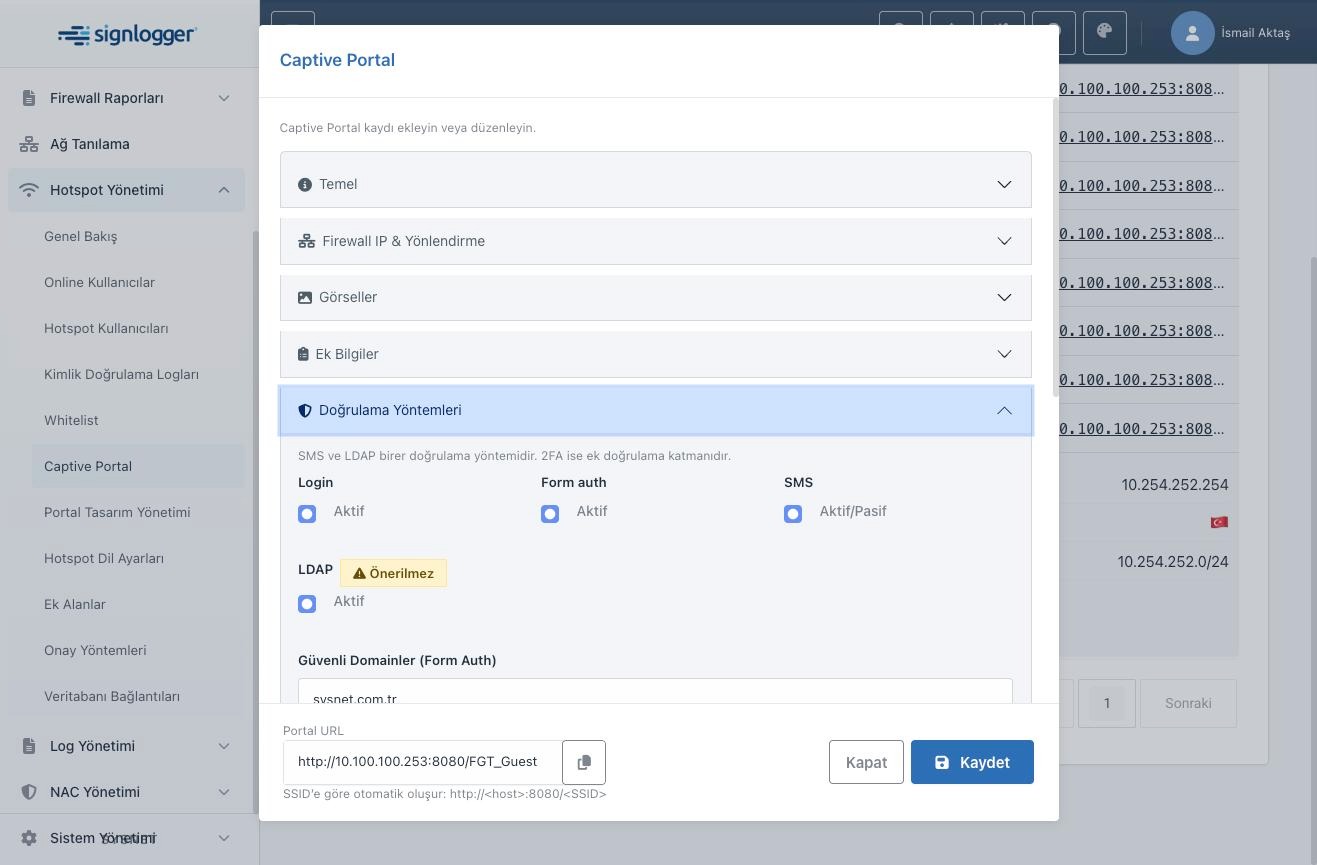
Figure 17 — Top of Authentication Methods: Login, Form auth, SMS and LDAP switches.
The rest of the section holds SMS- and LDAP-specific choices. SMS Method selects GET or POST toward the provider; SMS Provider picks the defined provider record. LDAP Config selects the primary directory configuration and LDAP Fallback the backup used when the primary is unreachable. These fields become conditionally required when their method is enabled.
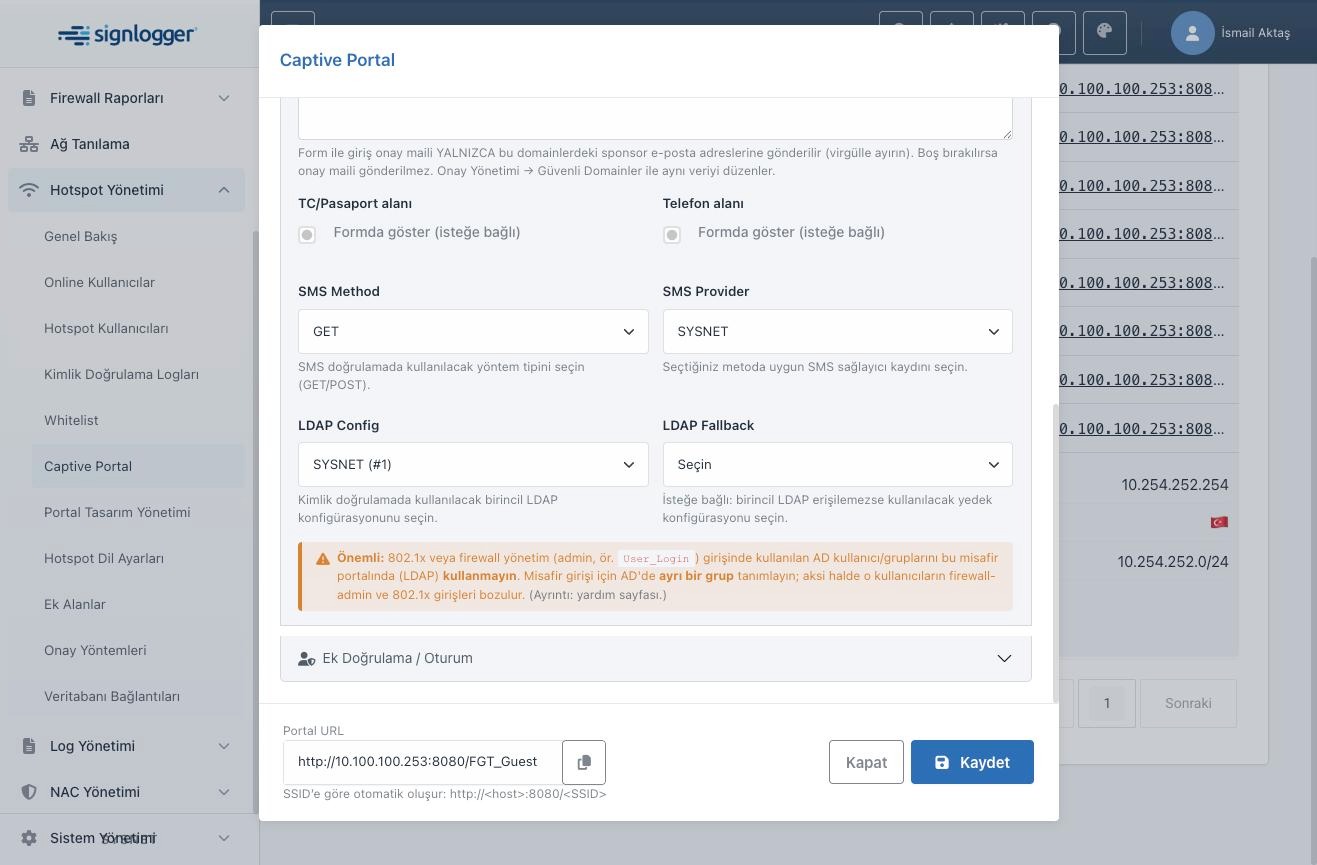
Figure 18 — SMS and LDAP selections and the 802.1x/firewall-admin warning.
8.6 Extra Verification and Session
The last section has two switches. 2FA layers extra verification on top of the selected methods, and requires at least one of SMS, Form, Login or LDAP to be on. Save user auth stores the user's credentials so they can sign in again on a later visit — comfortable on guest networks, but it can blur accountability when several people share one device.
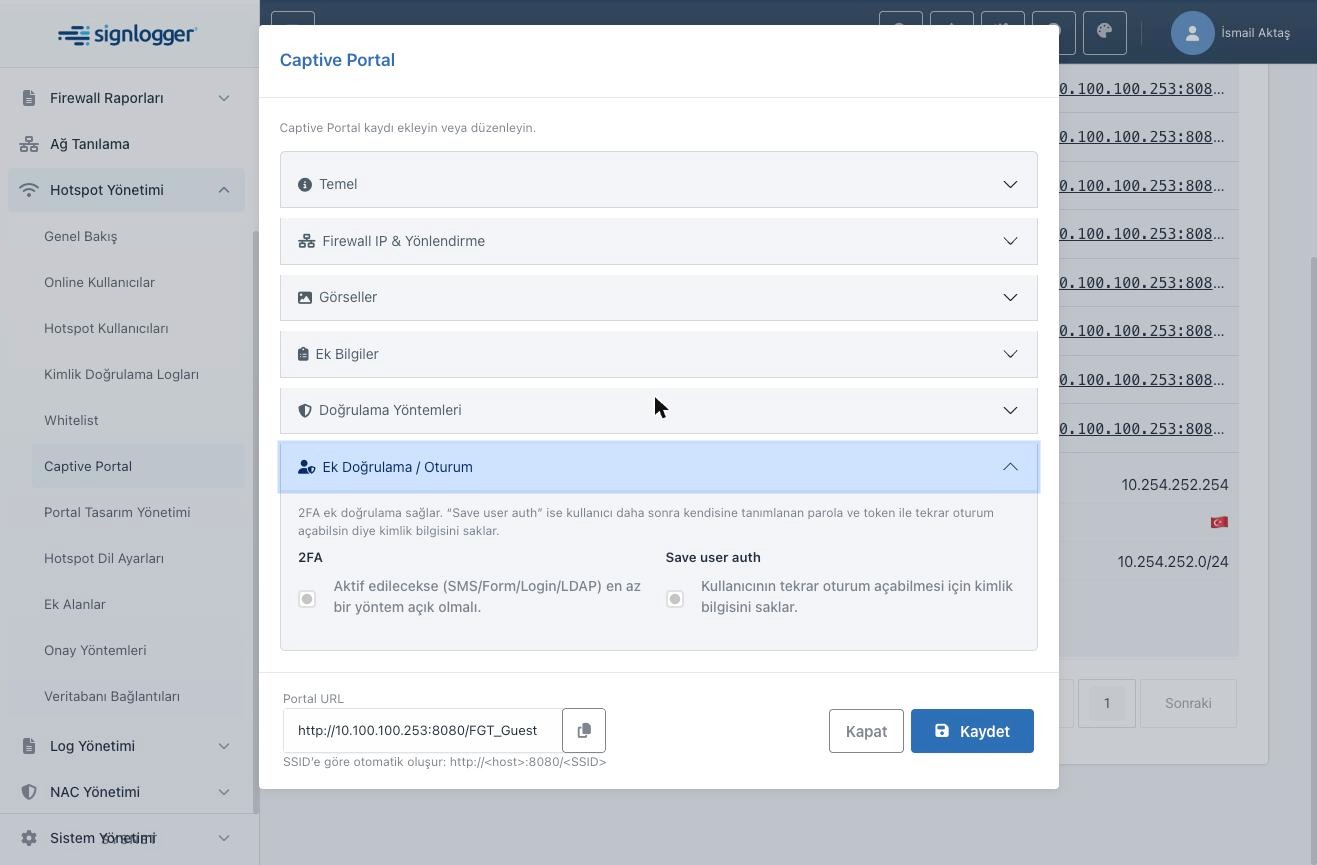
Figure 19 — Extra Verification / Session: 2FA and Save user auth.
8.7 LDAP Portal Sign-in: Why It Is Not Recommended
The "Not recommended" label next to the LDAP switch is deliberate, and the in-product help explains why. The first and biggest reason is password risk: devices like FortiGate re-verify the portal user over RADIUS in the background, mostly via PAP — for that to work, the system must keep the user's directory password in its own table. In a closed system the risk is low but not zero; SMS and form methods store nothing of the kind. The second reason is identity collision: if the same directory user is used both on the guest portal and for 802.1x or firewall admin sign-in, the guest record can break the other logins.
If LDAP is used anyway, all four conditions must hold: an active, default LDAP configuration with a successful connection test; the LDAP switch on with LDAP Config selected in this modal; the SSID's RADIUS Group field exactly matching one of the user's directory groups (case-insensitive but spelling-sensitive) — the condition most often missed; and Login or Form auth enabled on the portal. Even with a correct password, a user outside that group is denied and nothing is logged anywhere.
The design is intentionally restrictive: the point is not to admit the whole directory but only members of the one group defined for that SSID. An admin account therefore cannot sign in through the guest portal, and admin identity never leaks into a portal session. "LDAP is right but sign-in fails" is almost always the third condition.
8.8 Cisco Meraki Integration
Meraki works on a different model, and it affects portal setup directly. With Meraki, internet access is granted in the Meraki cloud, not on a local device — the access point can sit behind any firewall or NAT, and SignLogger needs no direct network path to it. All that is required is that the client can reach both the SignLogger portal and the Meraki cloud.
The flow: the user lands on the Meraki splash page and is forwarded with the necessary parameters to the SignLogger portal; authenticates with the enabled method; SignLogger produces a grant address and the user is redirected to the cloud through it. Two security points: the grant is issued only toward the verified Meraki cloud address (open-redirect protection), and sessions end by cloud-side expiry, not by a local kick-user command. So with Meraki, plan session durations instead of expecting force-logout from the Online Users screen.
9. Portal Design Management
This heading is a landing page for three sub-modules. Design Settings covers colors, fonts and images; Text Settings the per-language agreement and interface texts; Theme Management the ready-made themes and applying them to an SSID. All three ask for an SSID first.
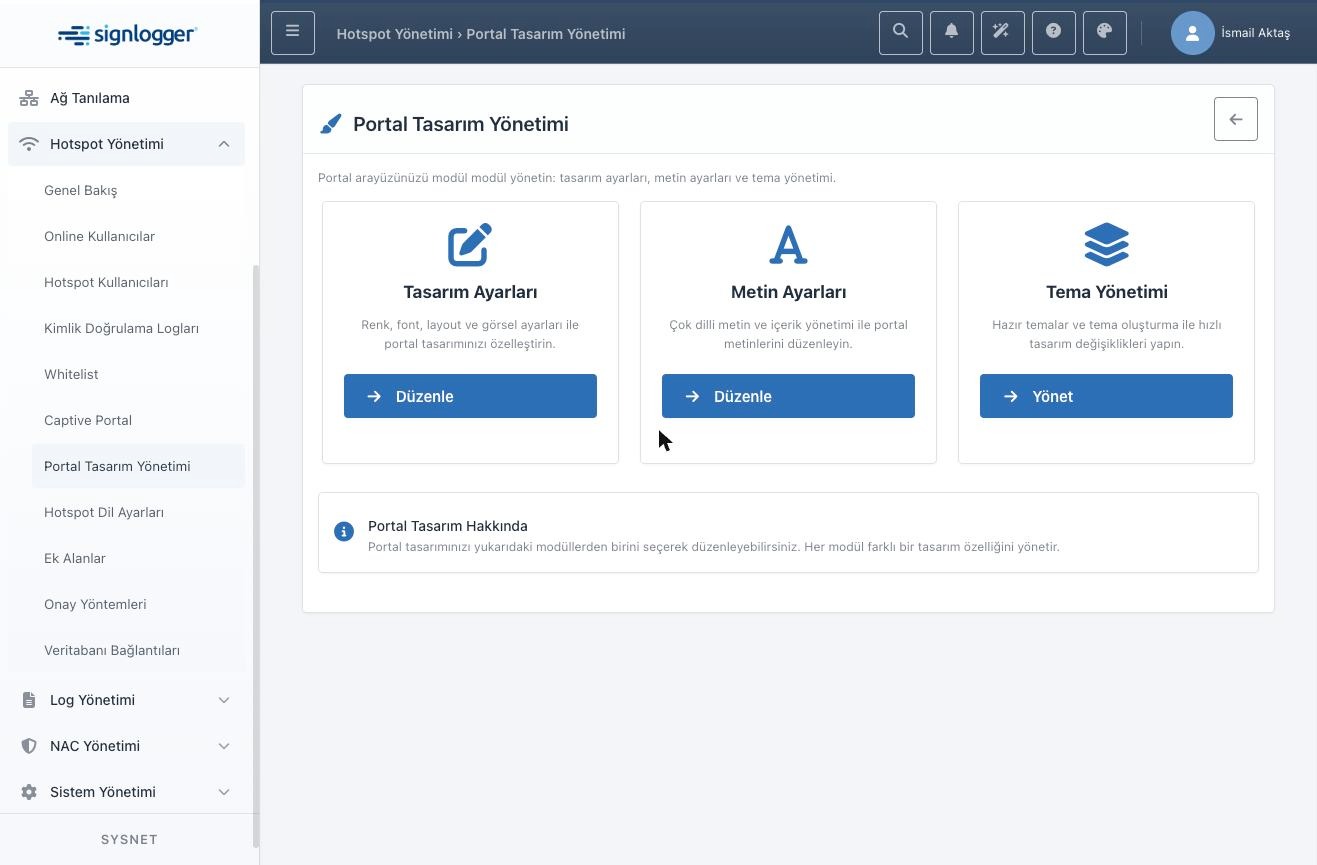
Figure 20 — Portal Design Management landing page and its three sub-modules.
9.1 Design Settings
The Design Settings screen works with the form on the left and a live preview on the right. The SSID selector at the top right decides which portal is being designed; Save stays inactive until one is selected. The fields are grouped into five accordion sections — Colors, Visual Settings, Fonts, Form Settings and Ad Spaces — with one section open at a time.
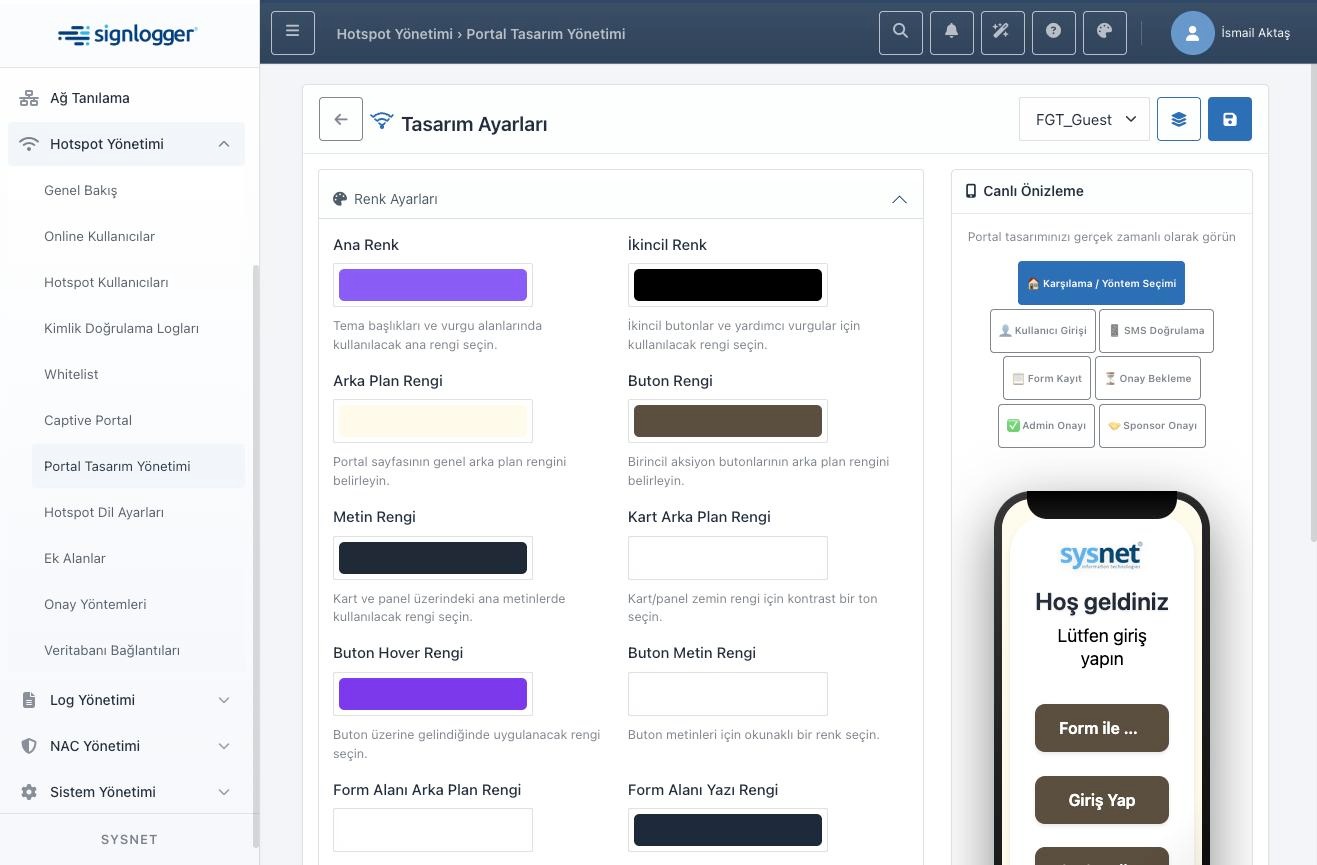
Figure 21 — Design Settings overview: accordion sections left, live preview right.
Colors
All eleven fields use a color picker. Primary Color drives theme headings and accents, Secondary Color auxiliary buttons, Background Color the page canvas, Button Color primary actions, Text Color the general text. Card Background, Button Hover, Button Text, Form Field Background, Form Field Text and Form Field Border complete the set. In the sample deployment the card background, button text and form field background are deliberately left empty; filling them consciously keeps a chosen theme consistent on every screen. Before saving, verify the contrast between button color and button text color in the preview.
Visual Settings
Visual Settings goes beyond color into shape. Text Opacity is a slider from 0 to 1 in 0.05 steps. Corner Radius and Button Corner Radius run 0–50 px separately for cards/panels and buttons. Background image placement uses three drop-downs: Position offers nine anchors (Center, Top, Bottom, Left, Right and the four corners), Size offers Cover, Contain, Auto and Full, Repeat offers No-repeat, Repeat, Repeat-X and Repeat-Y. Background Image Opacity (0–1, steps of 0.1) balances readability over the image.
The same section holds Animation Enabled (Yes/No) with Animation Type (Fade, Slide or Bounce), a free-text Theme Name (the sample uses colorful — the name you meet again when saving the design as a theme), and Button/Card Shadow fields that expect raw CSS shadow values (the sample uses 0 2px 4px rgba(0,0,0,0.1) and 0 4px 6px rgba(0,0,0,0.1)). Because these two are free text, an invalid value silently disables the shadow — check the preview after changes.
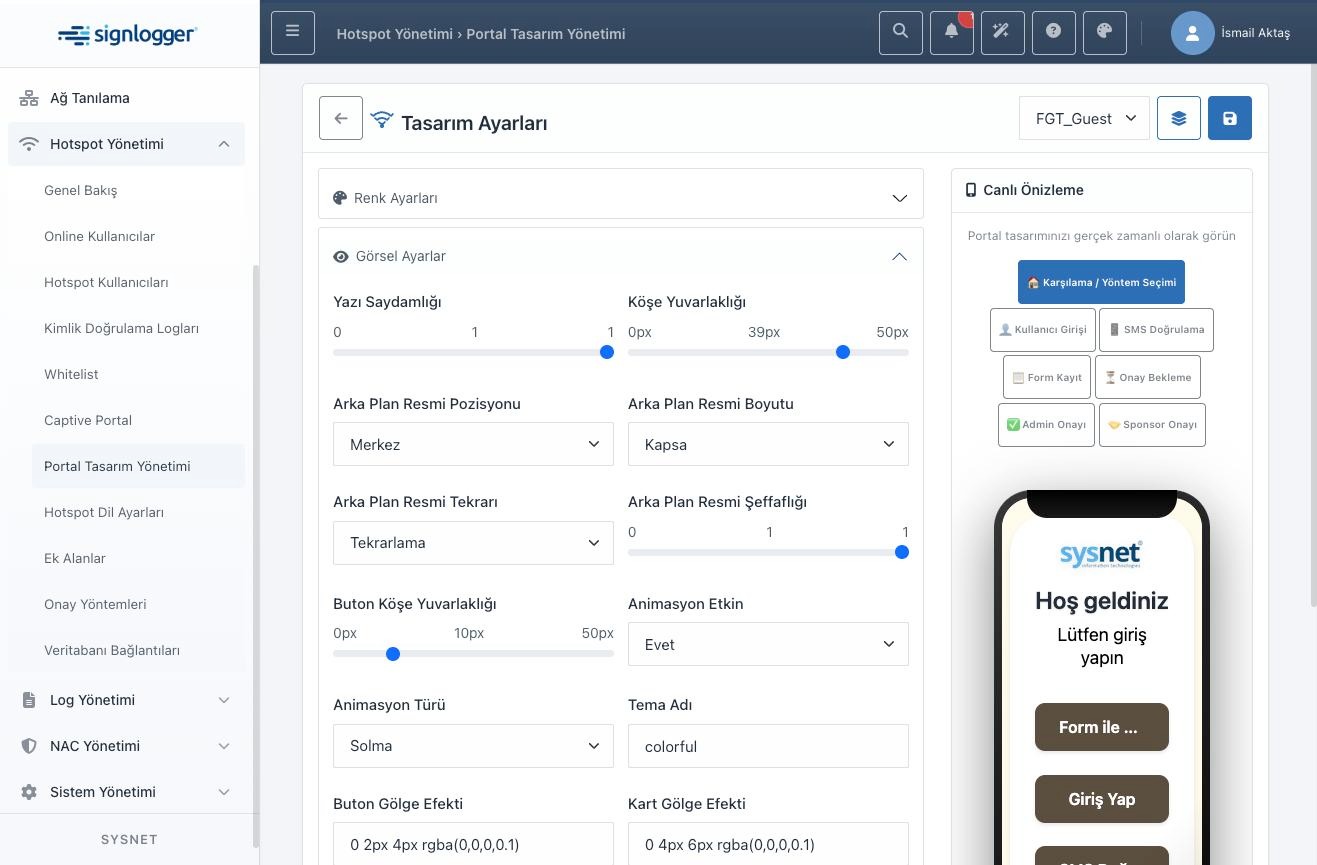
Figure 21a — Upper Visual Settings: opacity, corner radius and background image options.
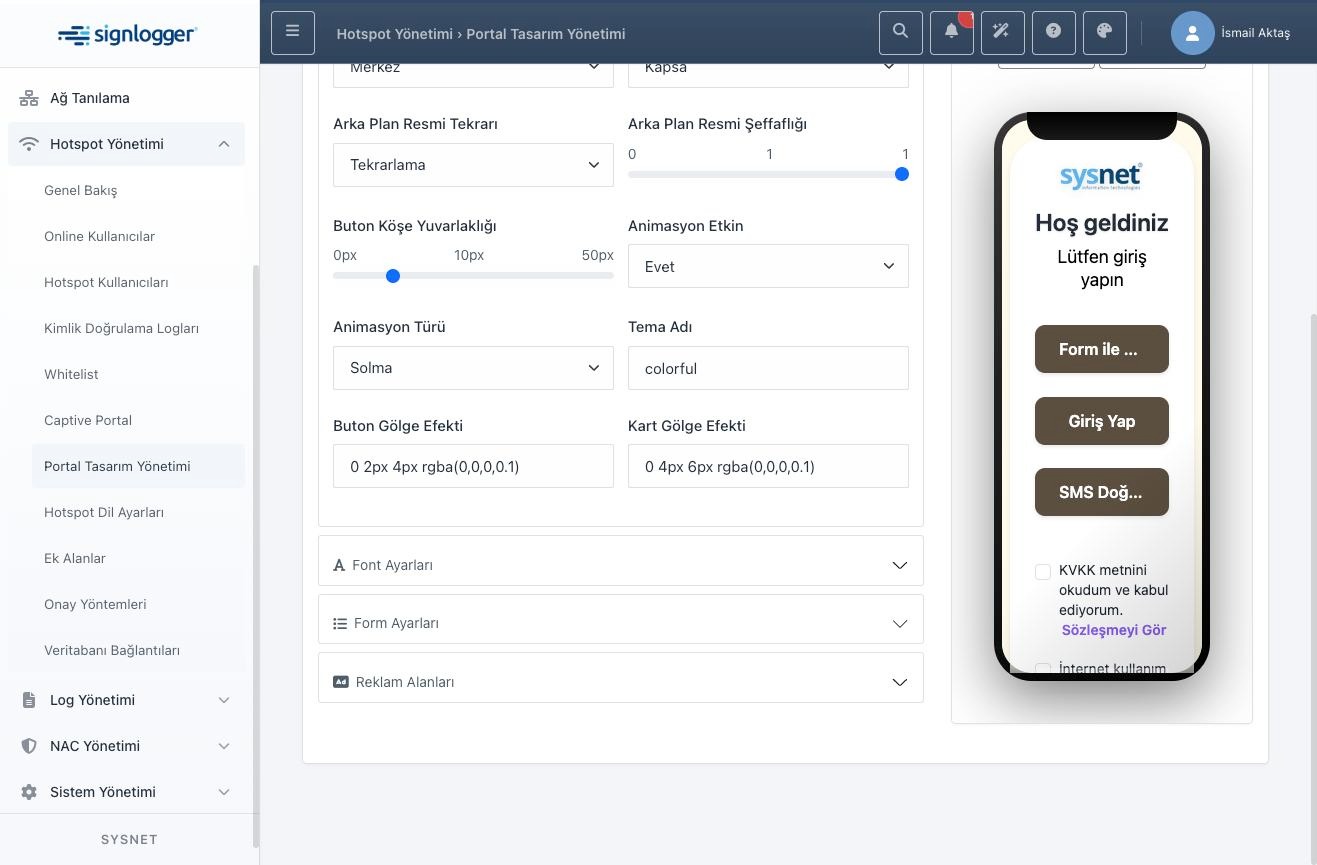
Figure 21b — Lower Visual Settings: animation, theme name and shadow effect fields.
Fonts
Six fields. Font Family offers Segoe UI, Arial, Times New Roman, Courier New, Georgia and Verdana; empty falls back to the browser default. The five numeric fields take pixels within enforced ranges: General 12–24, Heading 16–48, Subheading 12–32, Button 12–24 and Body 12–24. The sample uses 24/18/16/16. The limits prevent publishing a portal with text too large for small screens or too small to read.
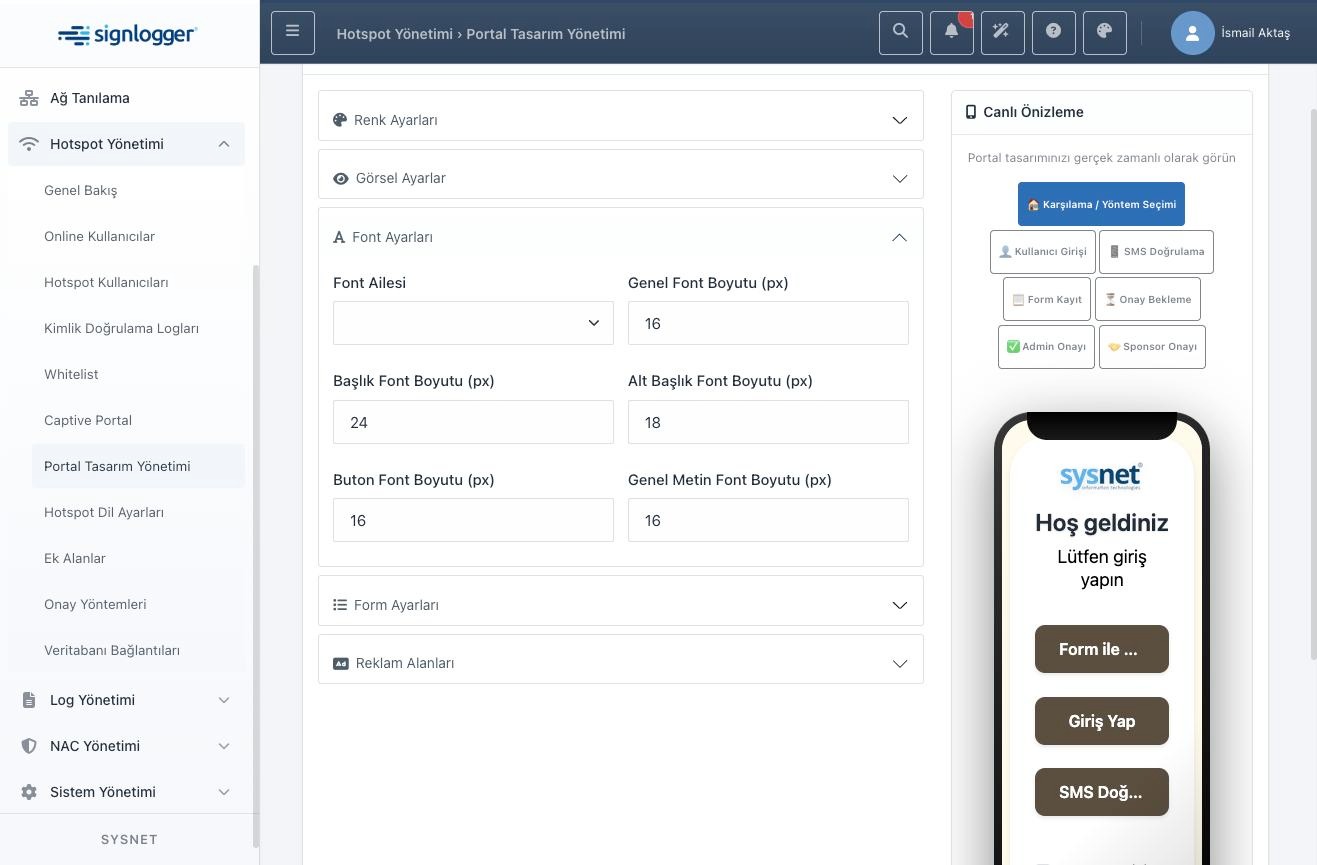
Figure 21c — Fonts: font family and the five separate font size fields.
Form Settings
Form Settings manages both spacing and the order of sign-in methods on the portal. Form Element Spacing, Button Horizontal Padding and Button Vertical Padding accept 5–50 px (24/24/12 in the sample). The important part is the Authentication Button Order list with rows for Form Sign-up, Username/Password and SMS Verification, reordered with up/down arrows. The note below matters: only active methods appear on the portal, but the ordering applies to all — a method disabled on the Captive Portal screen keeps its position and reappears there when re-enabled. Putting guests' most-used method on top is a simple, effective way to cut unnecessary taps.
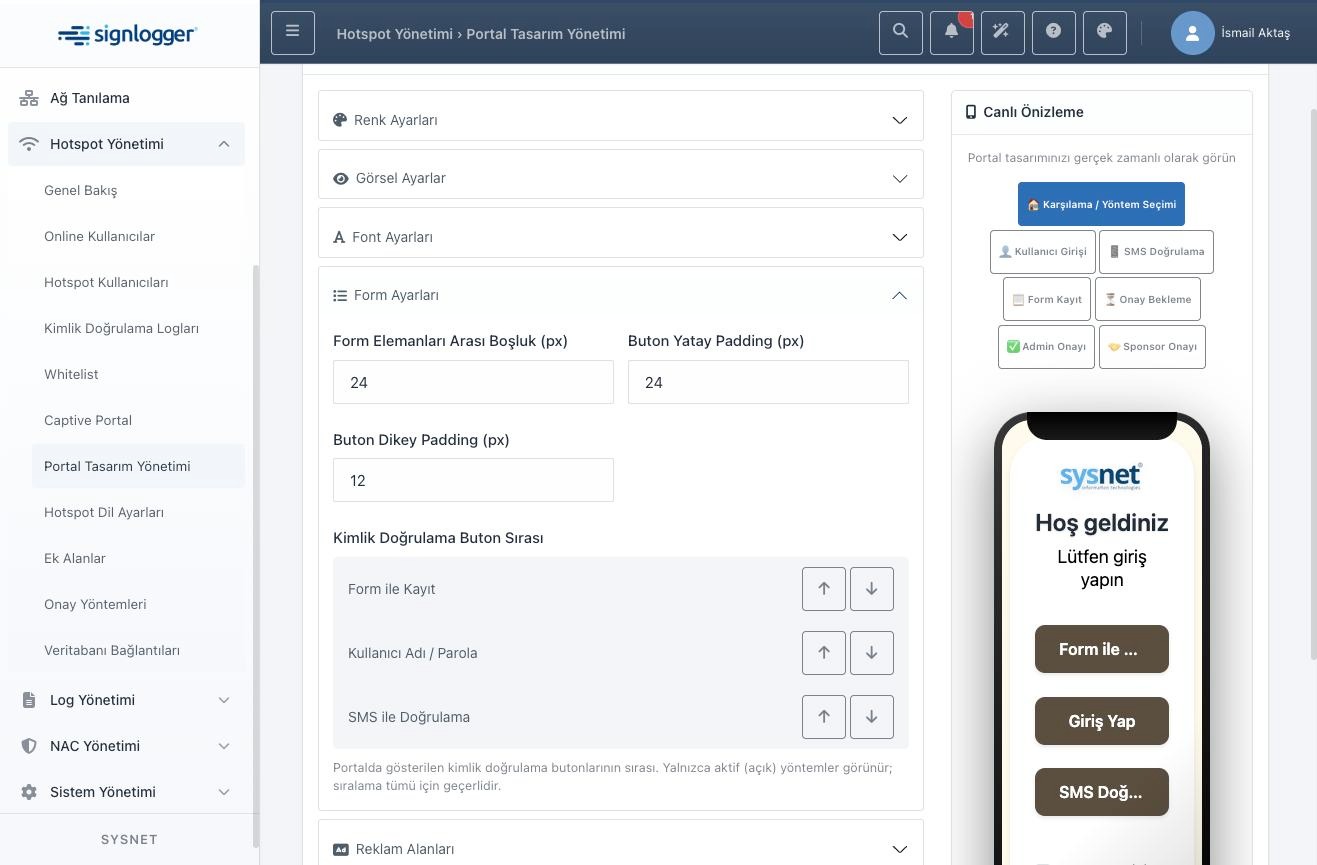
Figure 21d — Form Settings: spacing values and the authentication button order list.
Ad Spaces
Ad Spaces shows a full-page announcement before the welcome screen. The section is armed by the Pre-Authentication Ad switch; while off, nothing is editable and no ad shows. When on, Ad Type offers Rich Text (HTML) or Image. Countdown sets how many seconds the ad shows before the flow continues automatically; 0 disables auto-advance and the guest taps Continue — the default is 3 seconds.
Rich text opens a small editor (bold, italic, underline, lists, alignment, links, clear formatting). The UI warns clearly: content is sanitized server-side — script and iframe tags and event handlers are stripped — and the preview shows the cleaned result, so pasted external HTML blocks may not behave as expected. Choosing Image swaps in a file picker and Upload button; recommended sizes are 1080×1920 for portrait/mobile and 1920×1080 for landscape, scaled to fit while preserving aspect ratio. Both types end with an optional Click-through Link accepting only http(s), opening in a new tab.
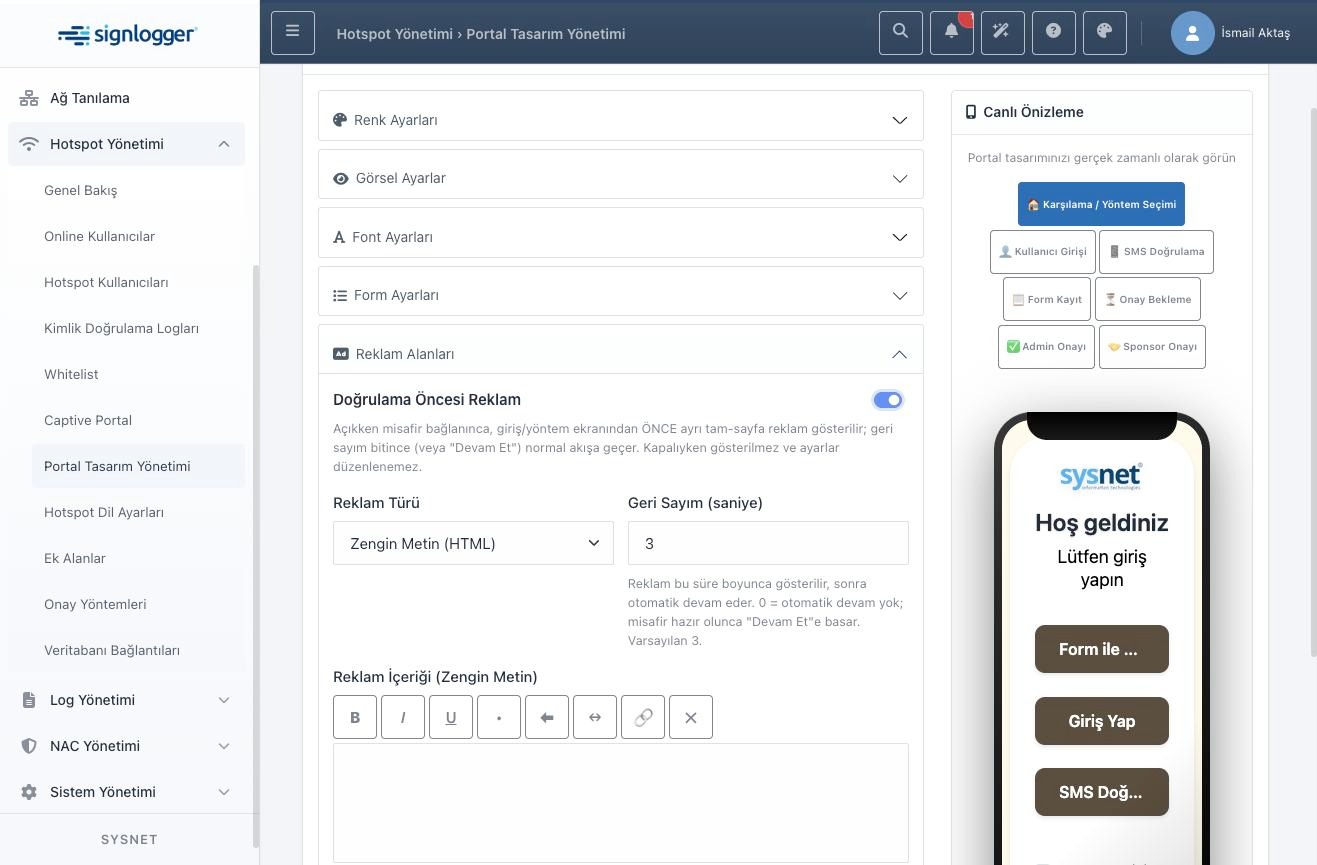
Figure 21e — Ad Spaces: rich text editor and countdown with the ad enabled.
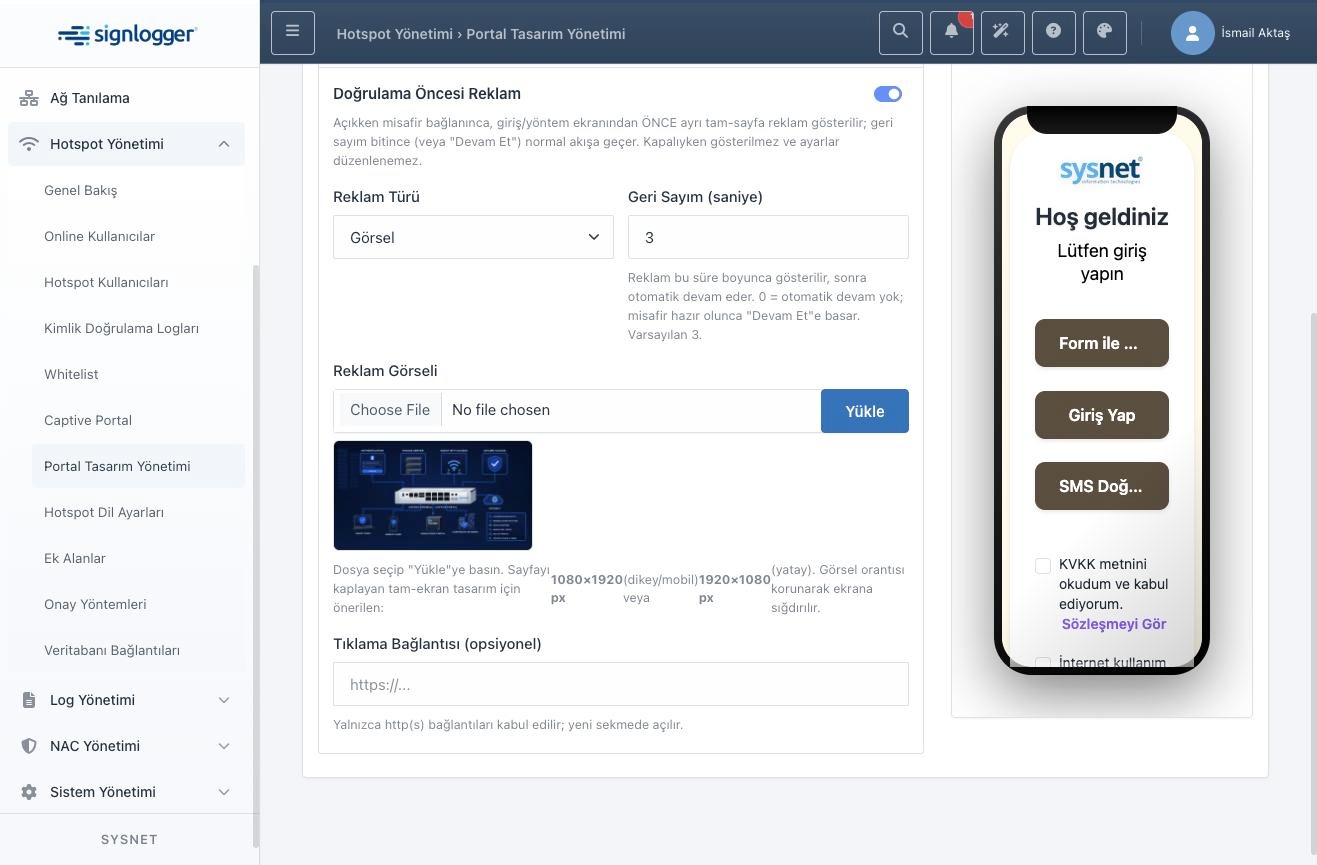
Figure 21f — Ad Spaces: upload area shown when the ad type is Image, with recommended sizes.
Live Preview and Saving the Design as a Theme
The right-hand Live Preview renders seven screens separately: Welcome/Method Selection, User Sign-in, SMS Verification, Form Sign-up, Approval Pending, Admin Approval and Sponsor Approval. The buttons switch the phone frame between steps, so you can confirm the form and approval screens look right in the same palette instead of judging only the welcome page. The preview is still marked beta — do the final check on a real device.
Next to Save sits Save as Theme, which turns the current colors, images, fonts, form and ad settings into a reusable theme you can apply to other SSIDs from Theme Management in one step. Save itself applies the settings only to the selected SSID and stays inactive until an SSID is selected and its data loaded.
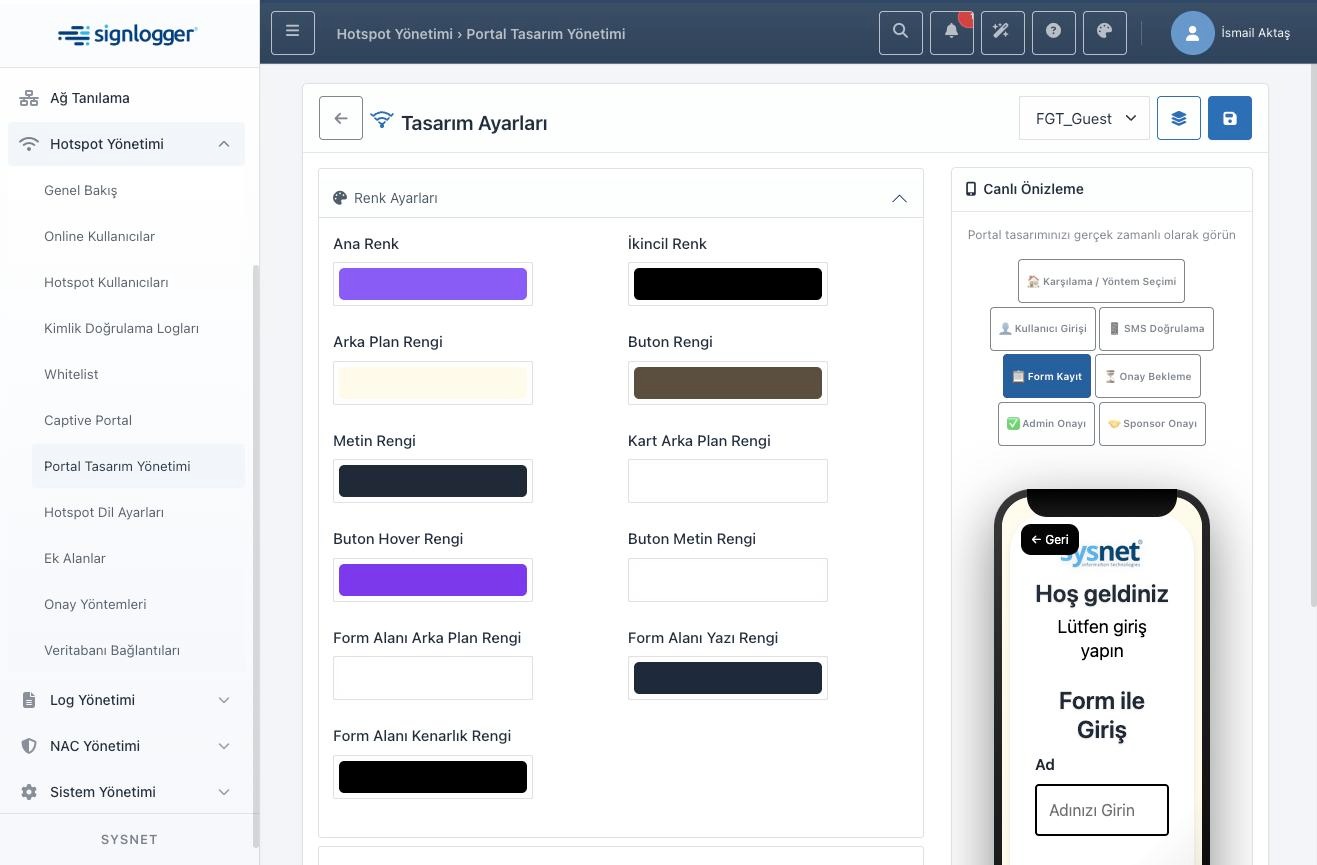
Figure 21g — Live preview on the Form Sign-up step; the buttons switch between the seven portal screens.
9.2 Text Settings
Text Settings edits the agreement and interface texts per language. The left panel lists the fields; the right shows the selected field's language tabs and content box. The labels tell you the role at a glance: Agreement fields hold legal texts such as KVKK and acceptable-use, Modal Title the dialog headings, Checkbox the consent labels, button the button texts. Fields labeled Required cannot be left empty.
The content box takes plain text or HTML. The UI is explicit: for security there is no preview — content is saved as is. When using HTML, verify your tags are closed yourself. Undo reverts only the selected field; Save submits all changes together.
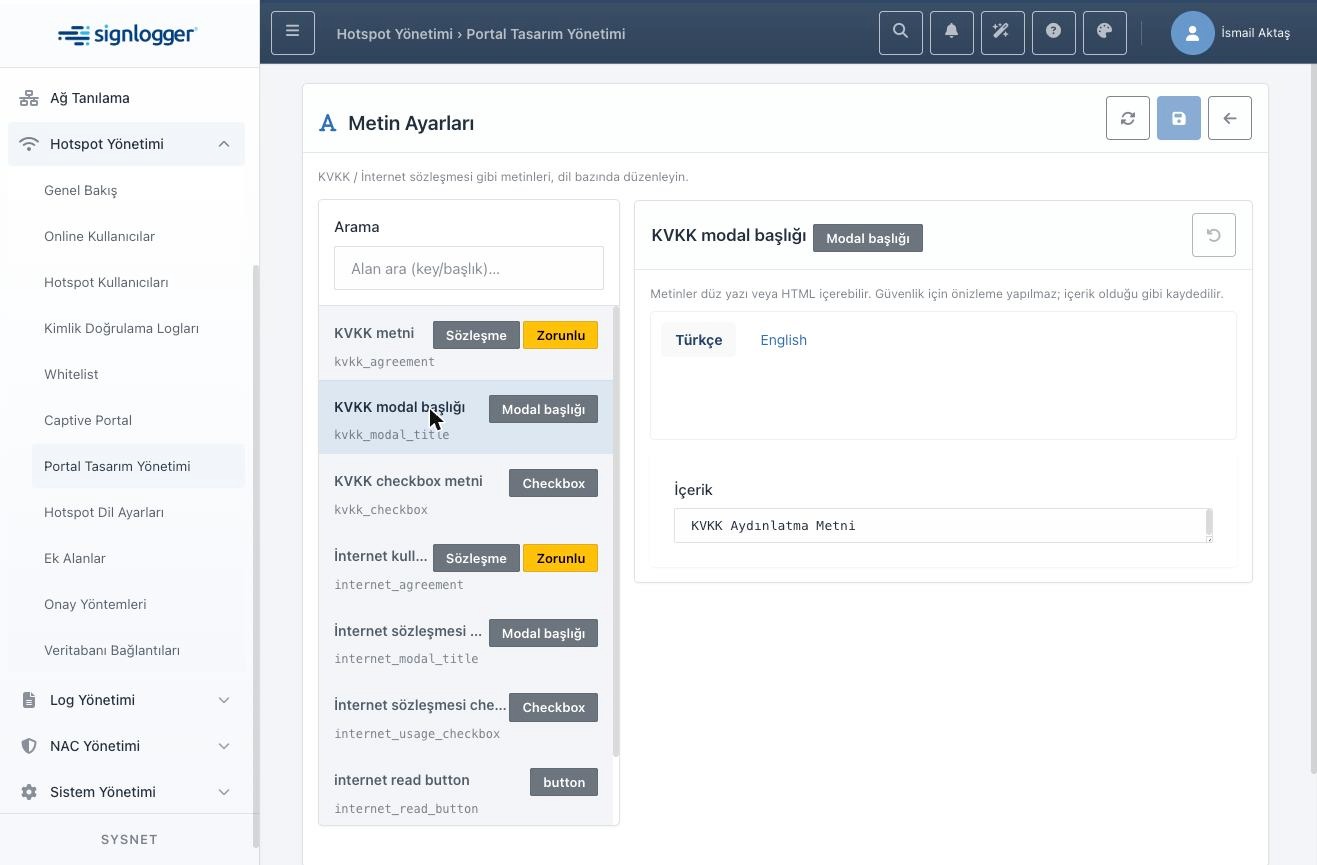
Figure 22 — Text Settings: field list and the selected field's language tabs.
9.3 Theme Management
Theme Management applies ready-made theme sets quickly. The SSID selector on top decides the target portal. Category and Type filters narrow the list — Type separates system themes from user-created ones. Each theme shows its name, category, type and color swatches; the default theme carries a green badge. The phone preview approximates the portal with the selected theme. After applying a theme, fine-tune in Design Settings.
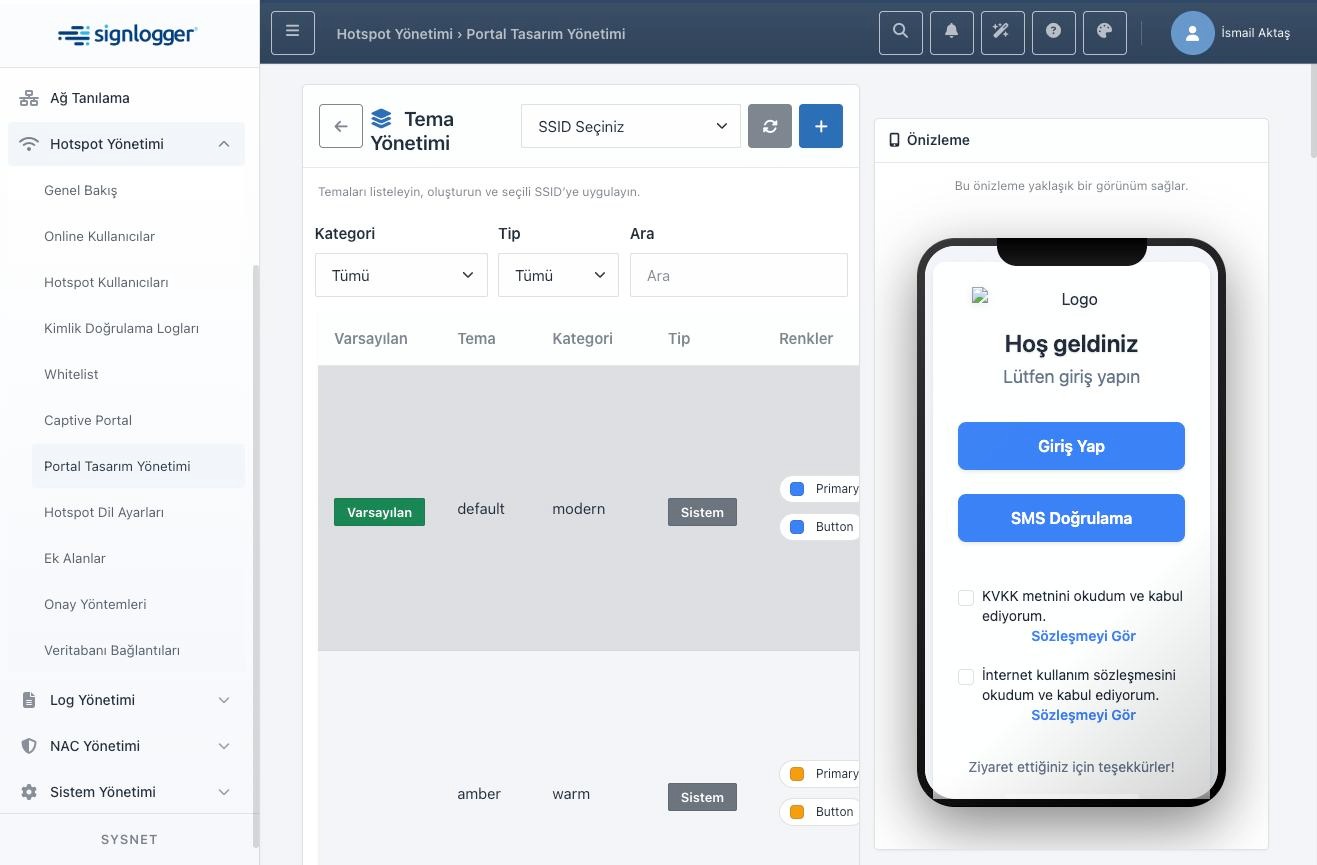
Figure 23 — Theme Management: theme list, filters and the phone preview.
10. Hotspot Language Settings
This page manages the portal's multilingual texts in one place. The header shows how many fields are loaded — 113 in the sample deployment. The left panel lists field keys with a search box; the All and Unsaved tabs make long editing sessions manageable. The right panel shows the selected key with one text box per language; the switch next to each language activates or deactivates it.
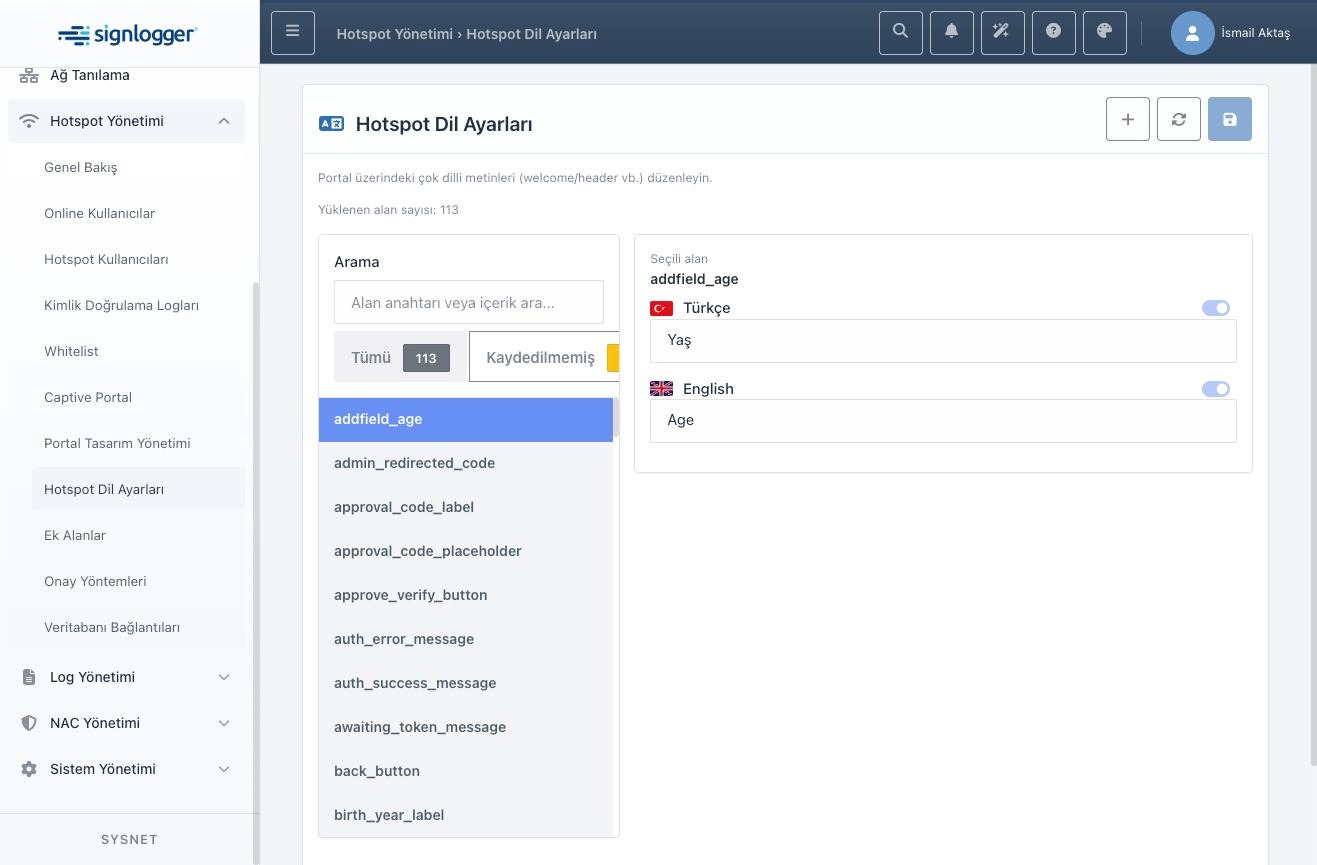
Figure 24 — Hotspot Language Settings: field list and per-language content boxes.
The plus button opens Add New Language. Picking from the preset list auto-fills the language key and label. Keys use the lang_xx form — lang_de for German. The label is the short name shown in admin screens. Adding a language adds a translation column to every field, after which each field's text must be entered — so a new language is not a one-click job; plan for translating a hundred-plus fields.
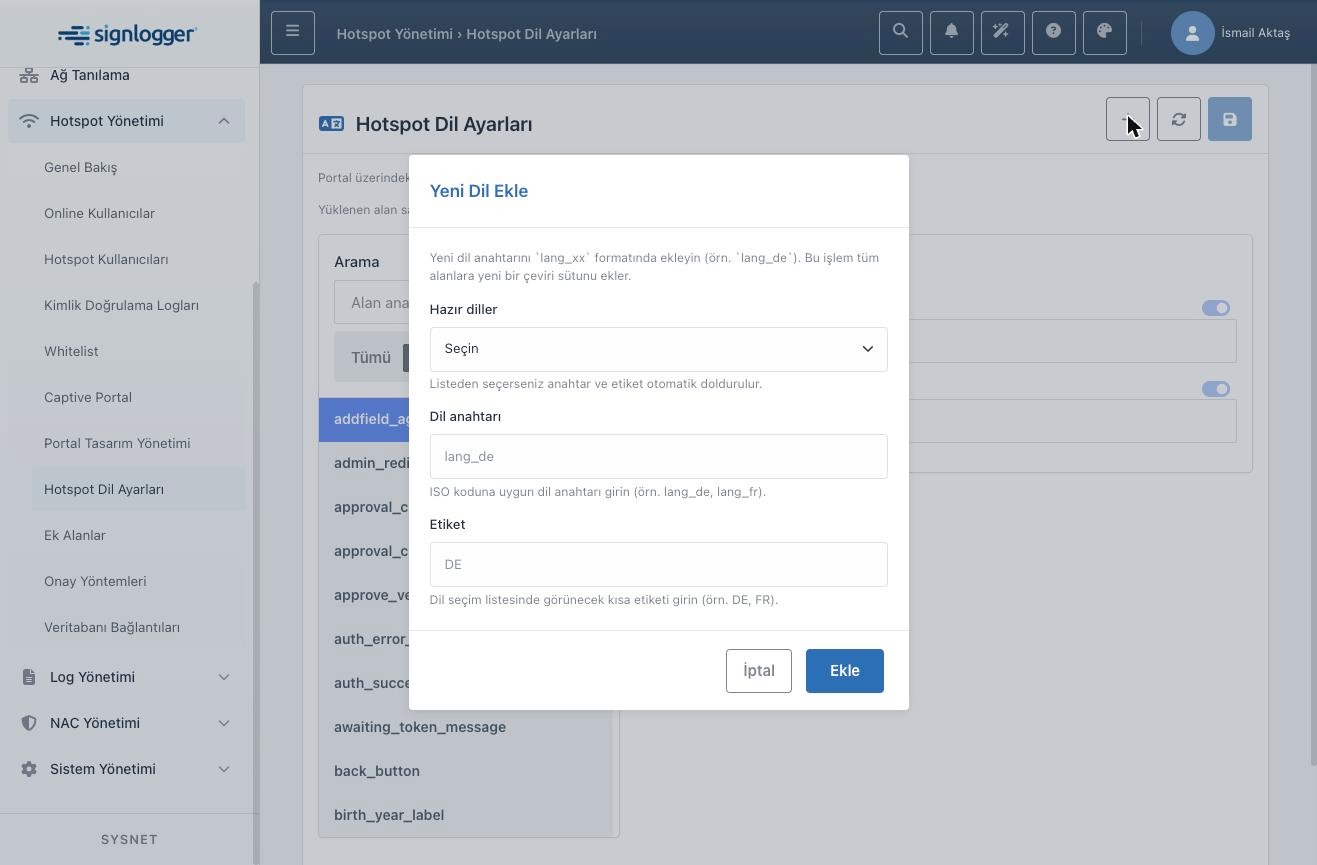
Figure 25 — Add New Language window.
11. Additional Fields
The Additional Fields page manages the labels and values shown when extra information is collected on the portal. Each record is identified by an SSID + language + field key trio. The table shows record ID, SSID, field key, value, language code, required flag, active flag and actions. Keys may be up to 120 characters, values up to 255.
All four fields in the add window are required. SSID decides which portal shows the field, Language which language it applies to. The recommended key format is lowercase with underscores — e.g. first_name_label or room_number_label. The value is the text shown on the portal. Repeating the same key for the same SSID and language violates the uniqueness rule and the record is rejected.
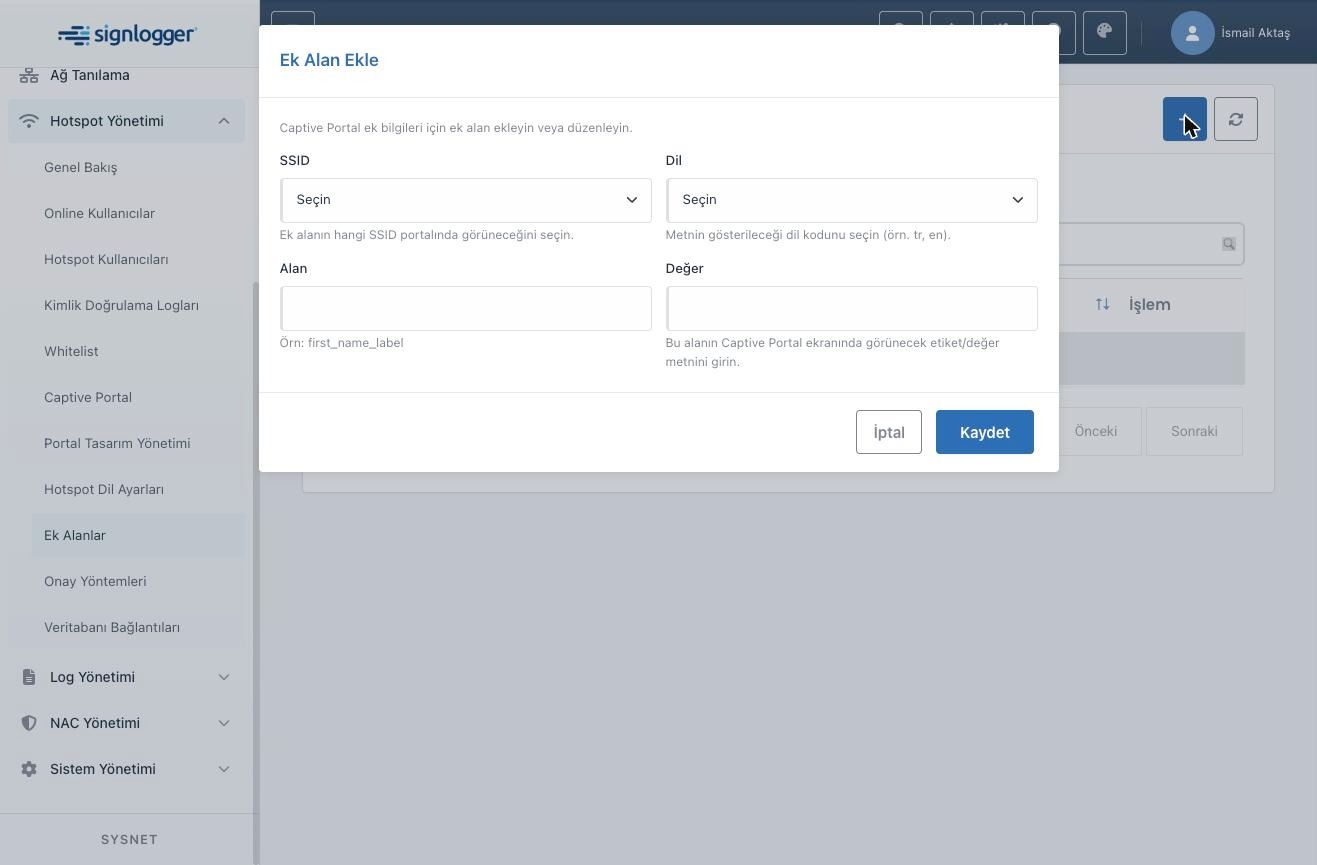
Figure 26 — Add Additional Field window.
12. Approval Methods
This page decides who approves what on an SSID. The SSID selector filters all tabs. There are three: Approval Method, Admin Approval Users and Trusted Domains.
The approval method has three options — Off, User approval and Admin approval — and only one can be active per SSID. The Approval-before-auth switch reverses the order: the user is approved first, then gains access. Left off, the user authenticates and gets access while approval runs in parallel.
With Admin approval, the Admin Approval Users tab defines who can approve; the e-mail address is required and unique because approval requests go there. With User approval, the Trusted Domains tab lists accepted sponsor e-mail domains — enter bare domains without protocol.
Order matters: first save the method on the Approval Method tab, then fill the related tab — otherwise there is no context to attach admin users or domains to.
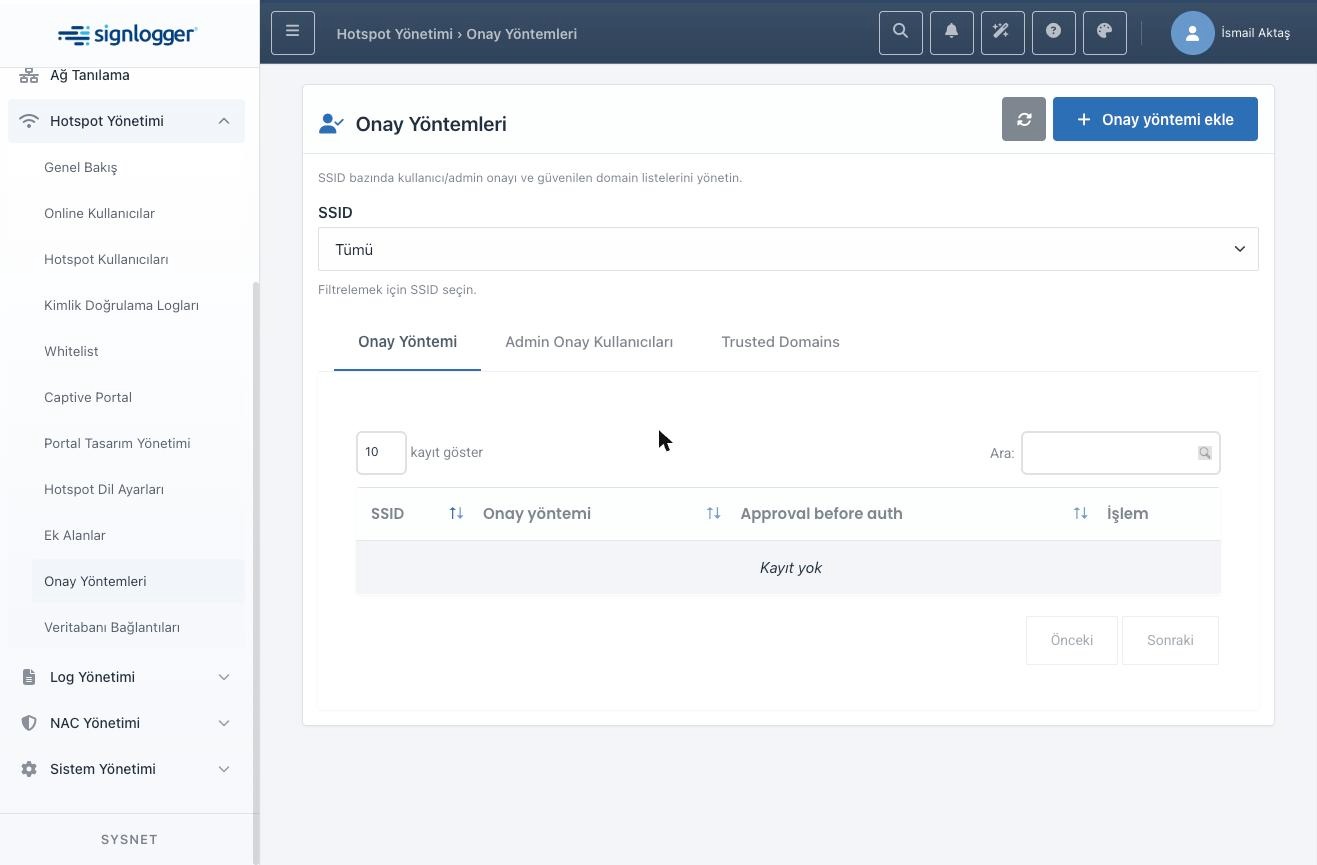
Figure 27 — Approval Methods page and its three tabs.
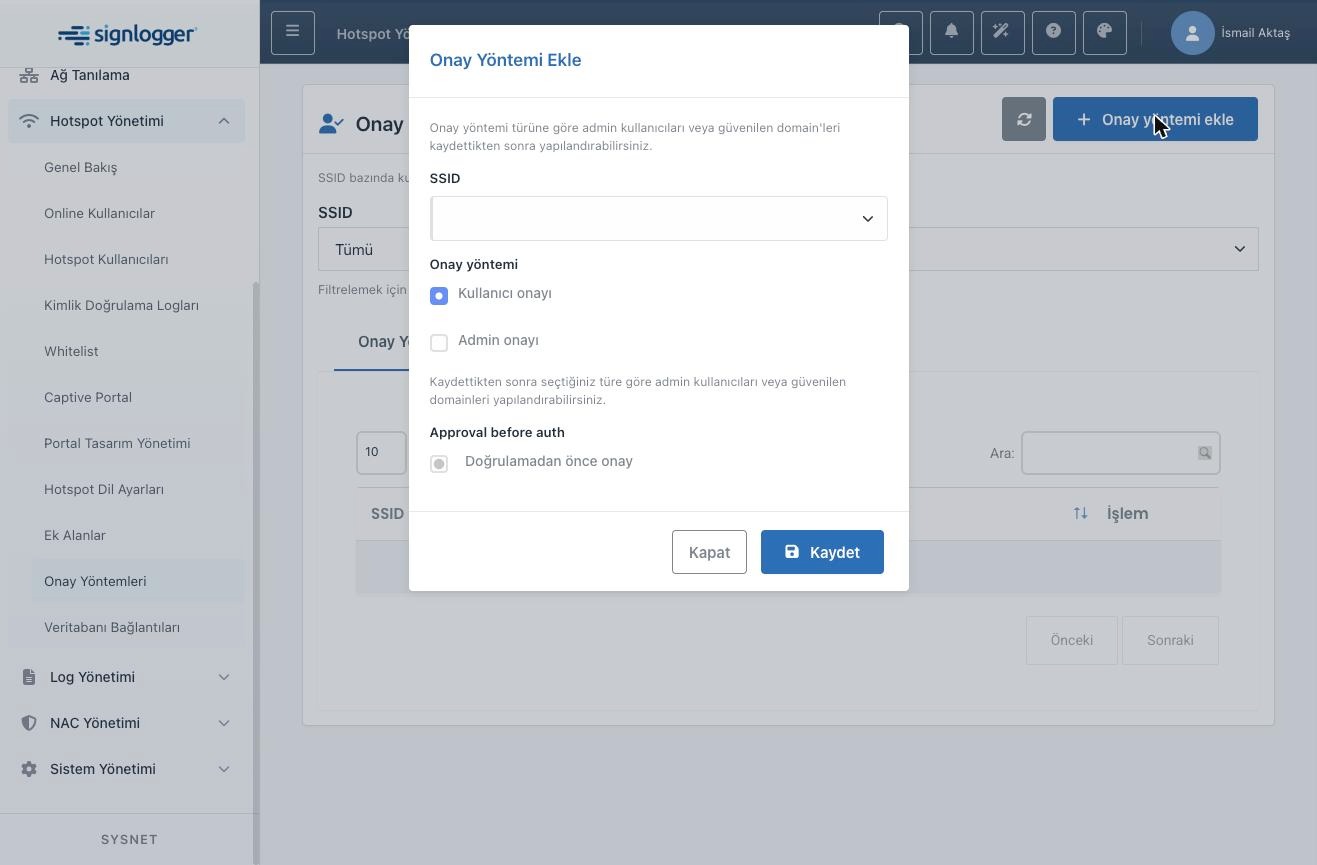
Figure 28 — Add Approval Method window.
13. Database Connections
This page manages the connections that let the portal verify users against an external database or hotel management system. Supported types: MariaDB, MSSQL, Oracle, ElektraWEB and OperaCloud. Hotel scenarios — guests signing in with room number and surname — are served by these connections.
The table shows SSID, type, host/identity, database name, user table and status per connection, with search plus type and status filters. Each connection binds to one SSID; different SSIDs can have their own.
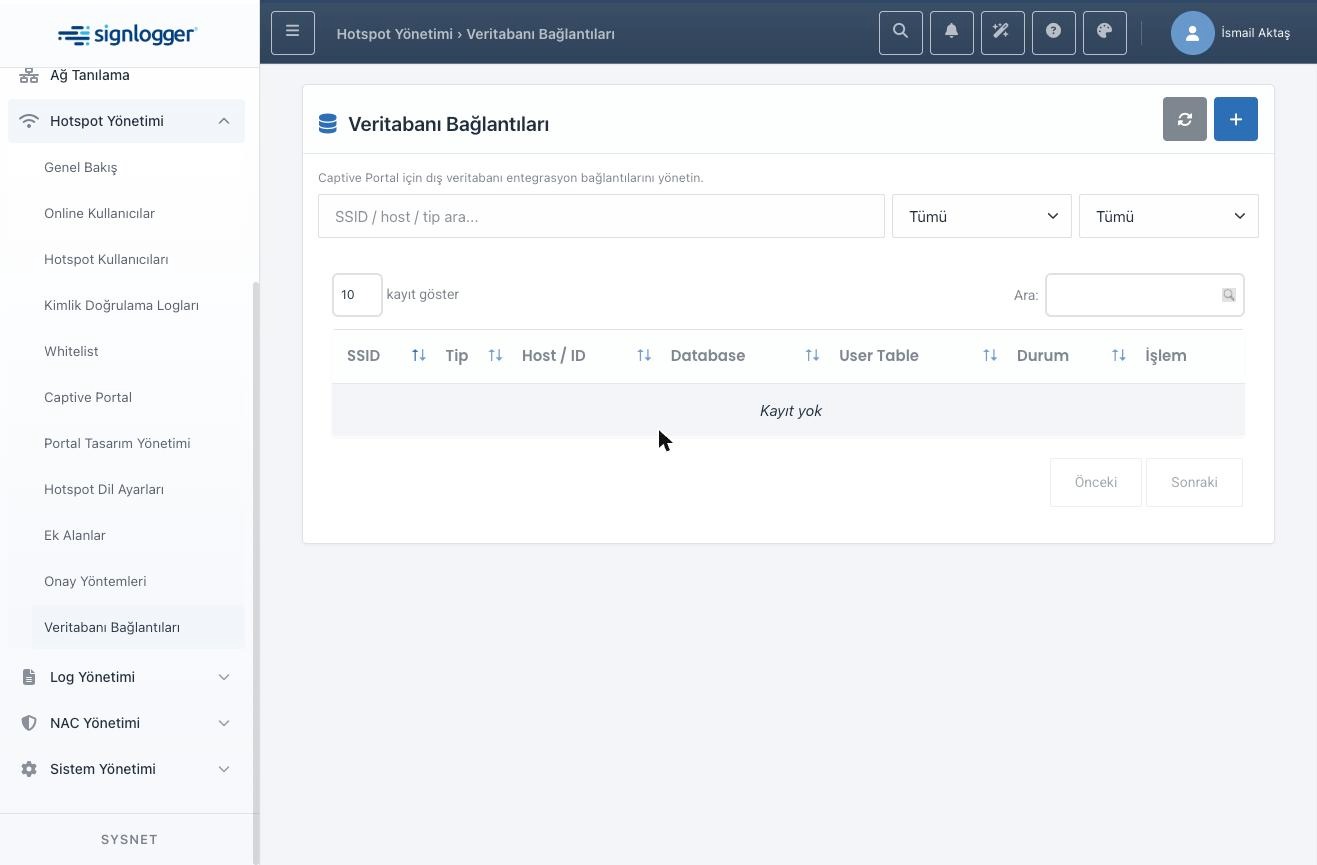
Figure 29 — Database Connections list and filters.
The add window starts with SSID and Type. DB IP takes the server address and optional port — for integration types it doubles as the Hotel ID or Property ID. Database Name maps to the schema (MySQL/MariaDB), database (MSSQL) or service name/SID (Oracle). User Table names the table holding user records. Admin User and Admin Password are the connection credentials; for integration types the password field carries the API key. Check Username Field and Check Password Field pick the columns compared during verification. The First/Last Name column fields are optional and only feed the logs — they play no part in verification.
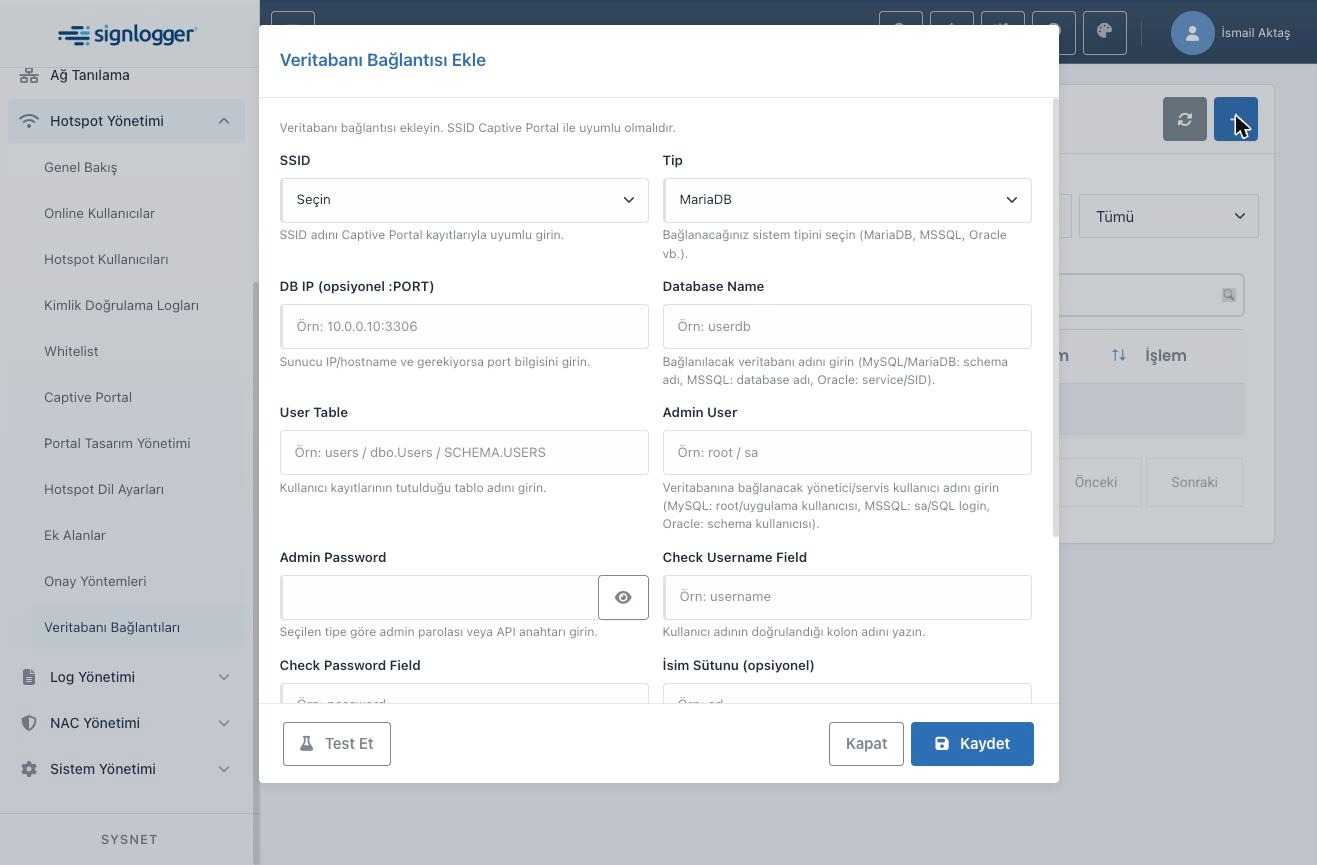
Figure 30 — Upper part of the Add Database Connection window.
The Test button at the bottom left tries the connection before saving. Don't skip it: a wrong column name or unreachable server turns into silent sign-in failures on the live portal.
Oracle has a particular detail: when the connecting admin user and the table owner live in different schemas, the User Table field needs the schema-qualified name, not just the table. Schema and table names can be case-sensitive — prefer uppercase when unsure.
The OperaCloud integration serves guest Wi-Fi, room-based access and single-session scenarios. Field meanings shift for this type: DB IP is the Property ID, Admin User the integration user, Admin Password the integration key and Database the optional hotel ID. Verification fields may use the guest profile's first name, middle name, surname, birth year, phone, e-mail and room number. The username may be one field or two joined with a comma — the system concatenates them for comparison.
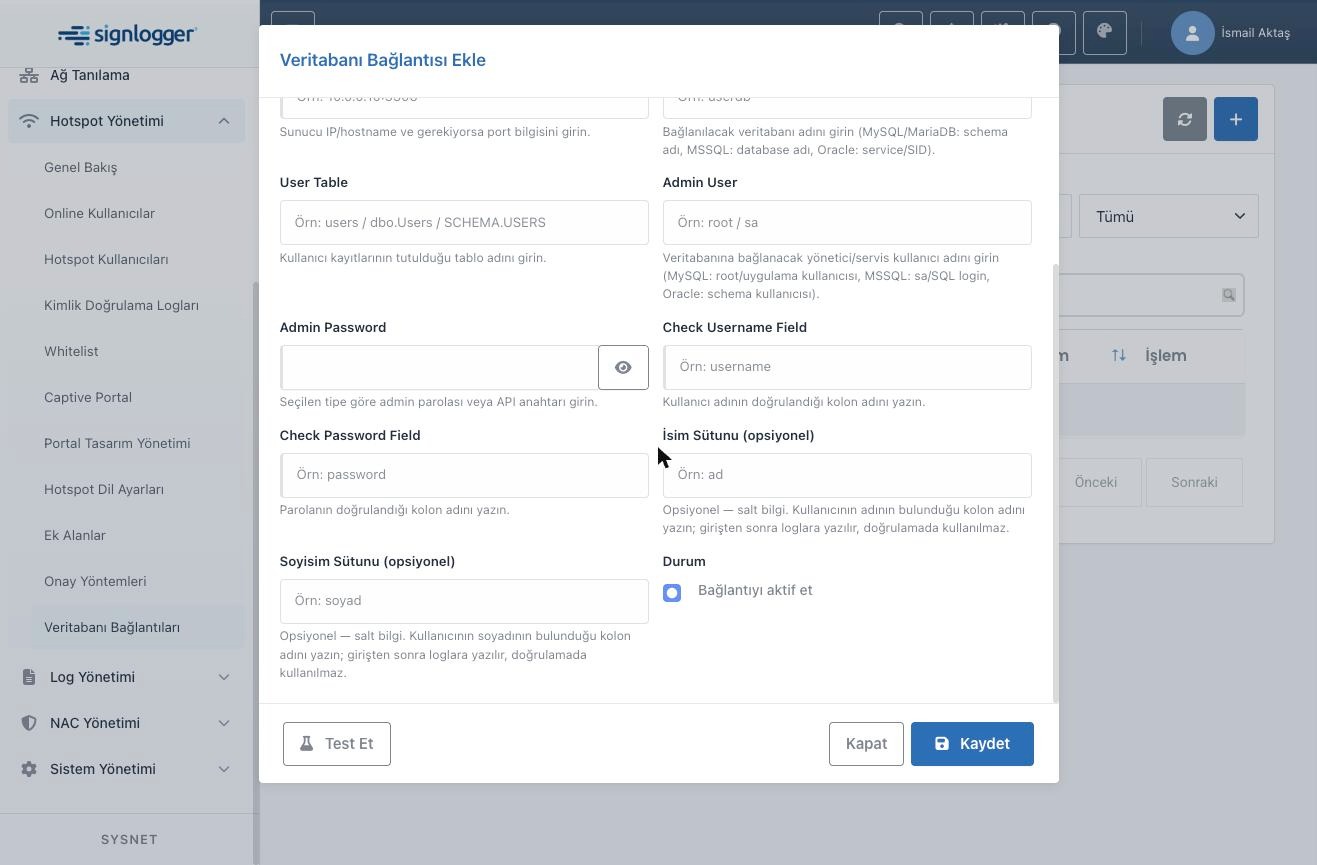
Figure 31 — Lower part of the add window and the Test button.
14. The In-Page Help System
Every page in SignLogger carries its own help content. The question-mark icon in the top bar opens a right-hand panel with documentation specific to the page you are on — the panel header even names the page file being described. Content is typically layered three ways: what the page is for, what the table columns mean, and which backend field each modal input maps to along with whether it is required.
That panel was a primary source for this document too. When unsure what a field does, open the help panel on that page instead of guessing — especially for LDAP and Meraki, where the warnings reflect direct field experience.
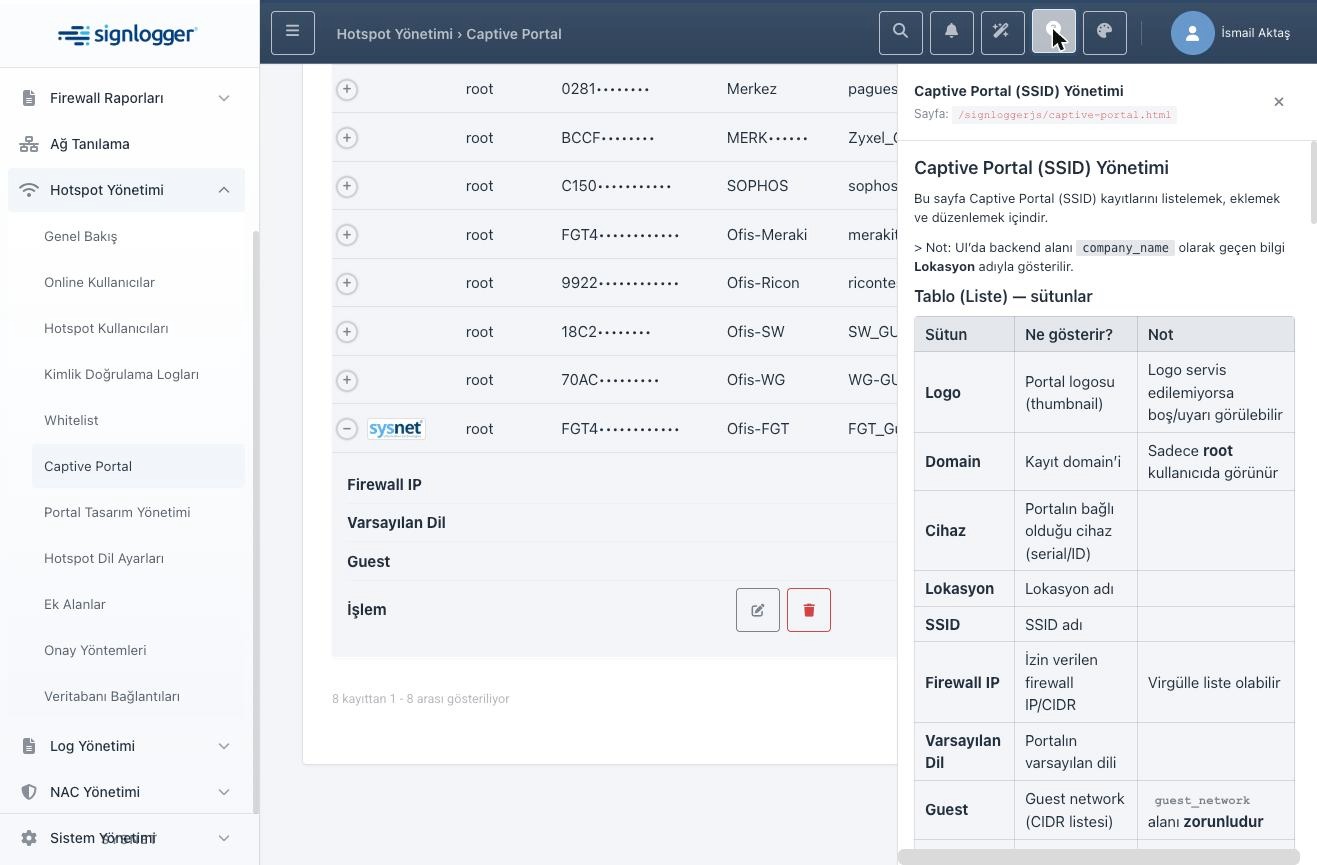
Figure 32 — The in-page help panel opened on the Captive Portal page.
15. End-to-End Setup Order
When building the module from scratch, this order is both fast and error-free. First create a record on the Captive Portal page: device, location, SSID and default language, then complete the Firewall IP, Guest Network and Redirect URL trio with correct values. Second, choose the authentication method — SMS or form verification is the recommended path for guest networks. Third, define the approval flow on Approval Methods if needed, adding the admin users or trusted domains.
Fourth, prepare the look: upload the logo and background on the portal record, then set colors in Portal Design Management or apply a theme. Fifth, edit the texts — the KVKK and acceptable-use agreements must carry content approved by your organization. Sixth, define Additional Fields if needed and enable the switch on the portal record. Seventh, if verifying against an external source, define the connection under Database Connections and prove it with Test.
Finally, return to Overview and check the Structure Consistency panel. Fix any Missing Design or Duplicate SSID warnings before going further, then make a test sign-in with a real device and confirm it in Authentication Logs.
16. Common Problems
If the portal doesn't open, first confirm the SSID matches the portal address and the firewall-side redirect points at it. If the portal opens but there's no internet after sign-in, check Firewall IP and Guest Network. If SMS doesn't arrive, verify the SMS Provider choice, the SMS Method compatibility and the provider record. If form approval mail never arrives, check whether Trusted Domains is empty — empty means no mail is sent at all. If LDAP sign-in fails, the cause is almost always a RADIUS Group name not exactly matching the directory group. If lists come up empty, check permissions and the selected SSID filter.
17. About Masking in the Screenshots
Everywhere device serial numbers appear — the Serial column in Hotspot Users, the Device column in Authentication Logs and the Captive Portal list, the device selector in the edit window, and the raw JSON in the detail window — was masked before publication: only the first four characters remain, the rest covered with dots, so the shape and length of the field stay recognizable without sharing the number itself. Device names, IP addresses and SSIDs are left as-is for the sake of the narrative.
Related Documents
- SignLogger Hotspot Management — Captive Portal User Guide — the separate, step-by-step how-to for the Captive Portal screen.
- FortiGate RADIUS Server and Guest Captive Portal Configuration Guide — the firewall-side portal redirect setup.
- Palo Alto Captive Portal and RADIUS Configuration Guide.