This guide is a comprehensive user handbook written to teach the System Management module of the SignLogger log management platform from start to finish. It explains what each screen is for, when it is used, how to operate it step by step, and the real-life scenarios you may encounter — enriched with screenshots and bulleted explanations for everyone from a first-day system administrator to an experienced operator.
Important — external access prerequisite: For licensing, updates, category data and the KamuSM timestamp the appliance needs outbound access to
license.sysnet.com.tr(TCP 4888),updates.sysnet.com.tr(TCP 4999),filter.sysnet.com.tr(TCP 7888) andzd.kamusm.gov.tr(TCP 80) allowed in the firewall; if blocked, the licence does not renew, updates do not arrive and Law 5651 signing stops. Details: Required Network Access for SignLogger.
How to Use This Guide
Each chapter corresponds to one panel page and follows the same structure: the page's purpose, when to use it, the fields and buttons on the screen, step-by-step usage, points to watch, and possible scenarios. Use the document outline on the left to jump to a topic quickly.
Overview of the System Management Module
System Management is the administration hub that gathers the SignLogger appliance's infrastructure, maintenance, network configuration, security settings, user permissions and external integrations under one roof. It has six main categories: Maintenance & Operations, Integrations, User Management, Network, Security and Notifications.
Maintenance & Operations
The Maintenance & Operations category contains the pages used to keep the SignLogger appliance healthy day to day: device status, time settings, services, licensing, updates, disk usage, backups and logging.
Disk Management
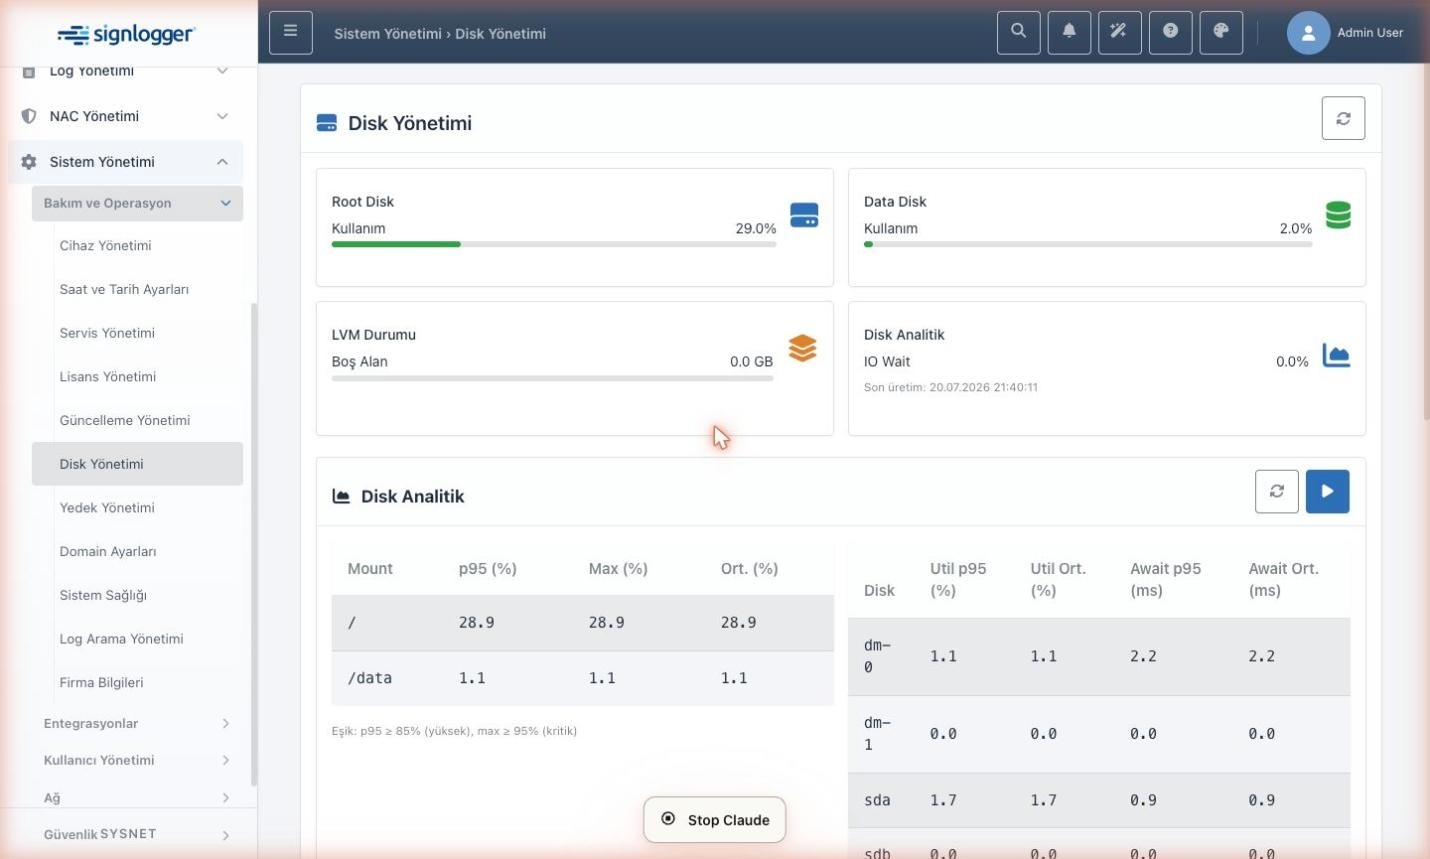
The Disk Management page monitors and manages the appliance's storage. In log management systems disk space is one of the most critical resources — a constant stream of logs can fill the disk over time and stop collection. This page shows root and data disk usage, LVM (Logical Volume Manager) state and disk performance metrics at a glance.
Information Cards
- Root Disk: usage percentage of the operating system disk.
- Data Disk: fill level of the data disk holding the logs.
- LVM State: free space in logical volume management, in GB.
- Disk Analytics: measures disk performance via IO Wait and read/write latency.
Step-by-Step Usage
- The usage cards load automatically when the page opens.
- Click the refresh button in the top right for current values.
- Use the play button in Disk Analytics to start an analysis.
- Review p95, maximum and average usage per mount in the table.
Points to Watch
A p95 above 85% counts as high usage, above 95% as critical. A full data disk can cause log loss — monitor it regularly.
Possible Scenarios
Scenario 1: data disk usage reached 90% — archive old logs or grow the disk capacity. Scenario 2: IO Wait is persistently high — a disk performance bottleneck that may need a hardware review.
Device Management
Device Management is the central registry of every network device SignLogger collects logs from — firewalls, switches, servers and more. Registered devices are listed here; new devices can be added and existing ones edited. Correctly defining your log sources is fundamental to healthy reporting and correlation.
Fields on the Screen
- Device table: name, IP, port, serial, location, connection state, HA (high availability) and status.
- Search box: quick filtering across devices.
- Records selector: how many devices are listed per page.
- Plus (+) button: adds a device.
- Actions column: per-device detail view and connection test.
Adding a Device Step by Step
- Click the plus (+) button in the top right.
- Enter the device name, IP, port and connection details.
- Define API or SSH credentials if needed.
- Save — the device joins the list and its connectivity is checked.
Connection States
- Connected: communication is healthy.
- No connection: the device is unreachable — check IP, port and network access.
- API/SSH Not Configured: the device exists but access credentials are missing.
Possible Scenarios
Scenario 1: a new firewall is installed — define it with its IP and port so its logs start flowing. Scenario 2: a device constantly shows "No connection" — verify the IP, network reachability and port settings.
Time and Date Settings
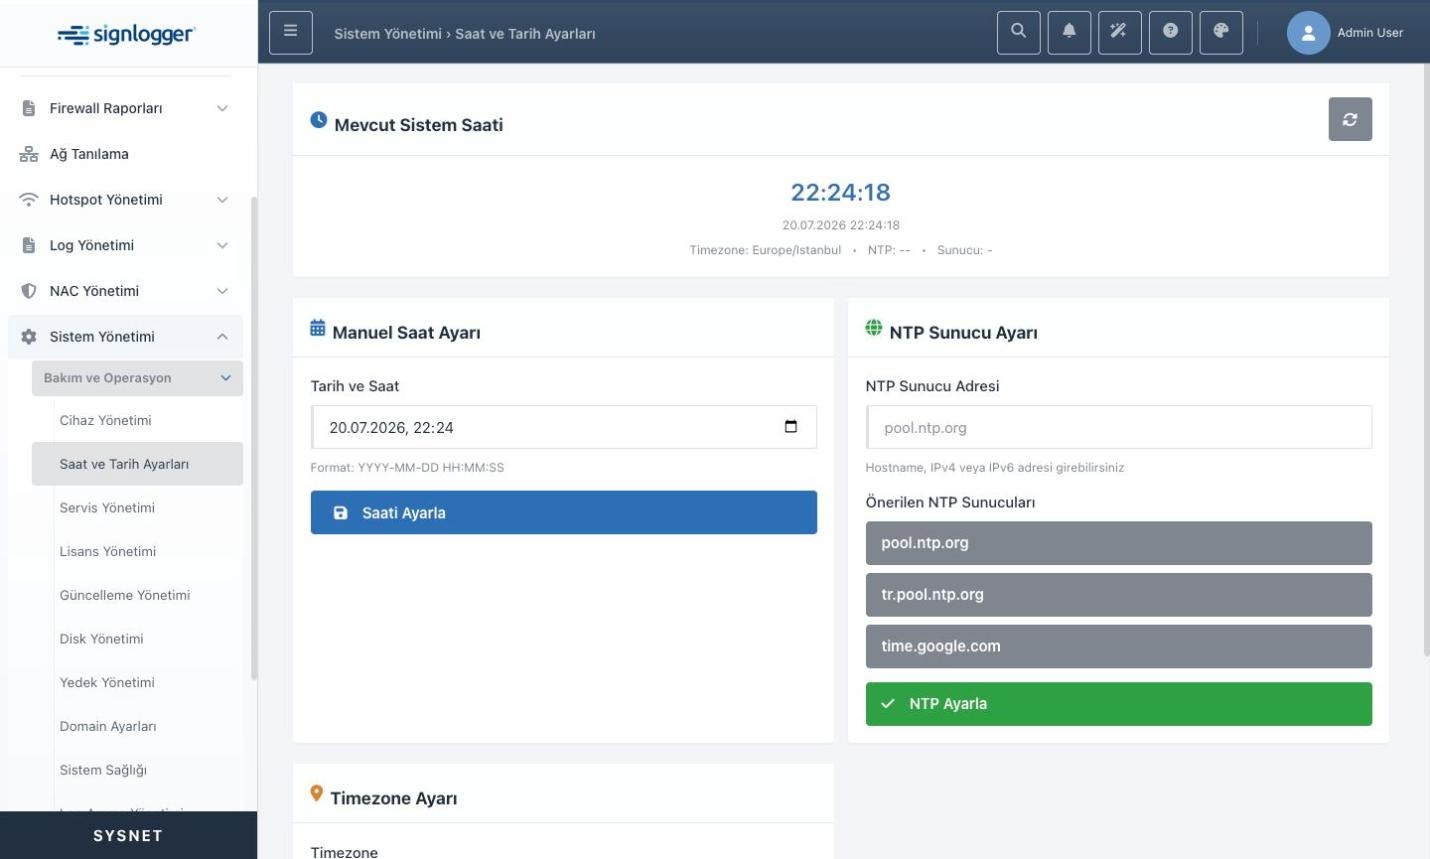
This page manages the appliance's system clock and time zone. Timestamp accuracy is critical in log management: event ordering, correlation and forensic analysis all depend on correct time. A wrong clock undermines the credibility of every report and log record.
Sections on the Screen
- Current System Time: the device's date, time, time zone and NTP state.
- Manual Time Setting: set date and time by hand.
- NTP Server Setting: synchronize automatically via a time server, with suggestions such as pool.ntp.org.
- Timezone Setting: select the device's time zone.
Step-by-Step Usage
- For automatic sync, enter an NTP server (or pick a suggestion) and click Set NTP.
- For manual setting, enter date and time under Manual Time Setting and click Set Time.
- Choose the correct time zone under Timezone Setting.
Points to Watch
NTP is more reliable than manual setting because it prevents clock drift. A wrong time zone makes log times differ from real local time.
Possible Scenarios
Scenario 1: the device has internet access — define an NTP server for continuous automatic sync. Scenario 2: an air-gapped network without NTP — set the clock manually and check it periodically.
Service Management
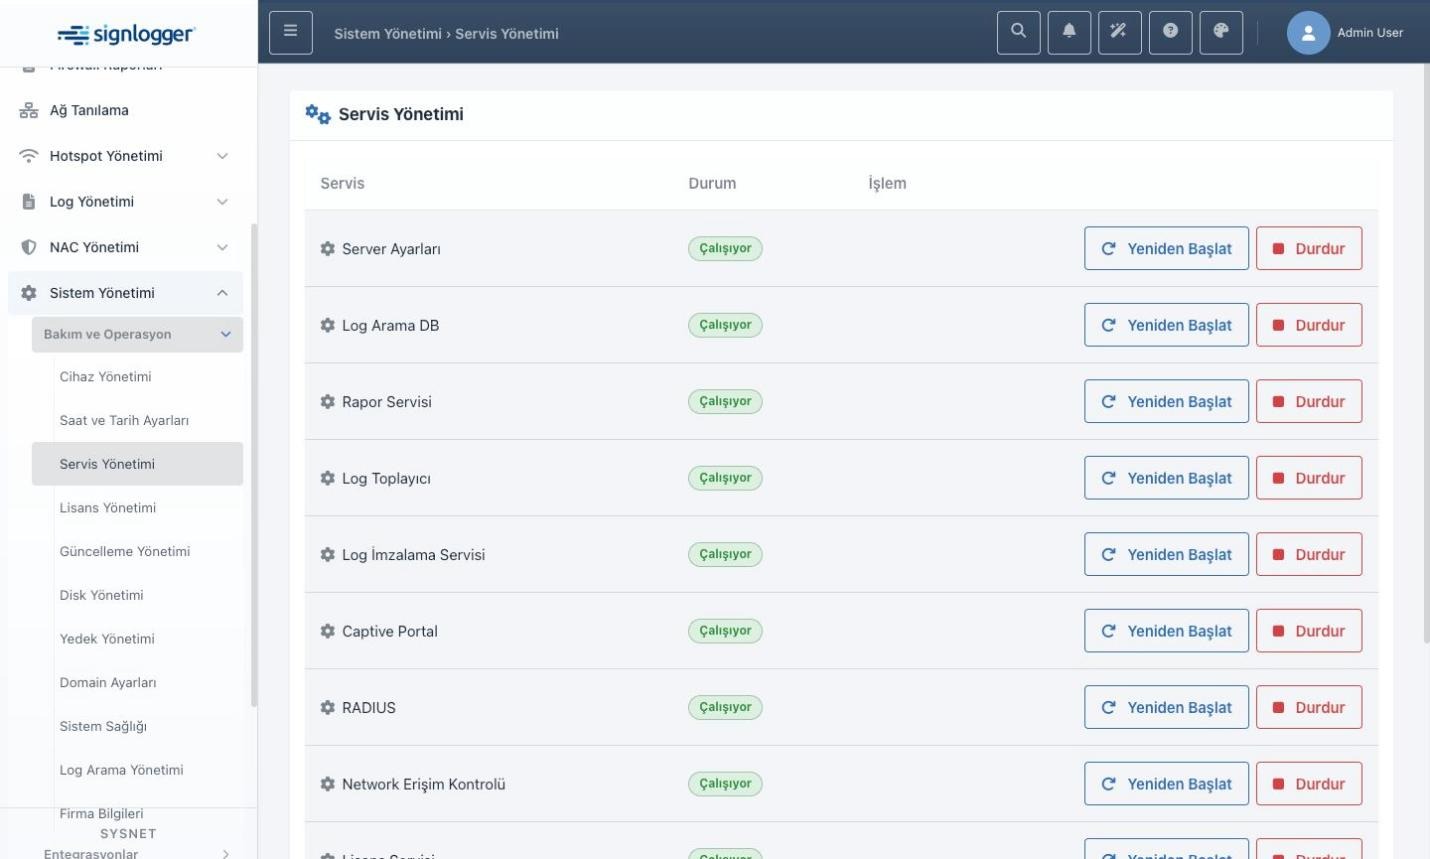
Service Management monitors and restarts or stops all background services on SignLogger. Every critical function — log collection, signing, reporting, databases — runs as a separate service, and restarting the right one is often the fastest fix.
Services and What They Do
- Server Settings: main server configuration service.
- Log Search DB: the log search database.
- Report Service: produces the reports.
- Log Collector: gathers incoming device logs.
- Log Signing Service: runs the signing that guarantees logs are unaltered.
- Captive Portal: the hotspot sign-in portal.
- RADIUS: authentication service.
- Network Access Control: the NAC service.
Step-by-Step Usage
- Each service shows a Running (or stopped) status label.
- Click Restart on a row to restart that service.
- Use Stop to pause a service temporarily.
Points to Watch
Stopping critical services such as Log Collector or Log Signing can cause log loss or gaps in the signing chain. Intervene only when needed and with the impact understood.
Possible Scenarios
Scenario 1: reports are not generated — check and restart the Report Service. Scenario 2: no new logs arrive — check whether the Log Collector is running.
License Management
License Management tracks the licenses of the devices defined on SignLogger — key, validity and state per device. An expired license can interrupt logging or specific features for its device, so license tracking matters for operational continuity.
Fields on the Screen
- Device ID: identity and brand of the licensed device.
- License Key: the key assigned to the device.
- License Expiry: end date.
- Virtual FW: virtual firewall scope.
- Status: whether the license is active.
- Days Left: days until expiry.
- Actions: operations such as deleting the record.
Step-by-Step Usage
- Refresh the list with the button in the top right.
- Add a license with the plus (+) button.
- Open license-related configuration via the Settings button.
- Watch the Days Left column to catch licenses nearing expiry.
Points to Watch
Renew low-Days-Left licenses first — an expired license can affect that device's collection and reporting.
Possible Scenarios
Scenario 1: a device's license has 14 days left — start the renewal now to avoid interruption. Scenario 2: a new device was purchased — add its license key here.
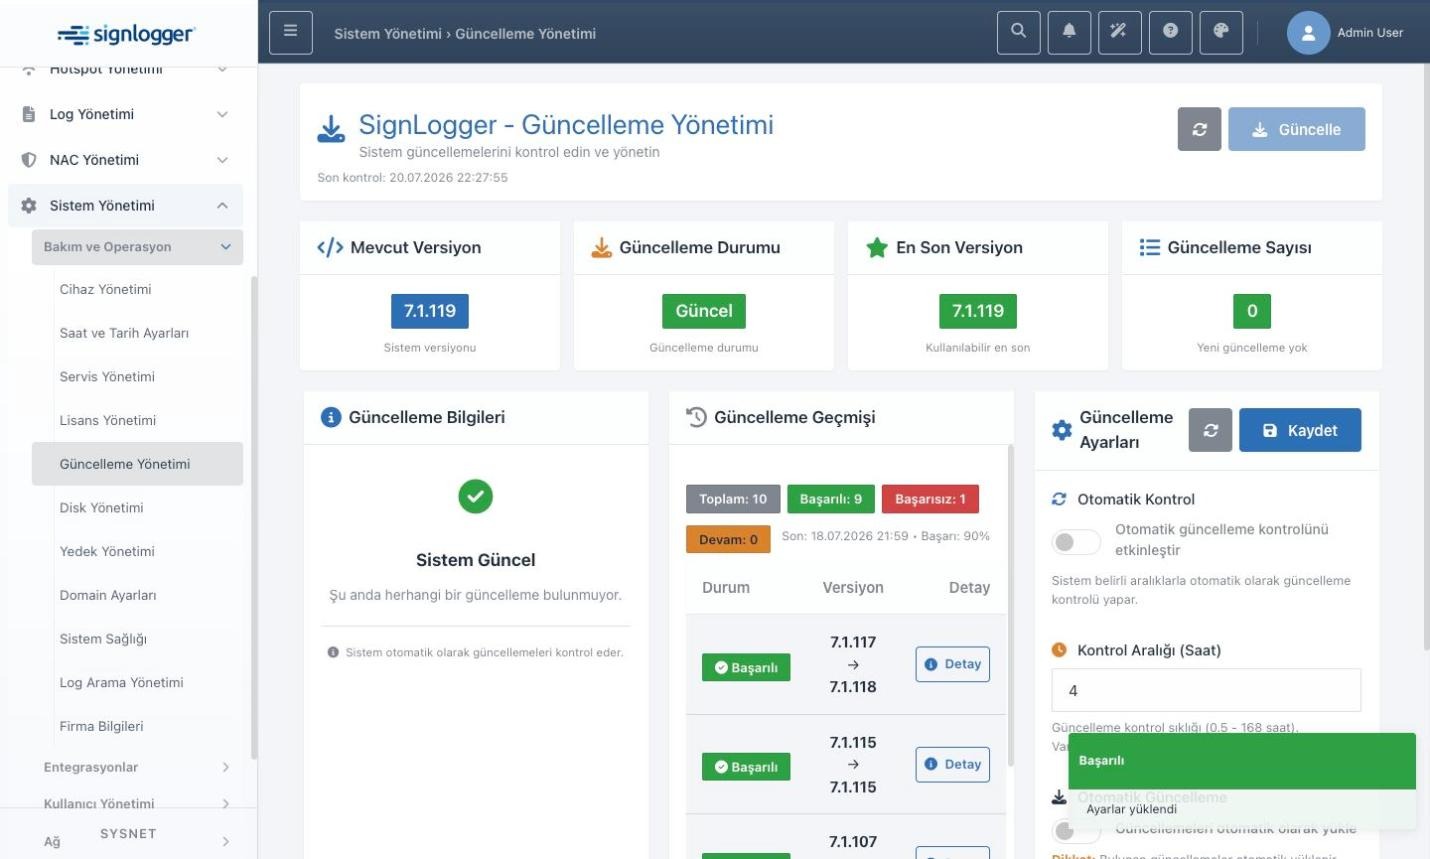
Update Management
Update Management checks, applies and audits SignLogger software updates. Staying current brings both security patches and new features; this screen shows the running version, whether it is up to date and any pending updates.
Information Cards
- Current Version — the running release. Update Status — e.g. Up to date. Latest Version — newest available. Update Count — pending updates. Update History — past updates with success/failure. Update Settings — automatic check, interval and auto-install options.
Step-by-Step Usage
- Use refresh/check to look for new updates.
- If one exists, click Update to install.
- Enable automatic checks at your chosen interval (hours).
Points to Watch
Take a backup before updating — it makes rollback easy. With auto-install on, updates apply without confirmation; decide deliberately whether you want that.
Possible Scenarios
Scenario 1: the system shows Up to date with zero pending — nothing to do. Scenario 2: a new release is out — back up first, update, then verify the result in the history.
Backup Management
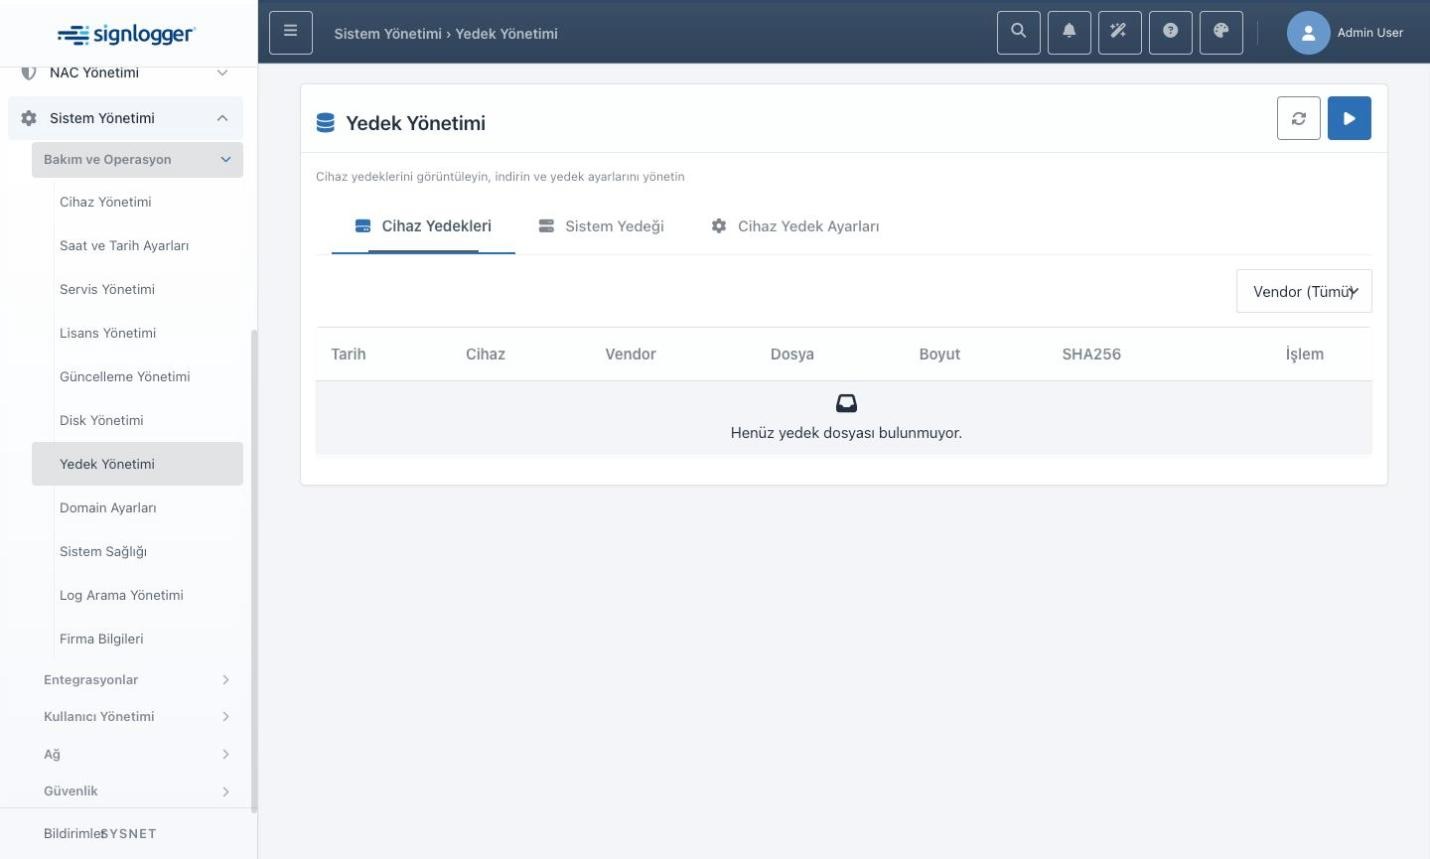
Backup Management views and downloads device configuration backups and system backups, and manages backup settings. Backups are the safest way back to a working state after a failure or a bad configuration.
Tabs on the Screen
- Device Backups: per-device configuration backups with date, device, vendor, file, size and SHA256 digest.
- System Backup: SignLogger's own system backups.
- Device Backup Settings: automatic backup configuration.
Step-by-Step Usage
- Switch to the relevant tab.
- Narrow by vendor with the filter.
- Download a backup with its row action.
- Start a new backup with the play button in the top right.
Points to Watch
The SHA256 digest verifies file integrity. Keeping backups in a safe, reachable location is critical for disaster recovery.
Possible Scenarios
Scenario 1: a device configuration was accidentally broken — download and restore the latest backup. Scenario 2: no backups exist yet — configure automatic backups in Device Backup Settings and create the first one.
Log Search Management
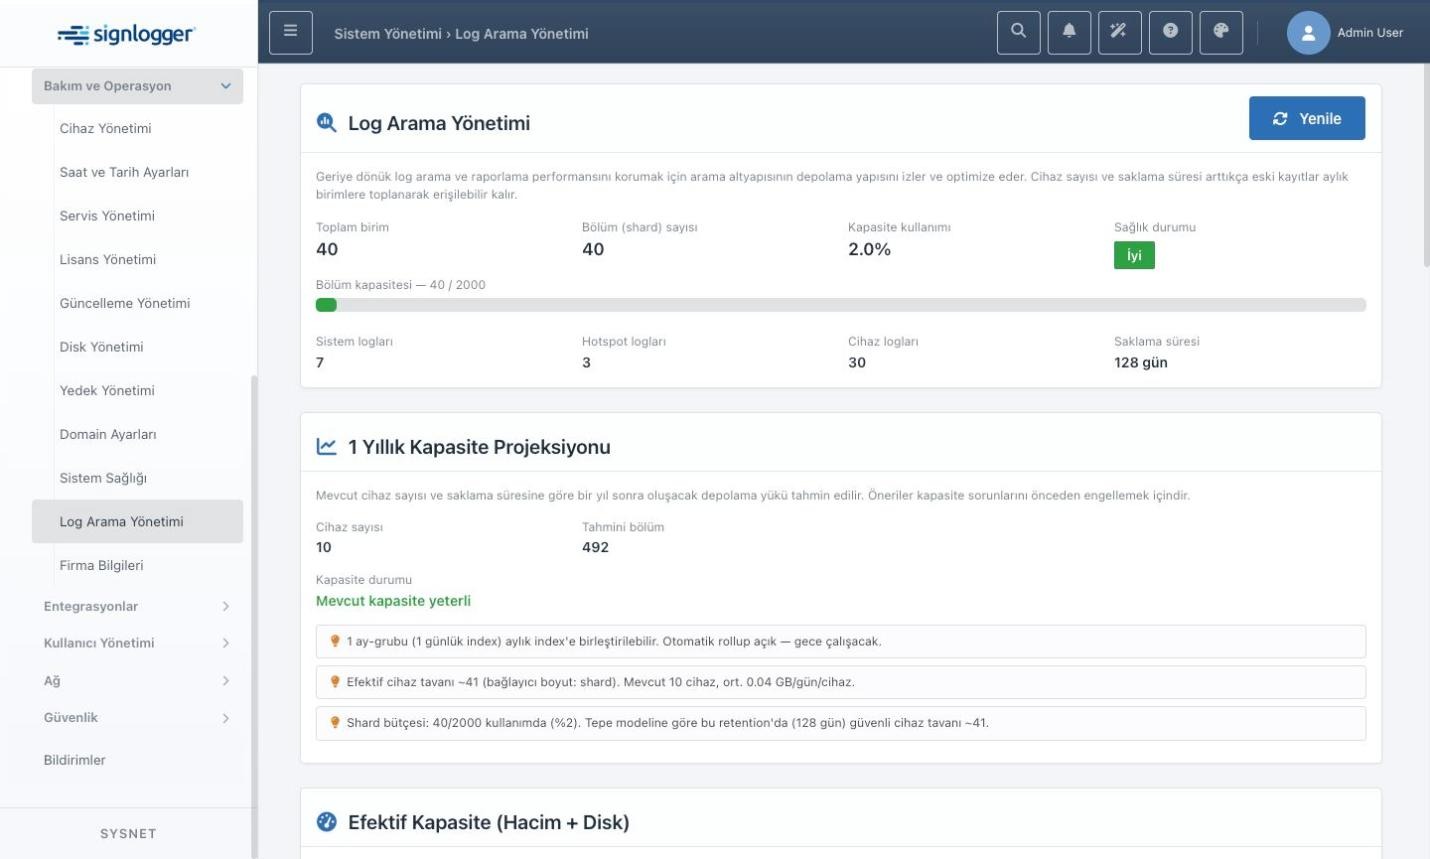
Log Search Management watches and optimizes the search infrastructure's storage layout so retrospective search and reporting stay fast. As device count and retention grow, older records are rolled into monthly units and remain reachable. The page surfaces capacity and health so you see performance and storage issues before they land.
Information on the Screen
- Total units and shard count: the data units of the search infrastructure.
- Capacity usage: percentage of capacity in use.
- Health: the overall state (e.g. Good).
- System, Hotspot and Device logs: unit distribution per log type.
- Retention: how many days logs are kept.
- 1-Year Capacity Projection: estimated load a year ahead based on current devices and retention.
Step-by-Step Usage
- Refresh for current state.
- Watch capacity usage and health regularly.
- Use the projection's recommendations for capacity planning.
Points to Watch
As the shard budget fills, search and reporting performance can suffer. Review the projection before increasing retention or device count.
Possible Scenarios
Scenario 1: low usage and Good health — keep monitoring. Scenario 2: device count will grow sharply — study the projection warnings and re-plan retention or capacity.
Domain Settings
Domain Settings defines the per-domain resource quotas and defaults of the multi-tenant structure. Different customers or units can be run as separate domains; this page sets how many devices, users, portals and hotspot users each may define, and its log retention. (Note: this page has no in-panel help; the description is based on screen review.)
Sections on the Screen
- New Domain Defaults: values applied when quota fields are left empty at domain creation — default max devices, users, portals and hotspot users. 0 means unlimited.
- Create new domains active: whether new domains start active.
- Domain Quotas and Usage: an editable usage/limit table per existing domain.
Step-by-Step Usage
- Enter defaults for new domains and Save.
- To change one domain's quota, edit its row and click its save button.
- Watch usage/limit columns for domains nearing quota.
Points to Watch
A quota of 0 means unlimited. The system-wide retention lives in Log Settings; each domain may override it with its own value.
Possible Scenarios
Scenario 1: a new customer domain is coming — set sensible defaults first so every new domain starts with consistent limits. Scenario 2: a domain hit its device quota — raise its limit in the table.
System Health
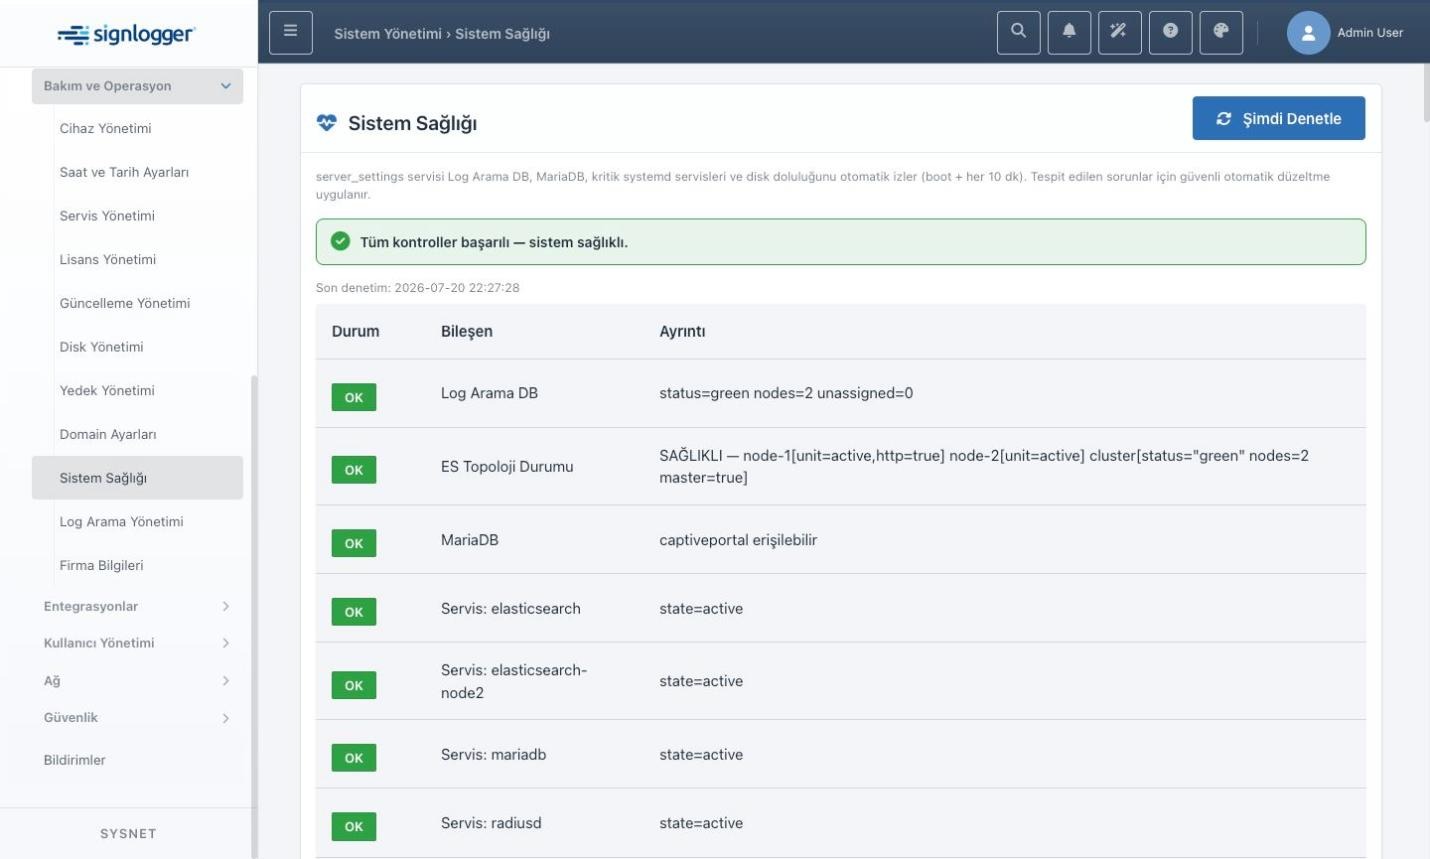
System Health summarizes the state of SignLogger's critical components on one screen. A background service watches the Log Search DB, MariaDB, critical system services and disk usage automatically (at boot and every 10 minutes) and can apply safe automatic fixes. Ideal for a quick overall check and early detection. (No in-panel help; based on screen review.)
Fields on the Screen
- Overall summary band: e.g. "All checks passed — system healthy".
- Last check: when the latest health check ran.
- Check table: Status (OK etc.), component and detail per row — Log Search DB, search topology, MariaDB and various services.
Step-by-Step Usage
- Open the page — checks load automatically.
- Click Check Now for an immediate re-check.
- Read the Detail column of any non-OK component.
Points to Watch
Even with automatic checks, run Check Now after major maintenance. Non-OK components deserve priority.
Possible Scenarios
Scenario 1: everything OK — no action. Scenario 2: a service shows an error — restart it in Service Management and re-check.
Company Information
Company Information manages the organization details shown in report headers and footers — used on screen and in every generated PDF. Accurate corporate identity and current contact details matter here. (No in-panel help; based on screen review.)
Fields on the Screen
- Company/Organization Name (required), Website, Address, E-mail, Phone, KVKK E-mail (data protection requests), Support E-mail and Emergency Phone.
Step-by-Step Usage
- Fill the fields with your organization's current details.
- The Company/Organization Name is mandatory.
- Apply with Save; reload with Refresh.
Points to Watch
These details flow into every report — outdated data shows up in corporate output. Correct KVKK and support addresses matter legally and operationally.
Possible Scenarios
Scenario 1: the phone number changed — update here and new reports carry the right number. Scenario 2: a polished corporate look is wanted — complete every field so reports look professional.
Integrations
The Integrations category holds the settings that let SignLogger talk to external systems: forwarding logs to other servers (syslog), SMS notifications and e-mail delivery.
Syslog Servers
The Syslog Servers page forwards SignLogger's collected logs to external syslog servers — critical when logs must reach a central SIEM or another collector. Servers can be added, edited and connection-tested; changes take effect on save.
Fields on the Screen
- Domain selector: which domain the records belong to.
- Search: quick search by SSID, name, IP or port.
- Server table: SSID, Name, IP, Port, Protocol, Active and actions.
- Plus (+) button: adds a server.
Adding a Syslog Server Step by Step
- Click the plus (+) button.
- Enter name, IP, port and protocol (UDP/TCP).
- Save — the server joins the list and can be activated.
- Test the connection to confirm logs arrive.
Points to Watch
Changes apply only when saved. A wrong port or protocol means logs never arrive — test after adding.
Possible Scenarios
Scenario 1: logs must reach a central SIEM — define its IP/port, pick the protocol and test. Scenario 2: a syslog server was retired — deactivate or remove its record.
SMS Providers
SMS Providers defines the SMS services SignLogger uses — needed for hotspot verification codes and system notifications. Providers can be configured with GET or POST APIs.
Tabs on the Screen
- GET Providers: providers using GET (Provider, Base URL, Method, Actions).
- POST Providers: the same structure for POST providers.
- Number Filter: rules targeting specific numbers or ranges.
Adding a Provider Step by Step
- Pick the GET or POST tab.
- Click the plus (+) button.
- Enter the provider name, Base URL and parameters.
- Save — edit/delete/view actions become available.
Points to Watch
The API URL and parameters must match the provider's documentation exactly or delivery fails. The Number Filter can block sending to unwanted numbers.
Possible Scenarios
Scenario 1: verification SMS for hotspot users — define your contracted provider as GET or POST. Scenario 2: SMS not arriving — verify the Base URL, parameters and number filter.
Mail Servers
Mail Servers defines and tests the SMTP servers SignLogger uses for report delivery, alerts and verification e-mails. Multiple providers may exist, each with its own credentials and encryption.
Fields on the Screen
- Domain selector for scoping; provider table with Name, Host, Port, Auth, Encryption (TLS etc.), Active, Domain and actions; action buttons for edit (pencil), test mail (plane) and delete (bin); plus (+) button to add.
Adding a Mail Server Step by Step
- Click the plus (+) button.
- Enter the name, host (e.g. smtp.gmail.com), port (e.g. 587), auth type and encryption (TLS).
- Save and activate.
- Send a test mail to confirm.
Points to Watch
Port and encryption must match your SMTP provider (e.g. 587 + TLS). Providers requiring OAuth2 (such as Office 365) need the matching auth method. Always send a test mail after adding.
Possible Scenarios
Scenario 1: reports go out by e-mail — define the corporate SMTP and verify with a test mail. Scenario 2: mail is not leaving — check host, port, encryption and credentials, then re-test.
User Management
User Management holds the pages defining the administrators who access the SignLogger panel and their permissions. Users and Roles work together to decide who can sign in and what they can do.
Users
The Users page creates and manages panel administrator accounts. Each user gets a role and a set of domains they are authorized for — a secure access model with different privilege levels and scopes per person.
Fields on the Screen
- User list: e-mail, name, role, authorized domains, phone and password-change state.
- Filter and search: by role, e-mail, name or phone.
- New User button and action buttons for domain scoping, editing and deletion.
Adding a User Step by Step
- Click New User.
- Enter e-mail, name and contact details.
- Pick a suitable role (e.g. Super User, Power User).
- Choose the user's authorized domains and save.
Points to Watch
Grant only what each user needs (least privilege). High-privilege roles like Super User belong to very few people. Password operations belong to the users themselves — administrators must never share passwords.
Possible Scenarios
Scenario 1: a new operator starts — create the account with an appropriate role and only their domains. Scenario 2: an employee leaves — disable or remove their account.
Roles
The Roles page manages roles and their permissions with role-based access control (RBAC). Each role is a permission set; users are assigned to roles, which decide what they see and change. Permissions live on roles, not individuals — much easier to govern.
Fields on the Screen
- Domain selector for scope; role table with name, description and actions — sample roles: Monitor User (view only), Power User (broad) and Super User (everything); Permissions button for detailed editing; New Role button for custom roles.
Step-by-Step Usage
- Edit a role's permissions via its Permissions button.
- Create a custom role with New Role, name and description.
- Tick the required permissions and save.
- Use the domain selector to manage roles per domain.
Points to Watch
Design roles by least privilege. Super User holds every permission — assign with care. Changing a role's permissions affects every user holding it.
Possible Scenarios
Scenario 1: a team only views reports — give them Monitor User so they cannot change anything. Scenario 2: a special task needs its own permission set — create a new role, define it, assign it.
Network
The Network category manages the appliance's network configuration and the multi-tenant domain structure: Domains, IPv4, DNS and hostname settings. Correct network configuration is fundamental to collection and panel access.
Domains
The Domains page configures the VDOM-like domains and assigns devices to them. In a multi-tenant structure each customer or unit is isolated as its own domain, separating data and permissions. The root domain is single, default and cannot be deleted.
Fields on the Screen
- Domain list: name, description, root flag, default flag and active state.
- Action buttons: export, device assignment, edit and delete.
- New Domain button and search.
Adding a Domain Step by Step
- Click New Domain.
- Enter name and description.
- Save it active.
- Assign the relevant devices via the action button.
Points to Watch
The root domain cannot be deleted. Domain isolation underpins data privacy and permission separation — assign devices deliberately.
Possible Scenarios
Scenario 1: a new customer joins — create their domain and assign their devices. Scenario 2: two units' data must stay apart — one domain each.
IPv4 Settings
IPv4 Settings views and changes the IPv4 configuration of the appliance's network interfaces. Reachability and log collection depend on getting this right; interfaces may use DHCP or a static address.
Fields on the Screen
- Device: the interface being configured (e.g. eth0).
- Current: the interface's live state, method, IPv4 and gateway.
- Mode: DHCP or Static.
- IP and Prefix: the static address and CIDR prefix (e.g. 24).
- Gateway: the default gateway.
- Restart connection after applying: apply immediately.
Step-by-Step Usage
- Select the interface.
- Pick DHCP or Static.
- For Static, fill IP, Prefix and Gateway.
- Click Apply.
Points to Watch
Connectivity may drop briefly while applying. A wrong IP or gateway can lock you out of the panel — enter static values carefully; the gateway must share the IP's subnet.
Possible Scenarios
Scenario 1: the device gets a fixed IP — Static mode, fill IP/Prefix/Gateway, apply. Scenario 2: the network runs on DHCP — pick DHCP mode.
DNS Settings
DNS Settings defines the DNS servers the appliance uses. NTP sync, update checks and external integrations all depend on working name resolution; DNS servers can be set per interface.
Fields on the Screen
- Device: the target interface.
- Current: effective and configured DNS for the connection.
- DNS: the servers, comma-separated (e.g. 1.1.1.1, 8.8.8.8).
- Restart connection after applying.
Step-by-Step Usage
- Select the interface.
- Enter the DNS servers comma-separated.
- Click Save.
Points to Watch
An empty DNS field clears the definition. A wrong or unreachable DNS breaks updates, NTP and e-mail — prefer reliable, fast servers.
Possible Scenarios
Scenario 1: updates and NTP fail — check DNS; define 1.1.1.1 or 8.8.8.8 if needed. Scenario 2: the organization runs its own internal DNS — enter those addresses.
Hostname Settings
Hostname Settings views and changes the system host name that identifies the appliance on the network. The hostname drives recognition by other systems, the source name in logs and DNS/directory integrations. A meaningful, standards-compliant hostname makes administration and troubleshooting much easier.
Fields on the Screen
- Current hostname: read-only (example: sysos.sysnet.local).
- New hostname: the new name, usually as an FQDN.
- Save: applies and persists it.
- Info note: some services may need a restart afterwards.
Step-by-Step Usage
- Check the current name.
- Enter the new name in FQDN form per your standards (e.g. signlogger01.company.local).
- Click Save.
- Restart the indicated services and confirm the new name appears in logs.
Points to Watch
A hostname change can touch many services, certificates and integrations — schedule it outside working hours. Valid hostnames use only letters, digits and hyphens. With an FQDN, update the matching DNS record too.
Possible Scenarios
Scenario 1: a new device gets renamed to the corporate standard (e.g. signlogger-hq-01.company.local). Scenario 2: the SSL certificate doesn't match the hostname — align the hostname with the certificate and restart the services.
Security
The Security category gathers authentication, encryption and access-security settings: certificate management, trusted host definitions and the general security policies. A log management appliance stays safe through valid certificates, correct access restrictions and solid policies — this section provides those tools.
Certificates
The Certificates page views, adds and manages the SSL/TLS certificates used on the appliance. Certificates secure web interface access, RADIUS (EAP) authentication and other encrypted traffic. The page tracks the system CA and Server certificates and selects the certificate for services such as RADIUS. Watching expiry dates prevents outages.
Fields on the Screen
- System Certificates: the CA and Server cards with expiry date, days left and SHA256 fingerprint.
- CA card: root CA validity (in the example valid to 2035, OK).
- Server card: state, expiry, days left and SAN entries.
- RADIUS (EAP): SSL certificate selection and state for the RADIUS service.
- Toolbar: refresh, download, upload and add (+) buttons.
- Info note: private key files can never be downloaded.
Step-by-Step Usage
- Check the CA and Server states and days left.
- Plan renewal when an expiry approaches.
- Select the SSL certificate for RADIUS (EAP).
- Add a new certificate with the plus button and upload the files.
- Confirm the state shows OK afterwards.
Points to Watch
Track expiry closely — an expired certificate can block the web interface or authentication services. Private keys cannot be downloaded, so store them securely. A Server certificate whose SAN covers the hostname and IPs avoids browser warnings.
Possible Scenarios
Scenario 1: the Server certificate is running out — prepare, upload and restart the services. Scenario 2: RADIUS-based 802.1X is being set up — select the right SSL certificate under RADIUS (EAP).
Trusted Hosts
Trusted Hosts is an allowlist restricting SignLogger API access to trusted IPs or networks — guaranteeing the management API is reachable only from approved sources. Entries take CIDR notation or single IPs (auto-masked to /32 or /128).
Fields on the Screen
- IP/CIDR: the allowed address or block (0.0.0.0/0 = everyone, 192.168.1.0/24 = one network).
- Description: what the entry is for.
- Updated: last change time.
- Actions: edit (pencil) and delete (bin).
- Toolbar: refresh and add (+), with a total-count badge; search and page-size controls.
Step-by-Step Usage
- Review the list and spot overly broad entries (e.g. 0.0.0.0/0).
- Add a trusted source with the plus button.
- Enter the IP/CIDR and a meaningful description.
- Save and confirm it appears.
- Edit with the pencil; remove stale entries with the bin.
Points to Watch
0.0.0.0/0 admits every address and is not recommended — keep CIDR blocks narrow. Accidentally removing the IP you manage from can cut your own API access — verify before saving. Clear descriptions explain later why each entry exists.
Possible Scenarios
Scenario 1: API access only from the internal network — remove 0.0.0.0/0 and add blocks like 192.168.0.0/16. Scenario 2: one integration server needs access — add its single IP with the integration's name in the description.
Security Settings
Security Settings is an advanced configuration center managing SignLogger's wider security policies on one screen. Settings are grouped into categories — agent communication, sessions, captcha, sign-in policies, password rules, password reset, rate limits, session durations and file uploads. Forty-four settings across tabs let administrators tune the system to corporate standards; each is edited and saved right here.
Fields on the Screen
- Category tabs: Agent Server, Agent Session, Captcha, Sign-in, Password, Password Reset, Rate Limit, Session and Upload — each badge shows its setting count.
- Search: filters by category, key or description.
- Settings table: key, description, type (string, number, bool…), value, state and actions per row.
- Value: the edit field. State: the on/off toggle. Actions: save and state change.
- Toolbar: bulk enable, bulk disable and reset-to-default, plus the total count.
Step-by-Step Usage
- Pick the category tab (e.g. Password, Session, Rate Limit).
- Find the setting with the search box.
- Edit its value or toggle its state.
- Save with the row's button.
- Test system behavior after critical changes; use reset-to-default if needed.
Points to Watch
These settings directly shape access and authentication — a wrong password or session policy can lock users out. Never share sensitive values like shared secrets. Keep rate limit and captcha enabled at sensible values against brute force. Bulk disable can affect every safeguard — use with extreme care in production.
Possible Scenarios
Scenario 1: the corporate password policy is being tightened — update minimum length, complexity and validity on the Password tab. Scenario 2: brute-force attempts hit the panel — enable failure limits and captcha under Sign-in and Rate Limit.
Notifications
The Notifications category runs the infrastructure that delivers important system events to the right people on time — disk saturation, service outages, security events — configurable by recipients, event types, thresholds and channels (mail/SMS). (No separate in-panel help; based on screen review.)
Notification Management
Notification Management defines in one place who (recipients), what (event types and thresholds), through which channel (mail/SMS) and in which scope (global or per device) gets notified. The page pairs a visual how-it-works summary with status cards and configuration tabs, making complex notification rules easy to define and follow.
Fields on the Screen
- Tabs: Overview, Global Settings, Per Device, Channels and History.
- How notifications work: Who (recipients — e-mail/phone), What (event types + thresholds), How (channels: mail/SMS) and Where (scope: global/device).
- Summary cards: notification state (Active/Passive), global recipients, open event types (e.g. 4/6), thresholds, mail servers and device count.
- Test channels: verifies the configured channels work.
- Delivery history: access to previously sent notifications.
Step-by-Step Usage
- Check the state and summary on Overview.
- Define recipients, event types and thresholds for all devices under Global Settings.
- Define device-specific overrides under Per Device.
- Configure mail and SMS under Channels and verify with Test channels.
- Track deliveries on the History tab.
Points to Watch
When a threshold trips, recipients of the open event types are notified through the selected channel — set thresholds correctly to avoid false alarms. Global settings apply to all devices; a per-device setting overrides them for that device. Misconfigured channels mean notifications never arrive — use Test channels regularly and keep recipient lists current.
Possible Scenarios
Scenario 1: e-mail on critical disk usage — define the event type, threshold, recipient and mail channel under Global Settings. Scenario 2: one critical device needs a lower threshold with SMS — define its override under Per Device.